
Physical Fulfillment
Configuring physical fulfillment consists of configuring physical locations, request policies, terms of use, and fulfillment units.
A fulfillment unit is one or more physical locations within an institution that follow the same policies. Fulfillment units have Terms of Use (TOU) which define policies for patrons.
A sample workflow for configuring fulfillment units, policies, and Terms of Use is as follows:
- Create fulfillment and item policies – See Adding Fulfillment Policies. These policies are applied to an item: whether it is renewable, where it can be picked up, how long it can be checked out, the fine assessed if the item is lost, and so forth.
Fulfillment policies are bundled into a Terms of Use, which are attached to one or more fulfillment units; the policies then apply to all items that match the fulfillment unit criteria.Item policies are attached to a particular item and override any conflicting fulfillment policies in that location.
- Create Terms of Use – This is a group of fulfillment policies for the items in a group of locations or for all items requested by the users in a group. See Adding a Set of Terms of Use.
- Create fulfillment units – Fulfillment units include one or more physical locations that follow the same policies. See Adding a Fulfillment Unit and Editing a Fulfillment Unit. When creating or editing a fulfillment unit, you configure:
- The Terms of Use that apply to:
- Specific locations (desks) within the physical location
- Users in specific user groups
- The Terms of Use that apply to:
Configuring Fulfillment Units
To configure fulfillment units, you must have one of the following roles:
- General System Administrator
- Fulfillment Administrator
You configure fulfillment units on the Fulfillment Units List page (Configuration > Fulfillment > Physical Fulfillment > Fulfillment Units).
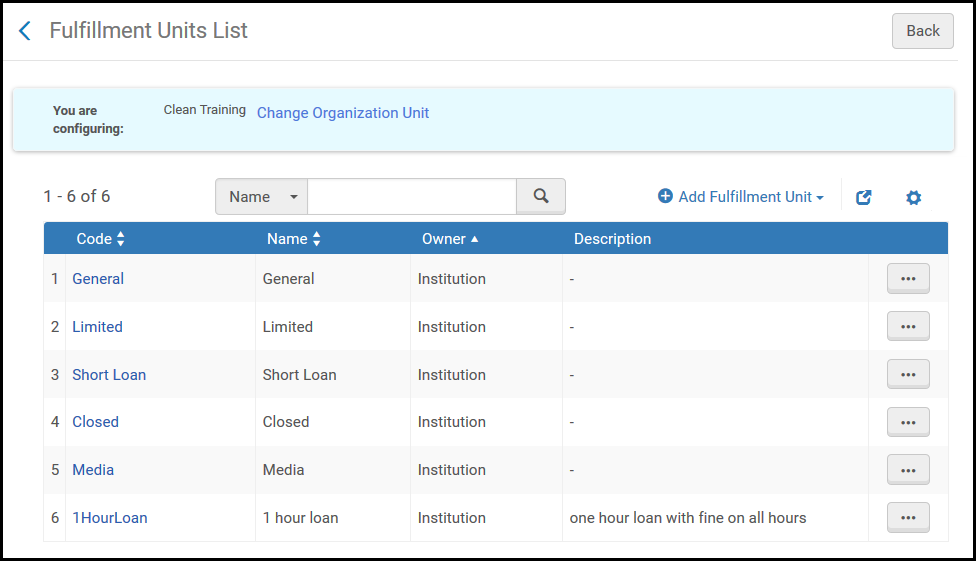
Fulfillment Units List Page
Ensure that you are within the context of the institution/library whose fulfillment units you want to configure by selecting the required institution/library from the Configuring filter on the Fulfillment Configuration page.
Resource Sharing libraries must have their own Fulfillment Unit to be able to configure the Borrowing Request Rules and the Lending Request Rules with the relevant Borrowing Resource Sharing Terms of Use and the Lending Resource Sharing Terms of Use.
The following actions can be performed on this page:
- Adding a fulfillment unit (see Adding a Fulfillment Unit)
- Editing a fulfillment unit (see Editing a Fulfillment Unit)
- Duplicating a fulfillment unit (select Duplicate from the row actions list and edit the relevant fields)
- Deleting a fulfillment unit (select Delete from the row actions list)
Adding a Fulfillment Unit
You can add a fulfillment unit to the institution or to a library.
To add a fulfillment unit:
- On the Fulfillment Units List page (Configuration > Fulfillment > Physical Fulfillment > Fulfillment Units), select Add Fulfillment Unit.
To create a copy of an existing fulfillment unit, select Duplicate from the row actions list. Once you have copied the fulfillment unit, you can modify it as needed.
- In the Add Fulfillment Unit dialog box, enter a code and name (both required) for the new fulfillment unit. Note that the code is limited to 10 characters
- Enter a description (optional) for the fulfillment unit.
- Select Add Fulfillment Unit to close the dialog box. The new fulfillment unit appears on the Fulfillment Units List page.
- After defining a new fulfillment unit, edit the fulfillment unit to specify which Terms of Use (TOU) are to be applied to the fulfillment unit. For details, see Editing a Fulfillment Unit below.
Editing a Fulfillment Unit
You can edit the following information about a fulfillment unit:
- Fulfillment Unit Details — The parameters configured when adding a fulfillment unit (see To edit fulfillment unit details in Editing a Fulfillment Unit).
- Fulfillment Unit Rules — The Terms of Use (TOU) to apply to the fulfillment unit.
For details on configuring rules for a Resource Sharing Library, see Configuring Rota Assignment Rules.
To edit fulfillment unit details:
- On the Fulfillment Units List page (Configuration > Fulfillment > Physical Fulfillment > Fulfillment Units), ensure that you are at the relevant library or institution (in the Configuring link) and select a code or select Edit from the row actions list of a fulfillment unit. The Edit Fulfillment Unit page appears.
- In the Fulfillment Unit Details tab, edit the general fulfillment unit details as required. For information on the fields displayed on this page, see Adding a Fulfillment Unit.
- Select the Fulfillment Unit Rules tab. The Fulfillment Unit Rules tab page appears.
 Edit Fulfillment Unit Page – Fulfillment Unit Rules Tab
 - In the Rule Type drop-down list, select one of the available rule types
- To add a new rule, select Add Rule. The Fulfillment Unit Rules Editor page appears.
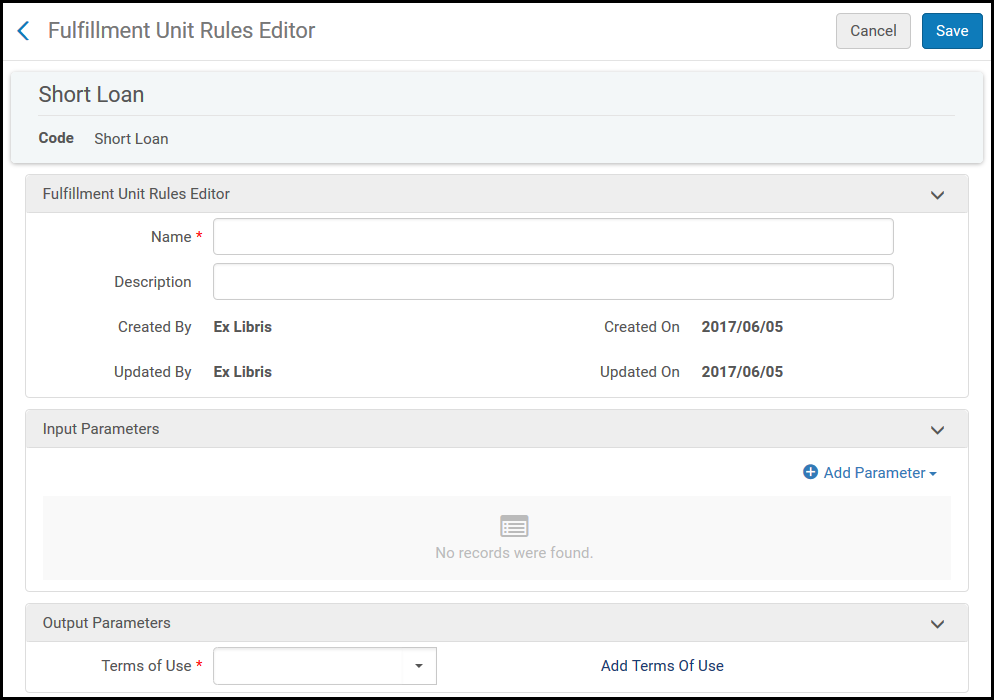 Fulfillment Unit Rules Editor Page
 - In the Fulfillment Unit Rules Editor section, specify a name (required) and description (optional) for the rule.
- In the Input Parameters section, specify the components of the input parameter (Name, Operator, and Value). A set of input parameters may appear, as follows:
Material Type = DVD-ROMPossible Name values are:
- Item policy — Create a rule for items with specific item policies.
- You can add/delete item policies from the code table that contains the item policies, but the table cannot be left blank. At least one default value must be defined.
- Changing an item policy in this table does not automatically affect the rules of the fulfillment unit. Make sure to keep the table and the fulfillment unit rules aligned.
- Job category — Create a rule for users with specific roles.
- Patron Affiliated Campus — Create a rule to allow requests only from users affiliated with specific campuses.
- User Group — Create a rule for users in specific user groups.
- Resource Sharing Partner — in Resource Sharing rules only — Create a rule for requests with specific partners.
- Request Format — in Borrowing Resource Sharing rules only — Create a rule for requests that have a specified format.
- Item policy — Create a rule for items with specific item policies.
- Select Add Parameter. The set of input parameters is added to the list of parameters for the fulfillment unit rule. All the parameters in the list must be satisfied for the output parameter to be applied (that is, a Boolean AND operator operates between fields). You can edit or delete rules.
- In the Output Parameters section, specify the terms of use to be applied when the input parameters are met. Note that the list of available terms of use is determined dynamically, according to your previous selection of rule type. Select TOU Details to view the details of the Terms of Use that you select. For details on configuring terms of use, see Configuring Terms of Use.
- Select Save to store your changes to the fulfillment unit rule. The new rule appears in the list of rules in the Fulfillment Unit Rules tab.
- If you have defined more than one rule for the fulfillment unit, in the Fulfillment Unit Rules tab, you can use the Move Up and Move Down arrows to set the order of the rules. Rapido applies the first (and only the first) appropriate, enabled rule. If no appropriate rule is found, the system uses the default rule.
Use the rule’s Actions menu to edit, duplicate, or delete a rule. Enable/disable the rule by toggling the slider.
- Select Save to store the fulfillment unit details. The new fulfillment unit appears in the list of fulfillment units on the Fulfillment Units List page.
Configuring Fulfillment Policies
To configure fulfillment policies, you must have one of the following roles:
- General System Administrator
- Fulfillment Administrator
Fulfillment policies define the library service attributes and parameters that are imposed when a patron receives service from the library. Fulfillment policies are divided into policy types. You can create several fulfillment policies for each type. When multiple fulfillment policies exist for a given type, you can specify the default.
Fulfillment policies are provided out-of-the-box and may be used by both institutions and libraries as long as the owner of the policy is defined as Generic. When the institution or a library wants to update a given policy, that policy applies to the organization level for which it was configured, and is inherited downward. For example, updating a policy at the institution level changes the policy owner to Institution. This policy may then be used by all libraries of the institution. Alternatively, a specific library may further configure the policy.
You configure fulfillment policies on the Policy Management page (Configuration > Fulfillment > Physical Fulfillment > Advanced Policy Configuration).

Policy Management Page
Ensure that you are within the context of the institution/library whose policies you want to configure by selecting the required institution/library from the Configuring filter on the Fulfillment Configuration page.
The following actions can be performed on this page:
- Add a new fulfillment policy (see Adding Fulfillment Policies)
- Edit a fulfillment policy. Select Edit from the row actions list.
- View Terms of Use that use this policy. Select Show related terms of use from the row actions list.
- Duplicate a policy. Select Duplicate from the row actions list and edit the relevant fields.
- Delete a policy. Select Delete from the row actions list.
Adding Fulfillment Policies
You can add a new fulfillment policy to a Terms of Use (TOU).
To add new policies:
- On the Policy Management page (Configuration > Fulfillment > Physical Fulfillment > Advanced Policy Configuration), select Add Fulfillment Policy. The Select Fulfillment Policy Type page appears, displaying a list of policies. This is the first page of a two-page wizard.
 Select Fulfillment Policy Type Page (Partial List)
 - On the Select Fulfillment Policy Type page, select the policy type. In the following table, the indicated values appear on the second page of the wizard after you select the policy type on this page.
Fulfillment Policy Types Fulfillment Policy Type Description Borrowing Resource Sharing: Allow Resource Sharing Requesting Whether a patron can place a resource sharing borrowing request. Value: True/FalseResource Sharing Receive Fee A default fee that is applied to resource sharing requests. The fee is applied when an item is received and scanned. Values: None/Other. If you select Other, enter a value in the local currency.Resource Sharing Request Fee This fee may be applied at the time that a borrowing request is created. It may be applied to requests coming in from external sources such as Primo requests or NCIP messages. Values: None/Other. If you select Other, enter a value in the local currency.Renew Fee The amount that the patron must pay for renewing an item. Values: None/Other. If you select Other, enter a value in the local currency.Active Resource Sharing Requests Limit The maximum number of active resource sharing requests that a patron is allowed to have. The following request statuses will not be included when counting the number of requests for this policy: Completed, Canceled, Canceled by Patron, Cancel Requested, and Deleted. Active requests which were already returned from the patron to the library, but were not yet returned to the lender are ignored when calculating this limit. Values: None/Other. If you select Other, enter the maximum number of requests. If you select None, there is no limit to the number of requests.Yearly Resource Sharing Requests Limit The maximum number of resource sharing requests that a patron is allowed to have in a given year. Deleted requests are not considered in this count. The year is counted starting from the date that is configured in the rs_yearly_ill_limit_start_date parameter. Values: None/Other. If you select Other, enter the maximum number of annual requests. If you select None, there is no limit to the number of requests.Pickup Locations The locations where a patron can request to pick up a requested item. The available values are:- At Any Institution
- At Any Reading Room
- At Library Reading Room
- In Campus - The campus to which the item's library belongs
- In Institution - Includes all of an institution's libraries, not only those whose circulation desk has a Hold Shelf
- In Library - The library to which the item belongs
- In Patron Affiliated Campus - The campus to which the patron belongs
Personal delivery Whether a patron can request personal delivery of the item. Values: select one of the following values to configure personal delivery: - All (Deliver items to a home or an office address)
- Home (Deliver items only to a home address)
- None (Do not deliver items at all)
- Office (Deliver items only to an office address)
A patron can request personal delivery only if he/she has defined a home/work address on the User Details page (see Managing User Contact Information) and there are no blocks on the user.Personal delivery fee Whether a delivery fee is associated with the personal delivery of a physical item. Values: None/Other. If you select Other, enter the amount to pay in the local currency.Lending Resource Sharing: Due Date The length of time the item may be borrowed. The values are:-
Fixed – Based on your institution’s calendar, the end of a term. Select a semester.
-
Non Fixed – Based on the date the item was borrowed. Select a value and a unit of time measurement.
If you set the Unit of Measurement field to Days, Month, or Week, you can also specify a specific time. If you don’t specify a time, the default is your institution’s closing time.The original date that the item was borrowed is not included when determining the due date. For example – an item loaned on April 1 with a loan period of 6 days is due on April 7.The due date on a borrowing request is the due date assigned by the lender. If the lender did not assign a due date, the operator may enter the date when the item is received.The loan due date on a resource sharing item is the due date of the borrowing request, if present, less the delivery delay. If the due date is not populated on the borrowing request, the due date is set based on the due date policy in the Terms of Use. A delivery delay is not considered in that case.If the due date of the loan does not include hours/minutes, then the policy is activated only when the due date is a closed day. If the due date is an open day, then the due hour from the policy is used.Maximum Renew Date The maximum amount of time after a lending request is sent that renewal of the request is permitted. Values: None/Other. If you select Other, enter a value and a unit of time measurement.For example, if the Maximum Renew Date policy has a value of 2 weeks when using the Renew option on the lending side, the system blocks renewal if the due date after renewal is more than two weeks after the item was shipped.Additionally, if requests exist on an item that is being renewed, the renewal is rejected. If requests exist on the title that is being renewed, the renewal succeeds or is rejected based on the configured block preferences setting.Resource Sharing Recall Period The amount of time, in days, that a borrower has to return a recalled item. Values: None/Other. If you select Other, enter a value in days.This value takes into account calendar days and not library open days.Lost Item Resource Sharing Fee This policy defines the lost item fee to apply when an item is reported lost by the partner. - Select Next. The Policy Details page appears. This is the second page of the two-page wizard.
 Select Fulfillment Policy Type Page
 - Enter a policy name (required) and policy description (optional).
- In the Value field, select the relevant value to indicate that the policy is to be active. The values of this field vary, depending on the specified policy type (see above).
- In the Default policy field, specify False or True to indicate whether the new policy is the default policy for the policy type when multiple policies exist for a given policy type. Note that when you add a new set of terms of use, the default policies will be the default options in the policy drop-down lists. For details on configuring terms of use, see Configuring Terms of Use.
- Select Save. The details of the policies are stored, and the policy is added to the list of policies.
- Configured policies may override settings in other areas of Rapido. For example, the Is Renewable policy value can override the value of the Patron Renewal setting when configuring a Workflow Profile.
- The Rapido interface must be set to English to add fulfillment policies.
Configuring Terms of Use
To configure terms of use, you must have one of the following roles:
- General System Administrator
- Fulfillment Administrator
Terms of Use (TOU) refers to a list of policies that define the institution/library commitment to the patron according to which a service will be provided or terminated. Terms of Use are associated with a specific type of fulfillment activity, such as a loan, a request, or user registration. For details on the policies that can be included in terms of use, see Configuring Fulfillment Policies.
The fulfillment unit rules determine which Terms of Use to employ when delivering a particular service to the patron. For details, see Configuring Fulfillment Units, Policies, and Terms of Use.
If an item belongs to a location that does not have Terms of Use (for example, the location does not belong to any fulfillment unit), the system determines the Terms of Use based on the default policies.
An item's Terms of Use is re-calculated each time an activity is performed on a loaned item (such as renewal). Therefore, any change in a policy, fulfillment rule, patron information, or item information has an immediate effect on a request's Terms of Use.
You configure Terms of Use on the Terms of Use Management page (Configuration > Fulfillment > Physical Fulfillment > Terms of Use and Policies).

Terms of Use Management Page
Ensure that you are within the context of the institution/library whose Terms of Use you want to configure by selecting the required institution/library from the Configuring filter on the Fulfillment Configuration page.
Select the Terms of Use Name, Type, or Owner headings to sort the list alphabetically — in ascending or descending order.
The following actions can be performed on this page:
- Add a set of Terms of Use (see Adding a Set of Terms of Use)
- Edit a set of Terms of Use (Select Edit from the row actions list.)
- View a set of Terms of Use (Select View from the row actions list.)
- Delete a set of Terms of Use (Select Delete from the row actions list.)
- View the fulfillment rules related to the Terms of Use (see Viewing Related Fulfillment Rules)
- You can permanently delete a Terms of Use record only if the owner is the Institution. If the owner is Generic, you cannot delete the record.
- A Terms of Use in a fulfillment unit rule cannot be deleted.
Adding a Set of Terms of Use
You can add a new set of Terms of Use to the institution or to a library within the institution.
To add a new set of terms of use:
- On the Terms of Use Management page (Configuration > Fulfillment > Physical Fulfillment > Terms of Use and Policies), select Add a Terms of Use. The Select Fulfillment Terms of Use Type page appears. This is the first page of a three-page wizard.
 Select Fulfillment Terms of Use Type Page
 - Select the Terms of Use (TOU) type:
- Borrowing Resource Sharing – Aggregates a number of policy types that are related to resource sharing borrowing requests and fees
- Lending Resource Sharing – Aggregates a number of policy types that are required to enable lending of resource sharing material to take place
- Select Next. The second page of the three-page wizard appears
 Terms of Use Details Page - Second Page of the Wizard
- Enter a name for the Terms of Use (required) and a description (optional).
The remaining options in the Terms of Use Details page are the policy types that are available for the Terms of Use type that you selected on the previous page of the wizard.
- Select from the predefined drop-down lists to specify the policies for the new set of Terms of Use. Note that the policy options in the drop-down lists are the relevant policies that were defined. For details, see Configuring Fulfillment Policies.
For descriptions of the policies, see Fulfillment Policy Types in Adding Fulfillment Policies.Values selected on this page for the specified Terms of Use override the values configured in Fulfillment Configuration.
- To add a new policy, select Add from the row actions list. For more information, see Adding Fulfillment Policies.
- To edit a policy, select Edit from the row actions list. For more information, see Configuring Terms of Use. Editing a policy changes the policy and makes the change in all Terms of Use already using this policy.
- To add a new policy that is a duplicate of the currently selected policy, select Duplicate from the row actions list. A new policy is created and attached to the current Terms of Use; you can then edit the new policy. For more information, see Configuring Terms of Use.
- Select Next. The third page of the wizard appears.
 Terms of Use Management Page - Third Page of the Wizard
 - Review the details of the new terms of use. Select Back to make changes to the Terms of Use.
- Select Save to store the details of the new set of Terms of Use. The new set of Terms of Use is added to the list. If necessary, use the available filter and search controls to locate the new Terms of Use in the list. For details on Terms of Use, see Configuring Terms of Use.
- To view a Terms of Use record, select View from the row actions list. A page detailing the Terms of Use appears. Select Back to return to the Terms of Use Management page.
To configure a Terms of Use and attach it to a fulfillment unit to support sending resource sharing items to a patron:
- Create a Borrowing Resource Sharing Terms of Use (TOU) that supports Personal Delivery, as described in Adding a Set of Terms of Use.
- On the Fulfillment Units List page (Configuration > Fulfillment > Physical Fulfillment > Fulfillment Units), select the Change Organization Unit link.
 Organization Unit List LinkThe Organization Units List page appears.
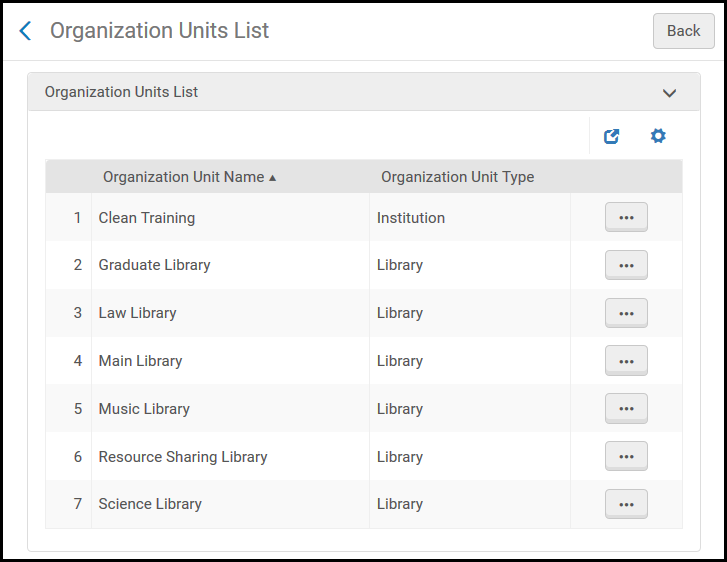 Organization Units List Page
 - Locate the Resource Sharing Library entry and select Choose from the row actions list. The Fulfillment Units List page displays the fulfillment units associated with the resource sharing library.
- Select Edit from the row actions list of a fulfillment unit. The Edit Fulfillment Unit page appears.
- Select the Fulfillment Unit Rules tab.
- In the Rule Type field, select Borrowing Resource Sharing to display the resource sharing borrowing rules.
 Edit Fulfillment Unit Page
 - Select Add Rule. The Fulfillment Unit Rules Editor page appears.
- Configure a rule, adding the Terms of Use you configured above.
- Select Save. The Fulfillment Units List page displays the fulfillment unit with the updated rule.
For a patron to be able to request resource sharing items for pickup at a personal delivery address, the patron must have a home or work address defined. A patron’s address type is configured on the patron’s User Details page (Admin > User Management > Manage Users). Select the Contact tab and add an address in the Addresses section (see Managing Users).