External Systems
Configuring Integration Profiles
- General System Administrator
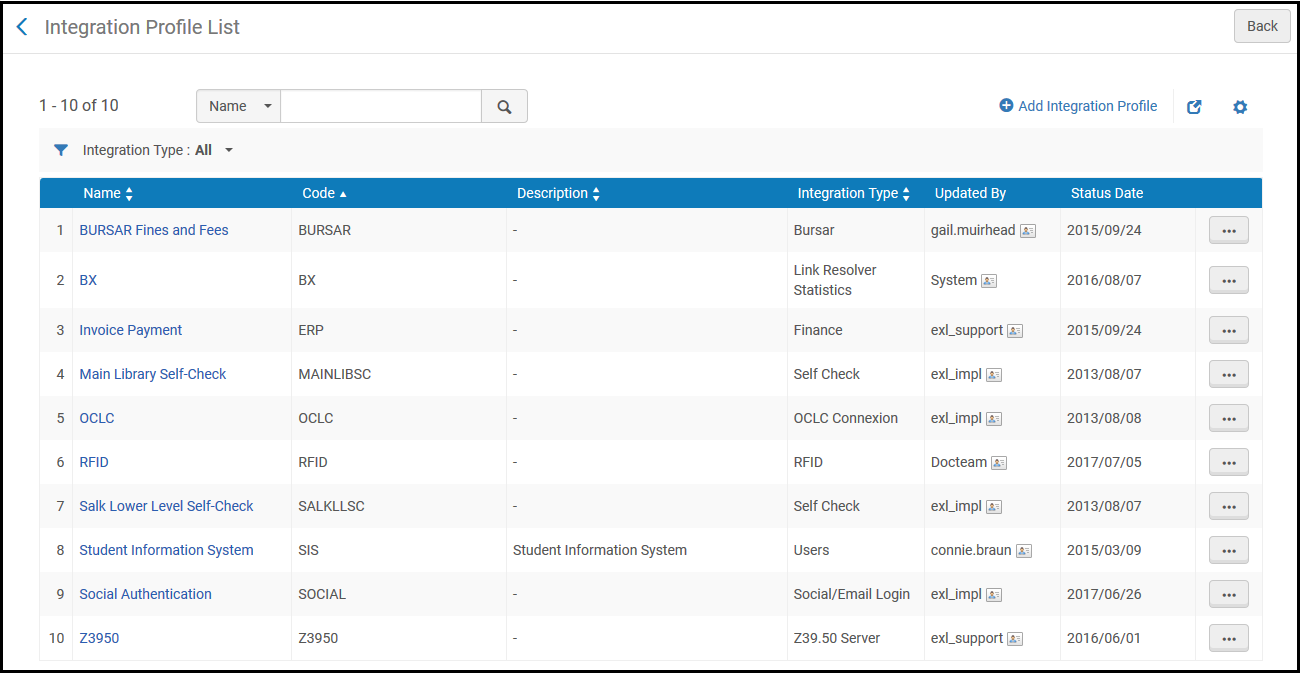
- Add an integration profile (see the linked sections in the table below).
- Edit an integration profile (Edit in the row actions list). When editing a profile, you cannot change the profile type. In addition, you can add contact information relevant to the profile on the Contact Information tab.
- Delete an integration profile (Delete in the row actions list).
- View job history (Job History in the row actions list; see Viewing Completed Jobs.)
The Rapido/ILS integration Profile
- General System Administrator
When Rapido is used by a library that is not using Alma as its library system, it is possible to set up integration points between Rapido and the library’s integrated library system (ILS). The integration is configured in the Rapido/ILS integration profile (Configuration > General > External Systems > Integration Profiles).

Enter a Code and Name, and select the System that correctly describes your ILS. Current options are:
- Aleph (supports only Look Up User functionality)
- Folio
- Polaris (supports only Look Up User functionality)
- Koha
- Sierra
- SirsiDynix Symphony
- TLC Library Solution (supports only Look Up User functionality)
- Other
The integration profile allows adding the below information in the configurable sections below.
General Information
The fields in this section configure how Rapido interacts with your ILS for NCIP purposes, as well as for using the APIs required for harvesting inventory data. The fields may change based on the System.
All Systems
-
From agency — The From Agency in the NCIP message. Use your institution code, e.g. 01TEST_INST
-
To agency — The To Agency in the NCIP message. Use your institution code, e.g. 01TEST_INST
-
Application profile — The application profile to include in the NCIP messages. Not required by systems such as Folio or Sierra
-
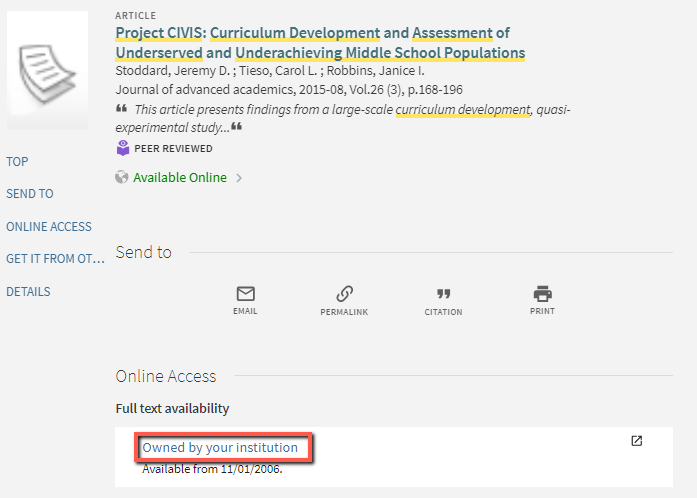
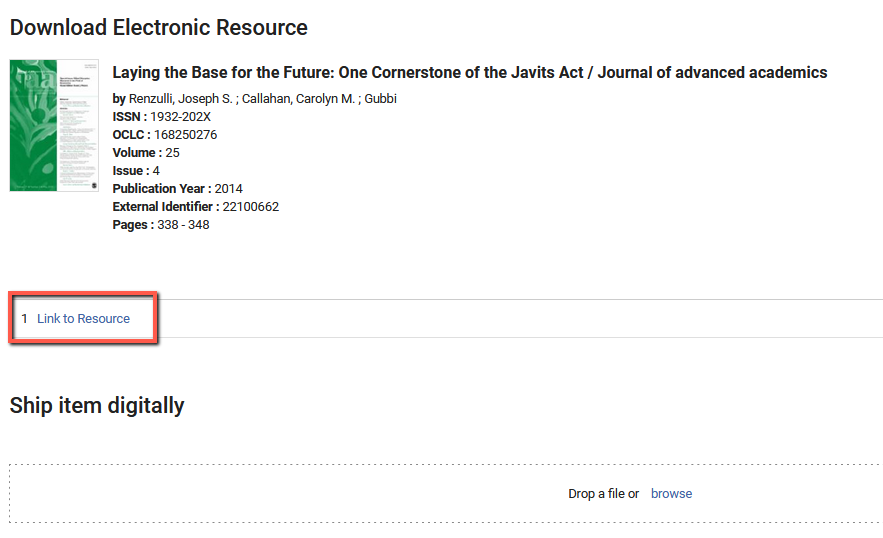
Link resolver URL - The base URL that Rapido will use when triggering an OpenURL to the library's link resolver. Rapido triggers a OpenURL when:
-
The electronic resource that has been discovered in the Discovery interface is self owned by the institution. The link from the ViewIt section triggers and OpenURL to the library's link resolver
-
The Download Electronic Resource action is used for a lending request. The link that the Rapido screen shows to the discovered electronic resource creates an OpenURL to the library's link resolver
-
-
Mapping of library codes to ILS library codes - Use this link to map the library codes in Rapido to the codes of the libraries in the ILS that will server as pickup locations for borrower requests. For example, to map the RES_SHARE code, which is the resource sharing libray in Rapido, to MAIN, which may be the code of the Main library on the ILS, which will be the pickup location for borrower requests.
Folio
Authentication Method can be Token or Key. If NCIP based integration is set up then it is recommended to use the Token Authentication method with the following parameters:
-
Base URL – The URL that for API access, e.g. https://folio-snapshot-okapi.dev.folio.org.
-
X-Okapi-Tenant – The OKAPI tenant code of your Folio institution. This is used by Rapido to authenticate API calls to Folio.
-
Username – The username that Rapido should use to authenticate API calls to Folio.
-
Password – The password that Rapido should use to authenticate API calls to Folio.
If using the Key option then only an API Key need to be configured.
Sierra and Aleph
-
NCIP URL – The URL Rapido uses to access Sierra’s or Aleph's NCIP server.
Polaris
- Base API URL - The base URL Rapido uses to access the Polaris NCIP server. Note that NCIP integration is supported with Polaris only for LookUpUser
The following are used for accessing the Polaris API, and are to be supplied by Polaris support:
- Access ID
- Access Key
- Domain
- Username
- Password
- In status Override – The API that checks item availability in Polaris expects a CircStatus field with the value In to indicate that the item is available. If Polaris has been configured to use a different value (for example, Available), then this value should be configured here.
- Mapping of record material types – If Material Types are to be configured for setting the Rapido member’s Participating Items then the valid values should be set up here.
- Mapping of collection IDs to collection names - If Collections are to be configured for setting the Rapido member’s Participating Items, then the valid values should be set up here.
Koha
- Base URL - The base URL Rapido uses to access the Koha APIs and the NCIP server. The following are used for accessing the Koha API:
- Client ID
- Client Secret
- Mapping of collection IDs to collection names - If Collections are to be configured for setting the Rapido member’s Participating Items then the valid values should be set up here.
- Mapping of item types – If Item Types are to be configured for setting the Rapido member’s Participating Items, then the valid values should be set up here.
Sirsi
- Base URL - The base URL Rapido uses to access the SirsiDynix API. The following are used for accessing the SirsiDynix API:
- Username
- Password
- Client ID
- Mapping of item category 1-5 - If Item Categories are to be configured for setting the Rapido member’s Participating Items then the valid values should be set up here.
- Mapping of item types – If Item Types are to be configured for setting the Rapido member’s Participating Items then the valid values should be set up here.
TLC
Rapido uses Z39.50 for integrating with TLC Library Solutions for real time availability. The below parameters are the TLC Z39.50 server parameters that need to be configured in order for Rapido to be able to query the TLC server:
- Hostname
- Port
- Database Code
- Username
- Password
There is no NCIP integration for TLC Library Solutions and therefore no option to configure From agency, To agency and Application profile.
API Setup (For Sierra Systems)
-
API base URL — The URL that for API access, e.g. https://progress-app-beta.iii.com/ii...relais/Restful.
-
API key – The API key that Rapido should use to authenticate API calls to Sierra.
-
API secret – The API secret that Rapido should use to authenticate API calls to Sierra.
Check-Out Item
-
Update lender ship — Whether or not Rapido should update the ILS when an item is shipped on the lender side.
-
Update Lender At Request — Whether or not Rapido should update the ILS when an item is requested on the lender side. Relevant only for Folio.When this field is selected an additional Pickup Location Code field requires configuring the code of the library that will be the pickup location of the lending requests being updated at the ILS.
- There must be a user record with the user ID RS_PARTNER on the ILS for the Check-Out message to successfully update the ILS.
Check-In Item
-
Borrower Check In – Whether or not Rapido should update the ILS when an item is returned to lender on the lender side.
-
Lender Check In — Whether or not Rapido should update the ILS when an item is checked back in on the lender side.
Accept Item
-
Update borrower receive — Whether or not Rapido should update the ILS when an item is received on the borrower side.
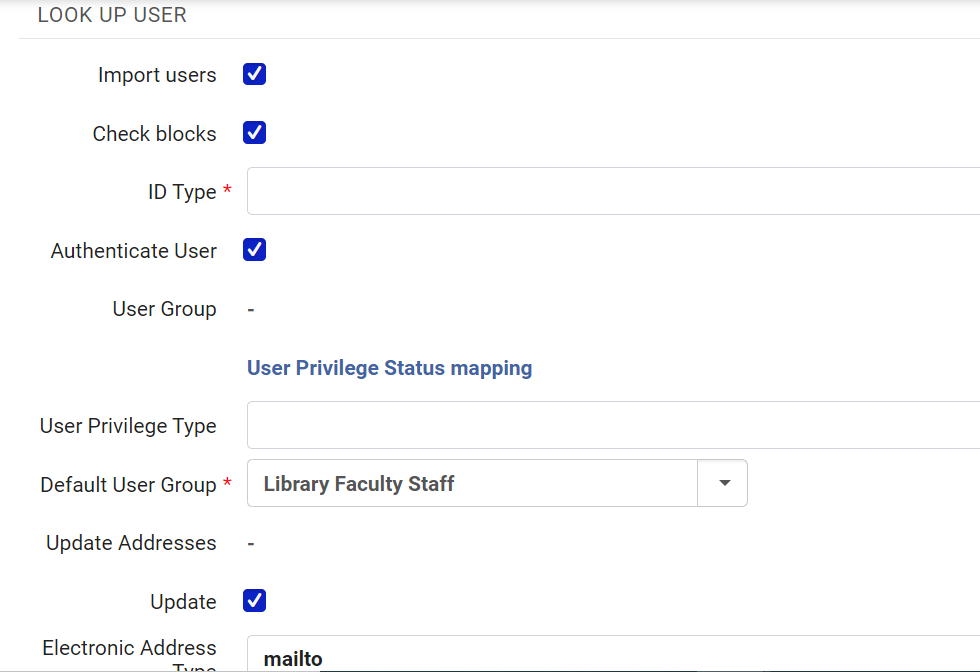
Look Up User
The LOOK UP USER section (Configuration > General > External Systems > Integration Profiles) is where parameter are configured to manage Rapido’s integration with your ILS for different aspects of user management.
-
Import Users — Select this option if you want Rapido to pull user records from your ILS in one of the following scenarios:
-
When patron logs into the discovery
-
When user account is pulled manually by the staff using the Rapido UI
-
-
Check Blocks – Select this option to set Rapido to check a patron’s eligibility for resource sharing services by sending an NCIP message to your ILS.
-
New for January! Block Types – allows you to specify which block types should be treated as blocking when processing an NCIP LookupUserResponce. The following block types could be included for Polaris and Sierra:
| Value | Conditions |
|---|---|
| Block Check Out |
Returned when any of the following are at or above the ILS configured limit:
Returned if the patron registration is expired. |
| Block Electronic Resource Access |
Returned when any of the following are at or above the ILS configured limit:
Returned if the patron registration is expired. |
| Block Hold | Returned when the number of holds for a patron is at or above the ILS configured limit. |
| Trap For Pickup | Returned when the patron has at least one item in a HELD state waiting for pickup. |
| Problem Type | Problem Detail | Note |
|---|---|---|
|
9006 Corresponds to Patron has expired |
User Blocked | Returned from Sierra, NCIPR_ERR_PATRON_EXP |
|
9007 Corresponds to Patron owes too much in fines |
User Blocked | Returned from Sierra, NCIPR_ERR_PATRON_FINES |
|
9008 Corresponds to Patron has too many overdue items |
User Blocked | Returned from Sierra, NCIPR_ERR_PATRON_ODUE |
|
9009 Corresponds to Staff has placed a manual block on the patron |
User Blocked | Returned from Sierra, NCIPR_ERR_PATRON_PBLOCK_M |
|
9010 Corresponds to Patron exceeds overdue penalty |
User Blocked | Returned from Sierra, NCIPR_ERR_PATRON_OD_PENALTY |
| 9012 | Patron PIN is Invalid |
Returned from Sierra, NCIPR_ERR_PATRON_INVALID_PIN |
|
9044 Corresponds to Patrons has reached limit |
User Blocked | Returned from Sierra, NCIPR_ERR_PATRON_HOLD_LIMIT |
-
Authenticate User — Select this option if you want some or all of the library patrons be able to authenticate to the Rapido discovery based on credentials that are managed at the ILS.
-
User Group – When Rapido queries the ILS for user information, it may create the user account with a default user group, as set in the Default User Group parameter, or use information that is supplied by the ILS in the NCIP response. Use the User Privilege Status Mapping link to map between values that the ILS reports and the user groups configured in Rapido. For example, while the ILS may report a user with user group Library Faculty, in Rapido this value may need to be mapped to the value Faculty which is its equivalent in Rapido.
-
User Privilege Type – Different ILS report the user group in different elements of the NCIP response. This element should indicate where your ILS reports the user group in the NCIP response.
-
For Sierra and Folio – PROFILE
-
For Aleph - Borrower Status
-
-
Default User Group – Set the default user group that will be assigned to new user records that are pulled from the ILS if the user group reported by the ILS in the NCIP response does not match a user group value in the Rapido configuration.
-
Update Address – Select Update to have Rapido pull address information from the ILS. Address Information is refreshed every time the patron logs into Rapido’s discovery.
-
Electronic Address Type – Text string that is used by the ILS in the NCIP LoookUpUser response to indicate email address. For example, some systems use text such as mailto or electronic mail address.
-
Configuring S/FTP Connections
- General System Administrator
- Rapido supports secure FTP (SFTP) over SSH, but not FTPS over SSL. For detailed port information, see Technical Requirements for Rapido and Discovery Implementation.

- diffie-hellman-group-exchange-sha1
- diffie-hellman-group1-sha1
- diffie-hellman-group14-sha1
- diffie-hellman-group-exchange-sha256
- ecdh-sha2-nistp256
- ecdh-sha2-nistp384
- ecdh-sha2-nistp521
- Add an S/FTP connection (see Adding S/FTP Connections)
- View an S/FTP connection (View in the row actions list).
- Edit an S/FTP connection (Edit in the row actions list)
- Duplicate an S/FTP connection (Duplicate in the row actions list)
- Delete an S/FTP connection (Delete in the row actions list)
Adding S/FTP Connections
- On the List of S/FTP Connections page (Configuration > General > External Systems > S/FTP Definitions), select Add S/FTP Connection. The Update S/FTP Connection page appears.
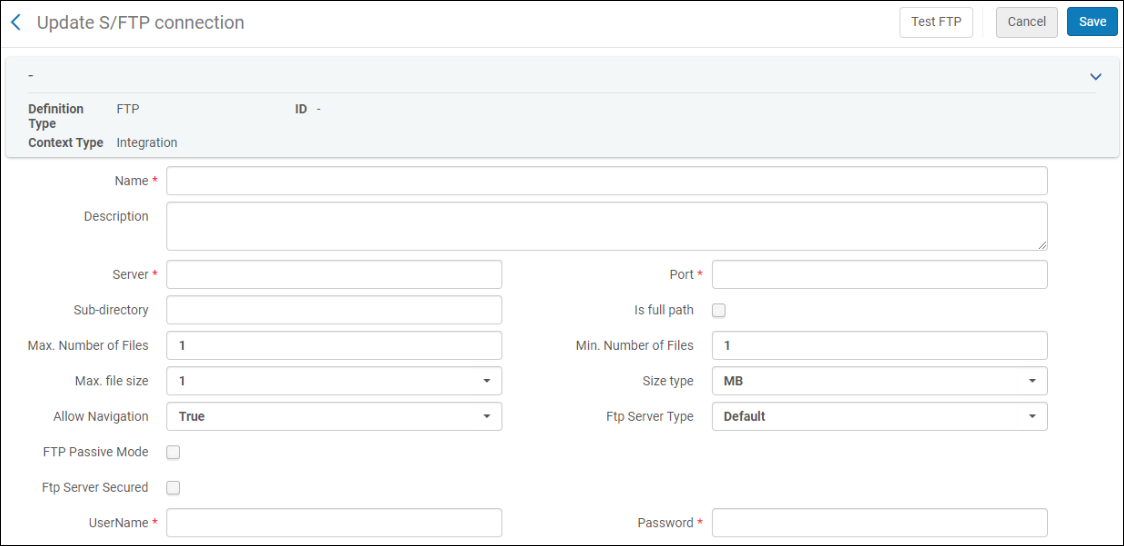 Update S/FTP Connection Page
 - Enter a name (mandatory) and a description (optional) for the new S/FTP connection.
- Enter information in the remaining fields, as described in the following table.
S/FTP Connection Fields Field Description Server (mandatory) The IP address of the server sending or receiving the files. Cannot begin with a dot, and cannot begin or end with a quotation mark. Port (mandatory) The server port. Sub-directory / Is full path (mandatory) The subdirectory in which the files are saved. If this is an absolute path, select "Is full path" checkbox and preface your path with the '/' sign. If this is a relative path, leave "Is full path" clear and start the path at your current directory.
If you also specify a sub-directory in the integration profile, this directory is concatenated onto that one. For example, if you define the system1 S/FTP connection as: Sub-directory – ftp
And you define an Export Bibliographic Records profile with:- FTP configuration – system1
- FTP sub-directory – alma
This field cannot remain empty, otherwise, the import/export fails and returns an error message.The directories of the S/FTP definition and the integration profiles work as follows:- There is a subdirectory in the definition of the S/FTP connection defined in Configuration > General > External Systems > S/FTP Definitions.
- The integration profiles defined in Configuration > General > External Systems > Integration Profiles also have a field called subdirectory which defines where the file will be taken from or placed.
- The subdirectory of the integration profile is relative to the subdirectory of the S/FTP definition. Thus, for example, if:
- The S/FTP profile used by the integration profile has the subdirectory alma
- The input file path of the integration profile of the type Users is yilis_patrons
- The the file is taken from [root directory]/alma/yilis_patrons
Max. number of files Not in use. Accept the default value. Min. number of files Not in use. Accept the default value. Max. file size Not in use. Accept the default value. Size type The units used for the file sizes. Valid values are: GB, MB, and TB. The default value is GB. Allow navigation True if you want to enable access to other areas of the FTP site, or False if you do not. The default is to allow navigation (True). FTP server type Default or MVS. Select MVS to work with IBM’s Multiple Virtual Storage operating system. FTP passive mode Whether the client IP works in passive mode. FTP server secured Select if the FTP server is secured. The Authentication Method option appears when this option is selected. If you select MVS as the FTP server type, do not select this. Secure MVS servers are not supported.Authentication method Appears if FTP Server Secured is enabled. Select one of:- Username/password authentication - Use a username and password.
- Key authentication (public key encryption) - When you select this, a public key appears. The public key is used to authenticate files received from Rapido. When this option is selected, the password field is removed.
User name (mandatory) The S/FTP user name. This field appears and is required regardless of whether or not you are using a secured FTP. Password (mandatory, except when Key authentication is selected) The S/FTP password. Required unless you are using key authentication. Rapido does not support passwords that include special characters.Public keyThe public key appears on the page if Key Authentication is selected for Authentication method.Rapido's public key. You must add this key to the .ssh/authorized_keys file on your FTP server. Every institution has its own public key. When implementing a Network Zone, customers must add the public key of each institution to their authorized_keys file. -
Select Test FTP (recommended) to test the S/FTP connection. You should receive messages indicating that the following FTP command actions were successful:
- List and check files in the specified directory using ls, pwd, and cd commands
- Upload and download files using the put and get commands
- Delete using the delete command
If you do not receive success messages for these actions, resolve your S/FTP connection issues before continuing. - Select Save when you are done.
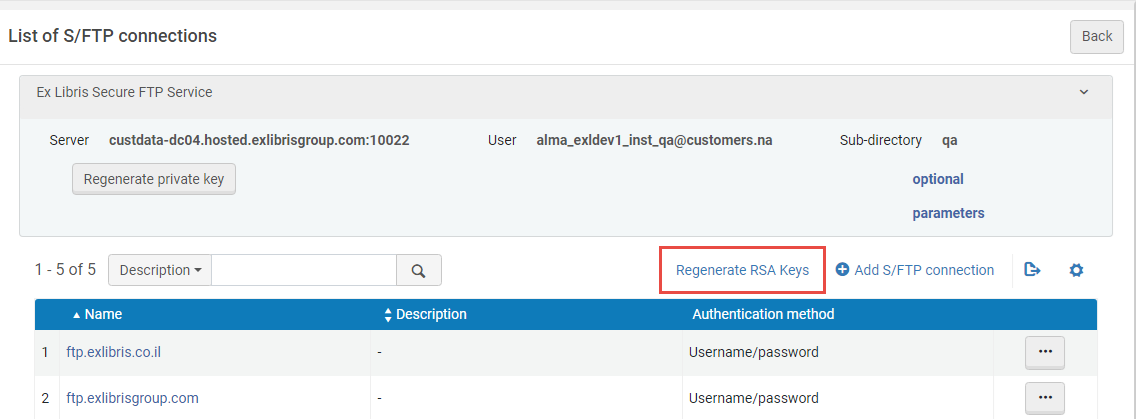
Regenerate Public Key in S/FTP Profile
Public Keys associated with an S/FTP profile remained static and could not be updated or refreshed. Rapido enables users to refresh the Public Key by following these steps: Navigate to Configuration > General > S/FTP definitions and select Regenerate X Keys.
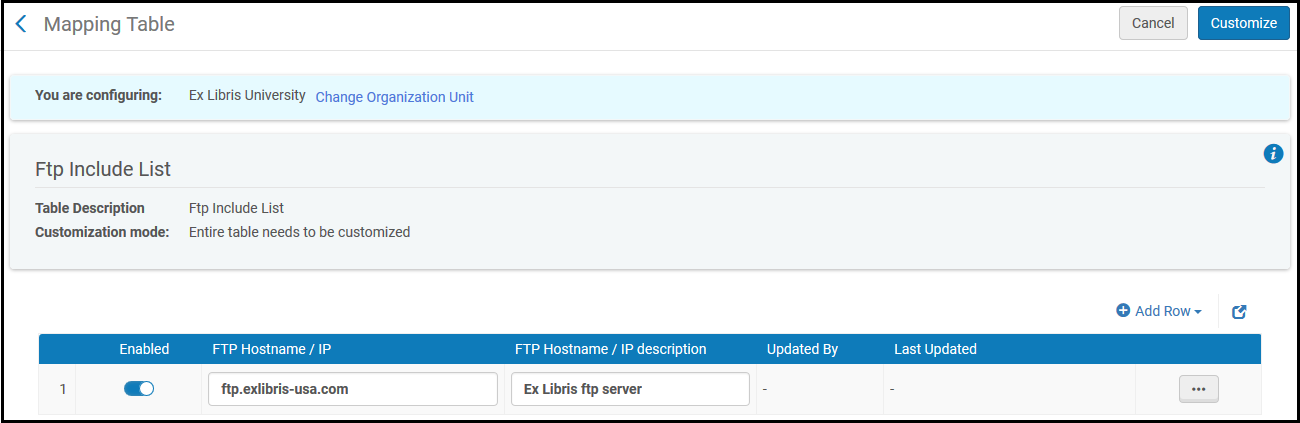
Configuring Allowed Emails
- General System Administrator

Configuring Allowed S/FTP Connections During Testing
- General System Administrator