
Administrator and Workgroup Editor Guide
The definition of words in italics can be found in the glossary.
This section details the additional functionality available for users with administrator and workgroup editor rights on *Research Professional. This functionality focuses on giving you ways to share information with other *Research Professional users at your institution and managing user accounts at your institution. Administrators and workgroup editors have different levels of functionality available to them:
Administrators can create shared resources for other users to access, create and delete workgroups, email resources to groups of users, create magazines, create new user accounts, and edit or delete existing accounts.
Workgroup Editors share much of the same functionalities as administrators, they are able to share resources with users and members of workgroups, but they do not have the same user management privileges as administrators in terms of creating, editing, and deleting user accounts
Throughout the rest of this section, it will be highlighted whenever the feature being discussed is only accessible to administrators.
Individual users may be granted administrator and workgroup editor rights for specific workgroups as well as for the entire institution. Any rights granted will be active for the workgroup they were allocated for, including any of its sub-groups.
Creating, editing, archiving and deleting users
Administrators only
Administrators can manage users from the Our Institution section and can take the following actions:
Create a user: click on the Actions drop-down and select the New user option. Fill in all the mandatory fields and then click Create at the bottom of the page. Please note that you will be asked to set a password for the users, but after creating the account, the user will automatically receive an email notifying them that an account has been created on their behalf and prompting them to set a new password for themselves.

Edit a user: open the People tab and search for the user you want to edit using their name or email address. Click on the user’s name to view their profile, then select Edit profile to update their account details.

Archive a user: open the People tab and search for the user as described above. Click Archive to add the user to the Archived Users folder. The user will be unable to log in and will stop receiving email alerts. From there, Administrators have the option to either restore or permanently delete the user account.
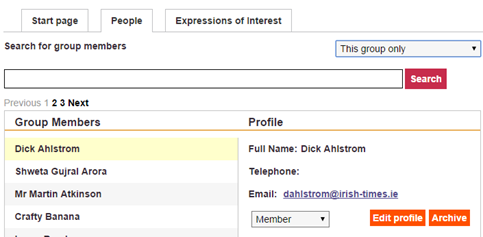
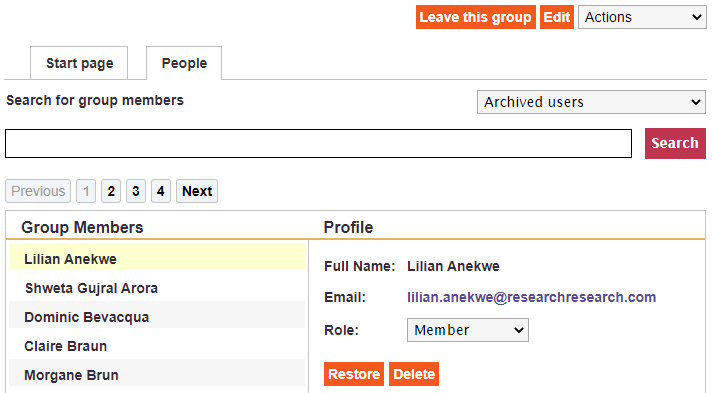
Delete a user: open the People tab and change the group member search from This group only to Archived Users in the dropdown and then click Search to see all archived users. Select the name of the users you wish to restore or permanently delete from the *Research Professional system and click either the Restore or Delete button. After restoring an account, the user will again be able to log in and any previously registered email alerts will be reactivated.
Editing start pages
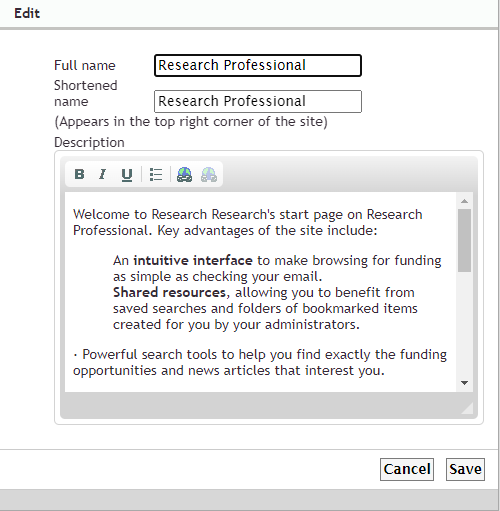
You can edit the name and introductory text of any of your workgroups (including your institutional home page). When viewing the workgroup you wish to edit, click on the Edit button to open a pop-up window where you can edit the title of the page, update the workgroup description, apply basic formatting, and insert external links.
Shared resources
You can share saved searches and folders of bookmarked funding opportunities and news articles on to workgroup pages for other users to access.
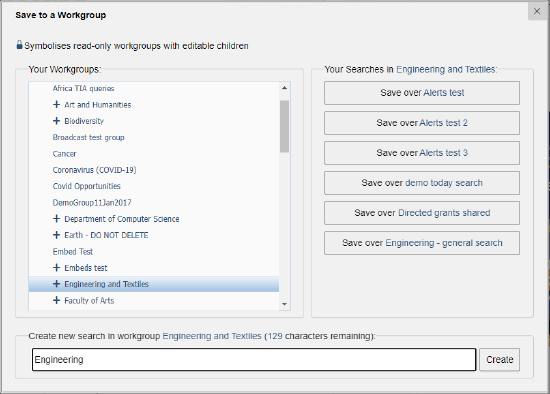
To save and share a search with a workgroup, create a search in either the funding or news section and click the Save to Workgroup button. In the save pop-up, you will see a list of all of the workgroups you are able to share resources with. Select the workgroup you want to share the saved search with, give the search a name (or select an existing saved search to overwrite), and click Create. The saved search will be posted to the workgroup's Start page and will be visible to any users who view the workgroup.
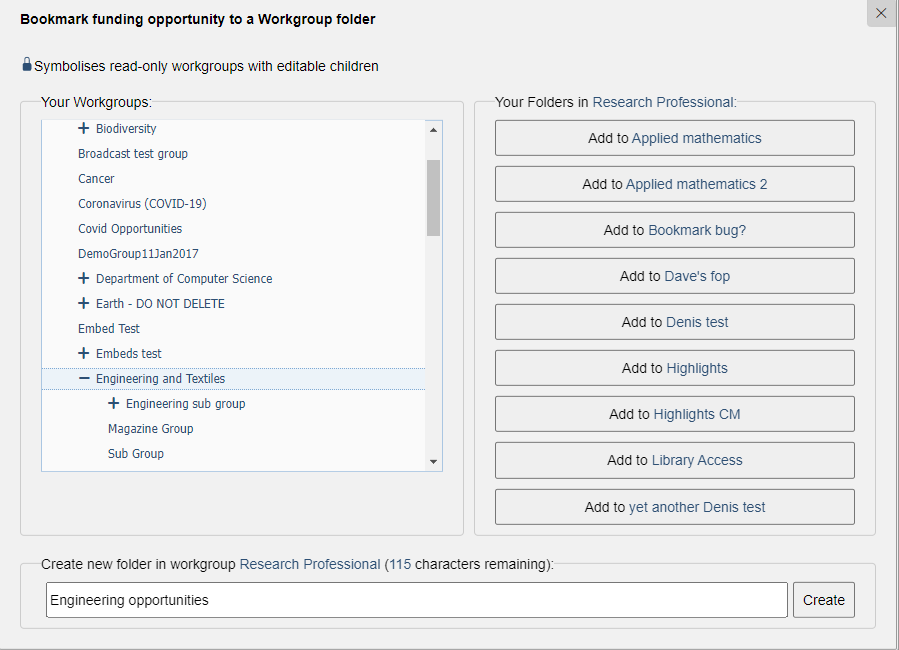
To save and share a folder of bookmarked opportunities or articled with a workgroup, select the items from your search in either the funding or news section, and from the actions drop-down menu, click Bookmark to Workgroup. In the bookmark pop-up, select the workgroup you want to share the bookmarked folder with, give the folder a name, and click Create to post it to the workgroup's start page.
Generating usage reports
Administrators only
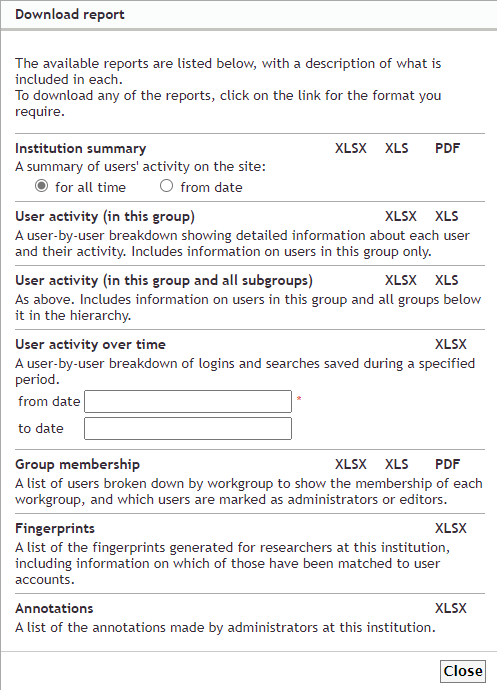
You can generate usage reports to monitor activity from members of individual workgroups or across the entire institution. When generating reports from a specific workgroup, you will only be able to see information on users who are members of that workgroup or its sub-groups. When generating reports from the institutional home page, you will have additional reports giving you a summary of usage across the institution.
To view a usage report, open the workgroup you wish to generate a report for. From the Actions drop-down menu and select View reports, and then select the report and the format you wish to download.
Creating workgroups
Administrators only
If your institution has a Networked level subscription, you will have the ability to create multiple workgroups. Current workgroups at your institution can be seen on the right-hand side of the page, under the Our Hierarchy heading.
Workgroups are structured like a tree diagram. Each workgroup has a parent group (with your main institutional page at the top), and each workgroup can have any number of sub-workgroups.
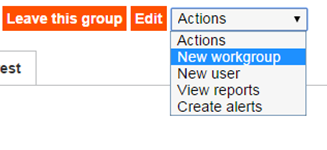
To create a new workgroup, the administrator will need to select the parent workgroup and from its start page, select New workgroup from the Actions drop-down.
In the pop-up window, you are able to give your workgroup a name and add a description to its start page. Click Save at the bottom of the pop-up, and your workgroup will now appear listed in the Our Hierarchy section.
Emailing workgroups
You can email links to searches, folders of bookmarks or individual items from, both the Funding and News sections, to all members of selected workgroups:
To share a saved search via email, select Email from the Actions drop-down.
To share a bookmarked folder via email, open up the folder you wish to share and then click Email to the right of the folder’s title.
To share selected items via email, tick the box next to the items you wish to share and then select Email from the Actions drop-down at the top of the list of search results.
In the pop-up window, select the workgroup you wish to send the search, bookmarked folder, or selected items to, enter an optional message in the Message section, and click Send to email your links to the members of that workgroup.
Managing workgroup membership
Administrator only
You can control which users at your institution are members of a given workgroup and assign different roles to them within that workgroup (member, workgroup editor, administrator).
To assign a specific role to a user, open the workgroup you wish to manage the membership of, and then go to the People tab.
Search for the user you want to edit using their name or email address.
Click on the user’s name to view their profile and then use the drop-down under their email address to change their membership status. Changes will be saved automatically.
Users who have been provided administrator or workgroup editor rights will have those rights in the workgroup in question and all of its subgroups.
Annotations
If your institution has a Networked level subscription to *Research Professional, administrators can annotate funding opportunities to add additional information such as internal deadlines or internal contacts onto the call abstract. This information will only be visible to users from the administrator’s institution who view the opportunity.
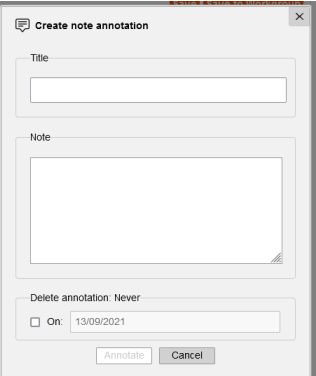
In the Funding section, run a funding search and then select the items you wish to annotate from the search results list by ticking the boxes next to the closing dates.
From the Actions drop-down at the top of the search results, select the type on annotation you wish to apply; deadline, note, contact or priority.
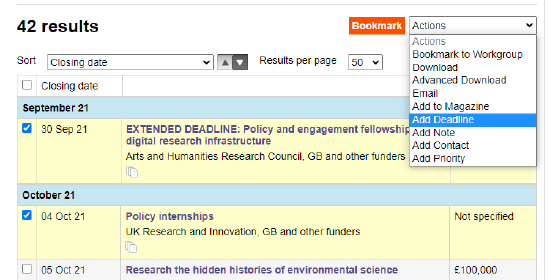
In the pop-up window, enter the required information for your annotation type, then click Annotate to add the annotation.
Your annotation will be displayed in the items description of the specific funding opportunity you have added the annotation to. It will be visible to all users from your institution who view that item.
Magazines
If your institution has a Networked level subscription to *Research Professional, administrators and workgroup editors have the ability to create institutional magazines, containing funding opportunities and news articles drawn from elsewhere on the site. The magazine can be emailed to selected individuals or to all members of relevant workgroups.
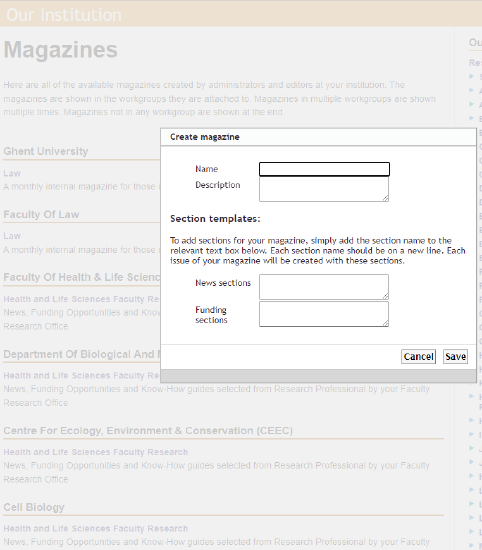
To create a magazine, go to the magazines home page. You can navigate there by clicking the See all Magazines link from any workgroup page.
Click New at the top right corner, enter a name and a short description for your magazine, and define the news and funding sections (e.g. Breaking News or International Funding). Then click Save, and you will get redirected to your magazine’s summary page.
To create an email list for your magazine, click on Edit email list from the Actions drop-down.
From the Users tab, you can search for any individuals you want to send the magazine to. Click + to add them to the email list.
From the Groups tab, select any workgroups you want to send the magazine to. All of the workgroup’s members will be emailed any new issues that you publish in the future.
To add content to your Magazine, run a search for either opportunities or articles, and then select the items you wish to add by checking the box next to the item in the list of search results.
Select Add to Magazine from the Actions drop-down.
In the pop-up, select the magazine you wish to add the content to. You will then be able to add the content to an existing issue or to create a new issue.
You can choose to add the content to one of the magazine’s existing sections or to create a new section.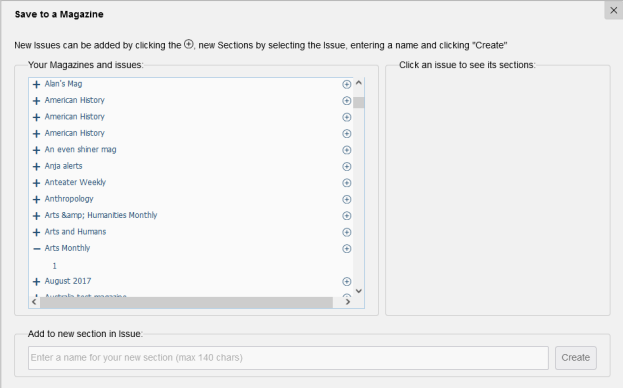
To publish and email your magazine, open the issue you wish to publish and review the content, then click the Publish button to publish the issue. This will make it visible to all users at your institution. After publishing the issue, click Email to send the issue as a html email to everyone on the email list for the magazine.