
Bytestream Extraction Rules
About Bytestream Extraction Rules
In order to provide bytestream support, Rosetta has set up a plug-in extraction tool for a bytestream-related task chain. The task chain is used during SIP processing for new deposits, as part of a maintenance job, or as part of an Add Representation task.
Bytestreams in Task Chains
The task chain includes a virus check, format identification, technical metadata extraction, and risk extraction. Should the extraction process fail at any stage, the entire SIP is routed to a Technical Analyst for handling.
When a file contains bytestreams (for example, a multi-TIFF file), Rosetta extracts the bytestreams and runs them through the validation stack. The metadata is kept separately for each bytestream while the file itself is kept in the permanent directory as is, not extracted.
New Bytestream Extraction Rule
A new rule available from the SIP Routing Rules page defines the following:
- Input: Dynamic input – All IE, REP, and File DNX attributes will be available.
- Output: Bytestream Extraction Tool – Extracts bytestreams out of a bytestream file. The list of bytestream extraction tools will be driven from the plug-in manager and will include all DecomposerPlugin extractors
Rule List
Which extraction rule to use when processing a file containing bytestreams is determined by bytestream type and rule precedence as configured by the Administrator.
To access the list of bytestream extraction rules:
Follow this path from the Rosetta Administration page:
- System Configuration > Deposit > Rules for Bytestream MD Extraction
The Rule List page for bytestream extractions opens.
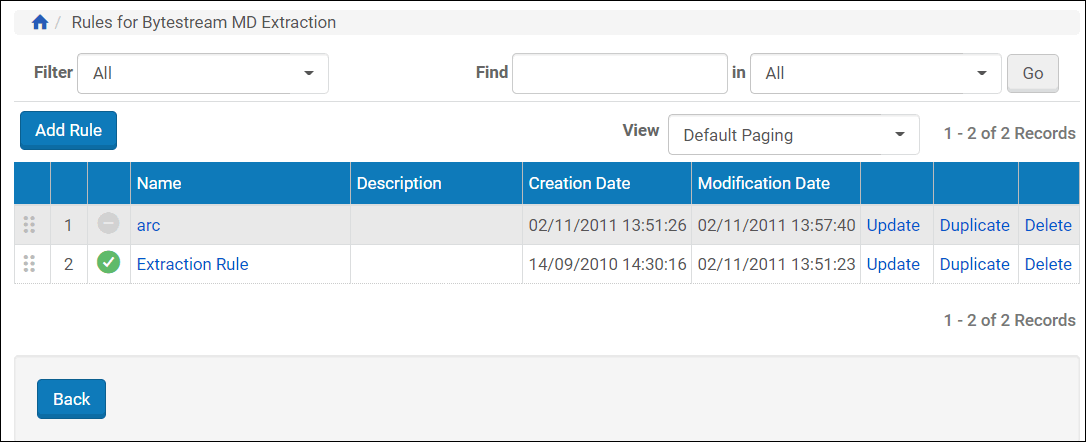
Rule List Page for Bytestream Extractions
The list can be filtered by All, Active, and Inactive rules. The page also includes a search field that allows the user to narrow the display of bytestream extraction rules. Drop-down attributes following the Find [term] in equation (such as the attributes/fields Name and Description) can be used to focus a list containing many entries.
The Bytestream Extractions Rule List page allows for additional actions described in the table below.
| Action | Description |
|---|---|
| Add Rule | Launches the Bytestream Extraction Rule Editor in Add mode. Allows the user to add a new rule. See Adding a Bytestream Extraction Rule. |
| Enable/Disable check mark | A clear check mark indicates that the rule in that row is inactive. A filled-in check mark indicates that the rule in that row is active. When a rule is deactived, the system ignores the rule when processing incoming SIPs. Clicking the check mark will toggle the value from activated to deactivated and vice versa. |
| Order | If more than on rule is active, the order of the rules (top to bottom, lowest number to highest), determines the order in which the rules are processed. Users can drag an drop rules to change their order. |
| Rule Name / Update | Launches the Bytestream Extraction Rule Editor in Update mode (the values and operators of this rule’s parameters are loaded into the editor). See Edit/Update. |
| Duplicate | Adds a new entry to the Rules List that is identical to the rule in this row. The system refreshes the Rules List. See Duplicate. |
| Delete | Deletes the rule in this row. See Delete. |
Adding a Bytestream Extraction Rule
Users can add a bytestream extraction rule from the Rule List page for bytestream extractions.
To add a new extraction rule:
- From the Rule List page for bytestream extractions, click the Add Rule button.
The Bytestream Extraction Rule Editor opens in Add mode.
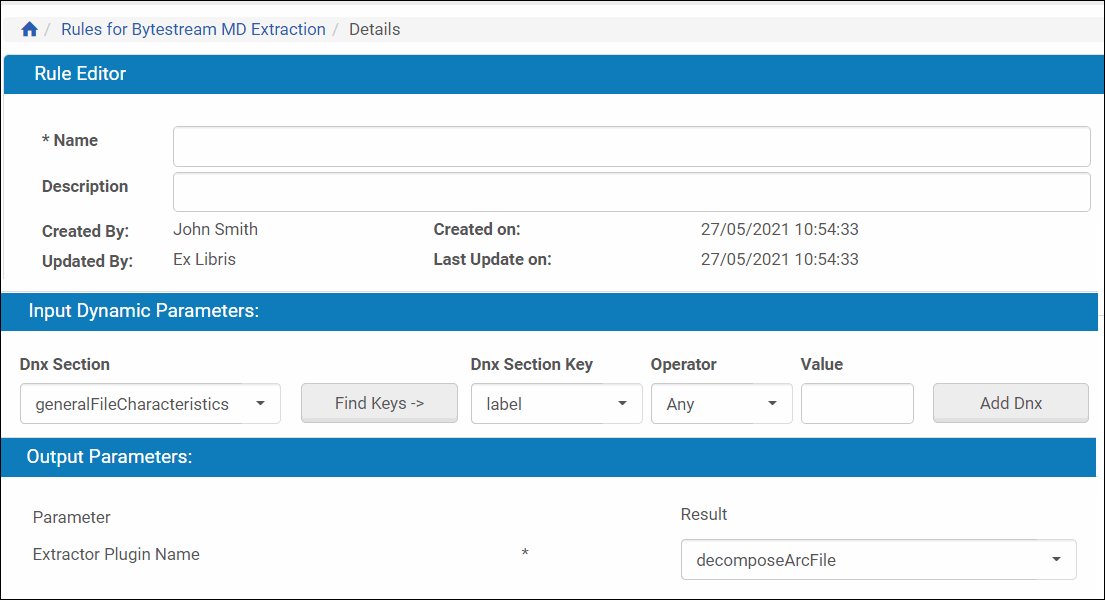
Rule Editor - Adding a Bytestream Rule
The page is divided into three sections: rule details, Input Dynamic Parameters, and Output Parameters. The input parameters are dynamic and user-defined based on drop-down and text fields. The output parameters are fixed; users cannot add or delete them, though they can select a plug-in from the drop-down list.
- Enter a name and description for the rule in the top pane of the Rule Editor.
- To add an input parameter from the DNX elements, enter values in the Input Dynamic Parameters section by creating an equation from left to right, as follows:
- Select an item from the Dnx Section drop-down menu.
- Click the Find Keys button to display keys belonging to the section selected.
- Select an item from the DNX Section Key drop-down menu.
- Select an operator from the Operator drop-down list. For a complete explanation of operators, see Operators Used in Rule Parameters.
- Enter the value you want to search for in the DNX parameter.
- Click the Add Dnx button.
The page is refreshed with the input parameter you defined displaying between the section headings and the fields.
- To select an extractor plug-in for an output parameter, select a plug-in name from the drop-down field next to the Extractor Plugin Name.
Users cannot select output parameters but may be able to select the plug-ins associated with those parameters.
- Click the Save button. (To discard the rule, click the Cancel button.
The new rule displays in the list of rules for bytestream extractions. By default, the new rule appears at the bottom of the list and is enabled.
Additional Bytestream Rule Actions
In addition to adding a new rule, the following actions can be performed from the Rule List page:
Edit/Update
Edit any rule listed on the Rule List page by clicking the name of the rule or the Update text link in the row of the rule.
The Bytestream Extraction Rule Editor opens with information for the rule selected.
Make changes to the Name, Description, or input parameters for the rule. Add or delete any parameters. For a complete explanation of operators, see Operators Used in Rule Parameters.
If available, users can also change the selection for the output plugin.
Duplicate
Use the duplication feature to create a back-up of an existing rule or to create a new rule with many of the same values and attributes as an existing rule.
To create a copy of a rule, click the Duplicate text link in the row of the rule you want to copy. The system does the following:
- Adds an identical rule to the database
- Names the duplicated rule Copy of [original rule name]
- Refreshes the Rule List page with the newly duplicated and named rule
Edit/update the new rule as needed.
Delete
To delete a rule from the Rule List page (and from the Rosetta system), click the Delete text link in the rule’s row. Confirm the action when the confirmation box opens. The Rule List page refreshes without the deleted rule.