
Configuration Procedures
Preparations for Creating a Plan
Building a Preservation Plan
A Plan from a Preservation Set
- With your risk results open on the Search Object page, click the Launch Advanced Plan button.
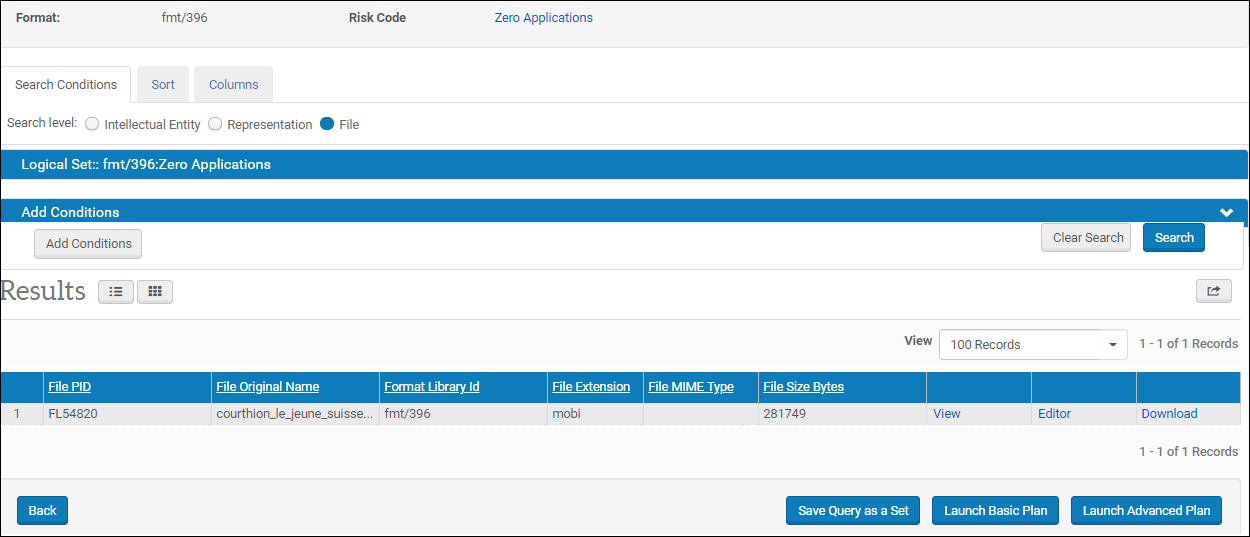
Post-query Search Object page
Rosetta opens the Plan Details - Administrator Information page.
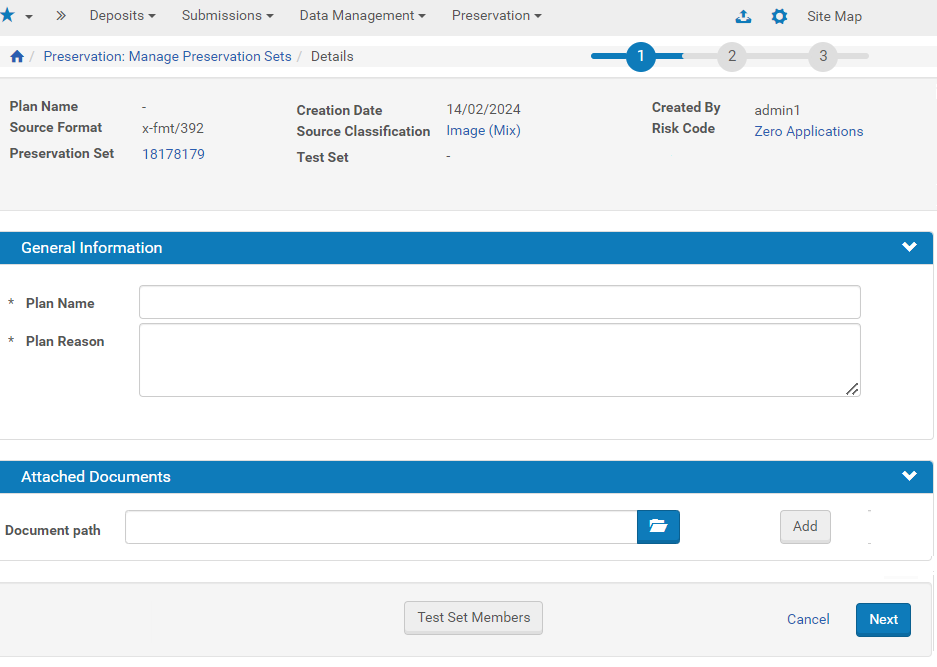
Preservation Plan Creation - Step 1
- In the General Information section of the page, enter a name for this plan and a reason for adding it to the Preservation plan database.
- To attach a supporting document to the test plan, click the Browse button in the Attached Documents section, locate the document you want to attach, and select it.
The path and filename display in the Document path field. - To upload the file, click the Add button. Information about the file displays in the Attached Documents section.
- To create a test set, click the Test Set Members button at the bottom of the page.
Creating a test set is required for moving on to the next step.The Search Object page opens.
Search Object page from Preservation Plan
- Select test set members from the Results pane by clicking the check boxes. If you have more than one page of test items to choose from, click the Add Selected button before moving on to the next page. (That will refresh the page.)
- When you have added all items for your test sample, click the Review Set button to review all items in the set.
The Set Members page shows the items you selected.
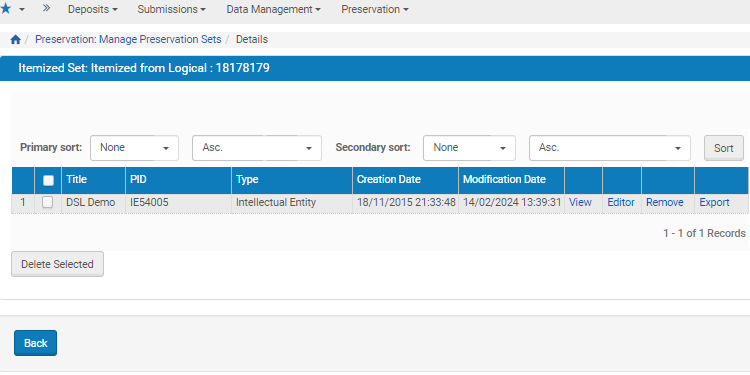
Set Members for Testing
- After you review the set and delete any items you want to exclude, return to the wizard by clicking the Back text, make any adjustments you need, then click Next.
The Plan Details - Alternatives Evaluation Form opens. This form determines the criteria your institution will use to evaluate the alternative. Criteria can relate any aspect of maintaining your institution and your collections.
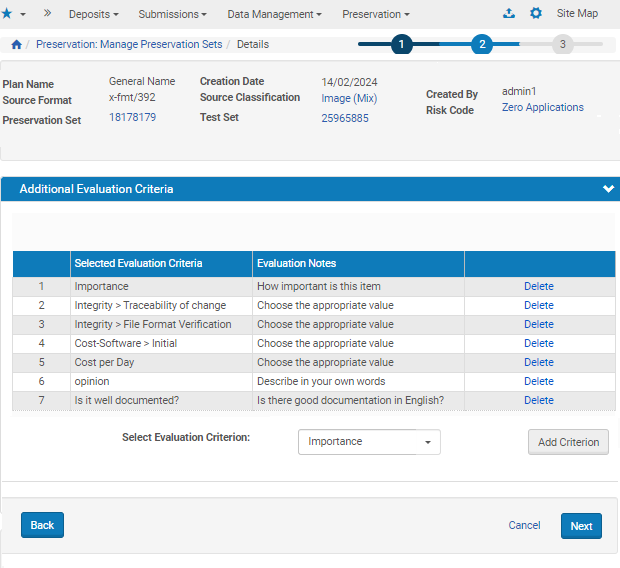
Evaluation Criteria
This page shows one set of evaluation criteria for comparing the different alternatives. The entire table of criteria is loaded from a separate table and the user can delete any items that don’t apply to this plan.
- For instructions on how to add new criteria that is not in the table, see Evaluation Criteria. When you are satisfied with the evaluation criteria for this alternative, click the Next button.
The Plan Details - Evaluation Assignment page opens.
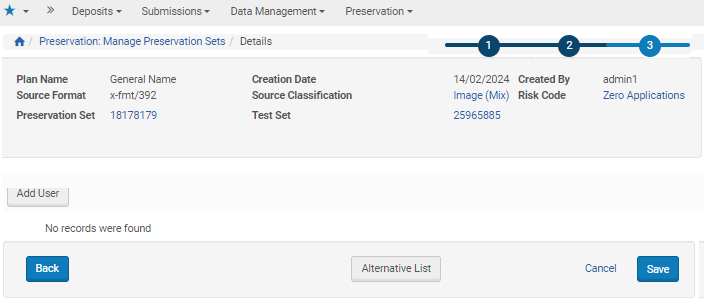
Evaluation Assignment
- Click the Add User button to assign the evaluation of test results to an Editor in the system.
The User List page opens to a table of Editors..
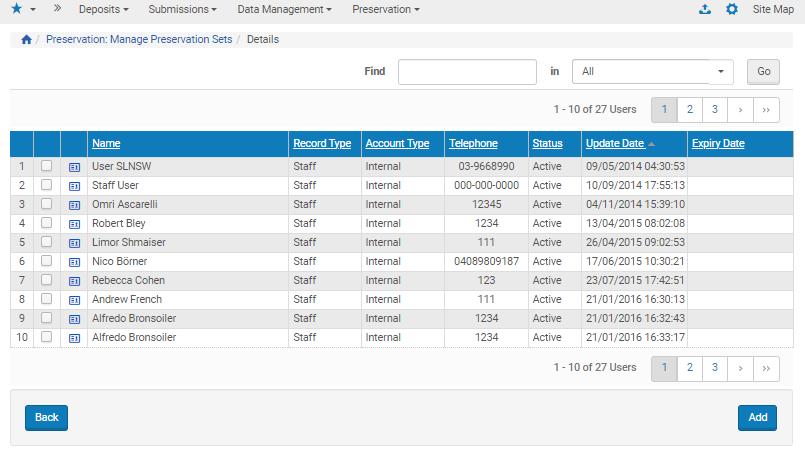
Editors Available for Evaluation Assignment
- Click the check boxes beside the users to which you want to assign the evaluation. Then click the Add button.
The Plan Details - Evaluation Assignment page refreshes with the user(s) you selected. - Click the Save button to save the plan and return to the List of Preservation Plans page. To save the plan and go directly to the Alternative List, click the Alternative List button.
Evaluation Criteria
Managing Plan and Alternative Evaluation Forms
- Follow the path from the Preservation tab to Advanced Preservation Activities to Plan Evaluation Criteria or Alternative Evaluation Criteria, depending on whether you are developing criteria by which to evaluate a plan or to evaluate an alternate to a plan.
The Manage Evaluation Criteria page you selected opens.

Evaluation Criteria Page
Existing fields and information for each field display in a table.
| Header | Information |
|---|---|
| Field Name | The label of the field as it appears on the user interface of the person creating the survey. |
| Description | The tooltip, typically directions for how to enter a value for the field. |
| Field Type | The type of value, indicating the way to enter the value (select drop-down or enter text). Drop-downs (or “Combo Boxes” must be accompanied by code tables listing available selections. |
| Code Table Name | The code table that lists values for a Combo Box field. This table can be added to the system, or an existing code table can be used, with or without edits. See |
Fields can be added (button top left), edited, or deleted (per row).
- To view a field in detail and perform edits, click the Edit link of the field’s row.
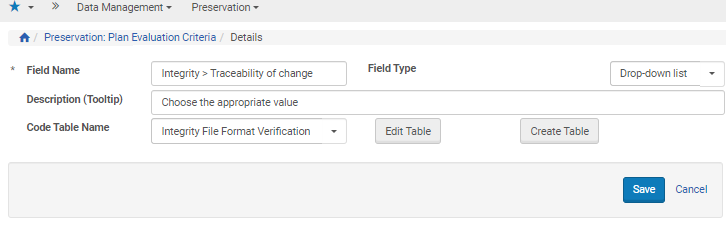
View or Edit Entries for an Evaluation Field
- Add entries for a new field or edit existing entries.
- If you are creating a “Combo Box” (or, a box displaying values that the customer much choose from), click either the Edit Table button or the Create Table button to edit or create values for the selection box. See Adding/Editing a Code Table for information on how to manage code values for an evaluation field.
- If you are creating or editing a text field, select the Field Type of Text.
- When you are finished entering fields and values for the evaluation field, click Save to save your edits/entries and return to the list of fields for your plan or alternate.
Adding/Editing a Code Table
- Click the Create Table button or, to edit an existing table’s values, select the Code Table Name from the drop-down menu and then click the Edit Table button.
The Code Tables page opens.
If you are creating a new table, enter a name and description in the respective fields and click the Create button. The empty row for a code table opens below the general table information.
If you are editing an existing table, the full Code Tables page opens with values entered for the field you selected.
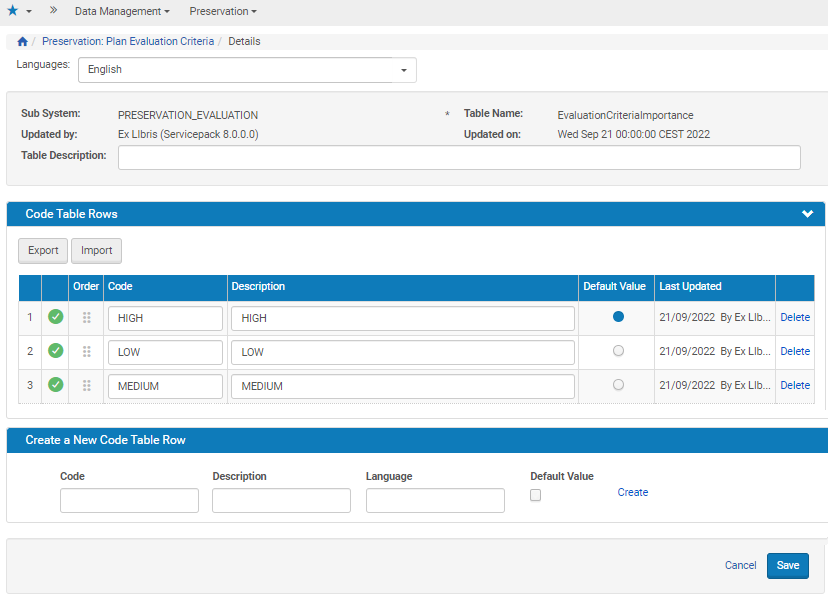
Code Table For Preservation Evaluation Criteria
To switch to another table, click the Table Name drop-down list and select a different table name.
- Edit any existing row or add a new row from the Create a New Code Table Row section. You can also change the display order of the values as they appear in the drop-down list by clicking the up or down arrow buttons in the Display Order column.
- When you have created the new table, click the Save button.
The new or edited code table is saved to the system and can be used as part of an evaluation criterion,is added to the Preservation Plan, and shows in all future Preservation Plans and Plan Alternatives.
Adding Plan Alternatives
- Access the Alternatives Details - General Information page through one of the following paths:
-
After creating a plan, click the Alternative List button at the bottom of the Plan Details - Evaluation Assignment page.
-
From the Preservation main page, click Preservation Plans, then click the Alternatives List text link corresponding to the row containing the plan you want to work with.
The first time the Alternatives List Page is opened for this plan, no alternatives are listed and the message. No records were found displays below the Add Alternative button. Once you have added alternatives, Rosetta lists them in a table below the Add Alternative button.
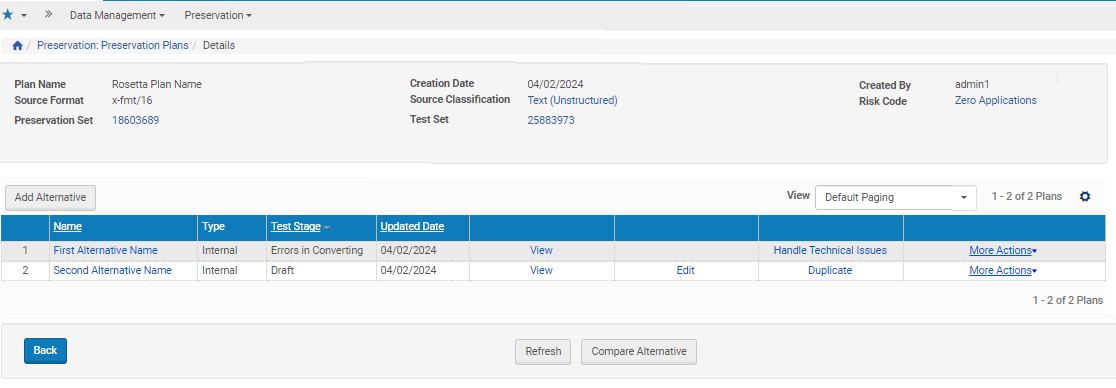 When alternatives have been added, they appear in a table with general information and available actions (detailed below).
Alternatives List, Two Existing EntriesFields and Actions on the List of Alternatives Field Description Add Alternative Adds a new alternative for the plan. Note that the only supported alternative type at this point is migration. Evaluate Test Opens the evaluation interface for evaluating the test results. View Opens the alternative in view mode. Handle Technical Issues Opens the TA folders where failed test sets are stored. Test Summary If the alternative has been tested, opens the test results summary. Edit Enables the user to edit the alternative details (selected plug-in, evaluation criteria, alternative evaluation). Duplicate Creates a duplicate of the alternative. Delete Deletes the alternative. Run Test Runs a new test of the plug-in on the test subset. The system creates a new test record and directs the user to the test list. In the case of an external migration alternative, this action launches the process of creating the descriptor file and separates the representations that need to be sent for migration outside of Rosetta. Import For external migration alternatives, this action launches the automatic validation that checks the descriptor file and matches it with the number of files in the import directory. If the validation passes, the loading starts automatically. If the validation fails, an error message specifies the lines in the descriptor file that didn’t pass the validation.
-
- To create an alternative, click the Add Alternative button below the general information pane.
The Alternatives Details wizard opens. The top pane contains general information like the plan name, the source classification and format, and the creator of the plan.
.png?revision=1)
- Enter information in the fields according to the table below.
Alternative Wizard Step 1 Fields Field Description Alternative Name The name of the plan alternative. Description (Optional.) A description of the actions involved in this alternative. Target Format The format to which the source files' common significant properties should be automatically compared. The drop-down opens a list of available formats in the Format Library. The actual migration target format depends on the selected migration tool.Migration Type Either internal or external, depending on whether the migrations in the file use an internal plug-in tool and are carried out through the Rosetta process automation framework or whether the files are sent to an external vendor who converts the files off-site and returns them to Rosetta as new representations of the IEs. Select Plug-in A field that displays after a user selects Internal for the Migration Type. The field contains a drop-down list of all plug-ins that work with the selected format. Export/Import Directory When the user has set the Migration Type to external, read-only directory paths for outgoing files (Export Directory) and returning files (Import Directory) display below the Migration Type field. - Click the Next button.
- If the plug-in requires parameters, the second step of the wizard opens with a place for those parameter values below the Plugin Parameters bar.
- Enter values in the Plugin Parameters section.
- Click the Next button. The evaluation criteria for the alternative opens as step 3.
- If no plug-in parameters are required, the evaluation criteria for the alternative opens as step 2.
- If the plug-in requires parameters, the second step of the wizard opens with a place for those parameter values below the Plugin Parameters bar.
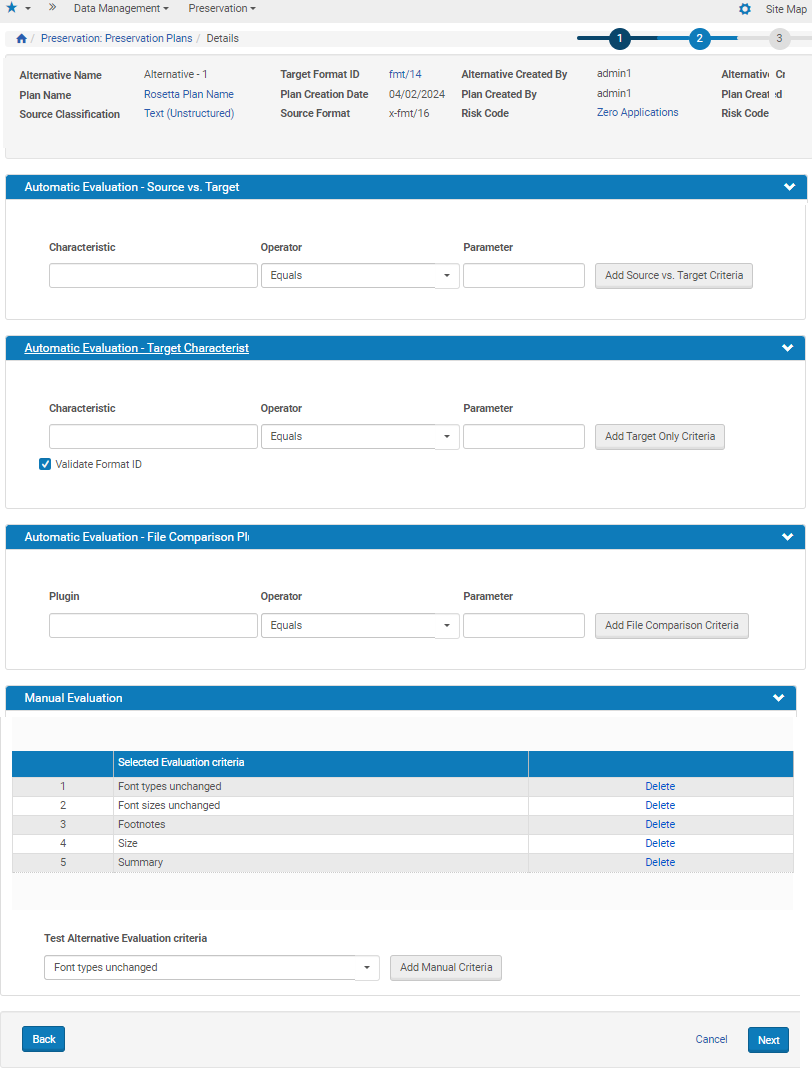
Alternative Wizard, Step 2
Four types of evaluation, based on the format source and target for the alternative, display on this page.
| Type | Description |
|---|
| Automatic Evaluation - Source vs. Target | The user selects the properties of the classification group that should be measured by the system when it compares the original format file to the migrated file (for example, File extension must equal file extension). |
| Automatic Evaluation - Target Characteristics only | The user selects the target file properties that are not compared to those of the original file, but are measured according to the selected operators and parameters (for example, File size smaller or equal 3MB). Select Validate Format ID to validate the target's file format (as selected in the first step of the alternative wizard) and inform the user when viewing the plan results if conversion succeeded or not. |
| Automatic Evaluation – File Comparison Plugin | The user selects a plugin, an operator, and a parameter to define the criteria for comparing the files. |
| Manual Evaluation | The user selects the evaluation criteria that are stored in a separate table with their possible values. For example, the criterion Character -> Font size unchanged could be Yes or No. The evaluation criteria is stored in the Evaluation Criteria Mapping table, which holds the name, description, and controlled list of values if the criterion is a drop-down. For more information about configuring this table, see the Rosetta Configuration Guide, Working with Mapping Tables. |
- Use the drop-down menus and text fields to indicate parameters for automatically evaluating the alternative source compared to the target or the target on its own.
- Add or remove any manual criteria using the Add buttons and Delete text in the bottom section (Manual Evaluation) of the page.
- Click the Next button.
The Alternatives Details - Evaluation Criteria page opens. This is the final step of the alternatives wizard.
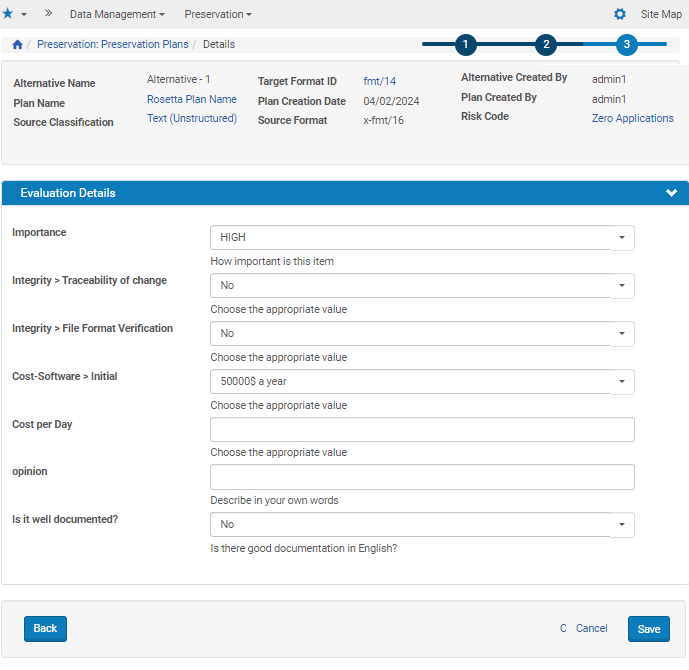
Alternative Wizard, Step 3
All the criteria selected previously by the plan editor displays for the evaluator. Each criterion has a list of possible values for selection (for example, Yes/No, Good/Fair/Bad) or an open text box for writing an evaluation.
- Enter the details and click the Save button
The alternative is complete and Rosetta returns you to the Alternatives List page, where the new alternative appears as an entry in the table.
Editing Alternatives

Alternative Details Edit Page
Descriptor File
Generation
Contents
| Field Name | Description |
|---|---|
| IE PID | The PID of the IE to which the new representation must be linked. |
| Representation PID | The PID of the original representation. The value is recorded in the descriptor during export. This value will be used later in the import process (for Provenance Information). |
| Preservation Type | The Preservation Type of the original representation, Preservation Master or Modified Master. For Preservation actions, the type is created during export and the same value will be used for import. The new representation will be assigned the same Preservation Type as the original representation. For representations added from the Web Editor, the Preservation Type will be taken from the value the Editor enters in the form. This column will be mapped to the field DNX.generalRepCharacteristics.preservationType. |
| Original PID | The PID of the original file. It is created during export. This value will be used later in the import process (for Provenance Information). |
| File Name | The name of the original file will be inserted during export. When importing, the name has to be replaced by the name of the new file. |
| File Location | The path to the file relative to the directory where the descriptor file is placed. |
| Usage Type | The Usage Type of the original representation. For Preservation actions, it is created during export. This value will be used later in the import process. The new representation will be assigned the same Usage Type as the original representation. For representations added from the Web Editor, the Usage Type will be taken from the value the Editor enters in the form. This column will be mapped to the field DNX.generalRepCharacteristics.usageType. |
| Conversion Required | When adding a representation, the user must provide all the files for the representation. When exporting, all the files will be exported. It is possible that only part of the files need conversion. For this purpose, for the files that need to be converted, the value of this field will be “Yes,” for files that don’t need conversion, the value of this field will be “No.” |
| Submission Reason | This field will appear only for Master representations. The field will be filled in only when Add Representation is called from the Web Editor (that is, no Preservation plan is attached). The text entered will be saved as a Provenance event. |
- When a new representation is created, a generic structure map is created and the original physical map is abandoned. The system does not support adding a new logical structure map through the descriptor.csv file. The physical structure map will be generated according to the order of the files in the descriptor file.
- There are two separate descriptor files, one for export and one for import. The format of the files is the same. The two files are placed in the same directory.
Validation
- The descriptor file format is correct: it is a.csv file. If an error is found, a message will be displayed and the Add Representation process aborted.
- The number of files in the Import Directory matches the number of files in the descriptor. If an error is found, a message will be displayed and the Add Representation process aborted.
- The names of the files in the Import Directory match the names of the files in the descriptor. There are no extra or missing files.
- When adding a representation from the Web Editor, if an error is found, a message will be displayed and the Add Representation process aborted.
- When adding a representation as part of a Preservation Test or Execution, if files are missing for an IE, the IE will be marked as a candidate to skip and Add Representation will continue with the next IE. See Error Handling for more details.
- The descriptor file is well-formed. If an error is found, a message will be displayed and the Add Representation process aborted.
- The descriptor file contains all the mandatory fields. If an error is found, a message will be displayed and the Add Representation process aborted.
- All the labels in the descriptor file match labels in the Add Representation Fields mapping table. If an error is found, a message will be displayed and the Add Representation process aborted.
- The values of fields with object type representation (for example, Preservation Type, Representation Code, Usage Type, Capture System and Source Type) are the same for all the files in the same representation. If an error is found, a message will be displayed and the Add Representation process aborted.