
Testing a Preservation Plan
Testing a Preservation Plan
Creating a Test Set
- On the Plan Details - Administrator Information page, click the Test Set Members button.
The Search Object page opens (slightly different from that in Creating a Preservation Set).

Search Object Page
- Select the check boxes of the items you want to be included in the test set.
- (Optional) To view all the items you have selected on a single page, click the Review Set button.
The Set Members page opens.

Click Back to return to the Set Members page.
- Click Continue.
The Plan Details - Administrator Information page opens again. - Click Next.
The Plan Details - Alternatives Evaluation Form page opens.

Plan Details - Alternatives Evaluation Form Page
This page displays a list of criteria for evaluation of the Preservation plan from the business point of view.
- To add an evaluation criterion, type the evaluation question in the Add New Evaluation Criterion field and click the Add Criteria button.
To delete a criterion from the list, click its Delete link. - Click Next.
The Plan Details - Evaluation Assignment page opens.

Plan Details - Evaluation Assignment Page
- Click the Add User button.
The User List page opens.
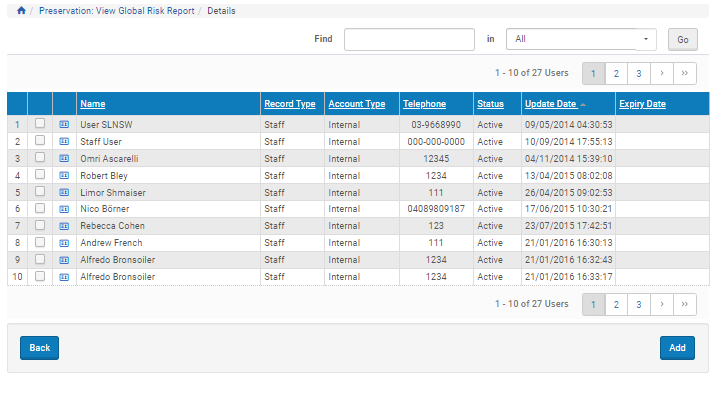
User List Page
This page displays a list of users available for evaluating the Preservation plan.
- Choose a user from the list and click Add.
The user is added to the list on Plan Details - Evaluation Assignment page.

Plan Details - Evaluation Assignment Page - User Added
- To proceed, see Adding Alternatives.
Viewing and Editing a Preservation Plan
- Access the existing list of Preservation plans from the Management home page by clicking Preservation > Preservation Plans.
A list of existing plans opens on the List of Preservation Plans page.

List of Preservation Plans
In the figure above, both plans can be viewed but only the second plan, which is in the lifecycle of Draft, can be edited.
- To view the plan, click View beside the plan you want to view. To edit a plan (in this example, the second plan), click the Edit text corresponding to the plan you want to edit.
The Plan Details - Administrator Information page opens.

Preservation Plan Details - Administrator Information
The Plan Name field is view-only, but in the editing mode, the Plan Reason and Attached Documents can be updated.
- Make changes to any of the tabs on the Plan Details page. See below for information on each subsequent tab.
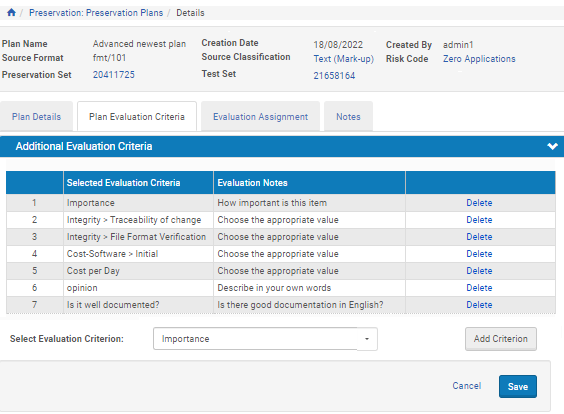
Plan Evaluation Criteria
On the Plan Evaluation Criteria tab, each existing criterion can be deleted, left as is, or used to create an additional criterion (using the Add Criterion From Existing Criteria button after selecting an existing one from the Select Evaluation Criterion drop-down list). New criteria can be added in the fields below the list of existing criteria.

Plan Details - Evaluation Assignment
The Evaluation Assignment tab names the user and role of the person assigned to evaluate the plan. In the editing mode, an existing evaluator can be deleted by clicking the Remove text in the row corresponding to that user. Users can be added by clicking the Add User button.

Plan Details - Notes
The Notes tab on the Plan Details page allows users in edit mode to enter notes about the plan. Users enter information in the text box, then click the Add Note button.
- When all changes have been made on the tabs (in edit mode), click the Save button to save the edits to the database.
Adding Alternatives
Running a Test
| Stage | Next Stage | Actions Allowed |
|---|---|---|
| Ready for Test | Running, Waiting for Import (for External-type alternatives) | View, Edit, Run Test, Duplicate, Delete |
| Running | Errors in..., Ready for Evaluation, | View, Duplicate |
| Errors in... (Loading, Converting, Enrichment, Validation) | Ready for Evaluation | View, Handle Technical Issues, Duplicate |
| Ready for Evaluation | Completed | Evaluate Results, View, Duplicate |
| Completed | Running | View, Edit, Duplicate, Delete, Run Test, Test Results |
| Waiting for Import (for External-type alternatives) | Ready for Import | Abort, Duplicate |
| Ready for Import (for External-type alternatives) | Running | View, Import, Duplicate |
- On the Alternatives List page, click the Run Test link of the alternative you want to test. (In the case of an External-type alternative, clicking the Run Test link places the test set files in the Export directory for converting outside the system.)
If the selected alternative is of the Internal type, the test stage changes to Running.
If the selected alternative is of the External type, the test stage changes to Waiting for Import.
- Click the Refresh button to see the updated test stage of the alternatives.
- If the selected alternative is of the Internal type, the test stage changes to Ready for Evaluation. If the test stage changes to one of the intermediary stages (Loading, Converting, Enrichment, or Validation), click the Refresh button again.
Alternatively, the test stage may change to Errors (in the example below, Errors in Converting).
 Running Test Page - Errors in Converting
 - If the selected alternative is of the External type, after the files of the test set have been manually taken from the Export directory, converted outside the system, and placed in the Import directory, the test stage changes to Ready for Import.
- If the selected alternative is of the Internal type, the test stage changes to Ready for Evaluation. If the test stage changes to one of the intermediary stages (Loading, Converting, Enrichment, or Validation), click the Refresh button again.
- If the selected alternative is of the Internal type, proceed to Step 5.
If the selected alternative is of the External type, click Import. - Click the Refresh button to see the updated test stage.
The test stage changes to Running, then to Ready for Evaluation.
Alternatively, the test stage may change to Errors. - If the test stage is Ready for Evaluation, see Evaluating Test Results to proceed.
If the test stage is Errors, see Resolving Technical Issues to proceed.
Evaluating Test Results
- On the Alternatives List - Ready for Evaluation page, click the Evaluate Test link.
The Test Evaluation Content List page opens.

This page displays the members of the test set. For each member of the test set, the user can manually evaluate the test results and review the results of the automatic evaluation.
- To manually evaluate the test results, click the Manual Evaluation link.
The manual Evaluation page opens.
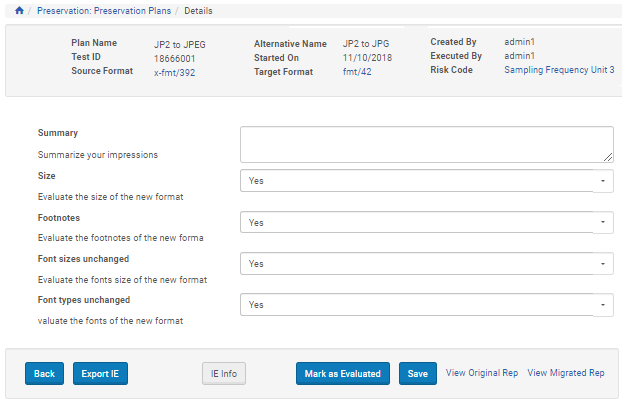
This page enables the user to open the original and the converted files and evaluate the results of the test conversion in accordance with the manual evaluation criteria that are part of the Preservation plan configuration.
- To view the original file, click the View Original Rep button. The file is opened in a new tab of the browser.
- To view the converted file, click the View Migrated Rep button. The file is opened in a new tab of the browser.
- After evaluating the conversion results, enter the answers to the evaluation criteria by selecting them from the drop-down lists or typing them where appropriate. Click Save.
The Test Evaluation Content List page opens again. - To review the results of the automatic evaluation, click the Review Auto Evaluation link.
The Automatic Evaluation page opens.

Automatic Evaluation Page
- After verifying that the IE did not fail the evaluation, click Back.
The Test Evaluation Content List page opens again. - Repeat the evaluation for all IEs in the list. Click the check mark in the Evaluation column for each IE that passed the evaluation.
- Click the Complete Evaluation button.
If all IEs do not display Evaluated check marks, a confirmation is requested. - Click Yes.
Note that by completing the evaluation you delete the files that were created in the course of the test run. A warning to that effect is displayed. - Click OK.
The Alternatives List page opens. The test stage of the alternative that has been tested is Completed. - If there are several alternatives in the list, the results of their evaluation can be compared. To do this, click the Compare Alt. button.
The Compare Alternatives page opens, showing a side-by-side comparison of the results.

Compare Alternatives Page
Click Back to return to the Alternatives List page.
- To proceed, see Test Sign-Off.
Test Sign-Off
- On the Alternatives List page, click the Ready for Sign-off button. The List of Preservation Plans page opens.

List of Preservation Plans Page
The Preservation Plans that have been successfully tested have the Sign Off Plan option.
- Click the Sign Off Plan link. The Plan Sign-off Form page opens.

Plan Sign-off Form Page
This page lists all alternatives of the given plan (in the example above, there is only one alternative).
- If none of the alternatives has been found suitable, the entire plan can be rejected by clicking the Reject Plan button.
- Select the radio button of the alternative you have chosen and click the Sign Off Plan button.
The Plan Sign-Off Note page opens.

Sign-off Page
- Add a sign-off note to the plan by typing it in the Note field.
- To keep a record of the preservation plan documents in the repository, click the Preserve Preservation Plan Documents check box below the Note field.
Rosetta saves the preservation plan materials to the following shared folder: .../operational_shared/preserve_pp_docs/[signed-off plan ID]/.... All of the plan’s relevant documents are stored in this folder. Additional signed-off plans are placed in the same preserve_pp_docs directory with the signed-off plan ID as the sub-folder holding all of the plan’s documents.Once the preservation plan information has been exported to the preserve_pp_docs directory, it can be deposited into Rosetta using the Submission Job, which reads the exported information in its current structure, transforms it to a valid Rosetta METS file, and uploads it. For more details regarding the Submission Job, see the Rosetta Staff User’s Guide. - Click Save. The List of Signed-Off Plans page opens.

List of Signed-Off Plans Page
This page displays a list of all preservation plans that have been signed off in the system. From this page, any signed-off plan can be executed. Basic plans can be deleted if they were not yet executed. This allows reviewing and editing the original preservation plans.
For instructions on how to execute a Preservation plan, see Preservation Plan Execution.