
Working with Sets
About Sets
To facilitate searching and accessing intellectual entities (IEs) that are stored in the Rosetta repository, Data Managers can create sets of IEs. A set is a group of objects (complete IEs, representations, or individual files) that satisfies criteria defined by Data Managers, such as matching on the creation date or the Producer’s name.
Data Managers can include in sets those objects that are frequently accessed. Then, instead of running a search every time such objects are required, a Data Manager accesses the appropriate set.
Data Managers can create an itemized set or a logical set.
- An itemized set contains a static group of objects that satisfies certain criteria. Data Managers manually select the objects to be stored in the set from the results of the search.
For example, if a Data Manager runs a search for Monet artworks and 25 objects are found, the Data Manager can select 10 paintings and save them as an itemized set. The Data Manager can then access this set and work with the objects without having to search for these paintings again.
The itemized set is static—that is, even if new objects that satisfy the criteria are moved to the Rosetta repository, the itemized set does not change. However, Data Managers can manually add new objects to an existing itemized set. - A logical set contains:
- A search request defined by a Data Manager
- All objects that satisfy the search request
For example, if a Data Manager runs a search for Monet artworks painted in 1890-1900, all objects that satisfy these criteria are automatically included in the set.
The logical set is dynamic—that is, it is updated every time Data Managers access the set and run the search request. New objects that satisfy the search criteria are automatically added to the set.
Data Managers can manage both itemized and logical sets using the Manage Sets page.
Accessing the Manage Sets Page
The Manage Sets page enables Data Managers to create and manage both itemized and logical sets.
To access the Manage Sets page:
From the Management Home page, click the Data Management link in the header or on the main pane. From the Data Management page, click Manage Sets under the Manage Sets and Processes heading. The Manage Sets (Set List) page opens.
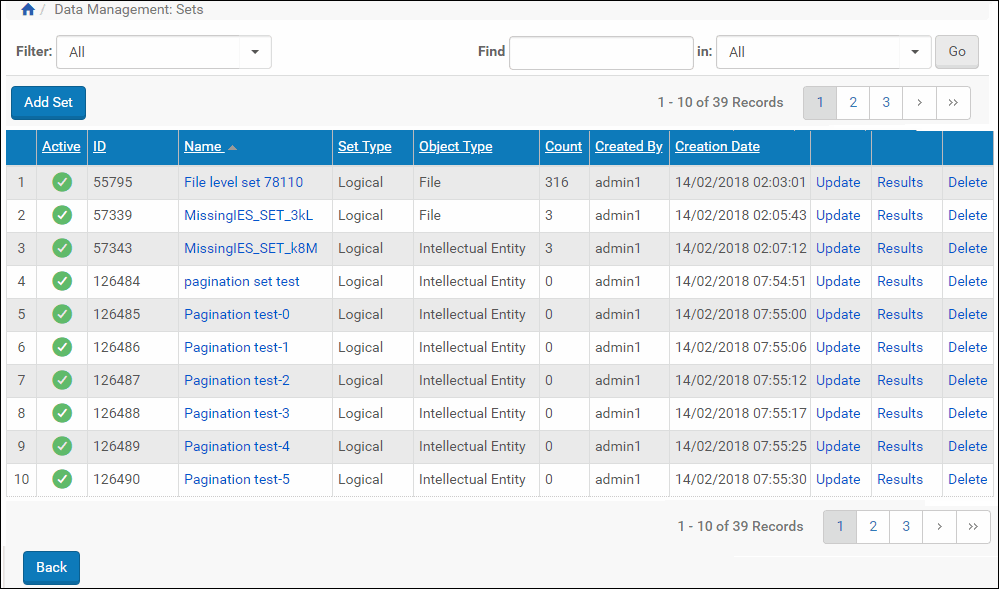
Manage Sets - Set List Page
- To view an itemized set, click Members.
- To view a logical set, click Results.
Creating Sets
Data Managers can create the following types of sets:
- Logical sets to store search queries that result in dynamically updated groups of objects
- Itemized sets to store static groups of objects
Creating a Logical Set
Logical sets function as queries or filters that select a new set of IEs each time they are run.
To create a logical set:
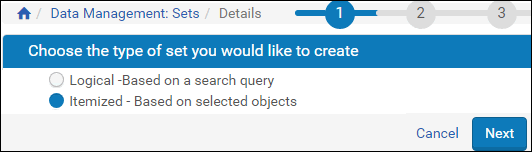
- On the Data Management main menu (see Accessing the Manage Sets Page), above the sets list, click Add Set. The Add Set page opens, step 1 of the Add Set wizard.
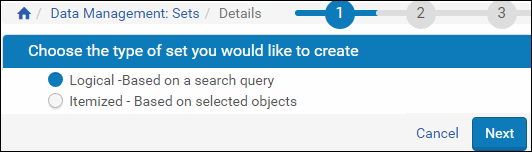
Add Set Page
-
Select Logical - Based on a search query, and click Next.
The Set Details page opens.
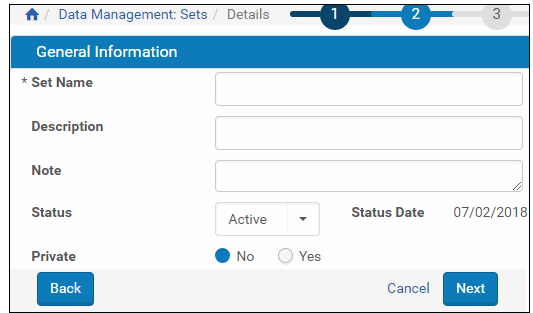
Set Details Page
- Complete the fields as described in the following table:
Set Details Page Fields Field Description Name The name of the set as you want it to appear in Set List pages and applicable lists of sets. Description A brief description of the set’s content or parameters. Notes Any notes associated with the set. Status The status of the set: - Active - The set is processed by the Rosetta system.
- Inactive - The set is not processed.
Status Date The date that the status was last set. Private The permissions that define who can access the set: - Yes - The set is accessible to other Data Managers.
- No - The set is accessible only to the Data Manager who created the set.
- Click Next.
Step 3 of the wizard opens.
Logical sets display the Simple Search page with the option to switch to the Advanced Search page.
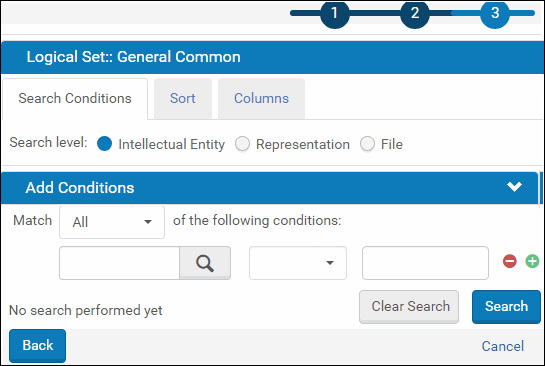
Simple Search for Adding a Logical Set
- Create the query for your search using the search form.
- Click the Go button to run the search.
The system returns results. For an explanation of results columns, see the table below. - If the results are appropriate for the purposes of your query, save the query. If the results are not adequate, alter some or all of your query and rerun the search.
- Save the query/logical set.
When you save the logical set, you are saving only the query, not the items returned in this particular search. When the database changes, your query may return different IEs.
Logical Sets - Updating
Data Managers can change both the general information of a set as well as the query criteria.
To update the general information for a logical set:
- On the Manage Sets > Set List page (see Accessing the Manage Sets Page), locate the set you want to change and click Update.
The Set Details page opens. - Modify the fields as described in the table Set Details Page Fields, and click Save.
To update a query for a logical set:
- On the Manage Sets > Set List page, locate the set you want to change and click Results in the corresponding row.
- Edit the search conditions as needed and click Search.
The updated query results show on the Results section of the page. - Once you are satisfied with the query results, click Save to update the logical set query.
Creating an Itemized Set
Itemized sets are comprised of a group of IEs that have been selected through a simple or advanced Rosetta search or through a text file of PIDs prepared by your institution. Both methods are described in the procedure below.
To create an itemized set:
- On the Data Management main menu (see Accessing the Manage Sets Page), above the sets list, click Add Set. The Add Set page opens, step 1 of the Add Set wizard.
Add Set Page
- Select Itemized - based on selected objects, and click Next.
The Set Details page opens.
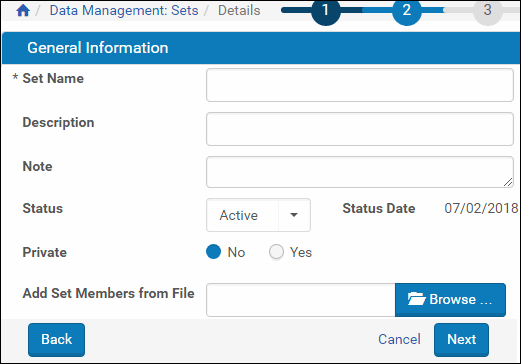
Set Details Page for Itemized Set
- Complete the fields as described in the Set Details table.
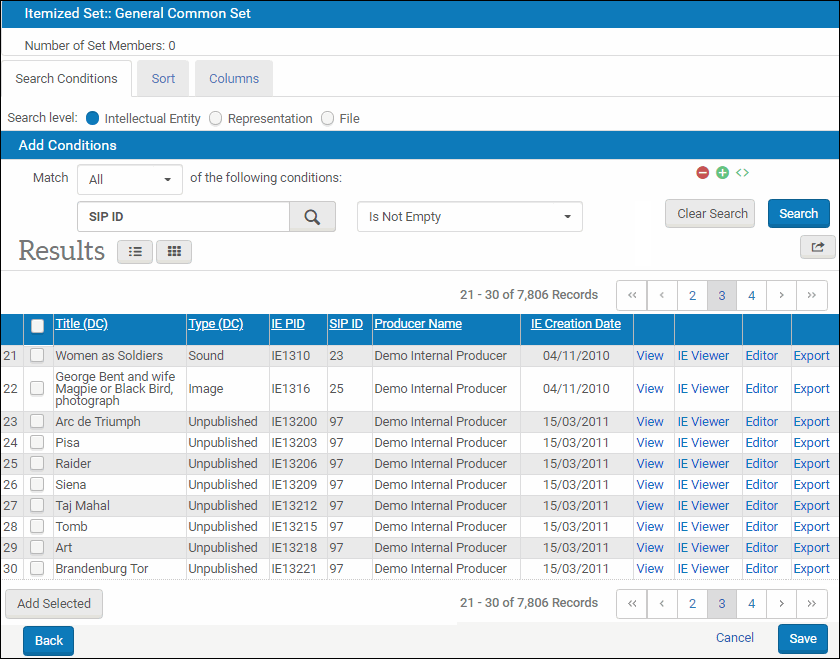
- To search to create a set of items:
- Click the Next button and enter search terms and parameters in the available fields.
- Select the Search level - IE, Representation, or File.
-
Click the Go button.
The system returns matches to your search.
 Set Members Page (Itemized Set)
The table contains the following columns:
Add Set Page Columns Column Description Check boxes
(relevant only for itemized sets, and not present for view-only member sets)Selecting these enables Data Managers to perform an action on multiple items. Title Displays the title of the set member. Type The type of the object. PID Displays the unique deposit number assigned to the set member. SIP ID Displays the unique SIP number assigned to the set member. Producer Name Displays the name of the set member’s Producer. Creation Date Displays the creation date of the set member. View Enables viewing the member using the Rosetta Delivery module. IE Viewer Enables viewing the member using a Web browser. Editor Opens the member in the metadata editor. Export Exports the IE to a zip file. - If the system returns results you want for your set, select the check boxes beside the results, and then click the Add Selected button. If the system returns no items you want for your set, try different search parameters.
- Repeat searches and add selections as necessary.
- When you have your set, click the Save button.
The system saves your set and returns you to the Set List page.
To upload a text file containing the PIDs you want to include in your set, do the following:- Create a .txt file with one PID per line. PIDs should take the form of IE[n], where n is the multi-digit ID. For example, IE2984.
- Click the Browse button of the Add Set Members from File field.
- Browse to the PID text file on your computer, select it, and click Open.
- Click the Next button.
The text file loads, and the system checks for matches in the database. It returns a status message at the top of the Set Members page. - You can remove any items by selecting their check boxes and clicking the Delete Selected button.
- To complete the set, click the Add Members button to open the Simple Search page. From here you can conduct a search for more items or, if you are satisfied with your set, conduct a mock search that will take you to the next page where you can save your set.
- After you save your itemized set, the system returns you to the Set List page, where the new set appears in the list.
Sets can be created and updated using APIs. For more information, see the SDK documentation.
Itemized Sets - Adding Members
Data Managers can add members to the itemized set by performing a search and manually selecting the members or by uploading members from a file. You add members to an itemized set from the Set Members page:

Set Members
Adding Members to an itemized Set by Performing a Search
You can add members to an itemized set by performing a search.
To add members to an itemized set by performing a search:
- From the Set Members page of a new or existing set (see Creating Sets), click the Add Members from Search button.
- Perform a simple or advanced search in the row above the sort selection fields. For details on simple and advanced searching, see Searching and
Reporting For All Staff. The search is limited to items at the same search level as the existing members of the set. - From the results of the search, select the members that you want to add to the set by clicking the members’ check boxes.
- Click Add Selected.
- Click Save.
New members are added to the itemized set. Data Managers can access the members at any time.
Sorting and Displaying the List of Members
From the Sort tab at the top of the List of Members page you can enter up to four levels of sort criteria to sort the list of members. Each sort level can be set as ascending or descending.
From the Columns tab you can select which columns appear in the List of Members table.
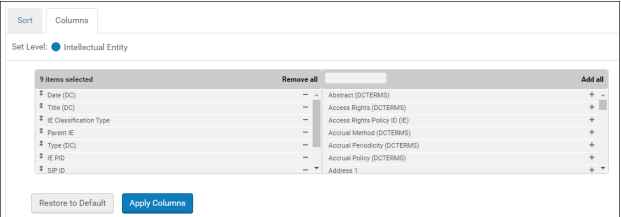
Columns Tab
Additionally, you can select an icon to display the table either as a list or as thumbnails.
Adding Members to an itemized Set by Uploading Members from a File
You can add or delete members to an itemized set by uploading a list of IEs from a file. The file must meet he following conditions:
- Only .txt files are valid (Excel, Word, RTF and all other formats are not supported)
- The PIDs in the file must have the prefix IE, which means:
- IE1433 – valid PID
- 1433 – not a valid PID
- Each PID must be written on a separate line
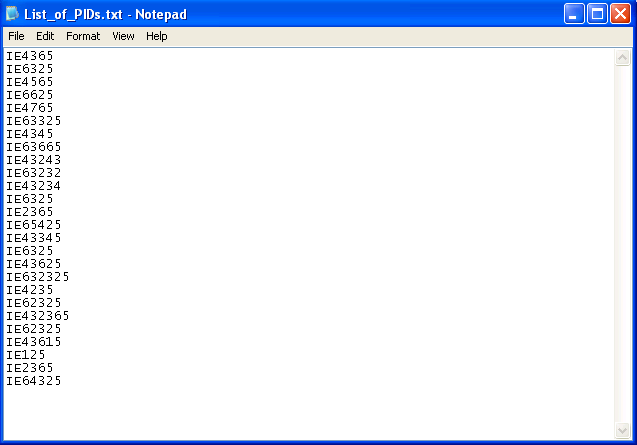
The following is an example of a valid file:
To add members to an itemized set by uploading members from a file:
- From the Set Members page of a new or existing set click the Add Set Members from File button.
- Select a file and click Upload.
New members are added to the itemized set. Data Managers can access the members at any time.
To delete members from an itemized set by uploading members from a file:
- From the Set Members page of a new or existing set click the Delete Set Members from File button.
- Select a file and click Upload.
The members in the file are deleted from the itemized set.
Deleting a Set
Data Managers can delete a set. However, the Rosetta system does not enable Data Managers to delete a set that is scheduled for, or is being used in, a task.
To delete a set:
- On the Manage Sets > Set List page (see Accessing the Manage Sets Page), locate the set that you want to delete and click Delete. The confirmation page opens.
- Click OK.
The set is deleted from the Rosetta system.