
Searching in Rosetta
Home Page
Out-of-the-box, the staff home page contains a summary view of statistics impacting the user, such as the number of SIPs at various stages. Additionally, you have the ability to search for SIPs or IEs or to add a Deposit activity.
For details, see:
Home Page Summary
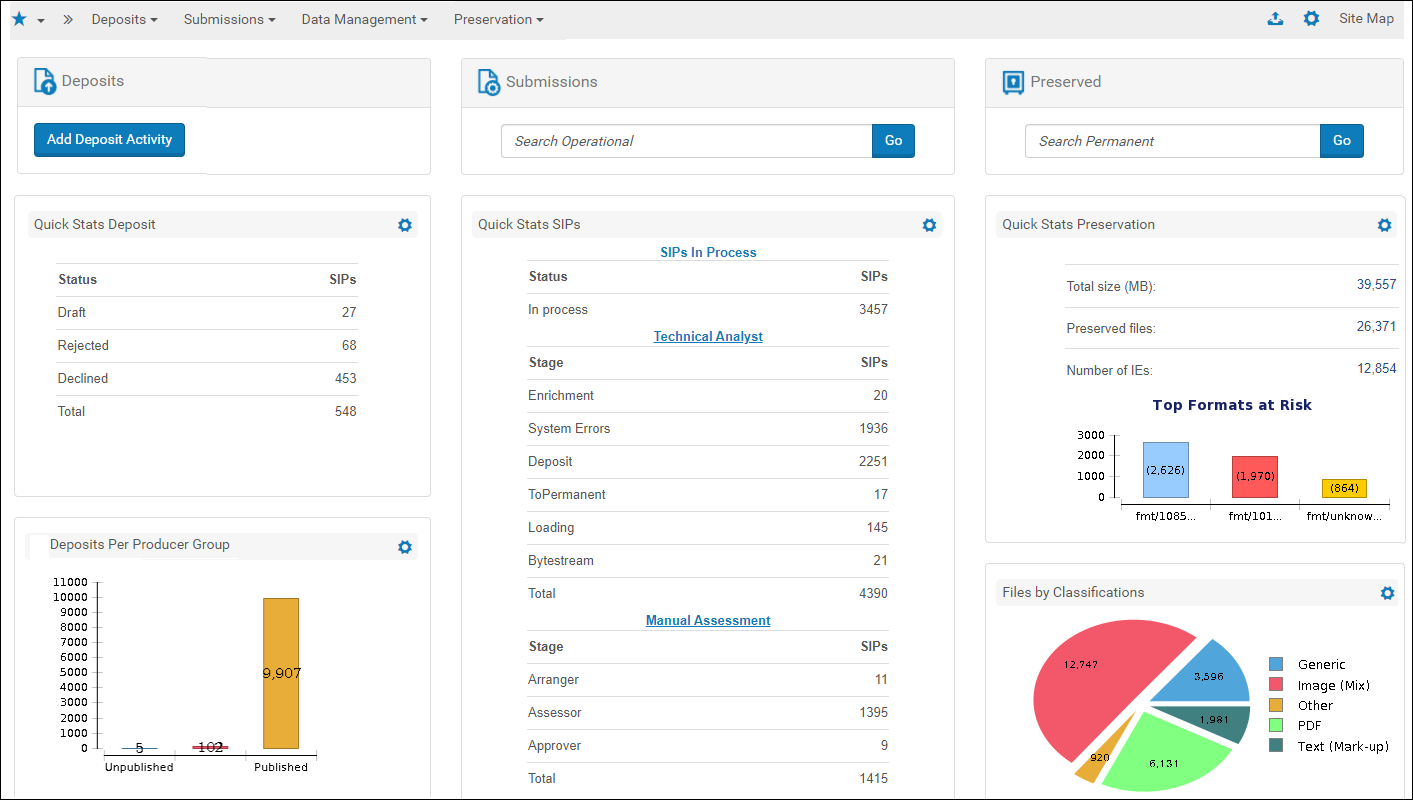 Staff Module Home Page View
If you see a red bar reporting a failed system check, contact your Administrator. For more information, see System Checks of the Rosetta Configuration Guide.
Home Page Customization
You can configure the reports that appear on the home page. To configure the reports that appear, click the Configuration icon next to a report. A list of reports for you to select appears. The following reports are available out-of-the-box:
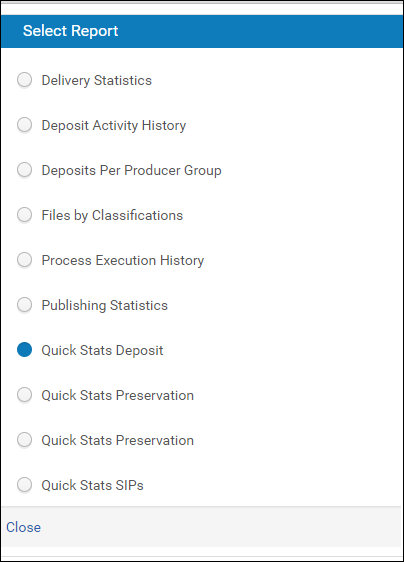
Select Report
Select a report and click Close. The report appears next to the icon you clicked.
You can configure the reports that are available for selection on this page. This is configured on the Birt Management Reports mapping table:
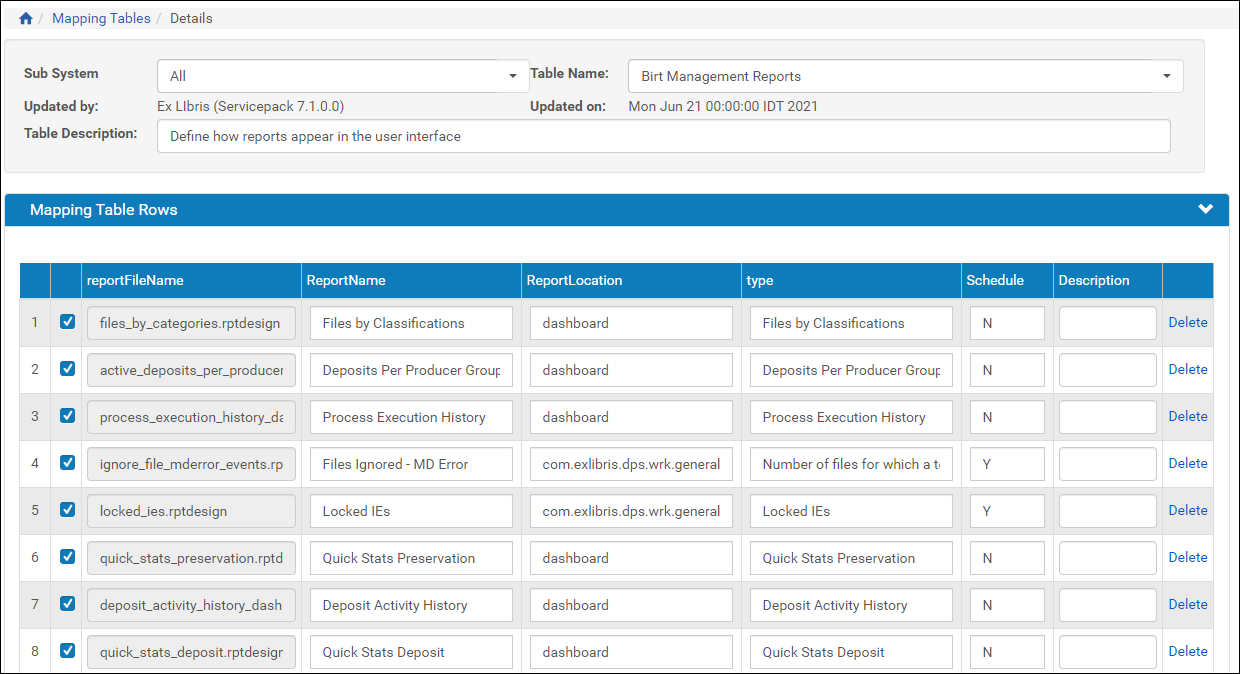
Birt Management Reports Mapping Table
Enter Dashboard in the ReportLocation column for the reports that you want to be available for selection and click Save. For more information on mapping tables, see the Rosetta Configuration Guide, Appendix B: Rosetta Mapping Tables.
Quick Search
Staff can search for objects using the single-field quick search provided on the Home page.
For the quick search under the Submissions heading, users can enter the SIP ID, SIP Title, Deposit ID, or external ID and receive information about the SIP’s status.
For the search under the Preserved heading, users can perform one of three search types on the permanent repository—by PID, SIP ID, or text field. The table below describes the three search types.
| Search By | Description |
|---|---|
| PID | When a user enters a string beginning with IExxxx, REPxxxx, or FLxxxx, and then clicks Go, the quick search by PID is activated, and Rosetta looks for the selected object type (IE/REP/File) based on its PID. If the PID provided by the user is found, the user is redirected to the Web editor to view or work on the object. If the PID does not exist, Rosetta redirects the user to the Advanced Search page, with the quick search criteria transformed to advanced search criteria (PID = IExxxx) and no results displayed. This allows the user to redefine the search criteria. |
| SIP ID | When a user enters a numeric string (SIP ID) into the quick search Find box and clicks the Go button, Rosetta searches for all IEs based on that SIP ID. The Advanced Search page opens with the quick search criteria transformed to advanced search criteria (SIP ID = xxxx) and results displayed on the bottom half of the page (under the Results heading). |
| Text | When a user enters a text string and clicks Go, Rosetta searches for all IEs that match the fields dc:title, dc:description dc:identifier, or dc:creator. The entered text must include a minimum of three characters and may employ an asterisk as a wildcard. |
The above search options are available for the Preserved heading search only. Rosetta activates one of the three types of searches by analyzing the string typed by the user.
PID searches, when successful, return a single IE, Representation, or File in the Wed Editor, as shown below.

Quick Search Results for Found PID
PID searches that fail to find a match return results on an Advanced Search page with the search terms reformatted into a query row (see below). All other searches, whether successful or not, resolve to the Advanced Search page.
Quick Search (PID) to Advanced Search
From here, users can modify their search, add conditions for a complex query, view thumbnails, export results, and sort and configure columns for results displays.
Advanced Search
The advanced search provides flexibility in the degree of complexity and specificity of a search.
See the following sections for details:
- Advanced Search Page Layout
- Advanced Search Conditions
- Field Element Selection
- Nested Search Conditions
- Operators
- Value Field
Advanced Search Page Layout
The Advanced Search page opens following most searches conducted from a Quick Search box (also from the Search for Objects link of the Data Management module).
The page consists of a top portion, where users can hone their search conditions, set sort preferences for results, and specify columns for display in the results (ands to Excel), and a bottom portion, where results are displayed.
Advanced Search Page
Options for searching, saving, exporting, and displaying results are discussed below.
You can resize the columns of the result table, set the number of results that appear on a page, have the results appear in list or thumbnail view (see List or Thumbnail View), and open or close the facets pane. These settings are saved for the next time you log on to Rosetta. For more information, see User Preferences in the Rosetta Overview Guide.
Advanced Search Conditions
For each condition of a search, a row with the field element name, an operator selection, and a value (either text-based or drop-down-list based) appear. To add a row parallel to the existing one, click the green circle button with the plus sign. To add a nested row, click the button with the upper plus sign and lower brackets. To delete a row, click the red circle button with the minus sign.
To set the relationship between the rows, select Any (Boolean OR) or All (Boolean AND) from the Match drop-down menu.
Field Element Selection
Users can select an element on which to search by clicking the icon to the right of the first text field. A complete list of available search fields opens. (See below.)
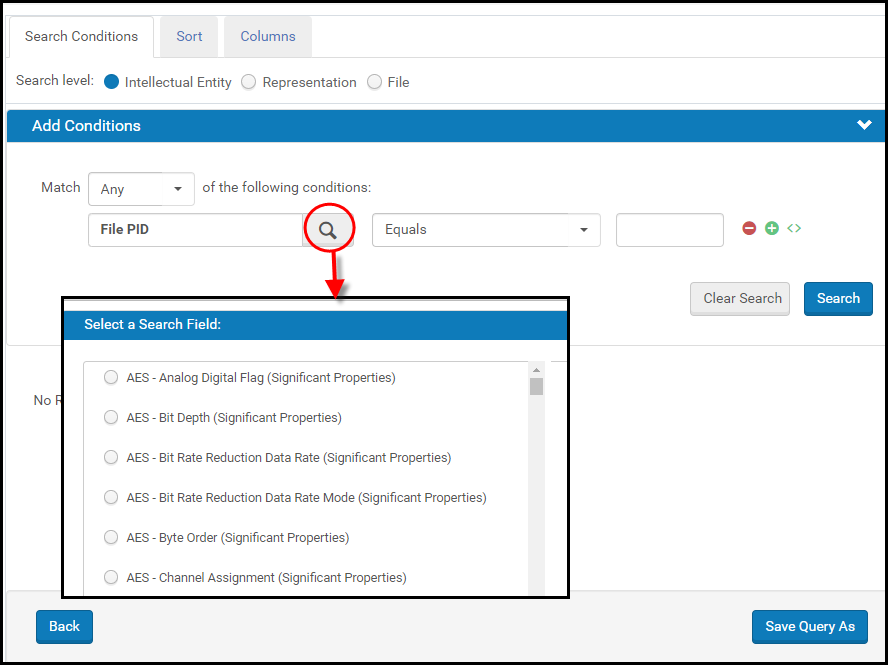
Select from all available fields
Alternatively, users can type a search field name directly in the text box, and the system will suggest matches in a drop-down list. Matches contain the same string as the user types but they do not necessarily begin with the same letters, as shown below. The user can continue typing or select a match from the dynamic list.
Auto-fill Element Field
Nested Search Conditions
Users can implement nested search conditions. For each block in the nested search, the user defines (using the All or Any UI operator) whether all the conditions in that block must be true (equivalent to the SQL AND operand) or whether, of the different search conditions, only one (or more) must be true (equivalent to the SQL OR operand). The number of nested blocks is limited to five. The operand between two (or more) rows in the same block is always AND.

Nested Conditions
Operators
Operators are determined by their elements. The following are the most common operators.
- Equals: exact match on word or phrase in value field (alternate: Not Equals)
- < : less/earlier/older than the date in the value field (variants: Before and <= for less than or equal to)
- > : greater/later/more recent than the date in the value field (variants: After and >= for greater than or equal to)
- Contains: all of the items in the value field are present but in no particular order (variants: Contains Keyword and Contains Phrase)
- Does not contain (variants: keywords, phrase): Contains none of the terms in the value field.
- Starts With: result begins with item(s) in the value field
- IsEmpty: field is empty.
- IsNotEmpty: field is not empty.
For more information about options you can use to make your search more precise, see Value Field.
Value Field
To the right of each operator drop-down list is a field for entering the value that restricts your search. The type of data that you enter in the value field is determined by the conditions you selected. Date selections, for example, produce date entries and/ or drop-down calendars in the value field.
To make your search more precise, you can use the following features when defining a value in the Value field:
| Feature | Description |
|---|---|
| Cross-Object Query | Search for one type of object using query criteria from another type. For example, you can search for IEs that have PDF files. |
| Wildcard | Use the following wildcard characters when the value is text and you want to define a pattern:
|
Search Results Features and Options
Rosetta provides several options for viewing information in the Results area of the Search page:
List or Thumbnail View
Search results can be viewed as a detailed list or as thumbnails:

Search Results List View

Search Results Thumbnail View
Sort By
All single-value elements can be configured as sortable. Four sorts can be configured in order of priority. Once an element has been selected for sorting, it no longer appears in the list of available elements.
If more than one instance of an element occurs in a single record (for example, two Creators, A and B), Rosetta uses only the first value (A) for the sort on Creator. (Both A and B are used in a search of the Creator element, but the results are sortable by A only.)
Users enter the elements and their sort priority on the Sort tab of the Search page (see below)

Sort Fields Auto-complete Drop-Down Menu
To choose an element, users type the beginning of the element into the Sort By field, then select the full element name from the auto-complete drop-down list that opens. All elements, whether visible in the Results pane or not, are available for sorting.
Users can select ascending or descending order for each element.
Select Save Sort Preferences to have Rosetta remember your sort preferences for the next time you log on.
Clicking the Apply Sort button sorts the results in the priority and order specified in the top portion of the page.
Column Display
Because all AIP elements are indexed and searchable, the Search Results page can be configured to display any of the elements. By default, the following elements are displayed in the search results according to the object type of the search:
For IE s and representations:
- Title
- Type
- PID
- SIP ID
- Producer
- Creation Date
For files:
- PID
- File Format
- File Extension
- Mime Type
- File Size
To change the items displayed in the search results table:
- Click the Columns tab at the top of the page.
Two boxes open in the top section of the page. The box on the left lists items currently displaying in the search results. The box on the right contains a text field and lists all items that are available - Delete any items you don’t want to view in the left box by clicking the minus sign next to the element.
The element moves to the right-side box and will not display as a column in the results. - To add an element for display, type the first few letters of the element in the text field of the box on the right.
 Preparing Columns for Custom Results Display
The system auto-completes with matches in the rows below the text box.
- Click the plus sign beside any element you want to add to the list.
The element moves from the right-side box to the left-side box, indicating that it will be displayed as a column in the results. - Repeat moving elements from left to right and right to left until all the elements you want to display as columns appear in the left box, and any items you don’t want to display do not appear in the left column.
- Click the Apply Columns button to view your search results with the custom elements displayed. (To return to the default list of columns, click the Restore to Default button.)
When the page refreshes, your new columns display information from the objects returned in your search. Your selections are saved across all institutions.
Facets
Search results can be grouped and filtered using facets, which are attributes of items returned in a search. Facets allow you to narrow results according to shared characteristics of records.
When a search returns too many results, use the facets feature in the left column of the page (below).

Facets on the Search Results Page
When you click the down arrow in the Refine Results box, available facets appear in a drop-down list (see below).

Facets List
For every facet selected, Rosetta returns a list of values and the number of returned items that share that value (see below).

Search Results with Facets
The Refine Results attributes (for example, Event Identifier Value in the figure above) display up to five values with an option to See All. The numbers in parentheses indicate how many records match that attribute value. To show only those records matching a specific value, click the check box for that value. The page reloads showing only those items from the facet you selected (see below).

Facet 27 Selected
For a facet with more than five values, the five values with the most records display in the Refine Results column under that facet’s heading. To see all of the facet’s values, or to select more than one value to be returned from the group, click See All and select the values from the light box (see below).
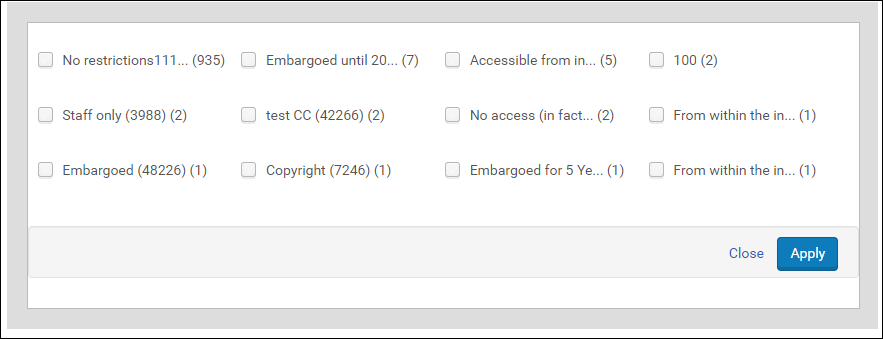
Facets “See All” Lightbox
Each search results page can have no more than four facets at one time. To remove a facet from your results, click the red circle with the minus sign beside the facet name. To remove all facets from your search results, click the Clean Facets button.
The list of available attributes is currently fixed and cannot be customized.
Actions
Users can click any of the action-oriented text links in the row of the item they want to work with.
Clicking View delivers the object using delivery rules, simulating an end-user's delivery request.
Clicking IE Viewer makes the system open the General IE Viewer using the default representation profile without going through the rules.
Clicking Editor opens the object in the Web editor.
Clicking Export generates an export process and prompts the user for the export path and other export task-related parameters.
If the enforce_ar_export general parameter is set to true, Access Rights will be enforced during export. Certain representations, or the entire IE, may not be exported, in accordance with the IE/REP AR policies.
Export to Excel
Users can export search results into Excel by clicking the export to Excel icon at the top of the Results section. The page reloads with a text message at the top of the page:
Your query will be exported to "/exlibris/dps/d4_1/profile/operational_shared/staff_work_area/admin1/export/queries/Query List 2017-06-15 09.49.29.csv". You can also click the Download button to download the file locally.
In addition to downloading the file to the server, you can click Download to download the excel locally.
The exported Excel spreadsheet includes the same columns and information that appear on the UI. This information is configurable (see Column Display).