
Submission Jobs
About Submission Jobs
Submission jobs are used to submit Producer content (per material flow) at specified intervals to the Deposit server for automated deposits.
- You can prevent the submission job from processing a folder. (This can be useful if you do not want it to be loaded prematurely.) To do so, create an empty file in the submission job folder and name it locked (or .locked).
- While processing a folder, the submission job adds a locked file.
- After a folder has been successfully processed, the submission job adds a done file. Folders with done files are not processed by the submission job. You can create a cron job to clean up these folders.
- After a folder has been unsuccessfully processed, the submission job adds an error file. Folders with error files are reprocessed by the submission job (and should not be deleted). Users can use this file to identify problematic submission folders.
Managing Submission Jobs
The Manage Scheduled Jobs page enables Negotiators to schedule submission jobs. To access this page, follow the Rosetta drop-down menu path: Deposits > Jobs > Submission Job.
The Manage Scheduled Jobs page opens to existing submission jobs:
Manage Scheduled Jobs (Submission Jobs List)
The following information appears on this page:
- Name – the name of the submission job
- Previous Fire Time – the last time the job ran
- Next Fire Time – the next time the job is scheduled to run
- Frequency – the frequency with which the job runs
- State – the state of the job, for example, Normal, Not Running, etc.
- Producer – the Producer who created the job
- Material Flow – the material flow with which the job is associated
This page enables Negotiators to monitor the status of each submission job and perform the following tasks: - Add a new job – For more information, see Adding a Submission Job.
- View a job’s history – Click the History link to display a list of times the job ran. For more information, see Viewing Submission Job History
- Modify a job – For more information, see Modifying a Submission Job.
- Execute a job – Click the Run Now link to run a job manually.
- Duplicate a job – Click Duplicate to create a copy of the job.
In addition, you can cancel a job. For more information, see Canceling a Submission Job.
Viewing Submission Job History
You can view the history of submission jobs.
To view the history of submission jobs:
From the Manage Scheduled Jobs page, click the History link for a job. The Submission Job History page opens:
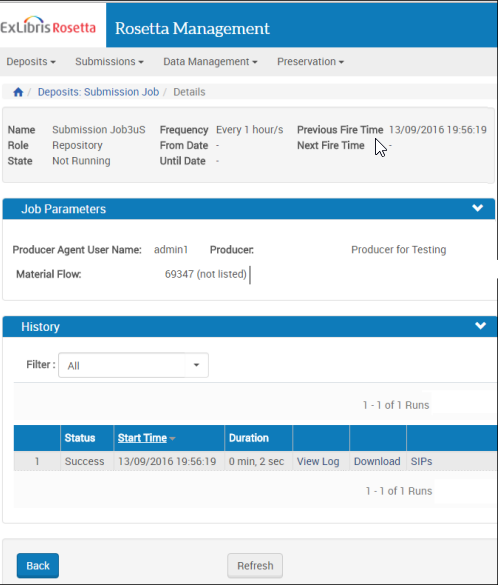
Submission Job History
A list of times the job ran is displayed. The following actions are available:
- Click View Log to see the log of the job. For example:

Submission Job History Log - Click Download to download the job log.
- Click SIPs to display a report of SIPs generated by the job.
Adding a Submission Job
This task allows Negotiators to create a new submission job for a material flow.
To add a submission job:
- Click the Add job button on the Manage Scheduled Jobs page.
The Job Details page opens.
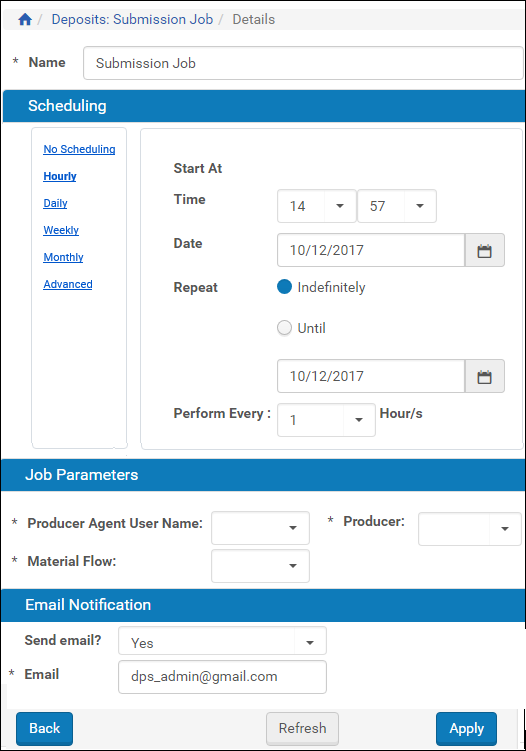
Job Details (Submission Job)
- Enter a name for the submission job in the Name field.
- Select the interval at which to execute the job: No Scheduling, Hourly, Daily, Weekly, Monthly, and Advanced.
- To configure hourly, daily, weekly, and monthly intervals:
- Use the following table to configure the common interval fields:
Common Interval Fields Section Field Description Start At Time Select the hour and minutes from the drop-down fields to specify the time at which to run the job. Date Use the calendar tool or select the month, day, and year from the drop-down fields to select the date at which to start running the job. Repeat Indefinitely Select this option to run the job indefinitely. Until Select the month, day, and year from the drop-down fields to specify the date at which to stop running the job. After this date, the state of the job will change from Normal to Not Running. - Use the following table to configure the interval-specific fields:
For information on how to configure advanced intervals, see Configuring Advanced Job Schedules.Interval-Specific Fields Type of Interval Perform this task: Description Hourly Every Select the hourly interval from the Hours drop-down field. Weekly Week days Select which days of the week to run this job. Monthly Monthly At Select the day of the month to run this job.
- Use the following table to configure the common interval fields:
- Complete the required fields in the Job Parameters pane.
Note: The list of available material flows will be populated based on the selected producer's profile. - From the Send Email? drop-down list, you have the following options:
- No (default)
- Yes (if there was work)
- On failure only
The email contains a report/log file for the job.
- Click the Apply button to add the job to the list of submission jobs.
Modifying a Submission Job
This task allows Negotiators to modify the details for an existing submission job.
To modify a submission job:
- On the Manage Scheduled Jobs page, click the Update link next to the job that you want to modify.
The Job Details page opens. - Select the interval at which to execute the job: No Scheduling, Hourly, Daily, Weekly, Monthly, and Advanced.
- To configure hourly, daily, weekly, and monthly intervals:
- Use the following table to configure the common interval fields:
Common Interval Fields Section Field Description Start At Time Select the hour and minutes from the drop-down fields to specify the time at which to run the job. Date Use the calendar tool or select the month, day, and year from the drop-down fields to select the date at which to start running the job. Repeat Indefinitely Select this option to run the job indefinitely. Until Select the month, day, and year from the drop-down fields to specify the date at which to stop running the job. After this date, the state of the job will change from Normal to Not Running. - Use the following table to configure the interval-specific fields:
For information on how to configure advanced intervals, see Configuring Advanced Job Schedules.Interval-Specific Fields Type of Interval Perform this task: Description Hourly Every Select the hourly interval from the Hours drop-down field. Weekly Week days Select which days of the week to run this job. Monthly Monthly At Select the day of the month to run this job.
- Use the following table to configure the common interval fields:
- Complete the required fields in the Job Parameters pane.
- Click the Apply button to add the job to the list of submission jobs.
Canceling a Submission Job
Canceling a job allows the Negotiator to postpone the execution of job indefinitely without deleting it from the system.
The Unschedule option will not be available when the state of the job is Not Running.
To cancel a submission job:
- On the Manage Scheduled Jobs page, click the Edit link next to the job that you want to modify.
The Job Details page opens. - Click the Unschedule button.
The state of the job should change to Not Running.