
EDI vendor code not does not match Voyager vendor code
- Article Type: General
- Product: Voyager
- Product Version: all
Problem Symptoms:
When attempting to process incoming EDI messages, receive following error:
"The EDI vendor code of this message is not associated with a Voyager vendor code.
So the message can not be loaded into database!"
Related Symptoms:
"Could not retrieve vendor information!" pop-up in Acquisitions.
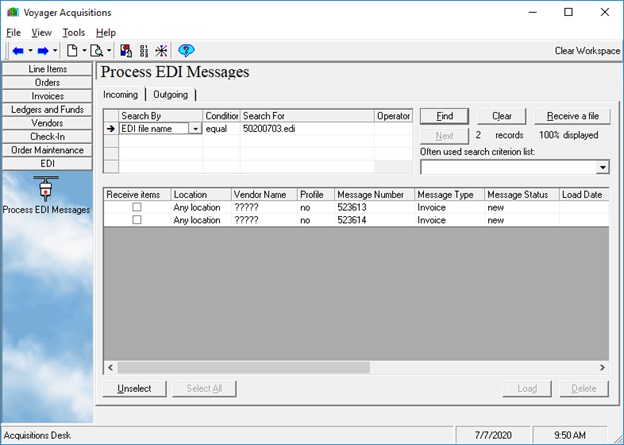
When received, the Vendor Name field says '?????' and the Profile column says 'no':
Cause:
Vendor envelope address in the incoming EDI message does not match any existing EDI Connection Profile
Resolution:
Check the address segment in the file and verify it matches an existing EDI Connection Profile
1. On server, navigate to /m1/voyager/xxxdb/edi/incoming
2. Look at beginning of relevant EDI message; note line that looks similar to this example:
UNB+UNOC:2+123456789:14+EXLIBRIS:92+990321:1417+0001'
3. Note the envelope addresses in the message (in this example, Vendor Envelope Address is "123456789:14", and Library Envelope Address is "EXLIBRIS:92")
4. In Acquisitions > Vendors > Search EDI Connection Profiles, find profile for the vendor in question; click Edit
5. Ensure Library Envelope Address and Vendor Envelope Address in the Connection Profile match the codes in EDI message (from step 2 & 3)
6. Re-load the file
OR:
Add a new EDI Connection Profile that matches on the fly
1. Look at the line from when you received the file; the Profile column will say 'no' (because the incoming file failed to match an existing EDI Connection Profile)
2. Click on the right side of the Profile column and a box with an ellipsis [...] will appear; click it
3. A New EDI Connection Profile, pre-populated with the Library and Vendor Envelope Addresses that were contained in the incoming file, will appear
4. Search for the Vendor that should be associated with this incoming invoice/EDI Connection Profile to populate the Vendor Code field
5. Select appropriate Library Location (or leave at default Any Location)
6. Check off all of the appropriate boxes under Usage (invoices as well as any other types of EDI that you plan to do with this vendor) and Save
7. Re-load the file
Category: Acquisitions
- Article last edited: 06-Jan-2020