
Overview of Processing Locations in the Voyager Reporter Module
- Product: Voyager
- Relevant for Installation Type: Multi-Tenant Direct, Dedicated-Direct, Local, TotalCare
Question
Overview of Processing Locations in the Voyager Reporter Module.
Answer
1. The first time you log into Voyager Reporter go to the File Menu> Preferences> Global Tab> Processing Location and double-check that the correct Processing Location is selected (Circulation location for Circulation notices/reports, Cataloging location for Cataloging notices/reports, or Acquisitions location for Acquisitions notices/reports).
2. The "Print Locations" set up in the Voyager System Administration client are used as the "Processing Locations" in Voyager Reporter. Voyager Reporter will remember the default Print Location (aka Processing Location) preference on the computer, but you can switch between Print Locations (if you need to) by going to the File Menu> Preferences> Global Tab> and change the Processing Location in the dropdown.
For example:
- If you have just one library (and no branch locations), changing between print locations to process all of your Circulation notices won't be necessary; however, a library with multiple branches that mails all print notices from the same office might need to do this.
- If your cataloger and circulation supervisor is the same person (same department), that person may want to run the notices/reports for both Circulation and Cataloging from the same computer, and as such will need to switch between Print Locations (Processing Locations).
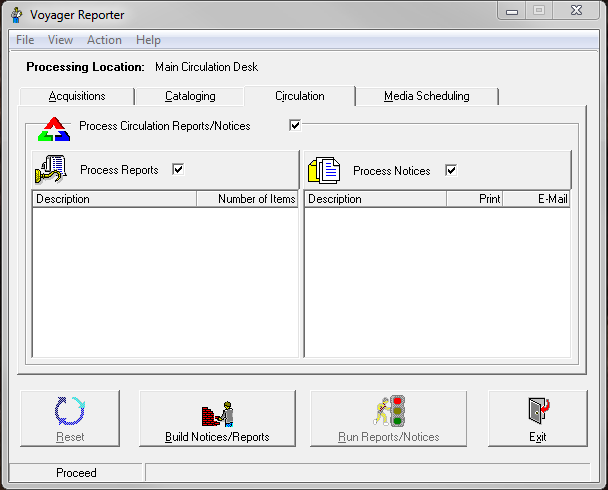
3. When you log into the Reporter client, click on the Reports/Notices Tab for your preferred Voyager client (Circulation, Cataloging, Acquisitions, or Media Scheduling).
- Notice how the “Process [Client Name] Reports/Notices” checkbox is checked for all clients by default.
- If this checkbox is checked, Voyager Reporter will check for notices or reports for that Voyager client that stored for your selected “Processing Location”.
4. Look beneath the “Process [Client Name] Notices/Reports” checkbox for two separate checkboxes for “Process Reports” and “Process Notices”. These checkboxes determine which data will be pulled from the server.
- If your library wants to generate BOTH Reports and Notices at the same time, have both boxes checked.
- If your library wants to generate EITHER Reports OR Notices with this login, and generate the other later in the day, check the appropriate box for what you want to generate now.
Additional Information
See: Overview of generating reports and notices via Reporter
- Article last edited: 23-Jul-2020