
Understanding the Voyager Preview Server
Table of Contents:
- Introduction
- Requirements
- Installing the Local Client Preview Server
- Remote OPAC Preview Server
- Local OPAC Preview Server
- Installing Voyager Skins
- Managing the Local OPAC Preview Server
- Customizing the Local OPAC Preview Server
- Stopping the Local OPAC Preview Server
- Uninstalling the Local OPAC Preview Server
- Appendix A - Changing the Default Port for Preview Server
Introduction
Preview Server is available for customers to view a preview of the new features of Voyager before upgrading to a new software release or version.
There are three types of Preview Server:
-
Local Client Preview Server – You can test the Voyager clients of the latest voyager release by downloading the clients from the documentation center. You are able to see all of the client feature updates and enhancements. If there is a client feature that depends on server side changes, those features are not enabled. This is to ensure that customers experience the functionality of the software without special customizations for any specific institution or workflow. Also, your changes might not remain in the Ex Libris environment for the duration of your testing. If at any point a refresh of the preview server is required, this refresh may be performed without notice.
-
Remote OPAC Preview Server – Using an environment that is setup and hosted by Ex Libris, you can connect your browser to an Ex Libris provided URL to preview the basic functionality of the OPAC. You cannot make any changes to the display of the OPAC and you cannot preview the OPAC’s extensive feature set. With this option, you can see what changes have been made out‐of‐the‐box for the new release. You can compare the new version of the OPAC with what is available in your installation using an unmodified skin.
-
Local OPAC Preview Server – If you are primarily interested in making customization changes to the OPAC in preparations for your Voyager upgrade, use the local OPAC Preview Server installation. The local preview server installation is the third component of preview server and allows you to test the OPAC in a local setting prior to the upgrade. This option gives you access to the XSL, CSS, and configuration files necessary to making changes to the look and feel of the OPAC. This feature can be valuable and reduce the stress of going through the Voyage upgrade process by making the necessary changes to the OPAC skins prior to your upgrade date. When you upgrade, you can then copy the skins from the preview server into your production environment. This feature can be particularly useful if you do not have a test server environment to receive the latest version prior to your production environment upgrade.
This document explains how to connect to these three options so that you can test the new features and prepare for your upgrade.
Requirements
Browser Requirements
For browser requirements to use the Remote OPAC Preview Server and the Local OPAC Preview Server, refer to the Voyager Installation and Upgrade Requirements document.
System Requirements
Refer to the Voyager Installation and Upgrade Requirements document for the minimum requirements for installing the Voyager clients on your PC.
If you already have Voyager clients on your local PC, be sure to install these clients in a different location – do not overwrite your current production clients.
Local Preview Server Requirements
The Voyager Installation and Upgrade Requirements document contains the packages necessary to run the local OPAC and Client Preview Servers. Ensure that your system has all of the system packages for your Voyager serverʹs operating system and that all requirements have been met.
Local OPAC Preview Server Requirements
-
Outbound access to downloads-na.hosted.exlibrisgroup.com port 10022 must be configured on the server in order to download the Preview Server package, and other Voyager products.
-
Outbound access to preview1.hosted.exlibrisgroup.com and preview server ports 9814 and 9914 must be configured on the server.
-
One (1) external port (by default 7098) is required for WebVoyáge and Skin Administration. Ensure that this port is available through your firewall. For information on changing the default port, see Appendix A: Changing the Default Port for Preview Server.
-
Root access is not required for this installation
Installing the Local Client Preview Server
-
Download and install the clients from the Documentation Center. (For more information on how to download and install the Voyager clients, refer to the Voyager Technical Userʹs Guide.)
-
Modify the Voyager.ini file located at C:\PreviewVoyager with the following information:
[Cataloging]
Server=preview1.hosted.exlibrisgroup.com
Port=9810
Timeout=60
[Acquisitions]
Server=preview1.hosted.exlibrisgroup.com
Port=9820
Timeout=60
[Circulation]
Server=preview1.hosted.exlibrisgroup.com
Port=9830
Timeout=60
ChargeTimeout=60
[Reports]
Server=preview1.hosted.exlibrisgroup.com
Port=9840
Timeout=60
[SysAdmin]
Server=preview1.hosted.exlibrisgroup.com
Port=9850
Timeout=60
[CallSlip]
Server=preview1.hosted.exlibrisgroup.com
Port=9880
Timeout=60
[MediaScheduling]
Server=preview1.hosted.exlibrisgroup.com
Port=9885
Timeout=60
[GlobalDataChange]
Server=preview1.hosted.exlibrisgroup.com
Port=9815
Timeout=60000
[GlobalLog]
SingleLogin=Y
Encrypt=N
ServerSortList=Y
ASCIISortList=Y
ASCIISortColumn=Y
[SearchURI]
#Name=Barn&esNoble
#URI=http://search.barnesandnoble.com
#Copy=Y
#SearchSyntax=/booksearch/results.asp?WRD=<searchtext>
#Name=WebVoyage
#URI=http://preview1.hosted.exlibrisgroup.com/
#Copy=Y
#SearchSyntax=/vwebv/search?searchArg=&searchCode=TALL&limitTo=none&recCount=10&searchType=0
#Name=Amazon
#URI=http://www.amazon.com
#ECopy=Y
#SearchSyntax=/exec/obidos/external-search?keyword=<searchtext>&mode=blended
#Name=Worldcat
#URI=http://www.worldcat.org/
#Copy=Y
#SearchSyntax=search?&q=
#Name=Google
#URI=http://www.google.com/
#Copy=Y
#SearchSyntax=search?&q=
[MARC POSTing]
#Classic WebVoyage
#WebVoyage="http://preview1.hosted.exlibrisgroup.com/cgi-bin/Pbibredirect.cgi"
#Tomcat WebVoyage
WebVoyage="http://preview1.hosted.exlibrisgroup.com/vwebv/holdingsInfo"
#Classic WebVoyage
#LinkResolver="http://preview1.hosted.exlibrisgroup.com/cgi-bin/Phttplinkresolver.cgi" -
Run the clients by navigating to the directory where you installed them. (The default location is C:\PreviewVoyager\). Double‐click the Voyager modules that you selected during installation.
Remote OPAC Preview Server
-
Enter the following URL into the browser address bar:
http://preview1.hosted.exlibrisgroup.com:9808 -
Enter the following username and password when you are prompted:
User: preview
Pass: (Open a case with Support to obtain username and password information.) -
If you want to log on as a patron, enter the following barcode and last name:
Barcode: 2692
Last Name: Hayes
Local OPAC Preview Server
Note: If you host your Voyager server, you must open up the firewall outbound to downloads-na.hosted.exlibrisgroup.com port 10022 before proceeding.
-
Download the Preview Server package.
-
Log on to your voyager server as the voyager user.
-
Change in to the /m1/incoming directory:
cd /m1/incoming -
Download the getvoyager tool, which you will use to download the Preview Server package:
$ wget https://knowledge.exlibrisgroup.com/@api/deki/files/107291/getvoyager.sfx
--2021-04-28 11:55:59-- https://knowledge.exlibrisgroup.com/@api/deki/files/107291/getvoyager.sfx
Resolving knowledge.exlibrisgroup.com (knowledge.exlibrisgroup.com)... 13.226.13.80, 13.226.13.103, 13.226.13.74, ...
Connecting to knowledge.exlibrisgroup.com (knowledge.exlibrisgroup.com)|13.226.13.80|:443... connected.
HTTP request sent, awaiting response... 302 Moved Temporarily
Location: https://files.mtstatic.com/site_11811/107291/2?Expires=1619632550&Signature=GbC76SqcAlM8ONfSvtJ1jrBCWY6~YCBx5y77Fdh0C2AwqMBxJhnL1egz4JFbFId2YHMwFGdJmqUD9fLDysQmAsW0UmoN6Sf6Wuz2VLskenFCb5fJUg3eMwU861SoSfbxKi93tzf3YK-aD6PMkUYT-NPbEwCRnbG4siZomwLNi9s_&Key-Pair-Id=APKAJ5Y6AV4GI7A555NA [following]
--2021-04-28 11:55:59-- https://files.mtstatic.com/site_11811/107291/2?Expires=1619632550&Signature=GbC76SqcAlM8ONfSvtJ1jrBCWY6~YCBx5y77Fdh0C2AwqMBxJhnL1egz4JFbFId2YHMwFGdJmqUD9fLDysQmAsW0UmoN6Sf6Wuz2VLskenFCb5fJUg3eMwU861SoSfbxKi93tzf3YK-aD6PMkUYT-NPbEwCRnbG4siZomwLNi9s_&Key-Pair-Id=APKAJ5Y6AV4GI7A555NA
Resolving files.mtstatic.com (files.mtstatic.com)... 13.226.13.7, 13.226.13.103, 13.226.13.20, ...
Connecting to files.mtstatic.com (files.mtstatic.com)|13.226.13.7|:443... connected.
HTTP request sent, awaiting response... 200 OK
Length: 2669843 (2.5M) [application/octet-stream]
Saving to: ‘getvoyager.sfx’
100%[==========================================================================================>] 2,669,843 --.-K/s in 0.09s
2021-04-28 11:56:00 (28.3 MB/s) - ‘getvoyager.sfx’ saved [2669843/2669843] -
Use the getvoyager.sfx tool to get the Preview Server package:
$ ksh getvoyager.sfx preview
Extracting GetVoyager starting line 20
Finding best way to connect to Ex Libris
Testing connection to sftp://downloads-na.hosted.exlibrisgroup.com:10022 OK
Writing /preview/VOY1030/Linux/preview1030_install_Linux to /m1/incoming
% Total % Received % Xferd Average Speed Time Time Time Current
Dload Upload Total Spent Left Speed
100 233M 100 233M 0 0 365k 0 0:10:54 0:10:54 --:--:-- 365k
-
-
Install the Preview server package:
-
Log on to your voyager server as the voyager user
-
Change in to the /m1/incoming directory
cd /m1/incoming -
Run the Preview Server installer
ksh preview1030_install_Linux -
Confirm where you want to install the package. The default is /m1/incoming. You may press Enter to accept the default.
Where do you wish to install? [/m1/incoming] -
Confirm where Voyager is installed. The default it /m1/voyager. You may press Enter to accept the default.
Where is voyager located? [/m1/voyager] -
Confirm the port which Preview Server uses. The default is 7098. Press Enter to accept the default. If you wish to change it after installation, see Appendix A: Changing the Default Port for Preview Server.
What is the web port for preview? [7098] -
The installer will summarize your choices. If you wish to change something, type N to cancel the installation. Press Y to continue.
Checking for the following ports availability:
7098
7093
7092
------------------------------------------------
Ports: 7098 7093 7092 : OK
###########################################################
Installing to: /m1/incoming/PREVOY1030
Current Voyager: /m1/voyager
Preview Server Port: 7098
########################################################### -
The installer does initial installation and configuration.
Checking for required files..........OK
Checking install space...............OK
Creating Install Directory...........OK
Extracting files, please be patient..OK
Configuring Preview Directory........OK
Creating mock xxxdb skins............OKIf there are any errors, uninstall the local OPAC Preview Server and re‐ execute preview1030_install. For information on uninstalling the local OPAC Preview Server, see Uninstalling the Local OPAC Preview Server.
-
The Preview Server installer will offer to update each of your custom Tomcat skins for the new release. Press Enter to convert each skin or N if you don't wish to convert the skin. See Installing Voyager Skins for a discussion of the conversion.
Shall I try to automatically convert big1000db skin en_US Y/N [Y]
Attempting to convert skin big1000db en_US to 2010.3.0
Extracting skin catalog....
Creating new skin /m1/incoming/PREVOY1030/tomcat/vwebv/context/vwebv/ui/bigdb-en_US-2010.3.0
Converted skin saved to /m1/incoming/PREVOY1030/tomcat/vwebv/context/vwebv/ui/bigdb-en_US-2010.3.0
Shall I try to automatically convert voydb skin today Y/N [Y] n
Shall I try to automatically convert voydb skin amy Y/N [Y]
Attempting to convert skin voydb amy to 2010.3.0
Creating new skin /m1/incoming/PREVOY1030/tomcat/vwebv/context/vwebv/ui/voydb-amy-2010.3.0
Converted skin saved to /m1/incoming/PREVOY1030/tomcat/vwebv/context/vwebv/ui/voydb-amy-2010.3.0 -
The updater may not be able to handle all of your customizations. When this happens, the old custom file will remain in place. See Installing Voyager Skins for further discussion.
Attempting to convert skin voydb mySkin to 2010.3.0
Creating new skin /m1/incoming/PREVOY1030/tomcat/vwebv/context/vwebv/ui/voydb-mySkin-2010.3.0
xsl/contentLayout/configs/displaycfg.xml appears to be based on v2008.2.0 . We weren't able to completely update it to version 2010.3.0
Hunk #8 FAILED at 586.
1 out of 8 hunks FAILED -- saving rejects to file xsl/contentLayout/configs/displaycfg.xml.rej
============================================================
Review the file xsl/contentLayout/configs/displaycfg.xml.rej
for a list of customizations that we couldn't automatically
make. Manually apply these customizations to
xsl/contentLayout/configs/displaycfg.xml_autocustomized
Then copy it back to xsl/contentLayout/configs/displaycfg.xml
============================================================
Converted skin saved to /m1/incoming/PREVOY1030/tomcat/vwebv/context/vwebv/ui/voydb-mySkin-2010.3.0 -
When the installer is complete, it will print the following:
##############################
To start preview server:
/m1/incoming/PREVOY1030/preview.ksh start
To stop preview server:
/m1/incoming/PREVOY1030/preview.ksh stop
##############################
##############################
Install Complete
##############################
-
Installing Voyager Skins
The preview server installer provides the option to generate an auto‐customized version of the newest Voyager skins for you. The new skin is named <xxxdb name>-<Skin Name>-<Voyager Release> and placed in /m1/incoming/PREVOY1030/tomcat/vwebv/context/vwebv/ui with the template skins and uncustomized skins that the preview server has created.
During the automatic customization process, any new skin files are added to your skin. Skin files that you have not customized are replaced with the newest version of those files.
The skin converter tries to isolate your customizations and apply them to the new skin files. Note that this is not a consistently successful process. More information about this is provided later in this section.
See below for an example skin customization session.
Creating mock xxxdb skins............OK
Shall I try to automatically convert xxxdb skin en_US Y/N [Y]
Attempting to convert skin xxxdb en_US to 2010.3.0
Extracting skin catalog....
Creating new skin /m1/incoming/PREVOY1030/tomcat/vwebv/context/vwebv/ui/xxxdb-en_US-2010.3.0
htdocs/help/index.html appears to be based on v2007.0.4 . We weren't able to completely update it to version 2010.3.0
Hunk #1 FAILED at 139.
1 out of 1 hunk FAILED -- saving rejects to file htdocs/help/index.html.rej
============================================================
Review the file htdocs/help/index.html.rej
for a list of customizations that we couldn't automatically
make. Manually apply these customizations to
htdocs/help/index.html_autocustomized
Then copy it back to htdocs/help/index.html
============================================================
webvoyage.properties -- Attempting semantic update.
xsl/contentLayout/configs/displaycfg.xml appears to be based on v2007.1.0 . We weren't able to completely update it to version 2010.3.0
Hunk #1 FAILED at 35.
Hunk #5 FAILED at 155.
2 out of 9 hunks FAILED -- saving rejects to file xsl/contentLayout/configs/displaycfg.xml.rej
============================================================
Review the file xsl/contentLayout/configs/displaycfg.xml.rej
for a list of customizations that we couldn't automatically
make. Manually apply these customizations to
xsl/contentLayout/configs/displaycfg.xml_autocustomized
Then copy it back to xsl/contentLayout/configs/displaycfg.xml
============================================================
Shall I try to automatically convert traindb skin en_US Y/N [Y]
Attempting to convert skin traindb en_US to 2010.3.0
Extracting skin catalog....
Creating new skin /m1/incoming/PREVOY1030/tomcat/vwebv/context/vwebv/ui/traindb-en_US-2010.3.0
When Auto-Customization Fails
The auto‐customization tool tries very hard to apply all of your skin customizations to the new Voyager skin files. But sometimes this is not possible. When the auto‐customization does not work, you see a message like the following:
Hunk #1 FAILED at 139.
1 out of 1 hunk FAILED -- saving rejects to file htdocs/help/index.html.rej
============================================================
Review the file htdocs/help/index.html.rej
for a list of customizations that we couldn't automatically
make. Manually apply these customizations to
htdocs/help/index.html_autocustomized
Then copy it back to htdocs/help/index.html
============================================================
When this happens, be aware of the following:
-
When the installer is unable to apply your customizations to the new skin file, a copy of your old skin file is made in place of the new skin file. In the above example, the htdocs/help/index.html file in your new skin is the same one that you were using in the old skin.
-
Since the customization tool is often able to apply some of your customizations to a file, even if it is unable to do the whole thing, the file is saved that was worked on as <filename>_autocustomized. In the above example, the partially customized file is named htdocs/help/index.html_autocustomized.
-
The installer saves the customizations that could not be completed to the file called <filename>.rej. Using the above example, the file is named htdocs/help/index.html.rej. The rej file is in Unified Diff format.
-
To apply the rejected customizations to your file, first review the rej file to determine how much work need to do. In the following example, it is relatively clear:
--- htdocs/help/index.html-version_2007.0.4 2018-04-16 16:27:12.000000000 -0400
+++ htdocs/help/index.html 2010-02-19 15:01:37.000000000 -0500
@@ -139,7 +139,7 @@
<div Id="pageFooter">
<div id="copyright">
- <span id="copySymbol">©</span> <span>2008 Ex Libris Group. All rights
+ <span id="copySymbol">©</span> <span>2010 Your Name Here. All rights
reserved.</span>
</div>
</div>-
The first line, which begins with ---, indicates the file that is being compared to your custom file.
-
The second line, which begins +++, indicates the name of your custom file.
-
What follows are one or more blocks of changes to apply. Each one begins with a line that starts like @@ -139,7.. This means that this section starts on line 139 of the uncustomized file, and was originally seven lines long. The +139,7 means that the section starts on line 139 of the customized file, and is still 7 lines long.
-
Lines following this that do not begin with a special character are unchanged. They are provided for context.
-
Lines beginning with a - (hyphen) character are the original lines in the original file. Look for something like these in the new file that you are customizing. Note that what you find will not look quite the same.
-
Lines beginning with a + (plus) character are the replacement, custom lines.
-
Many times there are - lines and + lines together, but some customizations only add or remove lines from a file.
-
-
Open the autocustomized file (like htdocs/help/index.html_autocustomized). For each - line and each + line, look for where that ought to fit. It is likely to be near where it was in the old file, so start around there. Look for unique strings in, or near the lines that you need to change, like div Id=”pageFooter” or copySymbol.
-
After you have applied or discarded all of the rejected customizations from your rej file, back up your old uncustomized file and replace it with the new autocustomized file that you worked on:
cp htdocs/help/index.html htdocs/help/index.html.orig
cp htdocs/help/index.html_autocustomized htdocs/help/index.html -
If you want to start over with a new, uncustomized copy of the file you can find that in /m1/incoming/PREVOY1030/tomcat/vwebv/context/vwebv/ui/exl_default.
Even though the auto‐customization tool makes every effort to apply all of your skin customizations to the new Voyager skin files, remember that it is not always successful; and it is important that you test all of your customizations in the preview server. You should also test again with your own data and configuration after the upgrade.
Note that the automatic customization tool is meant to encourage you to use the best quality skins, but support for automatically customized OPAC skins remains at the same level offered for your manually customized skins.
Managing the Local OPAC Preview Server
This section describes how to manage the local OPAC Preview Server.
-
Start the Preview Server.
-
Log on to your voyager server as the voyager user
-
Move to the Preview Server directory (i.e. /m1/incoming/PREVOY1030)
cd /m1/incoming/PREVOY1030
-
Run the following command to start the Preview Server
./preview.ksh start
-
-
Test the Preview Server.
-
Open a supported browser on your PC.
-
Enter the following URL into the browser address bar to view the Preview Server:
http://<voyager server IP or fqdn>:7098/
-
-
Log on to the Administration area.
-
Open a supported browser on your PC.
-
Enter the following URL into the browser address bar to view the Preview Server:
http://<voyager server IP or fqdn>:7098/skins
-
Enter the following user name and password
User name: preview
Password: previewThe following is displayed:
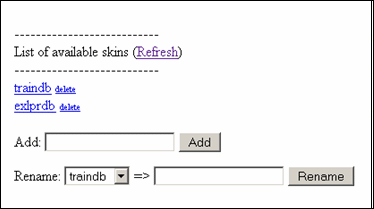 Skin Management
You can perform the following actions from this page:
Action Description View Skins in the OPAC Click the database to display the skin. Delete Skins Click delete next to the skin to be removed. Add Skins In the Add text box, enter the name of the additional skin, and click Add. Rename Skins Select an available skin from Rename drop‐down list. Enter the new name for the skin in the text box, and click Rename.
-
Customizing the Local OPAC Preview Server
For instructions on how to customize the skins, see the Voyager® 10.2.0 WebVoyáge Basic Userʹs Guide or the Voyager® 10.2.0 WebVoyáge Architecture Overview and Configuration Models.
Do not make any changes to exl_default. This skin is not for customer use. Any customizations may be lost during upgrade.
-
Log on to your voyager server as the voyager user
-
Change in to the Preview Server ui directory where skins reside
cd /m1/incoming/PREVOY1030/tomcat/vwebv/context/vwebv/ui -
View your created skins:
ls
For example:
exl_default traindb voydb
Stopping the Local OPAC Preview Server
-
Log on to your voyager server as the voyager user
-
Change in to the Preview Server directory (i.e. /m1/incoming/PREVOY1030)
cd /m1/incoming/PREVOY1030 -
Run the following command to stop the Preview Server
./preview.ksh stop For example:Stop tomcat...
Using CATALINA_BASE: /m1/incoming/PREVOY1030/tomcat/vwebv
Using CATALINA_HOME: /m1/incoming/PREVOY1030/tomcat/vwebv/catalina_home
Using CATALINA_TMPDIR: /m1/incoming/PREVOY1030/tomcat/vwebv/temp
Using JAVA_HOME: /m1/incoming/PREVOY1030/tomcat/vwebv/java
PLEASE WAIT...
Tomcat is stopping...
Uninstalling the Local OPAC Preview Server
-
Log on to your voyager server as the voyager user
-
Change in to the Preview Server directory (i.e. /m1/incoming/PREVOY1030)
cd /m1/incoming/PREVOY1030 -
Run the following command to stop the Preview Server
./preview.ksh stop -
Change to the parent directory and delete the Preview Server directory
cd ..
rm -rf PREVOY1030
Appendix A - Changing the Default Port for Preview Server
This appendix describes how to change the default port for Preview Server.
-
Log on to your voyager server as the voyager user
-
Change in to the Preview Server directory (i.e. /m1/incoming/PREVOY1030)
cd /m1/incoming/PREVOY1030 -
Run the following command to stop the Preview Server
./preview.ksh stop -
Edit the Preview Server Apache configuration
cd apache2/conf/ActivatedVirtualHosts
vi PREVOY_vwebv_httpd.conf -
Change 7098 to <New Port> in the following places:
Listen 7098
<VirtualHost *:7098> -
Start the Preview Server<
cd /m1/incoming/PREVOY1030
./preview.ksh start