
bX Registration Guide
|
Getting Started
Registration Process Overview
The Registration system for bX is designed to enable you to quickly and easily begin using the bX recommendation tool.
The typical process for bX registration is as follows:
-
Review the prerequisites for bX registration. See Prerequisites.
-
Prepare information needed for registration. See Preparation for Registration.
-
Open the bX registration system. For more information, see Online Registration.
-
Receive e-mail confirmation from Ex Libris with a license key/authentication token. See E-Mail Confirmation.
-
Use the license key/authentication token received to finalize your registration specifications.
Preparation for Registration
To ensure a quick and smooth bX registration, have ready the following information required for registration:
-
Contact details for the library systems office.
-
Customer Relationship Management (CRM) information – User name (ID) and Password. For more information, see CRM Information. This information is no longer supported and is not needed for bX registration.
-
Billing details – Name, Title, Institution, E-mail, Address, and Phone number.
-
Service level preferred – Subscriber only and Contributor and subscriber (SFX only). For more information, see Service Level (Subscriber/Contributor).
-
Link resolver and consortium details – Link resolver IP address, Link resolver base URL, Link resolver harvest URL (SFX only), and Registering one or multiple institutes in a single SFX instance (SFX only). For more information, see Consortium Details (SFX only).
-
Subscription preference – Try it then subscribe, Subscribe now
Prerequisites
SFX:
Primo:
Registration Procedure
Overview
The bX registration procedure is completed via an online wizard by providing a few key details (see Preparation for Registration) to specify your request and enable the tool. Have your prepared registration information with you when you begin the registration procedure.
Online Registration
-
Open the bX registration wizard.
-
Primo VE:
Edit the bX Integration Profile page (Configuration Menu > General > External Systems > Integration Profiles), select the Actions tab, and then select the Register button in the bX Registration section.
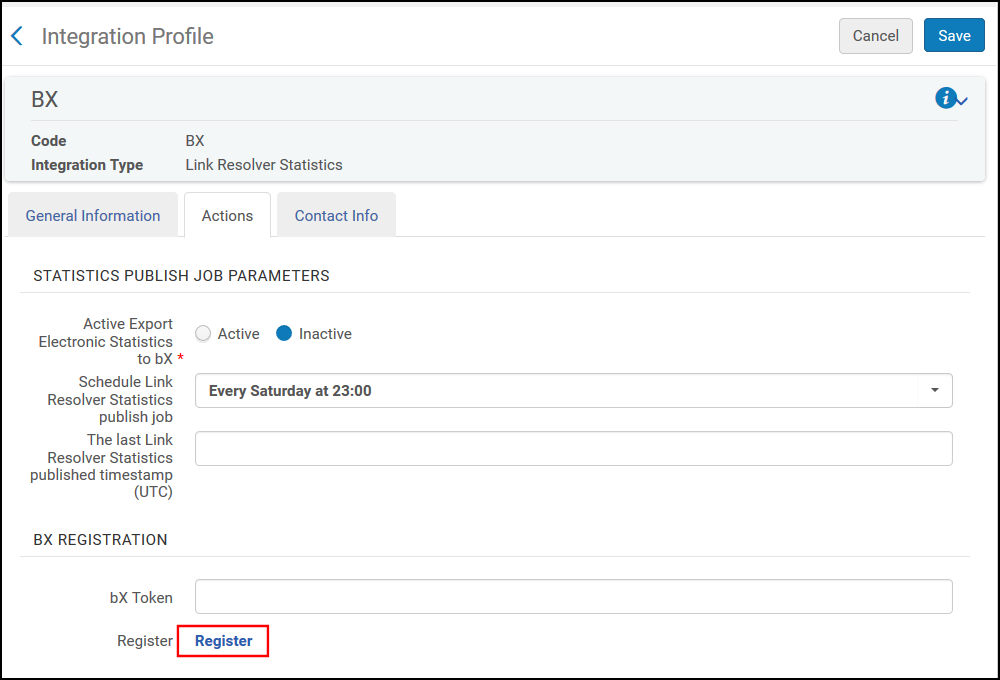 bX Integration Profile in Alma
 -
Primo:
Select the Register button next to the bX Token field in the Institution Wizard.
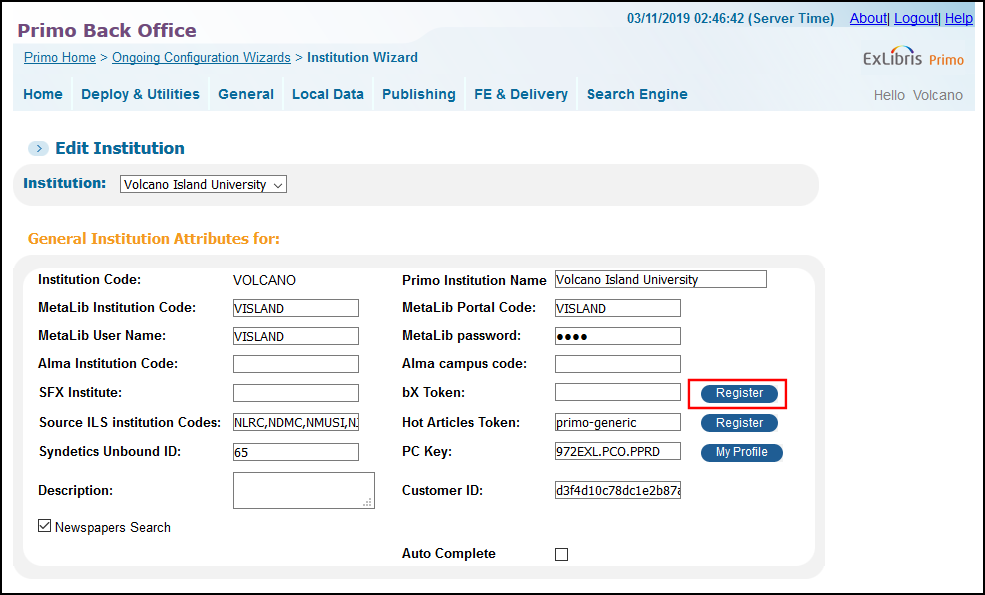 Institution Wizard in the Primo Back Office
 -
Single SFX Instance:
Select Register for bX from the bX Recommender Service menu in the SFX Admin Center or through ./server_admin_util.
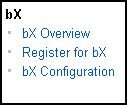 bX Recommender Service Menu
 -
Multiple SFX Instances:
-
Connect to the UNIX prompt of your SFX server as the sfxglb41 (sfxglb3 for SFX V3) user.
-
Type da.
-
Type ./server_admin_util.
-
Select 5 - statistics.
-
Select 7 - bX registration and configuration.
The bX registration menu displays.
-
(Optional) Select 1 to review the FAQ for bX registration.
-
Select 2 to generate and display the registration URL.
-
Copy/paste the displayed URL into your browser.
This enables you to complete the registration for all instances on your SFX server.
-
The Welcome registration screen displays.
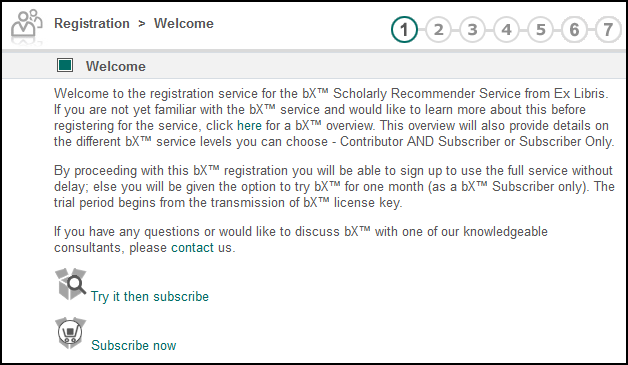 Welcome Display
 -
-
Follow the wizard steps to complete your registration.
-
Use the What is this? embedded help links and the following sections on this page to assist with your registration.
Service Level (Subscriber/Contributor)
You may choose to use the bX recommendation system as one of the following:
-
Subscriber
-
Subscriber and contributor (SFX only)
When you select the Subscriber option, you are indicating your intent to retrieve recommendations from the central bX server while not contributing any of your own data to the bX recommendation database. Subscribers have the benefit of retrieving global recommendations. However with the absence of local data, subscribers are not able to retrieve recommendations based on local usage.
When you select the Subscriber and Contributor option (SFX only), you contribute your SFX usage logs to bX, and you are able to retrieve recommendations. Contributors add their local usage to the main bX database that helps to create a richer recommendation database for all customers and makes the usage of their institution count.
CRM Information
This information is no longer supported and is not needed for bX registration.
The CRM is the Customer Relationship Management system that Ex Libris customers use to report items such as software bugs and enhancements. The Ex Libris CRM is also known as Pivotal.
You may find that the CRM Information section defaults to the CRM user name from your product’s instance. However, if this information is missing, enter your CRM user name and password. If you have an institutional CRM logon, enter that information. Otherwise, use your individual CRM logon.
Client Application
If you are not registering for bX from an SFX admin menu, you will need to specify the type of client application that will be calling bX. Please choose the appropriate entry from the list.
For Primo VE environments, select Primo. If your application is not in the list, please select Other.
Client Application IP Address
Your library's client application IP address is requested so that Ex Libris can open the firewall to allow you access to the bX recommendation system. This required IP represents the external IP of your system whether it's your local server or the firewall of your institution. The client application IP address should be in numeric format such as 123.45.67.89.
SFX:
If you have multiple SFX installations, you may set up multiple IP addresses by editing your profile after your registration has been completed. Refer to the bX-SFX Configuration Guide for more details regarding My Profile.
Primo:
For Primo, you can add one front-end server using the bX registration system. For multiple front-end configurations, you need to use My Profile to include additional front-end servers.
Primo VE:
Since the system does not use this field for Primo VE environments, enter any valid IP address (such as 123.123.123.123), which will be ignored by the system.
Link Resolver Base URL
The purpose of requesting your link resolver base URL is to enable the bX recommendation system to generate URL links to your link resolver as part of the returned recommendations.
For SFX, use the following format:
For Primo VE, use the following format, where the Primo VE view code contains the Alma institution code and the view code separated by a colon:
Example:
For Primo, use the following format:
Example:
Your Library's Harvest URL (SFX Only)
The purpose of requesting your library’s harvest URL for your instance of SFX is to enable bX to retrieve your published SFX usage logs. The URL should be formatted as follows:
This is for customers who have selected to be contributors. Refer to the bX-SFX Configuration Guide for more information regarding the publishing and contributing process.
Availability Check Details
This functionality is no longer supported and is not needed for bX registration.
The availability check details are relevant to you if you are planning to interact with bX via the HTML tile (like Primo).
The Holdings file URL is an optional registration parameter. This section/parameter is provided for you to enable the full-text link to be sent with the returned recommendation results.
If you supply your link resolver's holdings file URL, the holdings file is periodically read and the file’s data used to determine if you have holdings available for any returned recommendations. The following is an example of the format for this URL:
If you choose not to use the availability check service, leave the field empty.
If you want to allow bX to crawl your holdings file, you should allow access to the bX IP, 66.77.99.100. Refer to the SFX guides that describe allowing an application to crawl the holdings file.
Registering a Consortium
There are two separate procedures for registering a consortium. The first is available for all products. For more information, see Registering a Consortium Using My Profile. The second is unique to SFX. For more details, see Consortium Details (SFX only).
Registering a Consortium Using My Profile
Consortia should always register as one customer. After the first registration, the system automatically creates an institution and associates the customer with an application. All members of the consortia receive the same name. When you register from SFX for the first time, you can register all instances at the same time. For more information, see Online Registration.
This procedure must be performed for every member of your consortium.
-
Open the My Profile interface using the license code you received for the first registration and insert it into the following URL:
https://registration.service.exlibrisgroup.com/customer/management/customer.do?licenseToken=<key>If you have already registered one institution with SFX and entered the token in the respective SFX instance, you can also access your profile from SFX admin > bX configuration > change settings.
-
Click My client applications.
-
Click Add institution (link appears on the bottom of the list).
-
Enter the institution's name.
-
Enter the institution code.
-
For SFX – this is the SFX instance name.
-
For Primo – use the Primo institution name or institution code. You can find this information in Primo Back Office > Ongoing Configuration Wizards > Institution Wizard under Edit Institution - Institutional Attributes.
-
-
Click Submit. The list of institutions is displayed.
-
Click Add Client Application for your new institution.
-
Enter the client application name.
-
For SFX – the SFX instance name
-
For Primo and Primo VE – Primo-<Primo/Primo VE institution code or name>
-
-
Click Submit.
-
The request to add an institution is sent for approval. After approval, an e-mail is sent to you with the license code.
Consortium Details (SFX Only)
The Consortium Details section of bX registration only displays if the system has detected that you have multiple SFX institutes within a single SFX instance. If you have a single SFX instance with a single institute, this section of bX registration does not display.
If the individual instance has multiple institutes, you can either have them be represented as one entity in bX, or you can choose to have them represented separately in bX. If you register the institutes separately, each institute is able to retrieve local recommendations for the institute. If not, all users get local recommendations for the entire instance. See the following figures for a comparison of a single versus multiple institute configuration.
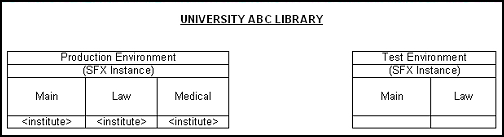
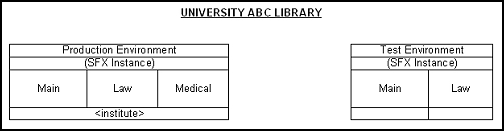
If, for example, you have institutes for Main, Law, and Medical and you choose to have each institute represented independently, the users from Law are able to get local recommendations based on what other Law users at your institution have already searched. Similarly, Medical (or Main) would be able to get local recommendations based on what other Medical (or Main) users at your institution have already searched. If you have all institutions registered as one, all users get local recommendations based on what all users (Main, Law, and Medical) have searched previously.
E-Mail Confirmation
Once you have completed the online bX registration, the system validates that you are an Ex Libris customer and responds with an e-mail (sent to the e-mail address that you provided) confirming your registration. This e-mail also includes the license key/authentication token that you need to complete the registration process.
The license key/authentication token that is provided is used to convey configuration information to begin your use of bX.
My Profile Configuration
There are several methods to configure the settings for your bX client:
-
SFX customers – select bX Configuration from the main page of the SFX Admin Center.
-
All customers – Log on to My Profile.
-
Copy the bX license key from your bX registration e-mail.
-
Enter the following URL in a browser, making sure that you paste the bX license key <key> at the end of the URL:
https://registration.service.exlibrisgroup.com/customer/management/customer.do?licenseToken=<key>For more information on updating customer details and client application settings, click the Help link.
-
Bookmark the My Profile > Main Menu page to use the link later.
-
For more information on configuring bX Recommendations for Primo customers, see the Primo Interoperability Guide.
-
For more information on configuring bX Recommendations for Primo VE customers, see Configuring bX Recommendations for Primo VE.
-