
Configuring Attendance
![]()

- Enable Attendance — Select to enable Attendance on the user's campusM app.
- Screen Title — The title that appears in the top header of the service.
General
- Suppress Attendance Excluded Events — Suppress events marked as excluded from the check-in screens.
- Default Locale — Enter a default location.
- Time Format — Enter the time format to be used in the service.
- Date Format (short) — Enter the short date format to be used in the service.
- Date Format (long) — Enter the long date format to be used in the service.
- DateTime Format (short) — Enter the short date/time format to be used in the service.
- DateTime Format (long) — Enter the long date/time format to be used in the service.
Look and Feel
- Primary Theme Color — Select a color for the main elements on the page.
- Secondary Theme Color — Select a color for the secondary elements on the page.
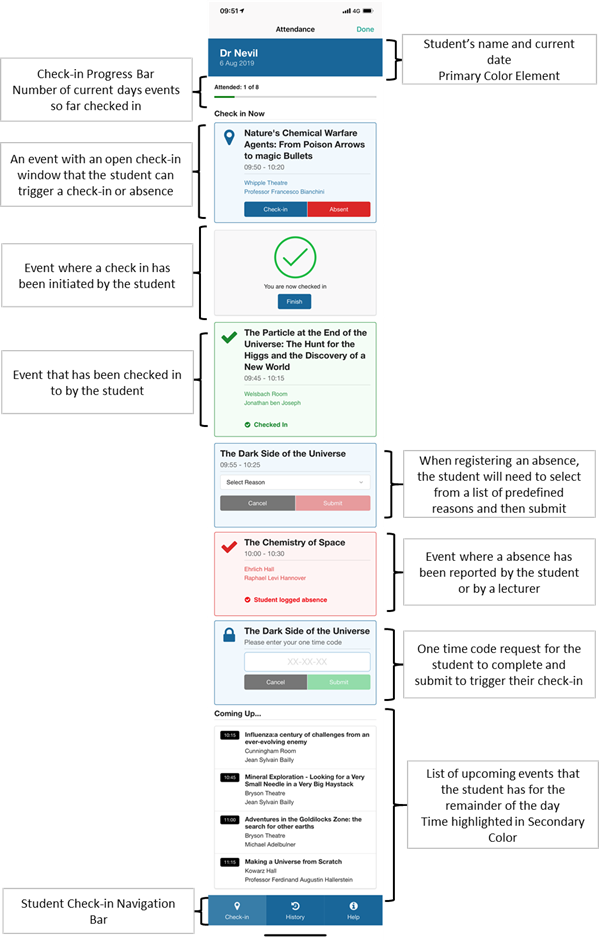
Student Check-in Settings
- Student Menu Option Associations — select the menu options to associate with Attendance.
- Display as Live Tile — select to have the tile display live Attendance information.
- Add Menu Options — select to associate additional menu options with Attendance.
- Student Timetable Webservice Endpoint — the name of the timetable that contains each student's class schedule. For more information, see campusM Timetable.
- Timetable Refresh — Enable in order to call the student's timetable service to refresh their class data on entry to the student check-in screen. The student will only be able to check in once the time table is refreshed. This is only relevant in the case where the Timetable Refresh option is enabled (see Student Check-In Page Overview).
Student Check-in Window
- Check-in Window Start — The number of minutes before or after the start of the class that the student can check-in. (Enter a negative value to have the check-in window start before the class starts. Maximum of 60. Default is -5.)
- Check-in Window End — The number of minutes before or after the end of the class that the student can no longer check-in. (Enter a negative value to have the check-in window end before the class ends. Maximum of 60. Default is 5.)
- Check-in Window Close Time Based on Padding from Start Time — When checked, the Check-In window closes based on the Start Time instead of the End Time.
Notification Settings
- Student Can Disable — Select to allow students to disable attendance reminders. When this option is selected, an Attendance option appears in the student's app under Settings > Notifications. The student can turn notifications on or off by selecting the toggle switch.
- Notification Padding — The number of minutes before or after the start of the class that the student receives a notification. (Enter a negative value to have the notification sent before the class starts. Maximum of 180. Default is -2.)
- Notification Title (template) — The title of the notification message.
- Notification Message (template) — The text of the notification message. (Maximum 120 characters). You can include the following dynamic event parameters in curly braces:
- {className}
- {startTime}
- {endTime}
- {location}
- {teacherName}
- Add Notification — Select to add a notification. You can configure up to three notifications.
Text/Labels
Geolocation Message
Bluetooth Message
Modify the title, message, and labels to display if Bluetooth permissions are required for check-in but are not yet enabled by the user.
Navigation Bar Labels
Live Tile Configuration
Help Page
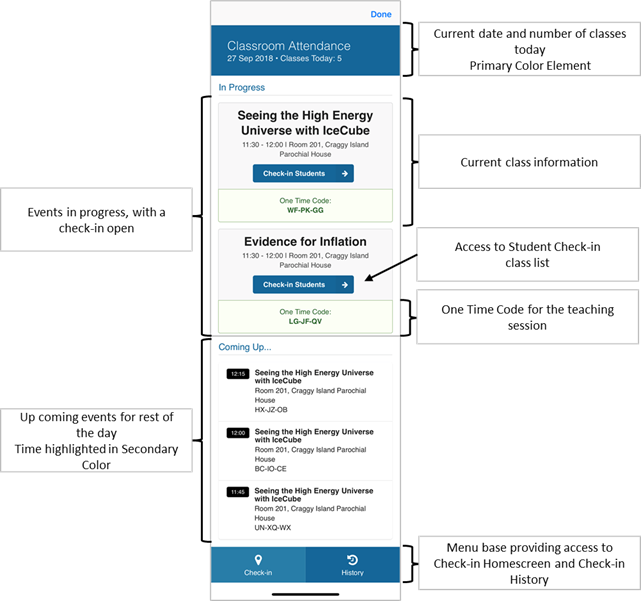
Lecturer Check-In Settings
- Lecturer Menu Option Associations — Select the menu options to associate with Attendance Lecturers. Lecturer permissions are enabled only for users with access to one or more of these menu options.
- Add Menu Options — Select to associate additional menu options with Attendance Lecturers.
- Lecturer Timetable Webservice Endpoint — The name of the timetable that contains each student's class schedule to enable lecturers to check in students. For more information, see campusM Timetable.
- Timetable Refresh — Enable in order to call the student's timetable service to refresh their class data on entry to the lecturer check-in screen.
Alternative Lecturer Settings
The alternative Lecturer feature provides the ability for lecturers or administration staff to search the timetable to locate other teachers’ events so that they can share the One Time Code or check students in if they are covering classes.
Once enabled, you are required to complete the base URL and configuration for the two required — searchEventsLecture and getStudentsByEventRef.
For more information on the configuration, see Alternative Lecturer Check-In.
Notification Settings
- Lecturer Can Disable — Select to allow lecturers to disable attendance reminders.
- Notification Padding — The number of minutes before or after the start of the class that the lecturer receives a notification. (Enter a negative value to have the notification sent before the class starts. Maximum of 180. Default is -2.)
- Notification Title (template) — The title of the notification message.
- Notification Message (template) — The text of the notification message. (Maximum 120 characters). You can include the following substitution codes in curly braces:
- {className}
- {startTime}
- {endTime}
- {location}
- {teacherName}
- Add Notification — Select to add a notification. You can configure up to three notifications.
Text/Labels
Navigation Bar Labels
Absence Settings
- Absence Lecturer / Student Reasons — Enter possible reasons from which lecturers and students can select when they want to indicate a reason for an absence. (Maximum 200 characters.)
- Add Item — Select to add an additional absence reason.
- Absence Labels — Enter replacements for labels that appear on the Absence page.
Check-In Types
Configure the default check-in types used by students to indicate their attendance at a class. For each check-in type, you can select to just Capture the check-in for informational purposes only (Capture) or additionally validate the check-in (Validation), which rejects the check-in if the check-in type is not validated.
- One Time Code (Client) — whether to enable one-time codes for checking in to each class. The lecturer receives the code for the class which is given to students with which to check-in.
- Validate — Select to enable one-time codes.
- QR Code (Client) — whether to enable QR code for checking in to each class. It can be used in conjunction with the One Time Code validation as an either-or option for checking into a class. The QR code for each location must be based on a text encoding with the following format:
-
{locationRef:"LOCATIONREFERENCE"} — Where the LOCATIONREFERENCE is the customer loc code parsed in the timetable integration feed. The QR check-in type validation is considered valid if the scanned LOCATIONREFERENCE matches that for the class in the timetable. If not, it is invalid.
-
Validate — Select to enable QR codes.
-
- Geolocation — Whether to enable geolocation requirements. When students check-in, their current location is sent with their check-in attempt.
- Capture — Select to enable geolocation data to be sent with the student check-in. If Validate is not also selected, this information is sent for informational purposes only.
- Validate — Select to reject check-in if the student's current location is not physically close to the class location. Spoofed locations – GPS locations that were set manually, overriding the GPS sensor – also invalidate the student's check-in when this option is selected. Information about mocked locations that were detected can be retrieved by admins via the API, using the Check In Report API, in the isLocationMocked parameter. For additional information about the Check In Report, see Check In Report in the Developer Network.
- Crowdsource — Select to enable the capture of 'visible' iBeacons seen by the student's device when a check-in is made.
- Capture — Select to enable visible iBeacon data to be sent with the student check-in. If Validate is not also selected, this information is sent for informational purposes only.
- Validate — Select to reject the check-in if the student is not in range of a validated iBeacon. An iBeacon is considered valid if it has been returned by more than the Valid Percentage of students who have checked in to the class with iBeacon data.
- IP — Select to determine whether the IP address of the student's device at the time of check-in falls within a customer-defined range.
- Capture — Select to enable IP data to be sent with the student check-in. If Validate is not also selected, this information is sent for informational purposes only.
- Validate — Select to reject the check-in if the IP address of the student's device does not fall within a customer-defined range.
Validation Configuration
The default validation rules, when 'Hybrid Check-in Validation' and 'Check-in Validation By Customer Role' are not applicable.
- Geolocation
- Tolerance Level — how close the student must be to the class location to allow the check-in to succeed. Set to a higher tolerance level if you are seeing a larger then expected number of check-ins that are not validating correctly. Select a tolerance level from the following values: LOW, MEDIUM (default), HIGH.
- Crowdsource
- Valid Percentage — the percentage of users that must have picked up a particular beacon configuration as part of their check-in transaction. An iBeacon is considered valid if it has been returned by more than the Valid Percentage of students who have checked in to the class with said iBeacon configuration.
- UUID — enter your beacon's UUID
- IP
- IP Range From: The beginning of the IP address range to check on the student's device
- IP Range To: The end of the IP address range to check on the student's device
Hybrid Check-in Validation
Custom check-in types for capture and validation, based on the API data returned for the event. This enables administrators to ensure that the check-in validation meets as wide and varied a range of requirements as possible.
This overrides the Check-in Types and Validation Configuration above, for the users that are attending a matching event (based on the API data).
Enable Hybrid Check-in Validation – Select this to activate the feature and open the Validation List.
Validation List — A list of Check-in Types, Validation Configuration and a Timetable Attribute. It is empty by default. The list is exclusionary, not additive, meaning that if an attribute appears twice, the first set of defined configurations are used, instead of both.
.png?revision=1)
Check-In Validation by Customer Role
Check-in types for capture and validation, based on user role. Currently, this only works with customer roles. In addition, the selected customer role must be associated with an App Role in App Settings > Enterprise Roles in order for the configuration to be applied.
This overrides the Check-in Types, Validation Configuration and Hybrid Check-in Validation described above, for users that have the specified role(s).
Enable Check-in Validation By Customer Role – Select this to activate the feature and open the Validation List.
Validation List – A list of Check-in Types and Validation Configuration, separated by role name. By default it is empty. The list is exclusionary, not additive, meaning that if a role appears twice, the first set of defined configurations are used, instead of both.
Check-In History Settings
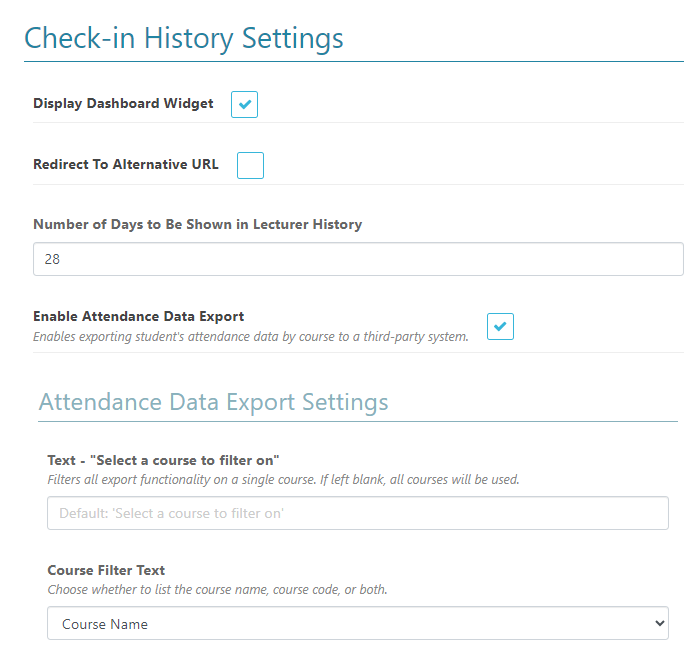
- Display Dashboard Widget — You can select to display a summary of the student's check-in transactions at the top of their Check-in History. This optional component shows the current proportion of attendance in class, with a graphical breakdown of the check-in outcomes for the selected period.
- Redirect to Alternative URL— Configure the Attendance page to redirect to a different URL from the History tab. This can be an internal campusM URL, or an external URL. When selecting this checkbox, the URL to Redirect To field appears, where you can fill the URL.
- Number of Days to be Shown in Lecturer History — Configure
- Enable Attendance Data Export — Enable lecturers to export attendance data to third party systems.
- Text Fields — When selecting this option, a number of Text fields will appear. If you leave these fields empty, the default text will display to the lecturer for each field in the Check-in History page. If you want different text to display to the lecturer for any of these fields, add the text in the relevant field.
- Date Display Format — The moment.js date format to display dates in, in the Data Export screens.
- Date Value Format — The moment.js date format to store dates in. This should only be changed if recommended.
- Attendees Service Batch Call Size — The number of Retrieve Attendees API calls to make in parallel. It defaults to 10.
- Show Error Details — Show specific error text, for any error during Data Export.
- Data Export Vendor — Settings to configure the third party vendor the data is being exported to.
- Supported vendors:
- Canvas LMS
- Integration Profile — The profile (in App Settings > Integration Profiles) that Canvas requires for authentication.
- API Configuration
- URL to retrieve the information — The Canvas proxy URL provided to the client by Ex Libris, the same as how the Canvas PI works.
- Use SIS User ID — Tick this box if exportVendorId in Retrieve Attendees returns the user's SIS ID, and not their actual Canvas ID.
- Use SIS Course or Section ID — Tick this box if courseCode in the user's Timetable returns the course or course section's SIS ID, and not its actual Canvas ID.
- Data Export Options
- Assignment Title — A template that determines the name of the Canvas assignment created.
- Default Checked-In Weight — Defaults to 100%.
- Default Absence Weight (By Lecturer) — Defaults to 50%.
- Default Absence Weight (By Student) — Defaults to 50%.
- Default Invalid Check-In Weight — Defaults to 0%.
- Automatically Publish Assignment
- Default (Assignment) Points — Defaults to 100.
- Default Display Type — The Canvas assignment grade type. Currently supported: Percentage, Points. Defaults to Percentage.
- Supported vendors:
- Tab Labels — Configure the look and feel of the tab in the app that presents your check-in history. Enter replacements for titles or labels that appear in the check-in filter tabs.
- Check-in Statuses — For each status, select a color for the display of the status, and replace the default text, as required. The following statuses are defined:
- Not Checked In
- Check-In Validated — Checked in and validated.
- Processing — Check-in is being validated.
- Checked in (Offline) — Checked in; validation is not possible because the user's device does not have an internet connection.
- Unable to validate — Checked in; validation is not possible for any other temporary reason.
- How To Consider Unable to Validate Entries — Choose how this status should be displayed in the UI:
- Valid — Marked with the Check-in Validated icon (
 ).
). - Invalid — Marked with the Invalid Check-in icon (
 ).
).
- Valid — Marked with the Check-in Validated icon (
- How To Consider Unable to Validate Entries — Choose how this status should be displayed in the UI:
- Invalid Check-in — Not checked in due to failed validation.
- Student logged absence
- Lecturer logged Absence
- Absent (Offline)
- Check-in not required
- Absent
- Other
Attendance Data Retention
In order to protect students' privacy, data retention can be configured so that information about student check-ins, including information about where they were when they checked in, can be deleted from the campusM database as soon as it is no longer needed. You can set a retention policy for how long check-in information should be retained, and how long location information should be retained. When a data-retention policy is enabled, by default, all check-in data is deleted from the database after 12 months have passed. You can change this to any number of months between 1 and 12. You can also choose to delete location data sooner.
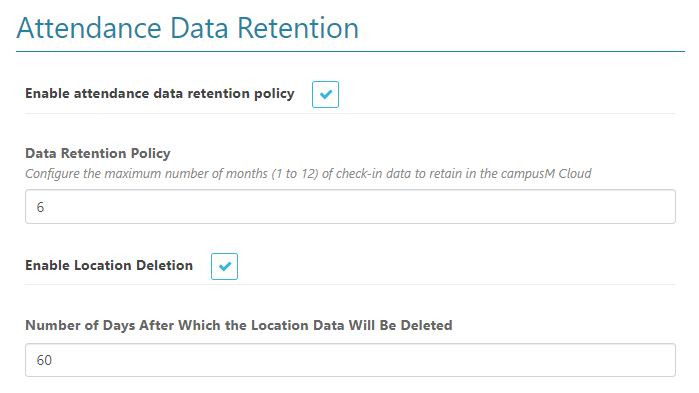
Enable attendance data retention policy – Select this option to turn on automatic deletion of attendance data from the database. The Data Retention Policy field is added to the page, and the default retention policy – 12 months – is selected.
Data Retention Policy – Enter the number of months (1-12) for which attendance data should be saved in the database.
Enable Location Deletion – If you want location information to be deleted before other check-in information, select this option. By default, the location information will be deleted after 2 days. You can modify this number under Number of Days After Which the Location Data Will Be Deleted.
Number of Days After Which the Location Data Will Be Deleted – If you selected Enable Location Deletion, enter the number of days to retain the location information (default = 2).
Data Extraction
Attendance data can be exported to CSV files, which can be opened by spreadsheet applications like Excel; see Exporting Attendance Data.
In addition, we provide a secure API, available through our API Gateway, to extract captured attendance transactions. Documentation on this API is available at https://developers.exlibrisgroup.com/campusm/apis/checkinreport/.