
Roles
|
Overview
- Roles and RoleSync (8 min)
- Roles Integration (7:52 min)
Vendors
User Experience
User Activities
Authentication
Offline Support
Technical Overview
Prerequisites
- The list of roles per user can be provided by a RESTful API service or by Microsoft Graph API, which returns a list of roles in JSON format.
- For Microsoft Graph API vendor, you need to configure Microsoft Azure. For more information, see Configuring Microsoft Azure (Graph) for the Roles Product Integration.
Required Format
RESTful API Vendor
{
"roles": [
"student",
"lecturer",
"other"
]
}
Microsoft Graph API Vendor
The list of roles provided by the Microsoft Graph API will be acquired by using the following Microsoft Graph API services:
- https://login.microsoftonline.com/{tenant}/oauth2/v2.0/token (in order to generate the token that will be used in the second service)
- https://graph.microsoft.com/v1.0/users/<username>/memberOf (in order to get the response which contains the roles list from above)
adAS SSO Vendor
[
{
"roles": [
"role1"
]
}
]
Okta
For the Okta vendor, campusM uses the /userinfo endpoint. The /userinfo endpoint should configured to return the groups claim for the user if it does not do so already, and this API attribute should be called "groups".
For further documentation please see Okta documentation: https://developer.okta.com/docs/api/...erinfoCustomAS
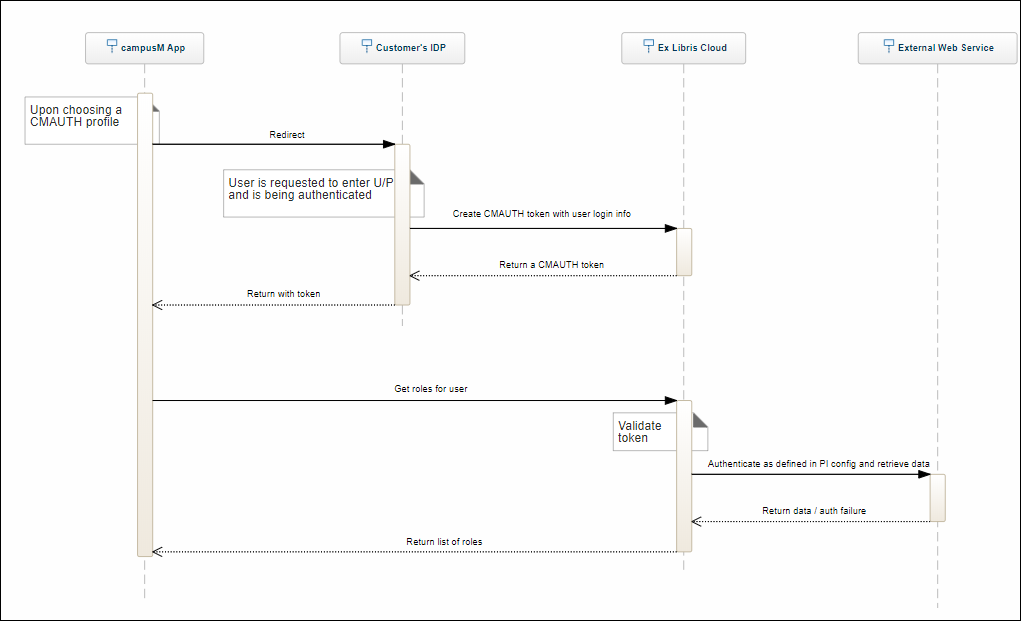
Technical Flow Diagram
Configuration
To use the Roles product integration, you must configure the following components:
- Customer roles and App roles according to Managing App Roles.
- A Roles product integration instance as described below.
- To be done by Ex Libris – Application Server, Authentication Access, and Profile Registration Authentication.
Configurations for RESTful API and adAS SSO Vendors
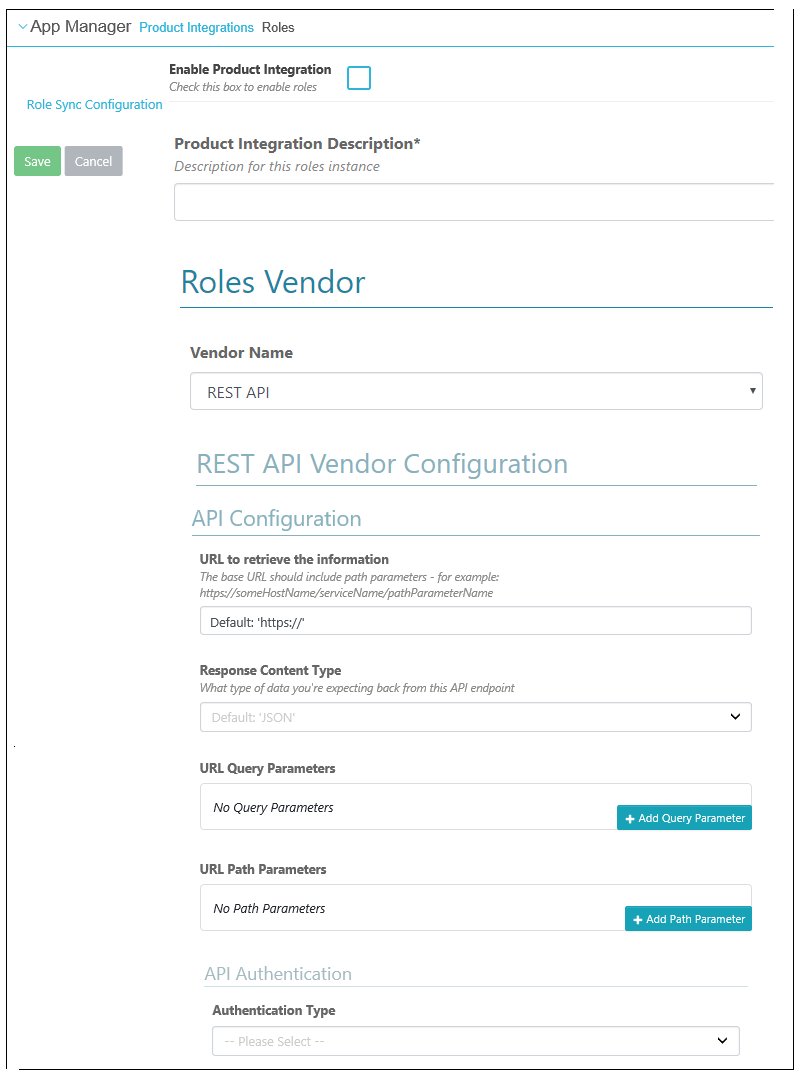
| Configuration Option | Description | Mandatory | Data Type | Default | Example |
|---|---|---|---|---|---|
| Enable Product Integration | Select to enable the product integration on the user's campusM app | No | |||
| Product Integration Description | A description of the PI for internal use | Yes | String | ||
| Vendor Name | Select RESTful API or adAS SSO. | Yes | Drop down list | ||
| API Configuration | |||||
| URL to retrieve the information | URL to retrieve the roles list | Yes | URL address | none | https://yrv80x694e.execute-api.eu-we.../Prod/rolesync |
| Response Content Type | For Roles PI, this should be JSON. | No | Drop down list | JSON | |
| URL Query Parameters | Parameters on the URL | No | An array of query parameter object information | No query parameters | |
| URL Path Parameters | Parameters on the URL | No | An array of path parameter object information | No path parameters | |
| API Authentication | |||||
| Authentication Type | Select one of the following options:
|
Yes | Drop-down list | ||
Configurations for the Okta Vendor
| Configuration Option | Description | Mandatory | Data Type | Default | Example |
|---|---|---|---|---|---|
| Enable Product Integration | Select to enable the product integration on the user's campusM app | No | |||
| Product Integration Description | A description of the PI for internal use | Yes | String | ||
| Vendor Name | Select Okta. | Yes | Drop down list | ||
| API Configuration | |||||
| Base URL to retrieve the information | Base URL for the API | Yes | URL address | - | https://myDomain.com |
| API Authentication | |||||
| Authentication Type | Select one of the following options:
|
Yes | Drop-down list | - | |
| Okta Auth Server Details | |||||
| Use Custom Auth Server ID | Depending on your Okta setup, the API endpoints used for this PI could require the auth ID to be included. Enable this to pass the "Custom Auth ID", below, into all relevant endpoints. | No | Checkbox | Unchecked (false) | |
| Custom Auth ID | Appears if "Use Custom Auth Server ID" is checked. | No | String | - | |
Configurations for the Microsoft Graph API Vendor
The following table describes the configuration options available for the Microsoft Graph API vendor:
| Configuration Option | Description | Mandatory | Data Type | Default | Example |
|---|---|---|---|---|---|
| Enable Product Integration | Select to enable the product integration on the user's campusM app. | No | |||
| Product Integration Description | A description of the product integration for internal use | Yes | |||
| Vendor Name | Select MS Graph APIs | Yes | |||
| Microsoft Graph APIs Configuration | |||||
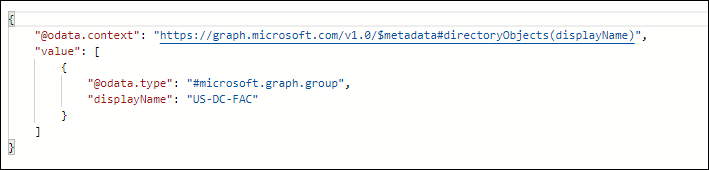
| Delimiter | The separator between the different roles returned in the displayName field. For example, in the following response, the delimiter is a hyphen (-):
displayName: US-DC-FAC
|
No | One of the following:
|
No delimiter | |
| Tenant | The tenant value in the path of the request can be used to control who can sign into the application. The allowed values are common for both Microsoft accounts and work or school accounts, organizations for work or school accounts only, consumers for Microsoft accounts only, and tenant identifiers such as the tenant ID | Yes | String | ||
| Client ID | The Application ID that the registration portal assigned your app | Yes | String | 6731..-..6914391e | |
| Client Secret | The application secret that you created in the app registration portal for your app. It should not be used in a native app, because client secrets cannot be reliably stored on devices. It is required for Web apps and Web APIs that have the ability to store the client secret securely on the server side | Yes | String | ||
| Grant Type | This value must be the string client_credentials. | Yes | String | client_credentials | |
| Scope | The scopes requested in this leg must be equivalent to or a subset of the scopes requested in the first (authorization) leg. If the scopes specified in this request span multiple resource servers, then the v2.0 endpoint returns a token for the resource specified in the first scope | Yes | String | https://graph.microsoft.com/.default | |
| User Input Identifier | |||||
| Parameter Input Option |
User input identifier for MemberOf API |
Yes | Input options | username | |
| Constant Value | Enter the constant value | ||||
Configurations for the Alma Vendor
The following table describes the configuration options available for the Alma vendor:
| Configuration Option | Description | Mandatory | Data Type | Default | Example |
|---|---|---|---|---|---|
| Enable Product Integration | Select this to enable the product integration on the user's campusM app. | No | |||
| Product Integration Description | A description of the product integration for internal use | Yes | |||
| Vendor Name | Select Alma. | Yes | |||
| Alma API Configuration | |||||
|
API Configuration |
|||||
| Base URL to retrieve the information | The URL of the enterprise server from which to retrieve the role information | Yes | URL | https://myDomain.com | https://myDomain.com |
|
User Input Identifier |
|||||
| Parameter Input Option |
User input identifier for MemberOf API: Username, Token Property (from CMAuth), or Constant (for a static value) |
Yes | Input options | Username | Username |
| Token Property Name | The name of the token property to be used when the value selected for Parameter Input Option is Token Property | No | String | USERNAME | |
| Constant Value | The constant value to be used when the value selected for Parameter Input Option is Constant | No | String | ||
|
Alma Authentication |
|||||
| API Key | The API key to use for authentication when retrieving data from Alma | Yes | String | 123456789asdfg | |
| Edit / Cancel editing | Select Edit to edit the API Key field. While editing, select Cancel editing to revert to the value that was in the field initially. | ||||
Adding Roles When Using Alma as a Vendor
Alma returns data about users in JSON format. The fields that contain role information are:
- user_statistic – This field contains an array of statistic_category objects, each of which is parsed by campusM as a role. A user can have multiple statistical categories, or none at all.
- user_group – This field contains the user group of the user. Each user has one user group. campusM parses this as a role.
Once you have configured the Alma vendor PI, as described above, you can select Test API Connection to retrieve a sample JSON object for a user. This object contains, among other user fields, all the statistic_category and user_group objects currently defined in your institution's Alma system. You can add Customer Roles to your campusM system based on the data that appears in this object and the following information about how campusM parses this data:
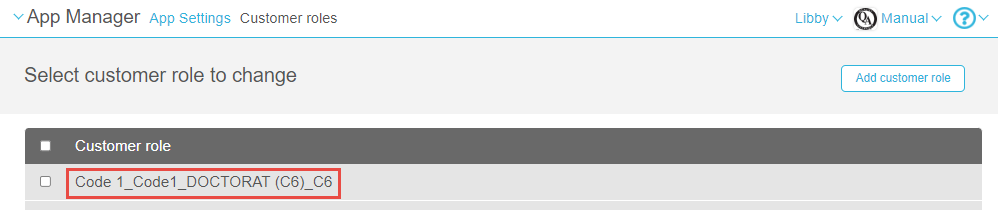
- statistic_category objects – This type of object is parsed in the format desc_value_desc_value, where the first desc_value pair is taken from the category_type and the second desc_value pair is taken from the statistic_category type. Thus, in the example below, the Customer Role that would be identified by campusM would be:
Code 1_Code1_DOCTORAT (C6)_C6.

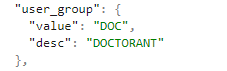
- user_group objects – This type of object is parsed in the format desc_value. Thus, in the example below, the Customer Role that would be identified by campusM would be:
DOCTORANT_DOC
 .
.
Once you have this information, you can create Customer Roles in campusM for each of the parsed Alma roles. You can do this in the App Manager at App Settings > Enterprise Roles > Customer Roles; see Managing App Roles: Configuring Customer Roles.
Finally, you can create mappings in campusM between the Customer Roles and their campusM App Roles at App Settings > Enterprise Roles > App Roles; see Managing App Roles: Managing App Roles.
Updating User Roles
When a user logs into campusM, the RoleSync web service retrieves the user’s roles from the enterprise system and assigns them to the user. Because users can remain logged into campusM for many days at a time, when roles have changed, it may be necessary to refresh them even when users are logged in. This can be done in one of two ways:
- A scheduled role-refresh process (see Scheduling Automatic Role Refreshes from the App Settings, below)
- Using the campusM setRolesUpdated API (see Updating Roles Via the campusM API, below)
When one of these processes is employed, users whose roles have changed are tagged, and the following occurs when the user next launches the app:
- The app calls the startup service on campusM, which informs the app that the roles of this user require an update.
- The app calls the configured Roles service to retrieve the user’s new roles. (For information about the Roles product-integration options and how to configure them, see Configuration, above.)
- The app presents the content and tiles according to the new user roles.
Scheduling Automatic Role Refreshes from the App Settings
The Refresh RoleSync process checks which users had role changes since they last logged into campusM and flags them for RoleSync the next time they open the app. This RoleSync takes place even if they were already logged into the app when they opened it.
Refreshing the RoleSync is an automated process that must be scheduled to take place on a weekly basis. It can be scheduled to run as much as once a day. We recommend only running it once a week, because it refreshes all users.
- Navigate to App Settings > Enterprise Roles > Refresh Roles. The Refresh Role Sync Config page opens.
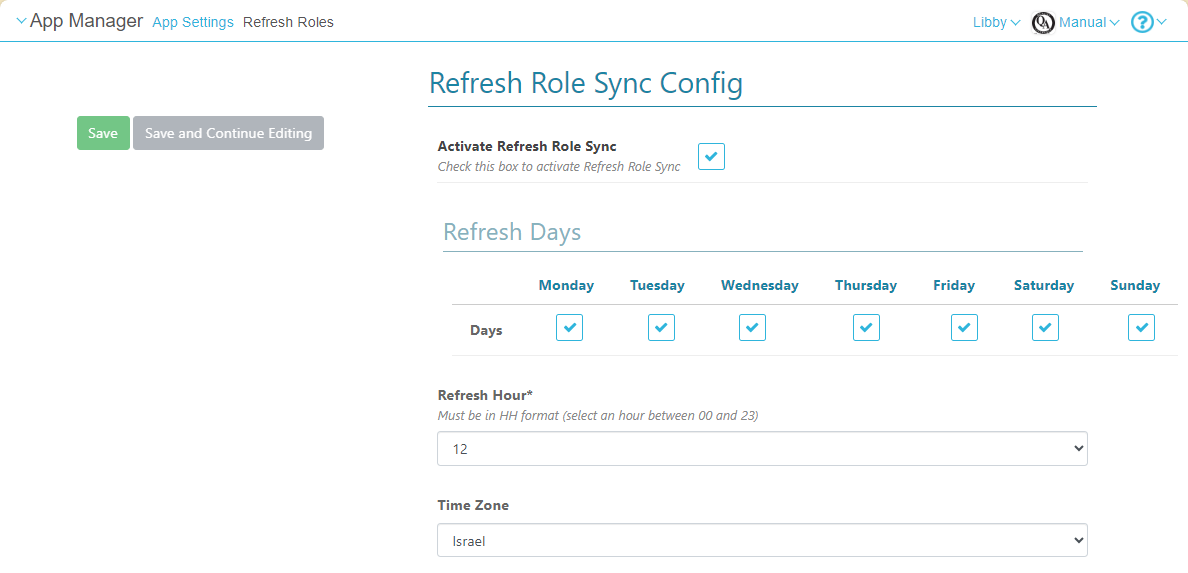
- Select Activate Refresh Role Sync.
- Select the days of the week on which to run the process, the time of day, and the time zone.
- Select Save.
Updating Roles via the campusM API
When user roles have changed – for example, a new role was added, or an existing role removed – the institution can call the campusM setRolesUpdated API service to update specific users' roles accordingly. The API call must include the emails of the users whose roles need to be updated. The users' roles are updated even if they are currently logged into campusM. For information about this API, see Refresh User Roles in the Developer Network.