Deploying and Configuring
The general experience of Quick Polls, as well as individual polls, are configured through App Manager. A new area of App Manager was created to access the Quick Polls Configuration:
![]()
Prerequisites
Quick Polls can only be deployed to authenticated Profiles or Profiles where the user is required to register (Standard Authentication). They cannot be deployed to Profiles that are open access (Anonymous).
Deployment
Deployment of Quick Polls is a two-step process:
- Deployment of the Quick Polls Menu Option within App Builder:
Select the +Add button at the top of the Menu Options panel in App Builder and select the Product Features Tile from the drop-down list. The Quick Polls Tile is the default selection. Provide a name for the tile and select Create.
 Quick Polls Menu
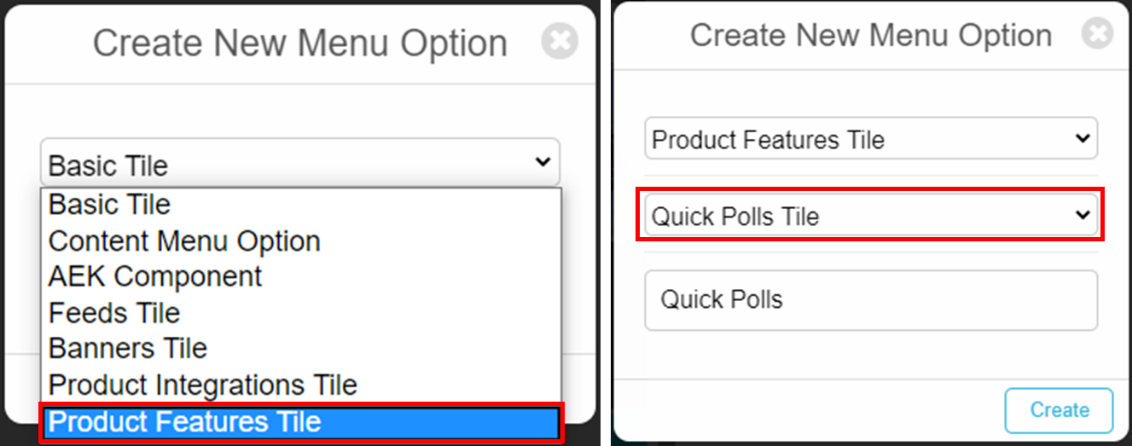 Quick Polls Tile
You can now configure the tile in the usual manner. Select roles, add an image, set the position on the homepage, and publish.
- Enabling Quick Polls:
After the tile is deployed, you can enable Quick Polls in the Quick Polls area of App Manager. Select General Settings, select the Enable Quick Polls checkbox at the top of the settings, and select Save.
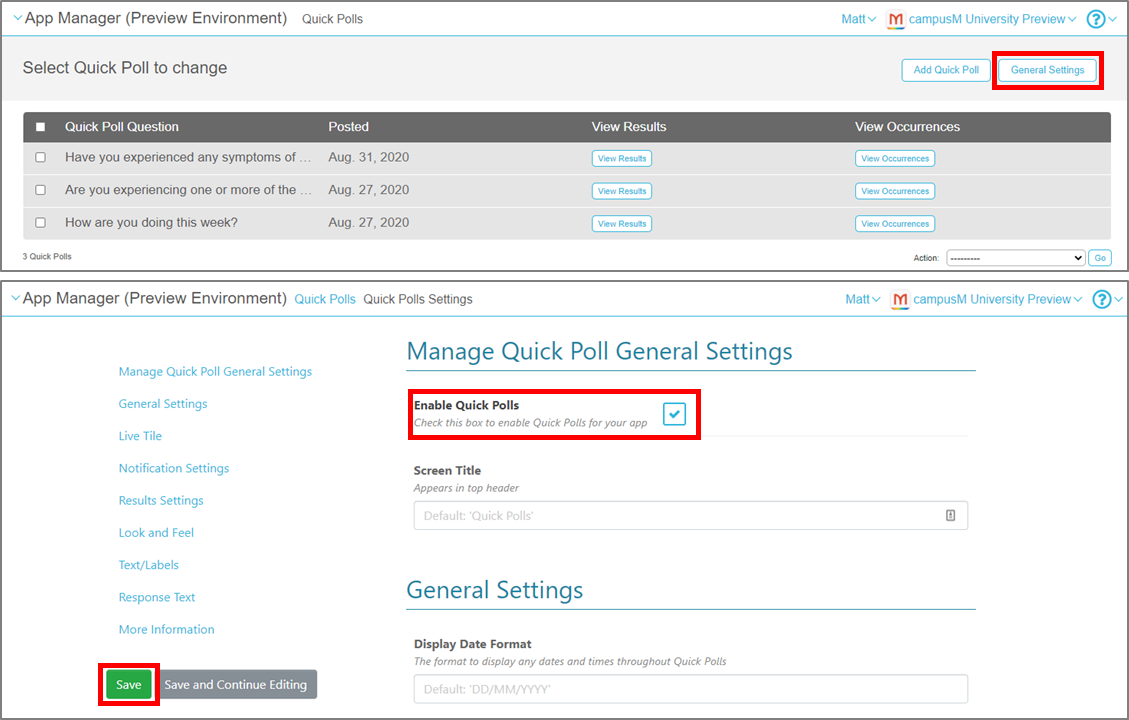 Enable Quick Polls
Configuration
The following section describes the Quick Polls configuration.
General Settings
The Quick Polls General Settings allow you to define the look and feel of the Quick Polls pages, the default configuration of notifications and responses, and the content of the polls. Note that the Notifications and Response configurations can be overridden at the individual Quick Polls level.

- Enable Quick Polls – select to enable Quick Polls on the user's app.
- Screen Title – the title that appears in the top header of the service.
General Settings
The date setting in this section affects the times and dates for the Quick Polls post and response dates that are displayed to students. For information concerning acceptable formats, see the Moment.js Documentation.
- Display Date format – enter the date format to be used in the service.
Live Tile
This configuration allows you to enable a live badge on the Quick Polls tile showing the number of open Quick Polls of the student:
- Enable Live Tile – select this checkbox to enable the Live Tile.
- Badge Color – select a background color for the Live Tile badge.
Notifications Settings
These are the default notification settings that affect the notifications sent to the selected students when the poll is released.
- Notification Title – the title of the notification message.
- Notification Message – the text of the notification message (maximum 120 characters).
Results Settings
- Show Quick Poll Results For End User – select this option to provide end-users with the ability to view a graphical representation of the distribution of aggregated data of the available responses.
Look and Feel
- Primary Theme Color – select a color for the main elements on the page.
- Secondary Theme Color – select a color for the secondary elements on the page.
Text and Labels
Enter replacements for titles or labels that appear on the check-in page.
Response Text
This is the default response text displayed to students after they submit their response to the Quick Poll. Note that this can be overridden at the individual Quick Poll level and at the submitted response level.
- Quick Poll Response Text – enter replacement text that is displayed on the Response page. To change the page contents, select the Edit icon in the Content Body field and edit the text or enter content using the rich text editor.
More Information
This is the text displayed to the user on the Information page.
- More Information Page Title – title text that appears that the top of the Information page.
- Content Body – enter replacement text that is displayed on the Information page. To change the page contents, select the Edit icon in the Content Body field and edit the text or enter content using the rich text editor.
Add Quick Poll
Select the Add Quick Polls button to create a new Quick Poll.

The Create/Edit Quick Polls page allows you to configure a Quick Poll and deploy to selected students based on their roles.
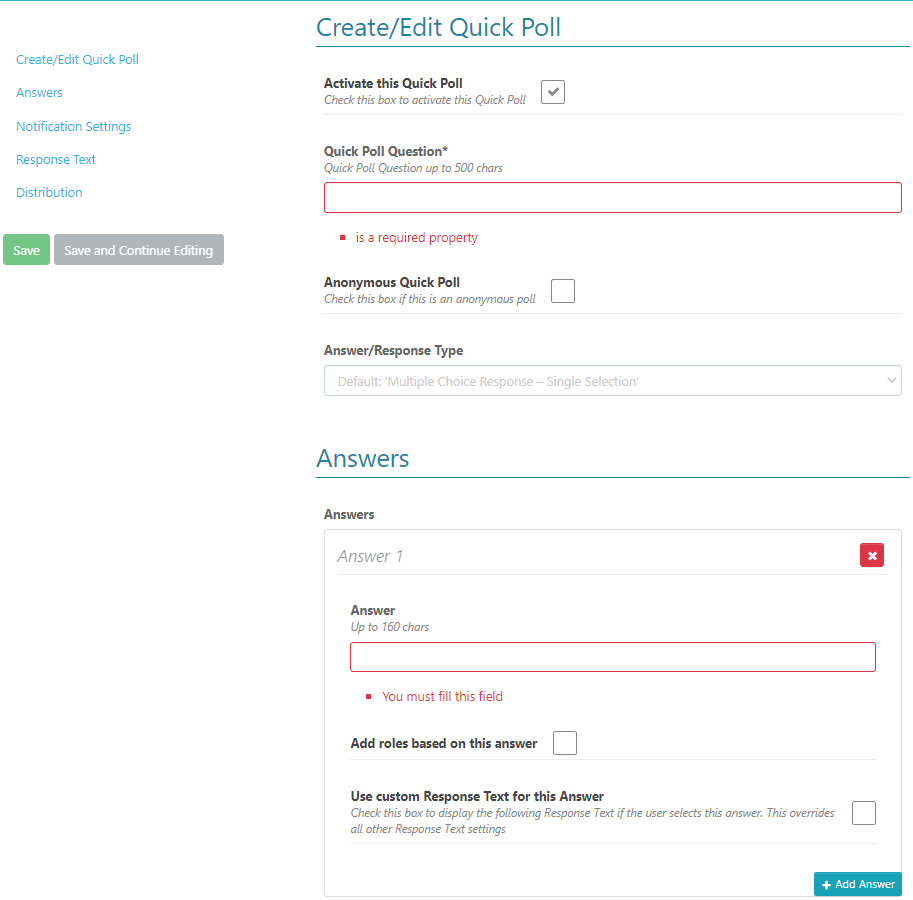
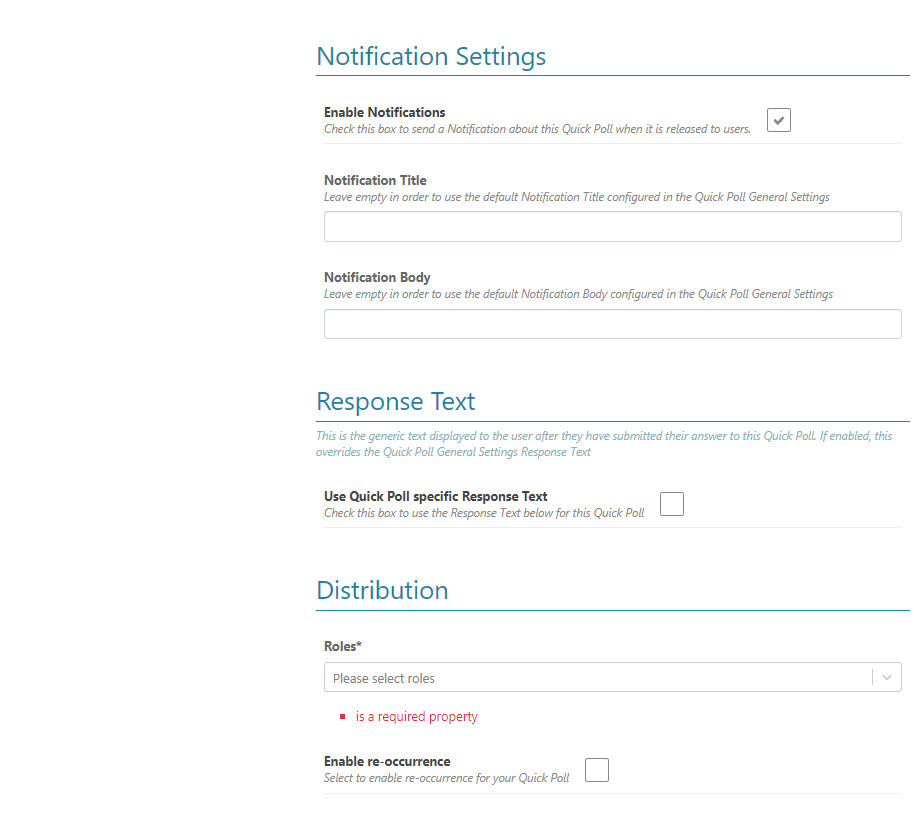

Create/Edit Quick Poll
The following sections describe the configuration options available on this page.
- Enable Quick Poll – select to enable the Quick Poll. This is enabled by default.
- Quick Poll Question – add the question text to the Quick Poll. Maximum length is 500 characters.
- Anonymous Quick Poll – select to enable anonymous poll. The results of this poll do not contain the identity of the end users that answered.
- Answer/Response Type - there are different response options:
- Multiple Choice Response – Single Selection
- Multiple Choice Response – Multiple Selection
- Free Text Response – When using the 'Free Text' option, it is not possible to add roles based on the end user's answer.
Notification Settings
These are the notification settings that affect the notification sent to the selected students when the poll is released. Note that this overrides the notification settings configured in the General Settings.
- Enable Notifications – select to send a notification about this Quick Poll when it is released to students.
- Notification Title – the title of the notification message.
- Notification Message – the text of the notification message (maximum length is 120 characters).
Answers
This is where you can configure the multiple-choice answers available for the student to select when responding to the defined Quick Poll question. Your poll must have at least one possible answer.
To add an answer, select the + Add Answer button. Additional answers for users to select can be added by selecting this button. Answers are displayed to students in the order they are displayed here and can be moved up and down the list of answers using the arrow buttons. Answers can be removed by selecting the X button.
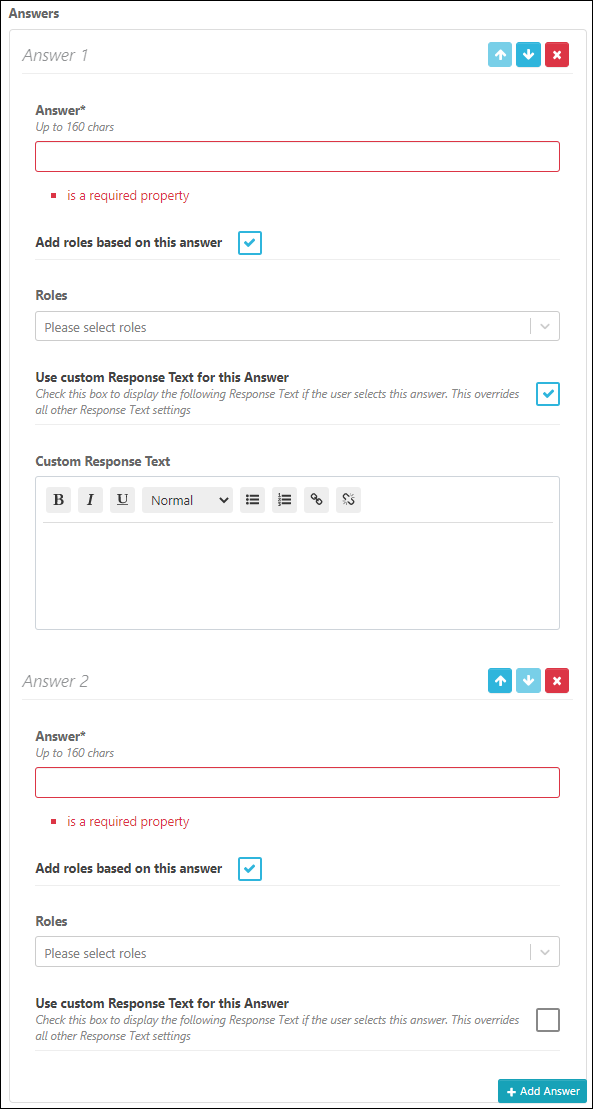
- Add roles based on this answer – selecting this option displays the Roles selection in which you can define roles that are applied if the specific answer is selected by the end-user. Note that when multiple instances of a Quick Poll are created, when the end-user next answers the poll, the roles for the selected answer are applied and the roles defined in any other unselected answers are removed.
- Roles – select from one or more of the available App Roles. Profiles are prefixed to the Roles show in the following format Profile: Role. Note that you can start typing to search for available roles. Roles can be removed from the selected list by clicking the X.
- Use custom Response Text for this Answer – select to enable the configuration of the response text that is displayed if the student submits this answer.
- Custom Response Text – enter the response text to be displayed on the Response page. To change the page contents, select the Edit icon in the Content Body field and edit the text or enter content using the rich text editor. This response overrides both the response text set in General Settings and the response text set at the Quick Poll level when the user submits this answer.
Response Text
This is the response text displayed to students after they submit their response to the Quick Poll. Note that this overrides the response text set in the General Settings and can be overridden by the response text set at the selected answer level.
- Use Quick Poll Specific Response Text – select to enable the configuration of the response text for this Quick Poll.
- Quick Poll Response Text – enter the response text to be displayed on the Response page. To change the page contents, select the Edit icon in the Content Body field and edit the text or enter content using the rich text editor.
Distribution
This section allows you to define the roles for the students who can receive a notification when the Quick Poll is active and are able to respond to the Quick Poll.
- Roles – select this option and select the roles that should have access to this Quick Poll. Profiles that are prefixed to the Roles are displayed in the following format Profile: Role. Note that you can start typing to search for available roles. Roles can be removed from the selected list by selecting the X.
- Enable Re-occurrence – select this option to enable recurrence for the Quick Poll. The recurrence selection options appear:
- Recurrence Pattern – select a weekly recurrence pattern.
- Weekly – checkbox that enables you to define which days of the week the Quick Poll is available.
- Start Time – the time from which the Quick Poll is available to be answered. This is also the time that the notification is sent to the selected users to inform them of the available Quick Poll (if this has been enabled).
- End Time – the expiry time of the Quick Poll, after which selected users can no longer respond to the Quick Poll.
- Start Date – the date from which the Quick Poll occurrences start.
- End Date – the date that the Quick Poll occurrences end.
The maximum duration between the Quick Poll Start Date and End Date is 90 days.
- Timezone – set the time zone for the dates and times applied against the Quick Poll recurrences.
If the re-occurrence check box is not selected, the following options for defining timings are displayed:
- Start Date and Time – the time from which the Quick Poll is available to be answered. This is also the time that the notification is sent to the selected students to inform them of the available Quick Poll if this was enabled. Note this is set in the time zone of the administrator configuring the Quick Poll.
- End Date and Time – the expiration time of the Quick Poll, after which the Quick Poll is no longer available for the selected users to answer. Note this is set in the time zone of the administrator configuring the Quick Poll.

