360 Resource Manager: Creating Licenses
- Product: 360 Resource Manager
How do we create a new license?
A new license can be created in one of three ways:
- Copy one of the common licenses already created in our License Template Library (separate instructions).
- Build your own license in the Licenses Tool.
- Download and update the License Data Uploader report (spreadsheet) and send it back to us to upload it to your Licenses.
Licenses Tool
To create one license at a time with the License Tool, use the following instructions:
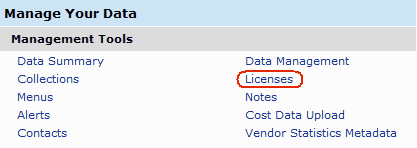
- Click Licenses on the Client Center Home page:

- You will see the Licenses page. If there is another license already in the Licenses list that is very similar to the one you want to create, click the copy (duplicate) button and then edit the license. If, instead, none of the other licenses are similar to the one you want to create, go to the next step in these instructions.

- On the Licenses page, click Add on the right side of the header:

- On the Add License page, enter your license details.
- Click Save.
Continue with other steps to work with licenses.
License Data Uploader Report
To create one or more licenses using a file you edit offline (outside the Client Center), use these instructions:
- Using the instructions for getting Management Reports, download the License Data Uploader report, which is a CSV (comma-separated values) file.
- Run a spreadsheet application, such as Microsoft Excel, and open up the downloaded report from within that application. If you use Excel, it will start the Text Import Wizard. The downloaded report is a delimited file, import from row 1, and the delimiters are commas. No other changes are necessary.
- When the report opens, you will see that the top row of the spreadsheet contains a column for each license information field. If your library already has some licenses, they will appear below, one license for each row.
- If one of your current licenses is very similar to the one you want to add, you can copy that license row into a new row and make appropriate changes.
- If you want to create a totally new license, fill out all the fields you want to on that row. The only field you must fill out is the License Name. Do not enter the LicenseID, because our system will add that field when we upload the file.
- You can delete all the rows of licenses that you don't plan to change. (This will not delete those licenses from your library profile.)
- Save the file, with the same filename.
- Using the Support Portal option, send the file to our staff. We will upload it into your library's profile and notify you when the licenses are available.
Continue with other steps to work with licenses.
- Date Created: 9-Feb-2014
- Last Edited Date: 14-Feb-2014
- Old Article Number: 7348

