How to Prevent Lost Items from Being Requested
- Product: Alma
Question
How can I configure it so that lost items cannot be requested?
Answer
Step 1: Configuring the Item Policy
Lost items can be configured as searchable but not requestable. First, you would configure a lost loan "Is Requestable" policy, which is set to "Not Requestable." If you know you already have an existing "Is Requestable" policy set to "Not Requestable" that you would like to use, you can skip this step and move to Step 2: Adding the Item Policy to a Terms of Use.
- Alma Configuration > Fulfillment > Physical Fulfillment > Advanced Policy Configuration. Here you can filter for Policy Type: "Is Requestable" to find all the existing policies of this type. If you find you already have an existing "Is Requestable" policy that is "Not Requestable," you can move to Step 2: Adding the Item Policy to a Terms of Use.
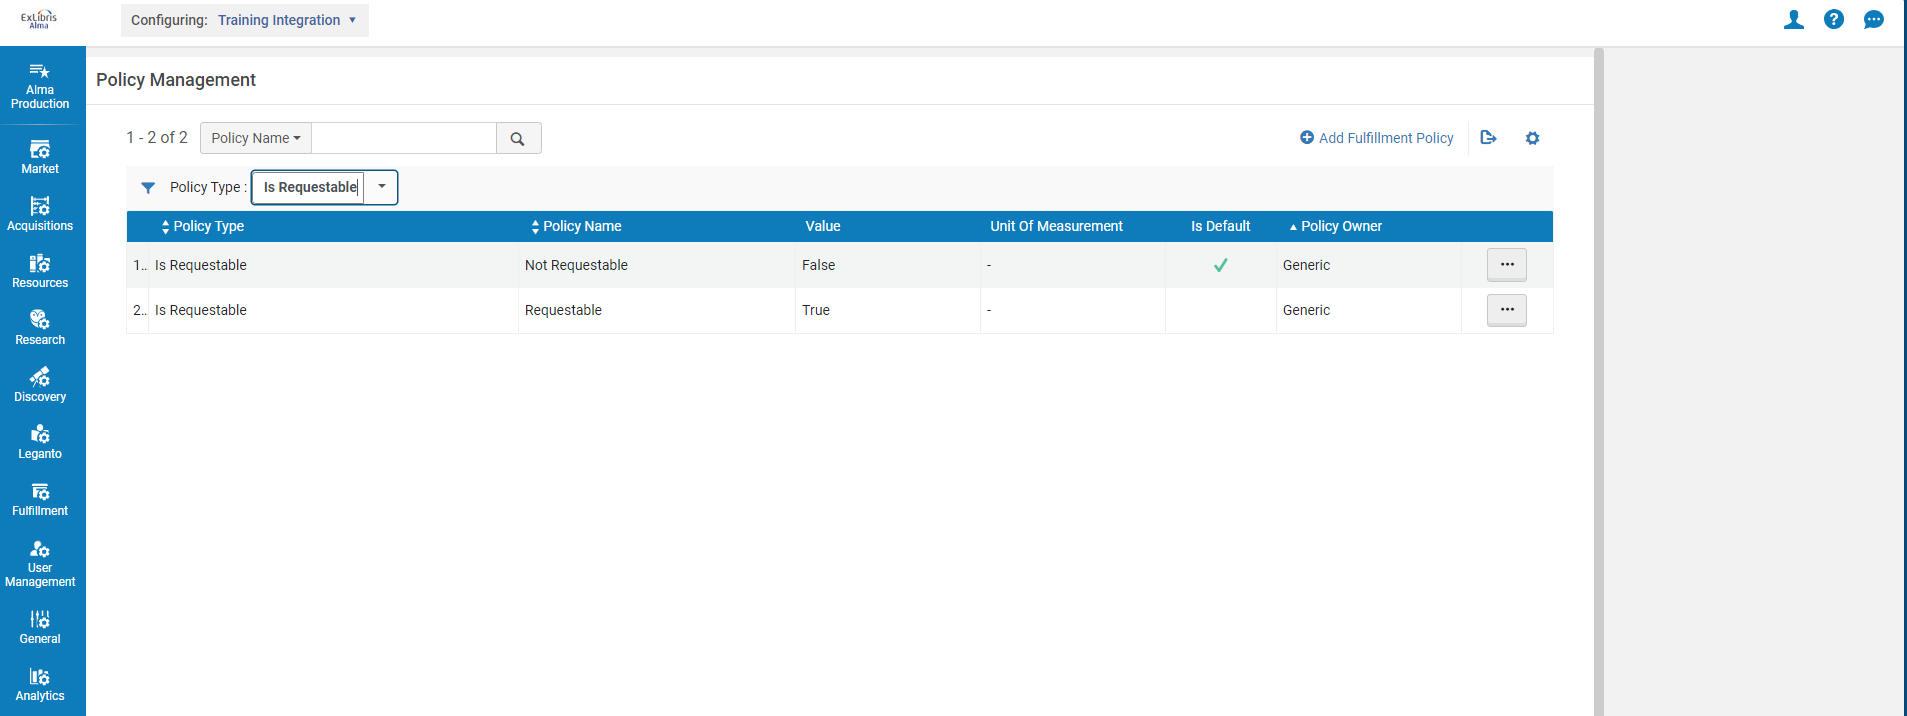
- If you don't have a "Not Requestable" policy, you would create one from this same page by clicking "Add Fulfillment Policy." Select "Is Requestable" from the list > Next. Name the policy, give a policy description (Not Requestable), and set the Value to False. Ignore the Default Policy setting, unless you want items to not be requestable as a default.
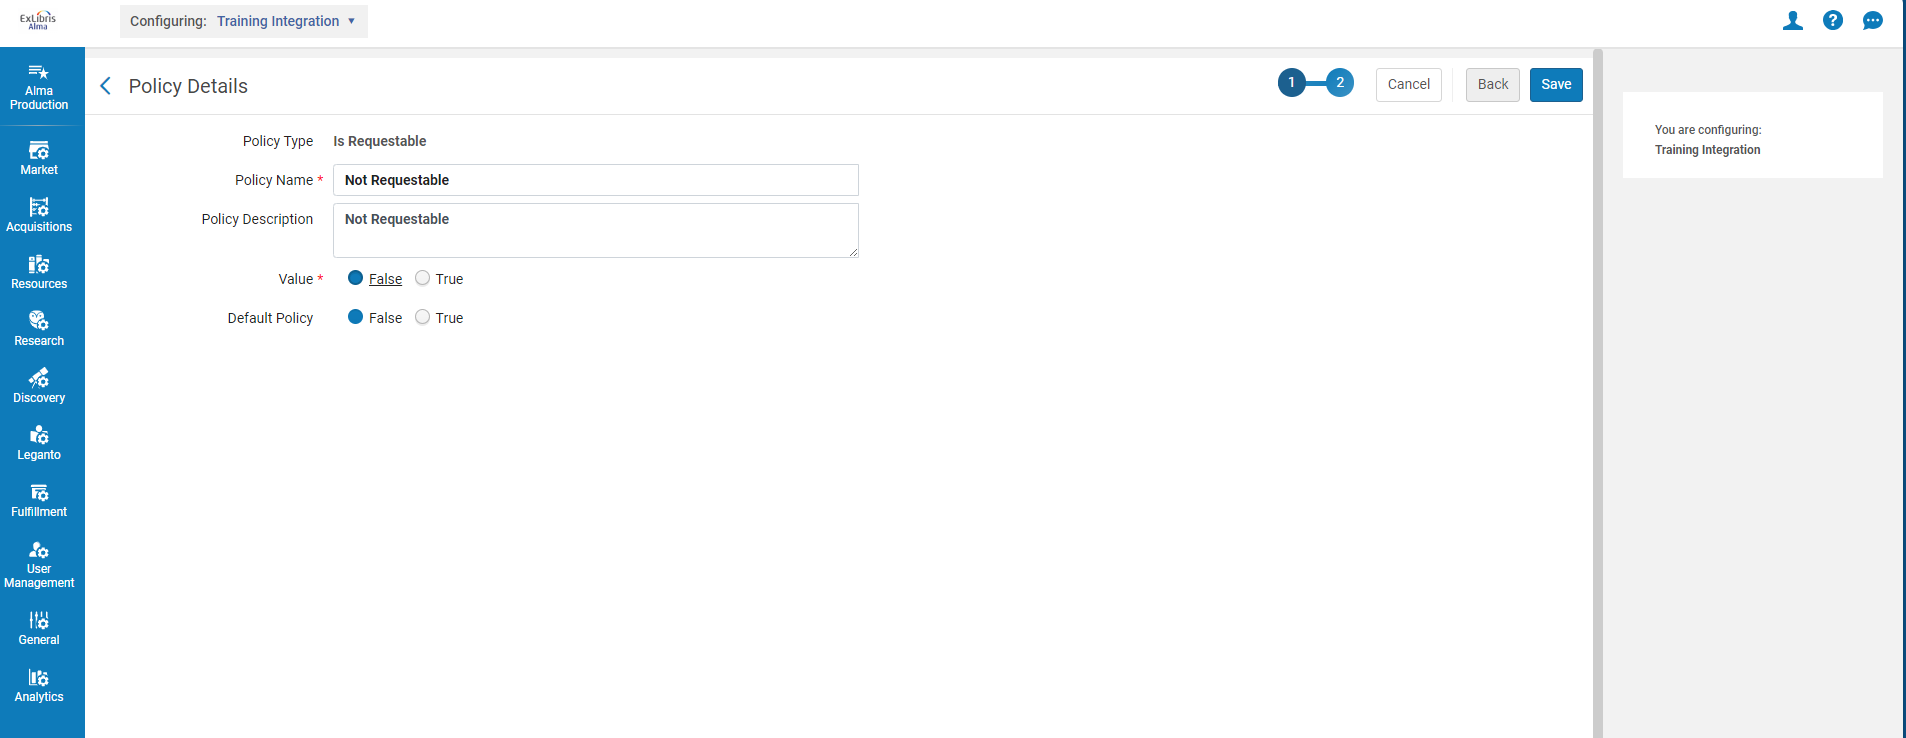
Step 2: Adding the Item Policy to a Terms of Use
The next step will be making sure the policy is applied to a Terms of Use. You can either create one, or add the "Is Requestable" policy we created previously to an existing Terms of Use.
- Alma Configuration > Fulfillment > Physical Fulfillment > Terms of Use and Policies. Filter Terms of Use Type to "Request." If you already have an existing Terms of Use you want to apply the Not Requestable policy to, find it in the list and go to the Row Actions (...) > Edit. Find the "Is Requestable" policy on the left, and use the drop down to the right to select the "Not Requestable" policy, then click Next to go to the confirmation page > Save.
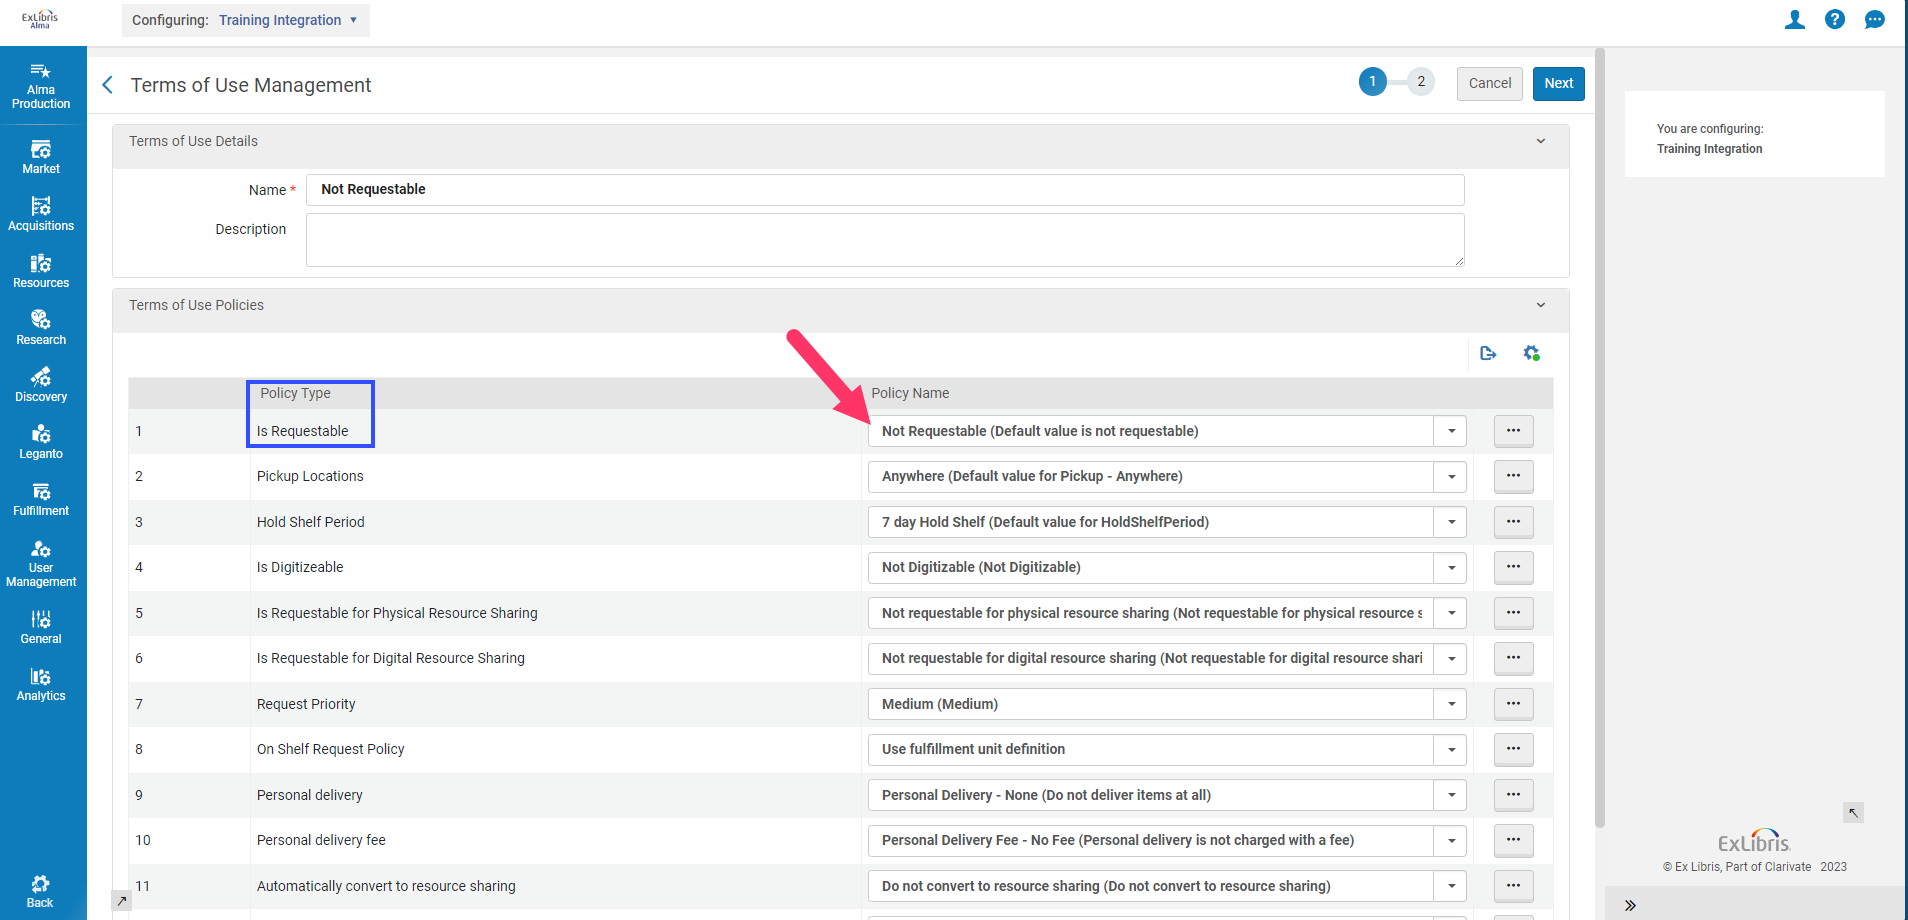
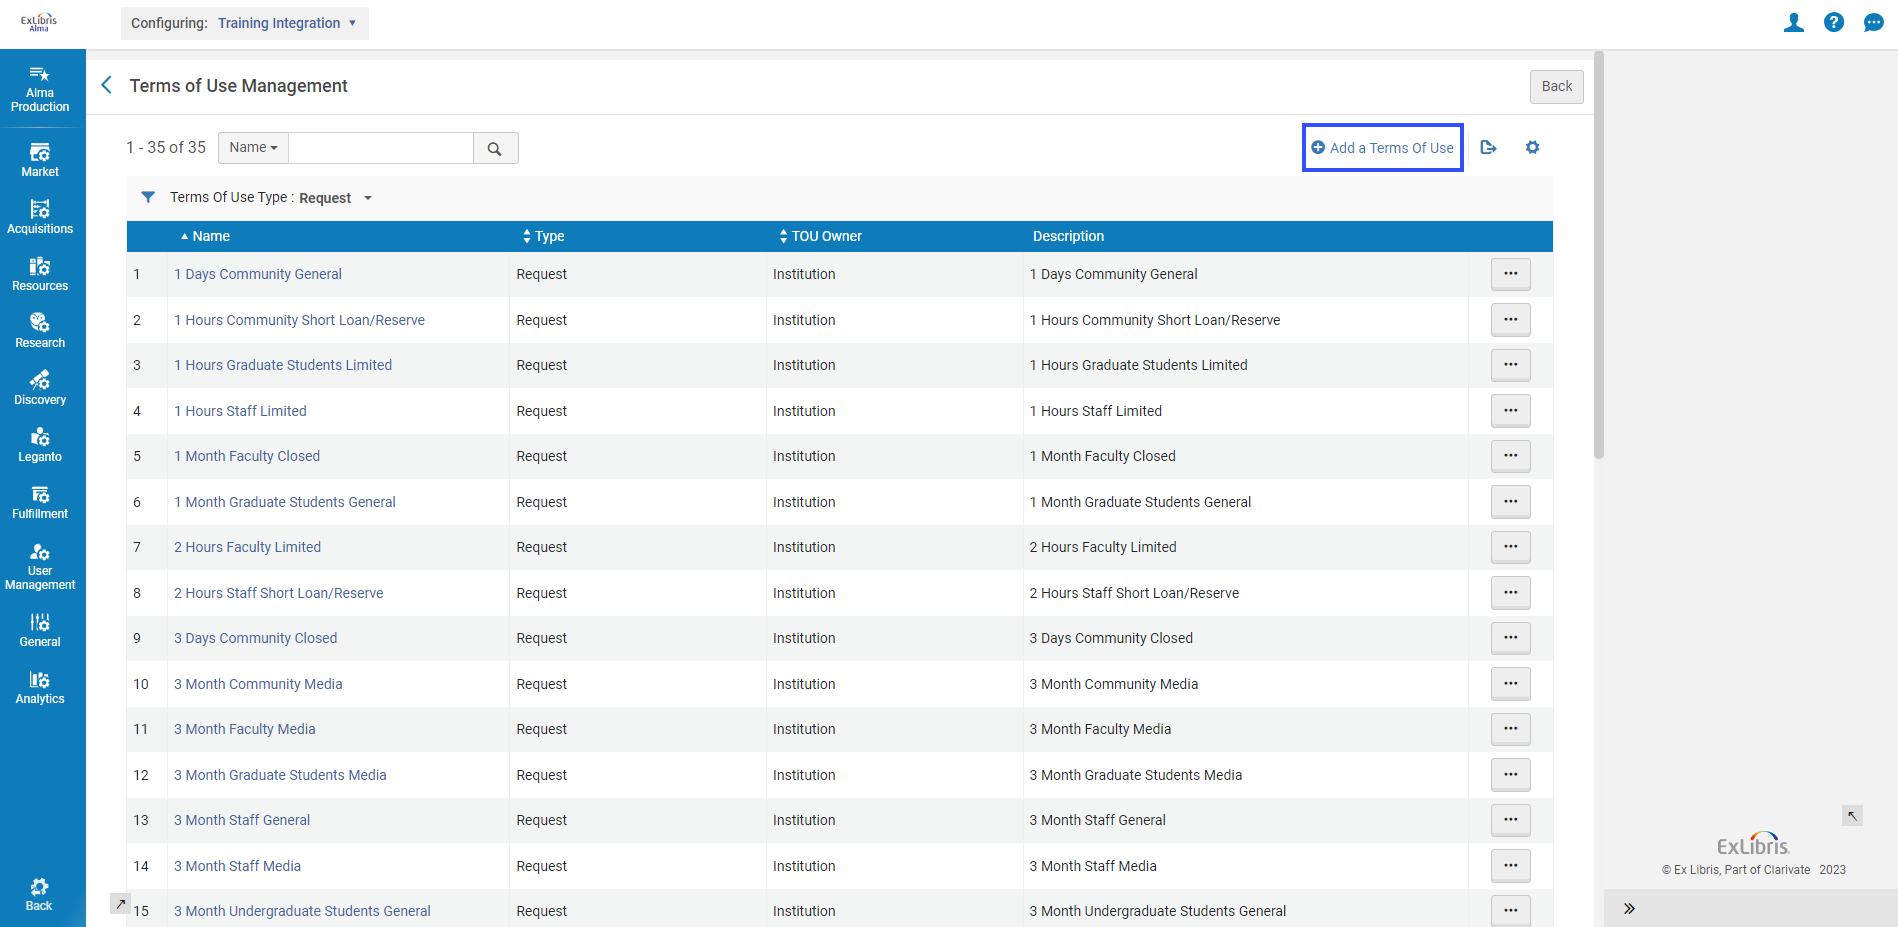
- If you don't already have a Terms of Use, you will need to create one. On the Terms of Use Management page found at Alma Configuration > Fulfillment > Physical Fulfillment > Terms of Use and Policies, you would click "Add a Terms of Use." Select "Request" > Next. Give it a name (Not Requestable, or whatever you like) and description as applicable. Then below the name and description, you would select the policies you want to apply, namely our "Not Requestable" policy. For the purposes of this article, we will not touch on the other policies but you can find additional information about them here.
- Once you are pleased with your choices, you can click Next to go to the confirmation page and Save.
Step 3: Creating the Fulfillment Unit Rule(s)
You can now add this Terms of Use to the relevant Fulfillment Unit on the Fulfillment Rules Editor page.
- You can find this at Alma Configuration > Fulfillment > Physical Fulfillment > Fulfillment Units. Select the applicable Fulfillment Unit that your lost item is in > then go to Row Actions (...) > Edit. Click the Fulfillment Unit Rules tab and set the Rule Type to Requests.
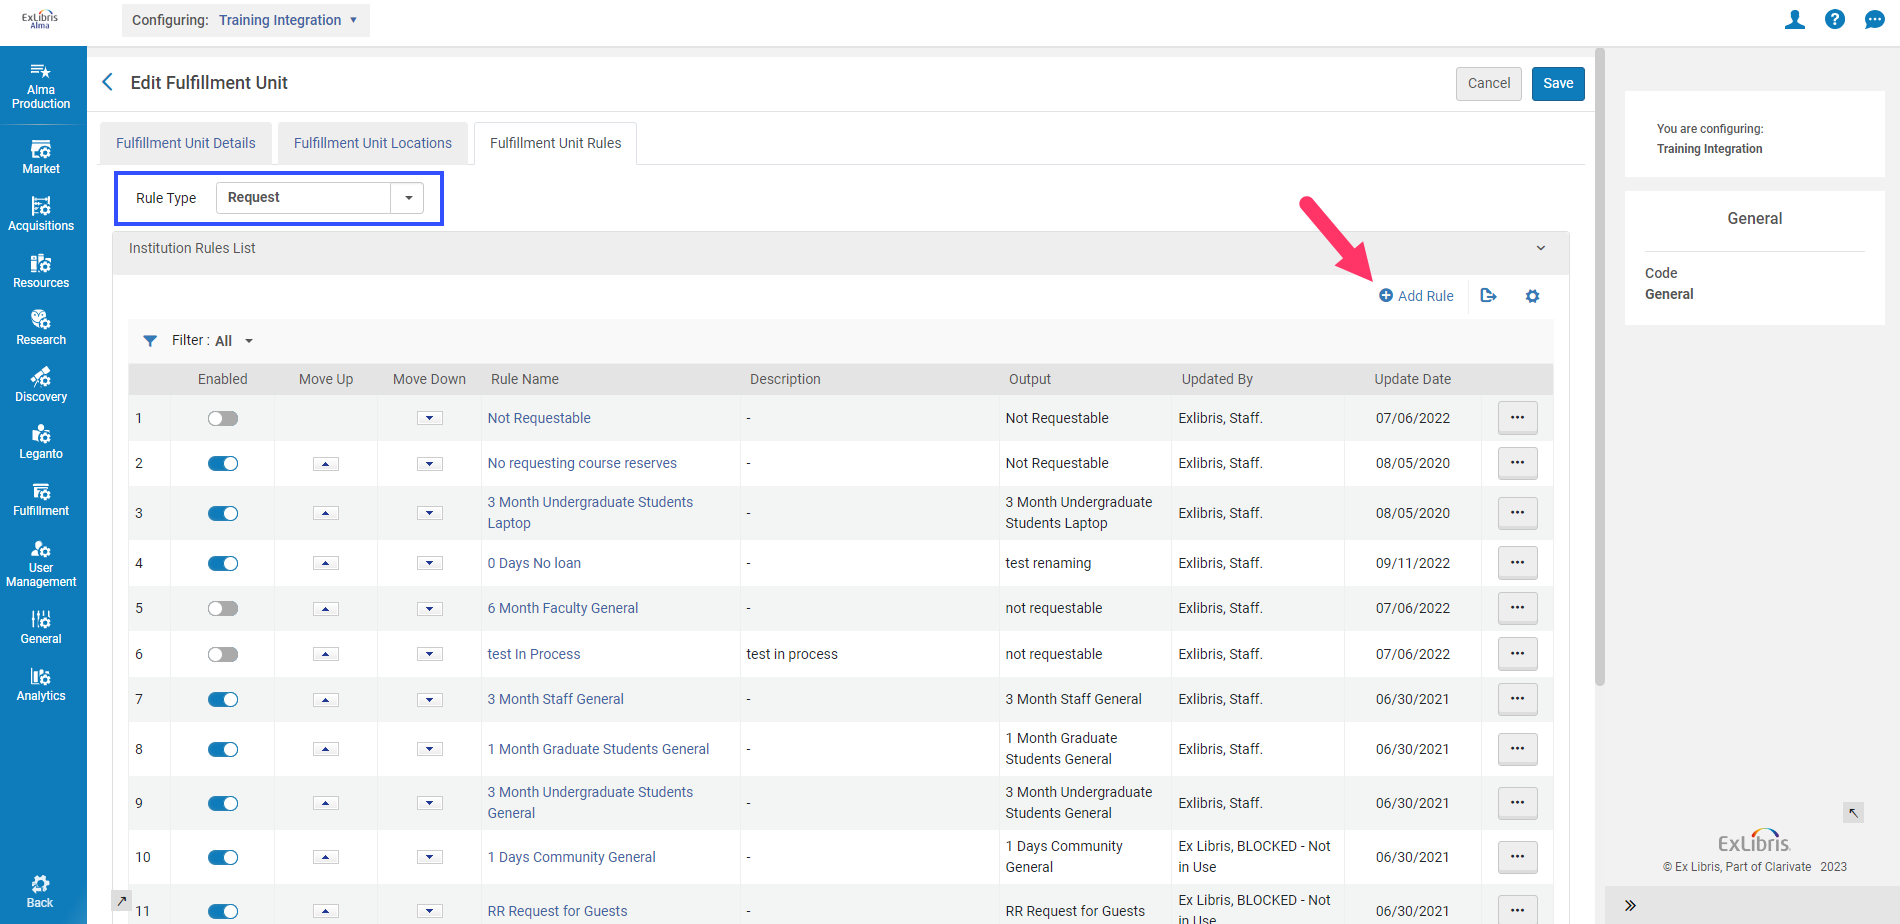
- Click "Add Rule." We recommend naming it "Not Requestable" or something similar, like "Lost Items Not Requestable." Add a description if desired.
- Next you will want to add input parameters, or the conditions the item needs to meet in order for the Terms of Use ("Not Requestable" policy) to apply to it and make it not requestable. This usually means that you will want to use "Process Type" with Operator "In List" and Value "Lost." You may also want to include "Lost and paid" and "Missing" process types in Value.
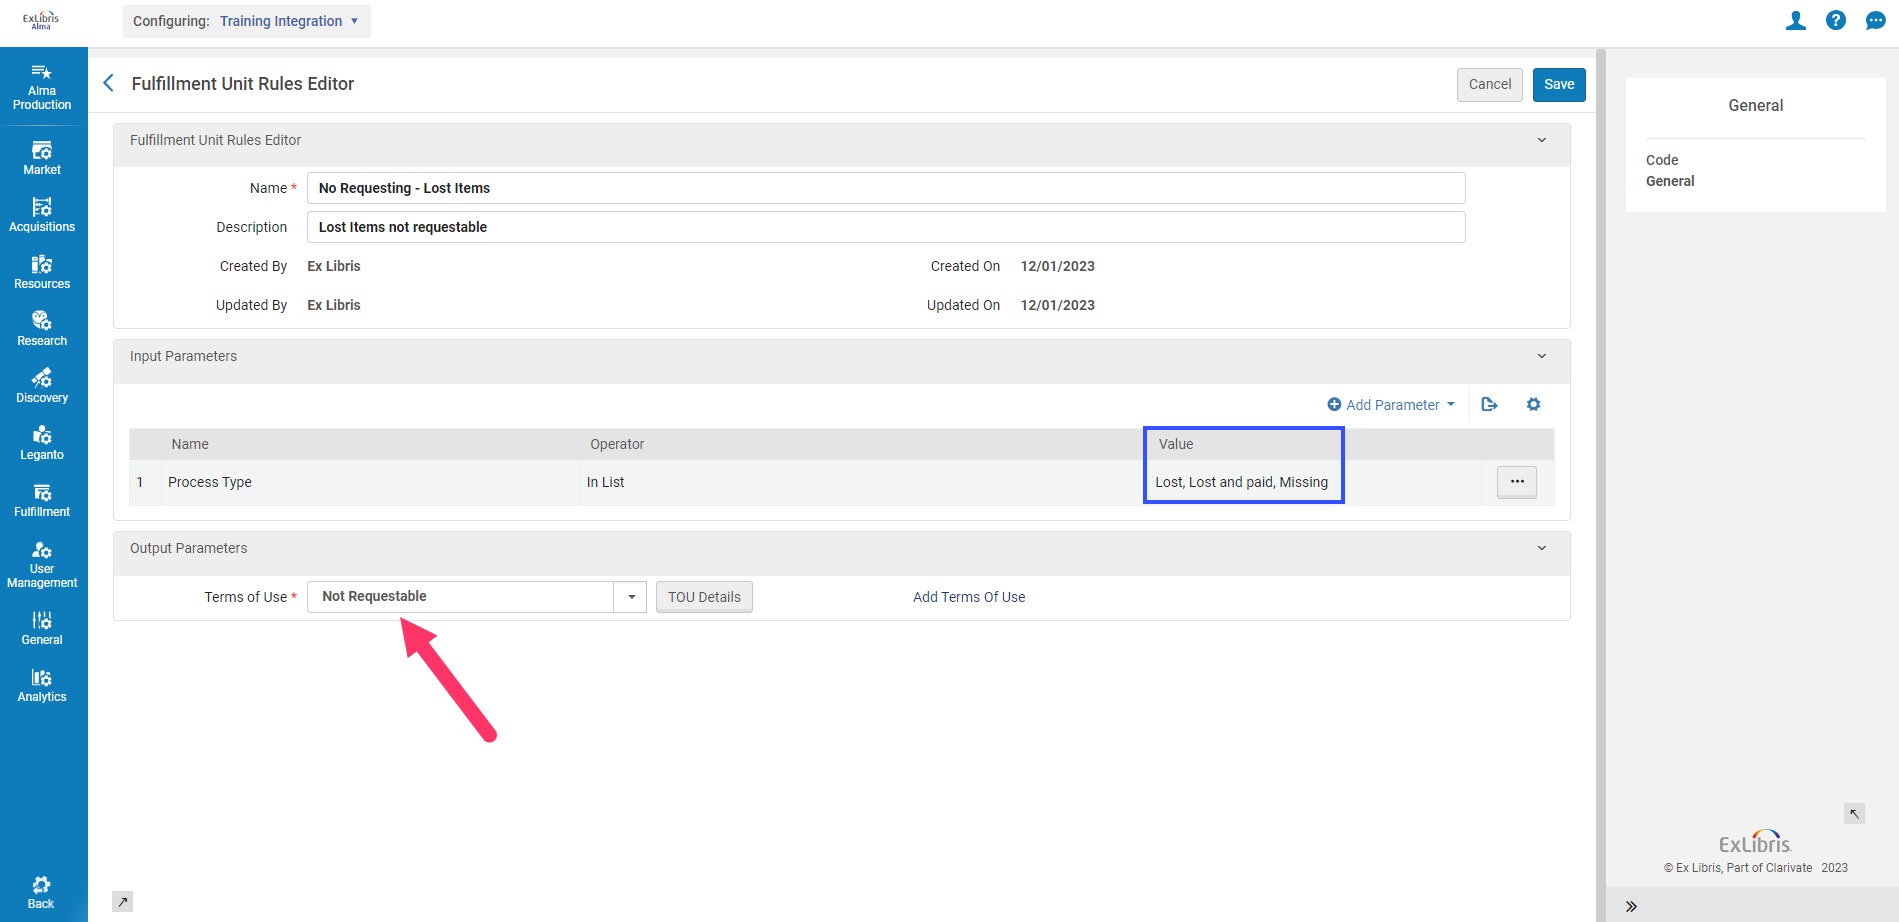
- Lastly, you will want to add the Terms of Use you created in Step 2: Adding the Item Policy to a Terms of Use (or the one you selected to use during this stage) as Output Parameters. Once you have completed this, you can Save.
- You may need to add additional Fulfillment Unit Rules if you want additional input parameters, as an item must meet all the conditions of a rule in order for its Terms of Use to be applied. Utilizing multiple input parameters may result in items slipping through if they do not meet all the conditions.
Optional Step 4: Checking the Fulfillment Configuration Utility
Optionally, you can check to make sure the "Not Requestable" policy is applying to your chosen lost items for your patrons. The full documentation and roles required for this tool can be found here. To use it:
- Go to Fulfillment > Advanced Tools - Loans > Fulfillment Configuration Utility.
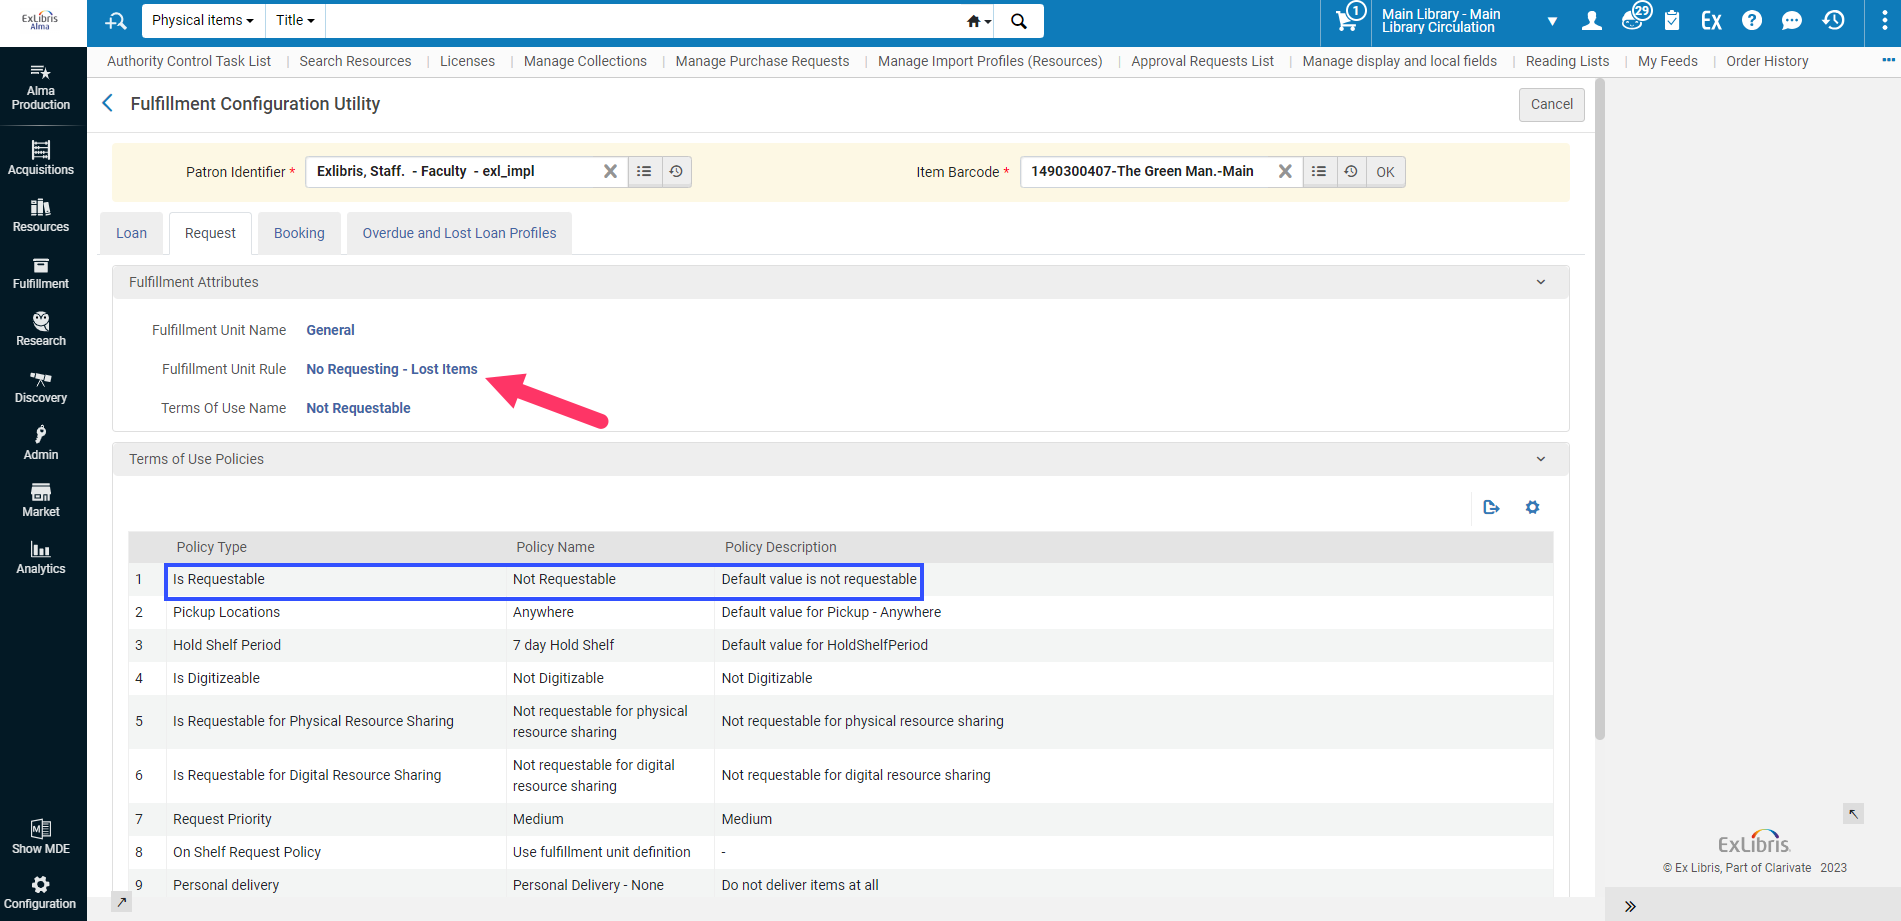
- For "Patron Identifier," select the primary identifier of a patron who should not be able to request lost items. For "Item Barcode," select the barcode of a lost item. Click OK.
- Select the Request tab. Under Fulfillment Attributes, you should see the expected Fulfillment Unit Name, as well as the Fulfillment Unit Rule and Terms of Use you just created for Not Requestable items. Additionally, you can see each and every one of the Terms of Use polices that are applying below the Fulfillment Attributes section.
Got questions? You can always open a case with Ex Libris Support for assistance!

