
Feature Rollout Configuration
To configure rollout settings for your institution, you must have the following role:
- General System Administrator
The instructions on this page apply to users with the Staff Record Type (see Managing Users).
New Alma features are rolled out in stages. This makes it possible for Ex Libris staff to ensure they are working properly and for Alma users to become acquainted with them before they fully replace any existing processes.
The rollout of a new feature proceeds in the following stages:
- Sandbox: Two weeks before its official rollout, a new feature is made available to institutions for preliminary testing purposes in the sandbox environment (see Alma Sandbox Environments).
- Phase 1 (Off by default): The official rollout of the new feature – phase 1 – takes place as part of a quarterly release. During this phase, the new feature is not activated by default, but it is available for institutions and individual users to turn on if they choose to do so.
- Phase 2 (On by default): Some time after the official layout, as part of a later quarterly release, phase 2 of the rollout begins. During this phase, the new feature is activated by default, but institutions and individual users can turn it off if they choose to do so.
- Full implementation: The final stage of a rollout takes place as part of a later quarterly release. In this release, the new feature is implemented for all users. Neither institutions nor individual users can opt-out from this point on.
During phases 1 and 2, administrators can override the default handling of a rollout in their institution. For example, they can turn a new feature on by default in their institution during phase 1 of the rollout. In addition, they can choose to completely opt out of a new feature for their entire institution (although this is not generally recommended; see Turn off and hide, below), and they can monitor the adoption of new features by individual users.
This page explains how to configure the institution-level configuration options. For information about how individual users can manage their own settings, see Opting In or Out of a New Feature.
Configuring the Rollout Settings for the Institution
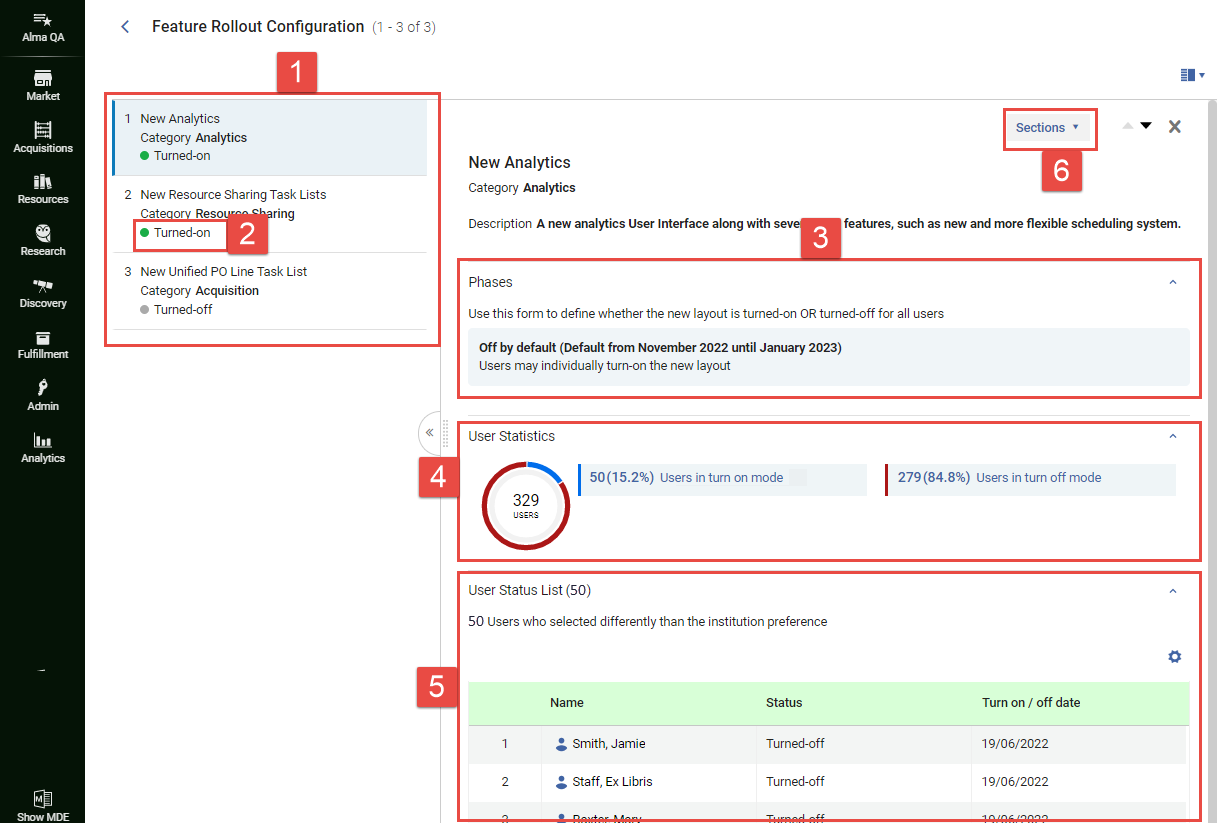
The Feature Rollout Configuration page (Configuration Menu > General > User Interface Settings > Feature Rollout Configuration) lists all of the features that are currently in the process of being rolled out. The list appears in the left panel (#1 in the illustration), along with information about whether each feature is currently globally enabled or disabled in your institution (e.g., #2). For each new feature being rolled out, administrators can choose how the feature is adopted in their institutions during the rollout (#3), and monitor its adoption by users.
This page uses the New Layout that is being rolled out in some Alma pages beginning with the August 2022 release. For information about working with this layout, see New Layout 2022.
 Feature Rollout Configuration page
- In the Feature Rollout Configuration page (Configuration Menu > General > User Interface Settings > Feature Rollout Configuration), in the left panel (#1), select the feature. A brief description of the feature is displayed in the right panel. The currently selected rollout setting is displayed in the Phases section (#3). For the Off by default and On by default options, the time period in which this option is activated by default is also shown. For example, Off by default (Default from November 2022 until January 2023) indicates that the currently selected option is Off by default, and that this option is selected by default when the November 2022 quarterly release is active.
If the description in the right panel is so long that you cannot see the other sections (Phases, User Statistics, and User Status List), you can navigate quickly to the required section by selecting Sections (#6), and then selecting the section from the menu that opens.
- Select the line in which the currently selected option appears.

Selecting the line of the currently selected optionThe Edit Phases box opens and lists the available options. In parentheses beside the Off by default (#7 below) and On by default (#8) options, the time period in which each of these options would be activated by default is also shown.

Edit Phases window - Select the required option, as follows:
- Turn off and hide: Turn the feature off for the entire institution, and do not allow individual users to override this selection. When this option is selected, individual users will not see this feature in the list of features they can choose to turn on or off (see Opting In or Out of a New Feature). This option is not recommended, and is only intended to be implemented for cases in which the new feature is actually causing a major problem in your system. In this case, after you choose this option, please contact technical support and describe the issue to them.
- Off by default: Turn the feature off for the entire institution, but allow individual users to turn it on if they wish.
- On by default: Turn the feature on for the entire institution, but allow individual users to turn it off if they wish.
- Select Apply. The selection is implemented in your institution, and overrides the existing settings selected by individual users. (If you selected Off by default or On by default, the users can then re-select the options they had chosen before, if they wish.) The Feature Rollout Configuration page closes, and the Alma home page opens. The setting you choose remains in force in your institution until it is either changed manually or the end of the phase arrives (at which point the default option for the next stage is implemented).
Monitoring the Adoption of New Features
The Feature Rollout Configuration page includes information about how many users in your institution have adopted each new feature, and which users have chosen not to follow the institution's recommended setting. You can use this information to help you pinpoint problems that have arisen with the new feature, and to identify users to contact in order to find out why they have chosen as they have. When a feature is selected in the left panel, this information appears in the User Statistics and User Status List sections of the right panel (#4 and #5).
It may take up to a minute for the user data to load, especially in large institutions with many users.
User Statistics
Under User Statistics (#4), the breakdown of users who have and have-not retained the institution-default setting is presented in two formats:
- A color-coded pie chart
- A key showing which group is represented by each color and presenting more detailed data about each group.
User Status List
Under User Status List (#5), information is displayed about which users have opted not to retain the institution-default setting. Select a user's name to access their contact information (email address and phone number).