Patron Account Configurations
This page describes how to configure patron accounts including user groups, patron limits, user authentication and loan limits.
For information on configuring demerits see Configuring User Blocks.
For links to all the main fulfillment documentation pages see Fulfillment.
Configuring Patron (User) Groups
To configure patron (user) groups, you must have one of the following roles:
- General System Administrator
- Fulfillment Administrator
This page explains how to configure patron limits and authentication requirements for patron user-groups.
- Watch the Configure User Blocks video.
- Watch the Configure Patron and Loan Limits video.
The patron user-groups themselves are created and configured on the User Groups Code Table page (Configuration Menu > Fulfillment > Patron Configurations > Patron Groups). For details, see Configuring User Groups.
Blocks on individual patrons, based on accumulated demerit points or overdue loans, can also be created. For details, see Configuring User Blocks.
If your institution is using user groups as fulfillment parameters (e.g., in Fulfillment Unit Rules, Display Logic Rules, etc.), you will need to update the rules with the new user group in order for them to take effect for users in the group.
Configuring Patron Limits
To configure patron limits, you must have one of the following roles:
- General System Administrator
- Fulfillment Administrator
For the how-to that guides you through the process of setting up librarian- and system-assigned blocks to patrons, see How To Set Up Blocks to Prevent Loaning, Renewing and Hold Requests for Patrons.
Alma enables you to define various limits that apply to the patrons who use the services of the institution and libraries within the institution. Patron limits are checked and applied when a patron attempts to borrow or renew a resource from the library. When a patron reaches one of the defined limits, the patron’s account is blocked. The patron limits are calculated in real-time during fulfillment activities (similar to loan limits) and do not appear in the user's "Blocks" tab. For example, you can specify that the patron’s account is blocked when the patron reaches 10 overdue items. The patron will not be able to borrow additional resources from the library until the number of overdue loans on their account is below the configured limit.

Block Pop-up Message
Selecting OK continues the flow and the user will be prompted with the block message where relevant when loaning or renewing an item. Selecting Override causes the blocks to be overridden i.e., the user will not be prompted with this message for loans.
Patron limits are defined for groups of patrons, based on the user groups to which the patrons are assigned. For example, you could define a set of limits for all patrons that are part of the Graduate Student user group. For each user group, you can define limits that may block a patron’s account, such as:
Maximum number of overdue items
- Maximum amount of cash that can be owed by the patron
- Maximum number of bookings (not including resource sharing requests)
- Maximum number of overdue recalled items
These limits are configured at the institution level using the Patron Limits Definitions mapping table. Each set of limits can be either enabled or disabled. By default, each new set of patron limits is enabled. The limits that you define apply to all libraries within the institution.
Patron limits are configured on the Patron Limits Mapping Table page (Configuration Menu > Fulfillment > Patron Configurations > Patron Limits).
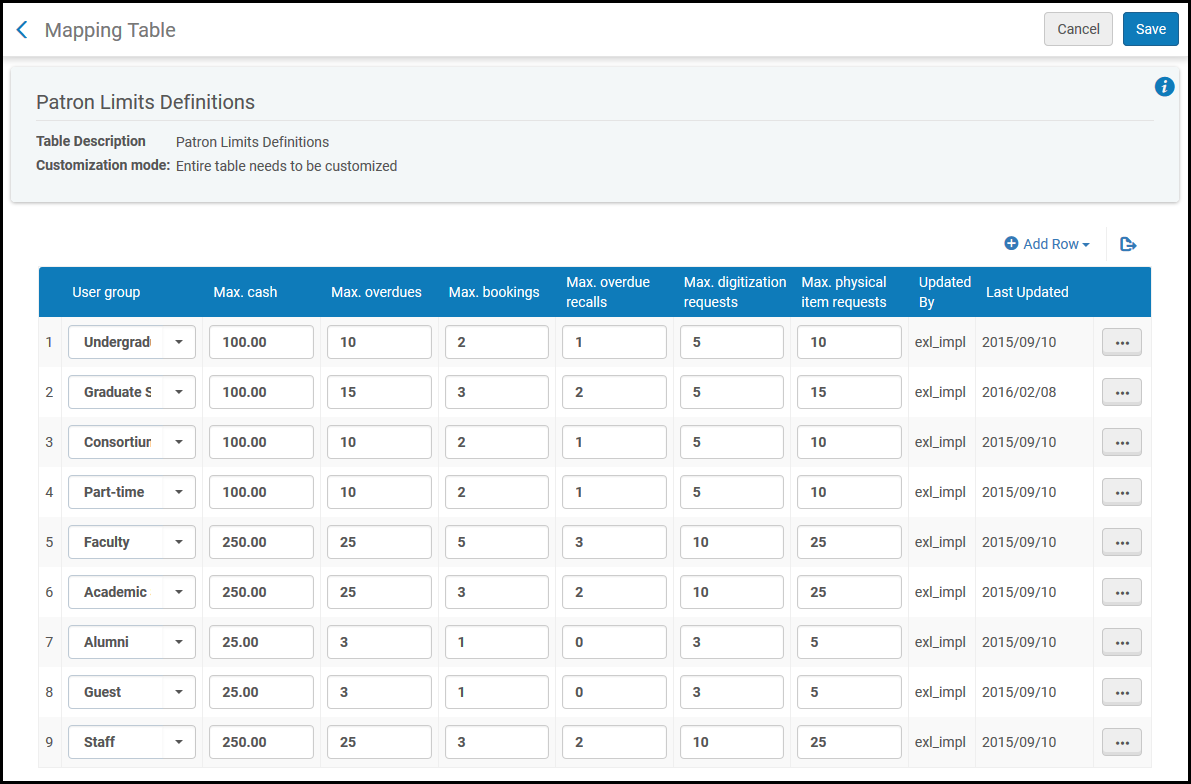
Patron Limits Mapping Table Page
Patron limits can be configured at the institution level only. Select the required institution from the Configuring filter on the Fulfillment Configuration page.
The following actions can be performed on this page:
- Add a set of patron limits (see Adding a Set of Patron Limits)
- Edit a set of patron limits (select Edit)
- Delete a set of patron limits (select Delete)
Adding a Set of Patron Limits
You can add a new set of patron limits to the institution. When you add a set of patron limits for a specific user group (for example, Alumni), ensure that there is only one enabled set of limits for this user group.
You define patron limits at the institution level. The limits that you define apply to all libraries within the institution.
To add a new set of patron limits:
- On the Patron Limits Mapping Table page (Configuration Menu > Fulfillment > Patron Configurations > Patron Limits), select Add Row and select the patron user group for which you want to create a new set of limits.
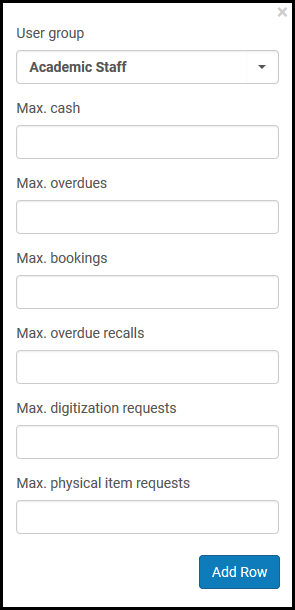 Create New Patron Limits
 - Enter the following information:
- Max. cash – Maximum amount of cash that can be owed by the patron before the patron’s account is blocked.
Max. cash is a required field.
- Max. overdues – Maximum allowed overdue loans before the patron's account is blocked. If you define max. overdue = 1, the patron account is blocked only after there is more than one overdue loan. Setting max. overdue to 0 will block a patron with one overdue loan.
- Max. bookings – Maximum number of bookings allowed before the patron’s account is blocked. This value does not include resource sharing requests.
- Max. overdue recalls – Maximum number of overdue recalled items allowed before the patron’s account is blocked. Note that setting max. overdue recalls to 0 will block a patron with one overdue loan.
- Max. digitization requests – Maximum number of digital item hold requests allowed before the patron’s account is blocked
- Max. physical item requests – Maximum number of concurrent active physical item hold requests allowed before the patron’s account is blocked
If you leave one of the above boxes blank, no limit will be applied in this area. - Max. cash – Maximum amount of cash that can be owed by the patron before the patron’s account is blocked.
- Select Add Row. The new set of limits is displayed at the bottom of the list of defined patron limits.
- Select Save to store the new set of patron limits.
Configuring Patron User Authentication
For Primo VE environments, you will also need to configure user authentication for Primo VE sessions. For more information, see Configuring User Authentication for Primo VE.
To configure patron user authentication, you must have one of the following roles:
- General System Administrator
- Fulfillment Administrator
You can configure the login options that appear in the Alma digital viewers from the User Authentication page (Configuration > Fulfillment > Patron Configurations).
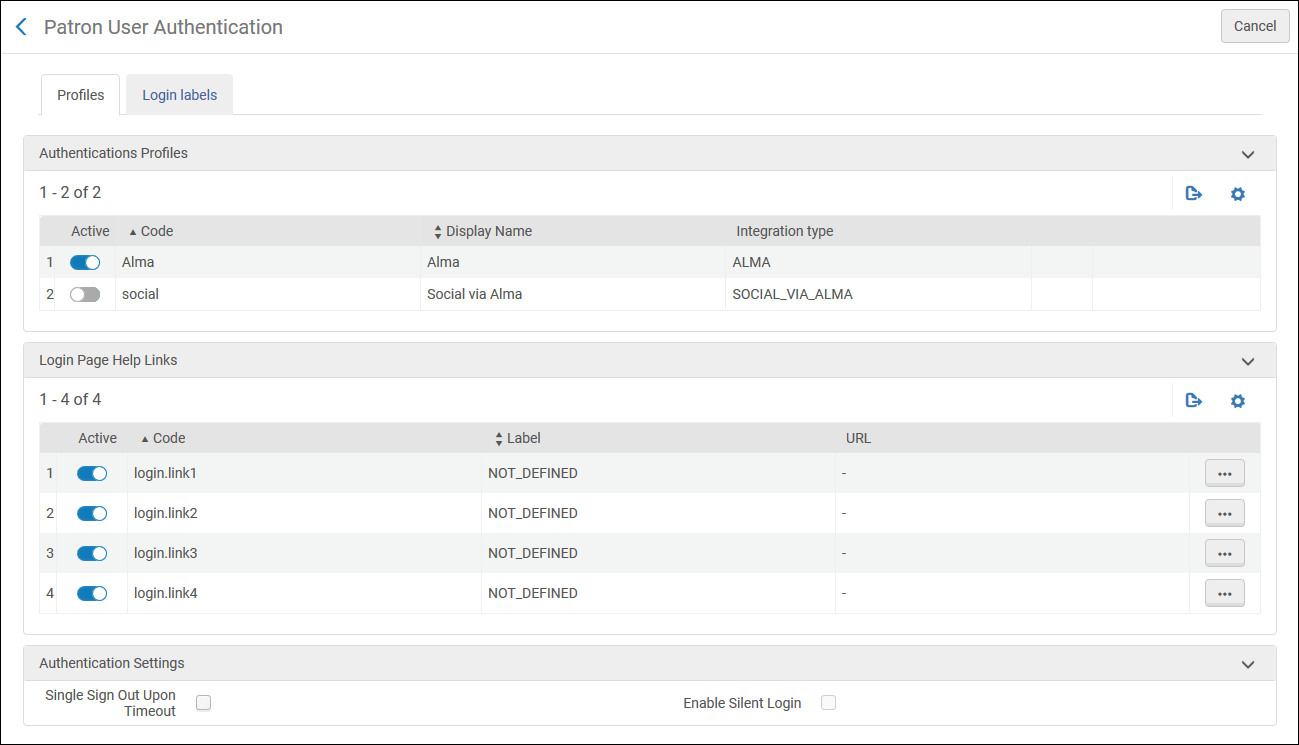

Patron User Authentication
To configure patron user authentication:
- Open the User Authentication page (Configuration > Fulfillment > Patron Configurations > Patron User Authentication).
- From the Profiles tab, in the Authentication Profiles section, activate the profiles that you want to appear in the Alma digital viewers.
The profiles that appear here are integration profiles configured with an integration type of SAML, LDAP, CAS, and Social/Email Login. For more information, see Configuring Integration Profiles.
- In the Login Page Help Links section, activate and edit the links that appear when the patron clicks the Need help for this page link (configurable) in the viewer login page.
- To have the viewer sign out when Alma times out, select Single Sign Out Upon Timeout.
- Select the Login Labels tab. The following appears:
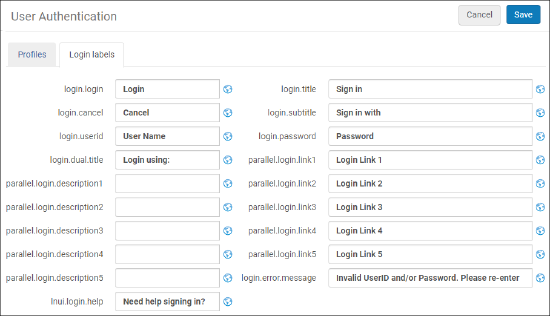 Login LabelsEdit the labels that appear in the viewer login page.
 - Click Save.
Configuring Loan Limit Rules
To configure loan limit rules, you must have one of the following roles:
- General System Administrator
- Fulfillment Administrator
To limit the number of items a patron can check out simultaneously, add a loan limit rule. The rule can be applied according to library, location, item policy, material type, and user group.
You configure loan limit rules from the Loan Limit Rule page (Configuration Menu > Fulfillment > Patron Configurations > Loan Limits).
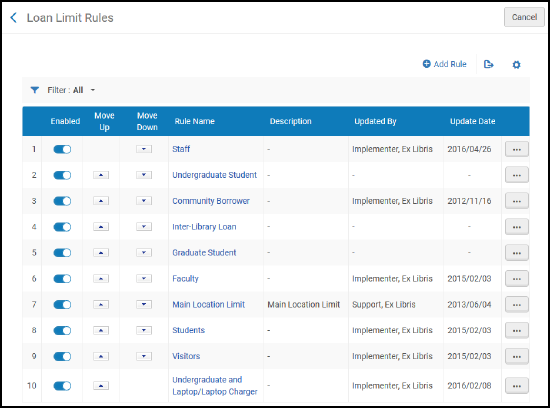
Loan Limit Rules Page
Loan limit rules can be configured at the institution level only. Select the required institution from the Configuring filter on the Fulfillment Configuration page.
The following actions can be performed on this page:
- Add Loan Limit Rules (see Adding Loan Limit Rules).
- Edit Loan Limit Rules (select Edit from the row actions list).
- Duplicate Loan Limit Rules (select Duplicate from the row actions list and modify the relevant fields).
- Delete Loan Limit Rules (select Delete from the row actions list).
Adding Loan Limit Rules
You can add a loan limit rule. The rules that you define apply to all the libraries within the institution.
To add a loan limit rule:
- On the Loan Limit Rules page (Configuration Menu > Fulfillment > Patron Configurations > Loan Limits), select Add Rule. The Loan Limit page opens.
If you want to create a copy of an existing loan limit rule, select Duplicate from the row actions. Once you have copied the loan limit rule, you can modify it as needed.
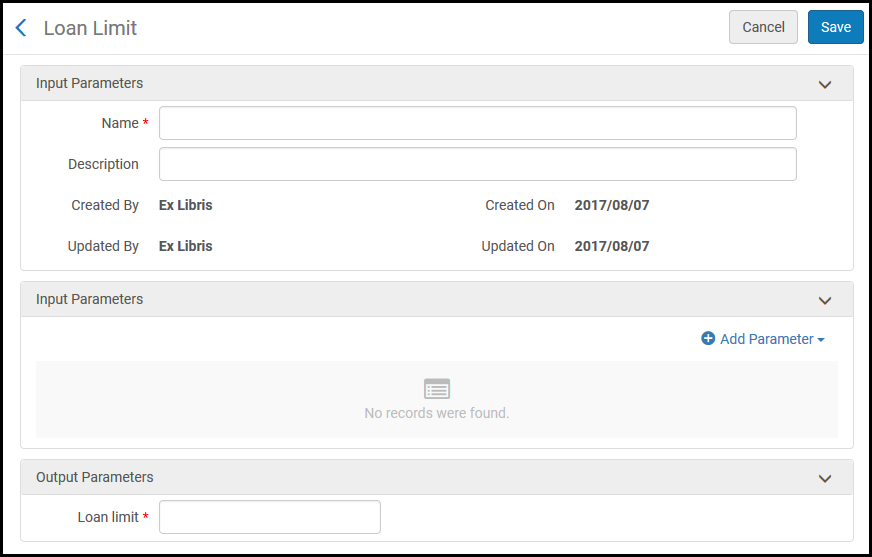 Loan Limit Page
 - Under Input Parameters, enter a name and description of the loan limit rule.
- Under Input Parameters, specify the components of the input parameter (Name, Operator, and Value). A set of input parameters may look like this: Library=ArtLibrary.
- Select Add Parameter. The set of input parameters is added to the list of parameters for the loan limits rule.
- Repeat the previous two steps to add all of the required parameters for the rule.
At least one input parameter must be fulfilled for the rule to be applied.
- Under Output Parameters, enter a loan limit – the maximum number of items that a patron can borrow according to the loan limit rule. If you enter 0 all loans are blocked.
- Select Save to store the new rule.
- The order of the rules is not important. All the rules that match the criteria are checked by the system. If a limit defined by any of the rules is exceeded, the new loan is not created.
- For unlimited loans, do not create a loan limit rule that applies to the loan.

