
Security
Restricting Alma Logins by IP Range
- General System Administrator
- From the IP Group Configuration page (Configuration Menu > General > Security > IP Group Configuration), select Add IP Group. The Add IP Group pane appears.
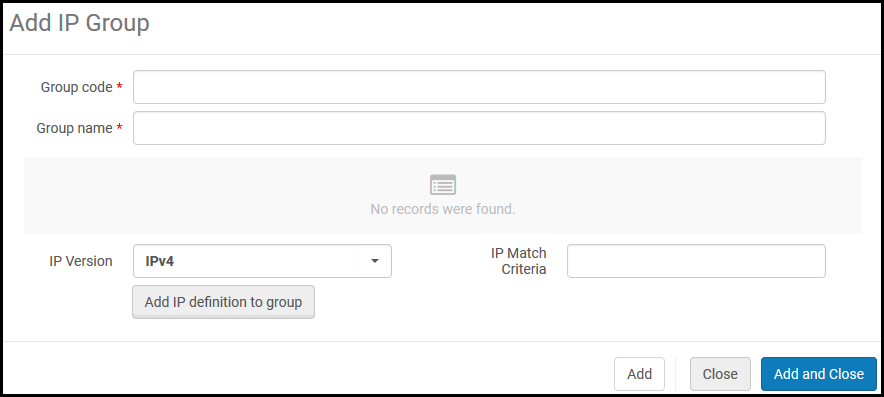 Add IP Group
 - Enter the following:
- Group Code – A code for the IP group
- Group Name – A name for the IP group that can be changed later
- IP Version – IPv4 or IPv6
- IP Match Criteria – A specific IP address or an IP range (two valid IP addresses separated by a hyphen)
- Select Add IP definition to Group. The range is added to the group and appears in the table.
- You can define multiple IP ranges for each group. Repeat steps 2 and 3 as necessary. To remove a range, select Delete in the row actions list.
- When you have finished adding IP ranges, select Add and Close. The IP group is added.
To edit the group, select Edit in the row actions list. To delete the group, select Delete in the row actions list.
- Open the Login Restriction Configuration page (Configuration Menu > General > Security > Login Restriction Configuration). Note that login restrictions are disabled until you enable them on this page.
 Login Restriction Configuration
 - The login restrictions can be overridden for a particular user by selecting Disable all login restrictions when editing the user (see Editing Users).
Selecting the Apply restrictions for all users checkbox cancels the user-level override and also applies the login restrictions for users with the General System Administrator role. Note that the previous configuration is not removed and will return once the checkbox is unchecked. - Select the IP groups from IP Group whose IP addresses you want to allow login access, and select Add. You can select Add all groups to add all IP groups.
Once an IP group is selected, all other IP addresses are restricted from logging in.
- Select a manager from the IP restrictions manager box (mandatory). This manager receives any messages sent by users when a login attempt is made from a restricted IP address.
- Select Enable login restrictions. To save your changes without enabling or disabling login restrictions, select Save.
- You must select Enable login restrictions for the IP login restrictions to take effect.
- Users with the General System Administrator role are not restricted.
- To disable login restrictions at a later time, select Disable login restrictions.
CSP (Content Security Policy) Header Configuration
You can enable and configure CSP header directives to fine-tune the security policy for your web applications. To access this configuration go to Configuration > General > CSP Header Configuration.

The preview pane at the bottom displays the headers and is updated automatically when the settings are changed.
The first four directives (frame-ancestors, object-src, worker-src, upgrade-insecure-requests) are active by default and cannot be disabled. You can however add additional domains to the allowed list in the Allowed List - Additions column, by hovering over the column to locate the edit icon and then adding the domain.
The last five directives (described below) are deactivated by default but unlike the first four directives, they can be activated. You can add additional domains to the allowed list in the Allowed List - Additions column.
-
form-action:
- This directive restricts the URLs that can be used as the target of form submissions (
<form action="..." />). It helps to prevent forms from being submitted to malicious sites.
- This directive restricts the URLs that can be used as the target of form submissions (
-
base-uri:
- This directive restricts the URLs that can be used in a document's
<base>element. The<base>element specifies the base URL to use for all relative URLs in a document, so controlling this can prevent attackers from changing the base URL and redirecting links to malicious sites.
- This directive restricts the URLs that can be used in a document's
-
script-src:
- This directive specifies valid sources for JavaScript. It helps to mitigate XSS attacks by allowing only scripts from trusted sources to be executed on the page. For example, you can specify that scripts should only be loaded from your own domain or from a trusted CDN.
-
frame-src:
- This directive specifies valid sources for embedding content using
<frame>,<iframe>,<object>,<embed>, and<applet>. It helps to control which sources can be embedded within the frame and thus prevent clickjacking and other types of frame-based attacks.
- This directive specifies valid sources for embedding content using
-
connect-src:
- This directive restricts the URLs that the document can fetch using mechanisms like
XMLHttpRequest,Fetch,WebSocket, and EventSource. It helps to control where scripts can send data, reducing the risk of data exfiltration.
- This directive restricts the URLs that the document can fetch using mechanisms like
-
style-src:
- The HTTP
Content-Security-Policy(CSP)style-srcdirective specifies valid sources for stylesheets.
- The HTTP
-
img-src:
- The HTTP
Content-Security-Policyimg-srcdirective specifies valid sources of images and favicons.
- The HTTP
-
font-src:
- The HTTP
Content-Security-Policy(CSP)font-srcdirective specifies valid sources for fonts loaded using@font-face.
- The HTTP
-
child-src:
- The HTTP
Content-Security-Policy(CSP)child-srcdirective defines the valid sources for web workers and nested browsing contexts loaded using elements such as<frame>and<iframe>. For workers, non-compliant requests are treated as fatal network errors by the user agent.
- The HTTP
-
default-src:
- The HTTP
Content-Security-Policy(CSP)default-srcdirective serves as a fallback for the other CSP fetch directives. For each directive that is absent, the user agent looks for thedefault-srcdirective and uses this value for it.
- The HTTP
Login Redirection Allowed List
To avoid potential security issues (open redirect vulnerability), you can create a list of trusted sites.
-
Ensure that the limit_login_redirects (Configuration > General > Other Settings) parameter is set to true.
-
Navigate to Configuration > General > Redirection Allowed List.
-
Add a new row for each trusted domain. The code is descriptive only and it not used by Alma.
Domains that belong to Ex Libris (*.exlibrisgroup.com) do not need to be listed.

Preventing Clickjacking
- General System Administrator
Clickjacking is an attack that tricks users by showing them an innocuous page that includes real controls from sensitive pages. These controls are disguised through the use of background frames that mask off everything except the control, and the user cannot tell that they are actually clicking on a sensitive function in some other website. This can cause users to unwittingly download malware, provide credentials or sensitive information, transfer money, or purchase products online.
To prevent clickjacking from ExLibris products, ExLibirs has adopted a policy-based mitigation technique. Now institutions can instruct the browser about appropriate actions to perform if their site is included inside an iframe.
Modifying this page may break UI integrations from other products. In case of any doubts as to how to use this page, consult Ex Libris Customer Support.
- Open the iFrame Embedding Options table (Configuration > General > Security > iFrame Embedding Options).
- For the desired product and component, select Customize in the row actions.
-
Alma Management and Esploro Management cannot be framed. This configuration cannot be edited.
-
IFrame Embedding is not supported if you are using an Azure IDP.
-
- In the Action column, select the appropriate action to perform if your site is included inside an iFrame:
- Allow all (default option) — Allow all pages to load this page inside an iFrame.
- Allow protected — Only trusted pages are permitted to load this page inside an iFrame. If you selected this option, in the Safe Domain column indicate the trusted URLs (no limit on the number of URLs you can specify, list multiple URLs with a blank space between them).
- Block All — Deny all attempts to frame the page.
- Select Save.