
Summon Configuration
When moving from the Client Center or Intota to Alma, there are a few items to note regarding the Summon user interface and collection data uploads.
When opening Support cases with requests regarding your local catalog (such as mapping changes, requests for new full load, questions about updates and deletes, requests for new institutional repository/Libguide, and so forth), please set the Category to Institutional repository/Summon local content.
Summon Administration Console
All of your library's existing configuration and customization in the Summon Administration Console will continue to apply to your Alma-Summon instance. For more information, see Configurations within the Summon Administration Console.
While a Summon library progresses through its Alma implementation, the library has two Summon Administration Console profiles:
-
The profile accessible via the Client Center or Intota: Until you go live with Alma-Summon, these settings and customizations continue to be reflected in the Summon instance you are providing to end users.
-
The profile accessible via Alma: These settings and customizations affect your Alma-Summon instance only; changes do no impact your live Summon instance.
Access your Alma-Summon administration console profile from the below Discovery menu in Alma; Alma users are automatically logged in.
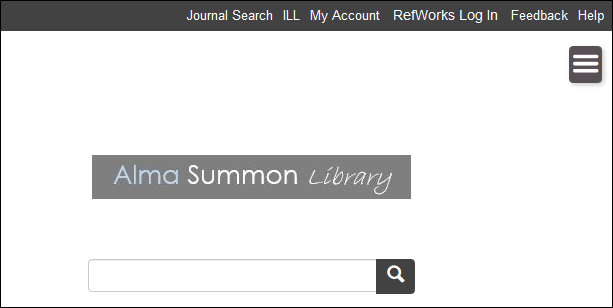
When user's are signed in, the Summon user interface provides additional Alma-related links in the top right-hand corner of Summon.
The Alma-related links are detailed below. Alma-Summon automatically configures these links for your library:
-
ILL – A Resource Sharing Request form can be used to request items from other institutions. For more information, see Configuring the Resource Sharing Request Form.
-
Journal Search – Your library's e-journal holdings in Alma are searchable via the Journal Search page. This feature is similar to the A-Z List link that was available to users when your library maintained its holdings in the Client Center or Intota. For more information, see Using Journal Search.
Journal Search currently provides access to e-journal titles; e-book titles are currently not searchable.
-
My Account– The My Account page in Summon displays the end user's Library Card information in Alma, such as loans and requests.
Collection Data Uploads and Timeframes for Availability in Summon
Updated Alma holdings and local collections (for example institutional repositories) will be indexed in Summon through the Summon Index process and timeframe your library relied on prior to moving to Alma.
Configuring the Links to Alma
The Alma Links page in the Summon Administration Console allows you to configure the following links on the Summon user interface:
-
The Alma links that appear in Summon.
-
The order in which the Alma links appear in Summon.
-
The labels that appear for each of the Alma links in Summon.
-
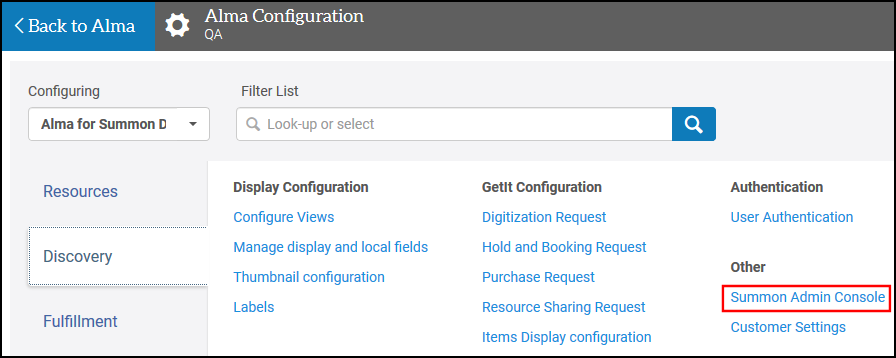
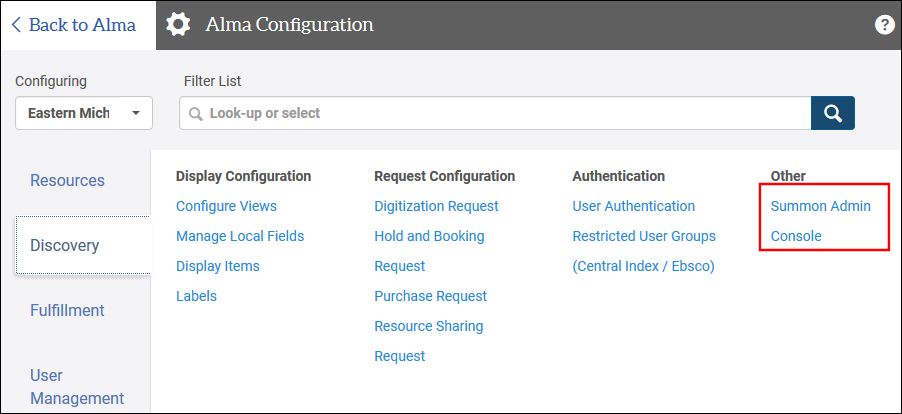
From the Discovery Configuration menu (Configuration Menu > Discovery), select Summon Admin Console under Other.
Alma Discovery Configuration Menu -
Select Settings and then Alma Links.
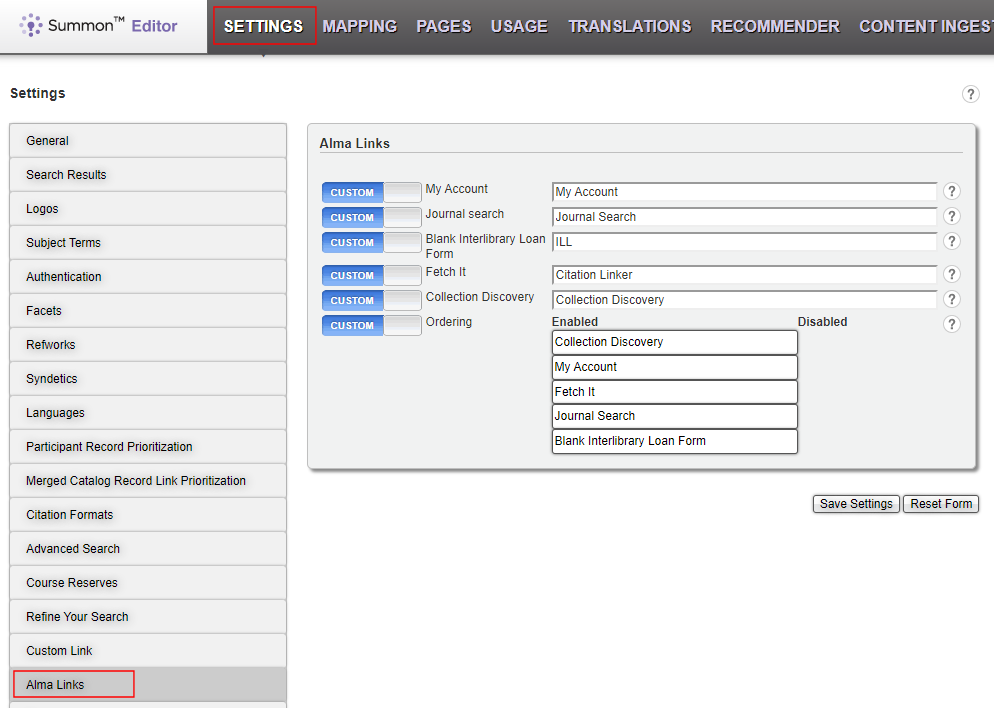 Alma Links Settings
 -
For each of the fields listed in the following table, select CUSTOM, to customize a field's settings. Select DEFAULT to return a field to its default settings.
Field Description My Account
Defines the display text for the link to the user's library card in Alma.
Journal Search
Defines the display text for the link to Journal Search page in Alma.
Blank Interlibrary Loan Form
Defines the display text for the link to the interlibrary loan request form in Alma.
Fetch It
Defines the link to the Fetch Item page (which may also be known as the Citation Linker) in Alma.
Collection Discovery
Defines the link to the Collections Lobby in Alma.
Ordering
This field allows to enable/disable the above links and specify their order in Summon by dragging and dropping an item under the Enabled or Disabled column.
-
Select Save Settings.
Adding a New Institutional Repository or LibGuide
As an Alma user, you can load into Summon a brand new Institutional Repository (IR) or LibGuide by following the below steps.
-
In advance of loading a new LibGuide into Summon, we recommend viewing the Metadata Suggestions for your Guides section of Summon: Search and Display of LibGuides.
-
If you are an Alma Digital user, records for the new digital content is included in your existing bibliographic record upload to Summon. See the Publishing Bibliographic Records section above to make sure the Content Options section of the Publishing Profile Details Page has the Digital checkbox selected. You do not need to complete any of the steps detailed below.
-
From the Discovery Configuration menu in Alma, select Summon Admin Console and then select Content Ingestion at the top of the administration console.
 Alma Discovery Configuration Menu
 -
Select either Institutional Repository or LibGuides from the Content Ingestion menu at the top of the page:
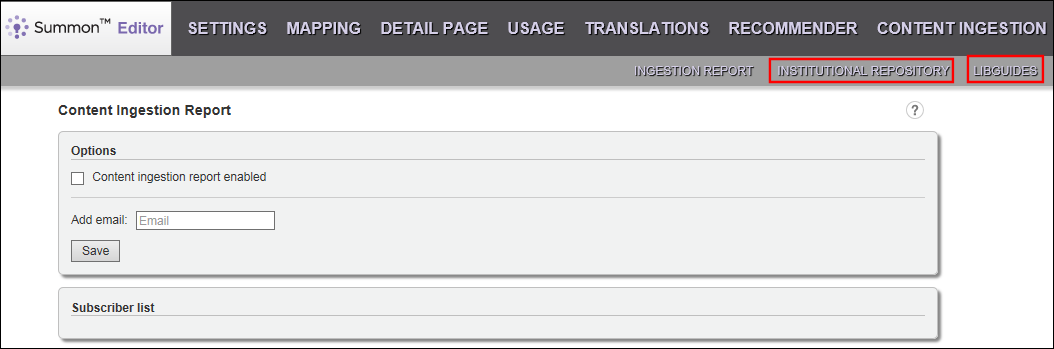 Content Ingestion Menu
 -
Complete the appropriate form:
-
Add Institutional Repository form:
-
Repository Type – Enter dspace, ContentDM, locally developed or whatever the appropriate type is. The Type does not display in the Summon user interface.
-
Public URL
-
OAI-PMH Access Point URL
-
Allow access to patrons outside your institution – Select Yes if repository should be publicly accessible to all Summon customers; select No if access should be limited to your institution's patrons.
-
Does IR contain any full-text records? – Select No if the repository only contains abstracts/citations.
-
Full Text Flagging Method – If you selected Yes, the IR contains full-text records, how are the full-text records identifiable so that Summon can include these records when a user limits to full-text?
-
For example, maybe all dissertations in the IR are full text, or maybe all records with a format of application/pdf are full text. Enter whatever way we can identify the full-text records.
-
-
Display name for library locations facet (Optional) – Some libraries find that the Library Location facet assists users in accessing IR content. Note that one Library Location per IR is our standard practice.
-
Description of Content – For example, "Images, texts and audio/video from ECU's diverse collections." The maximum length is 100 characters.
-
Select Save. The Status field at the bottom of the form in the Summon Administration Console changes from New Request to In Process.
-
-
Add LibGuides form:
-
LibGuides URL
-
LibGuides Name
-
Expected Record Count
-
Select Save. The Status field at the bottom of the form in the Summon Administration Console changes from New Request to In Process.
-
-
-
In Alma create a local electronic collection for your new Institutional Repository or LibGuide. For details, see Creating a Local Electronic Collection in Alma for a LibGuide or Institutional Repository.
-
Please open a Support ticket marked with the Summon Local Content Category so that our Content Team can help with the final configuration and make the IR live in your environment.
-
Once our Content Team has completed its work and the new IR or LibGuide is available in the Summon index, the Status field at the bottom of the form in the Summon Administration Console changes to Live in Summon. It takes approximately three to six weeks for the content to be processed and to appear in Summon.
-
Once the content is live in Summon, one way to quickly view all of the IR records in Summon is by doing a Summon search on the Provider Package Code (DB ID) that you entered into the Electronic Collection Editor in Alma.
-
Use the Summon search syntax DBID:<DBID for the IR>. For example, if the DBID is 01MyLibrary_ir_01, use the Summon search syntax DBID:01MyLibrary_ir_01.
-
-
For additional IR details such as how to maintain the content in Summon if the repository does not support the OAI-PMH protocol, see Summon: Including Your Library's Institutional Repository.
-
To contact our Support Team, use the Ex Libris Support Portal (accessible from the More Sites drop-down menu above). Please include the URL of the IR or LibGuide for which you are inquiring.
-
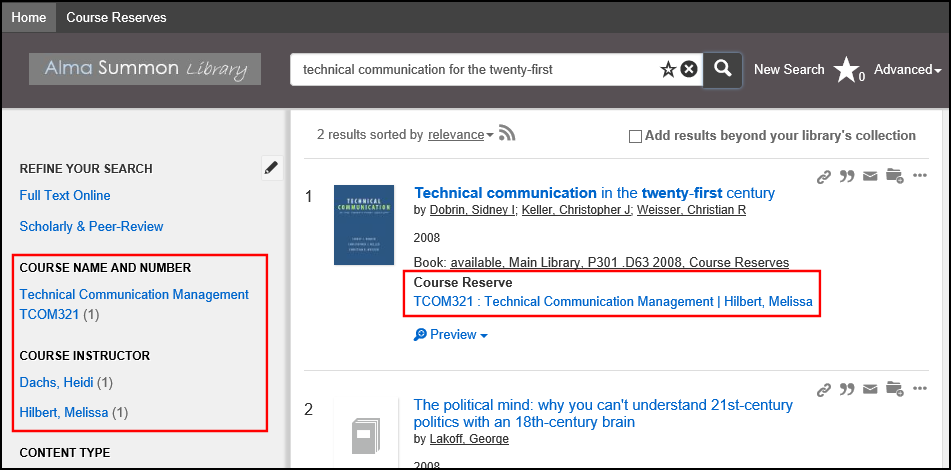
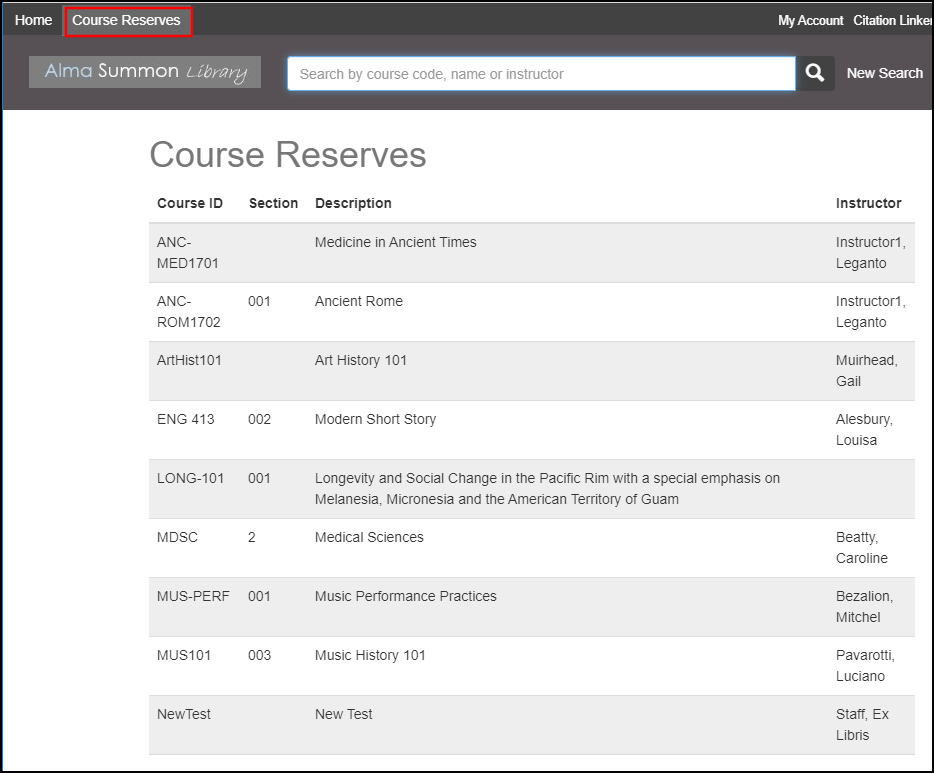
Configuring Course Reserves in the Summon UI
Course reserves information can appear in the following areas of the Summon UI: Facets, Brief results, and the Course Reserves page.
Enabling the Course Reserves Facets in Summon
Course reserves that are defined in Alma are published to Summon according to the course's start date and deleted according to the course's end date. Depending on the start date specified in Alma and the Summon Index Update Schedule, it can take up to a week for course reserves to appear in Summon. For this reason, you may want to backdate the start date by a week for your courses to ensure that the Summon Index Update completes before the start of the courses.
You must set the Course Information Enrichment option in the Publishing bibliographic records to Summon publishing job in Alma (see Publish Bibliographic Records to Summon).
-
Open the Summon Admin Console (Discovery > Summon Admin Console).
-
Select the Settings tab.
-
In the Facets section, drag and drop the Course Instructor and Course Name and Number fields to the Enabled column.
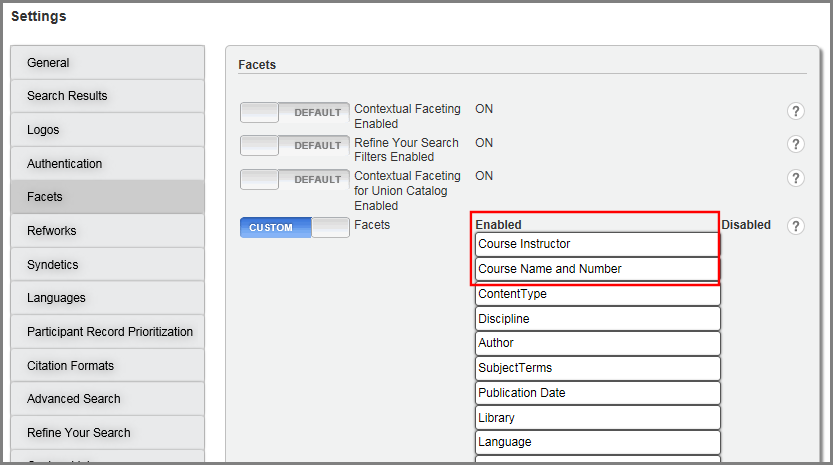 Settings > Facets Section
 -
Save your changes to the Facets section.
Configuring the Course Reserves Page
The Course Reserves page is a dedicated Summon page that allows users to view course reserves information defined in your institution. To enable the Course Reserves page, perform the following configurations:
-
Create the Alma Course Reserves API key.
-
Enable the Course Reserves Page in Summon.
-
Configure the display fields.
Creating the Key for the Courses API
The Courses API allows Summon to retrieve all course reserves information defined for the institution, which is defined in Alma/Leganto. To gain access to this information, you must create a key for your institution in the Ex Libris Developer Network.
-
Log on to the Ex Libris Developer Network using your institution-specific user name and password:
-
On the My APIs page (Ex Libris Developer Network > Build My APIs), select API Keys > Manage Keys.
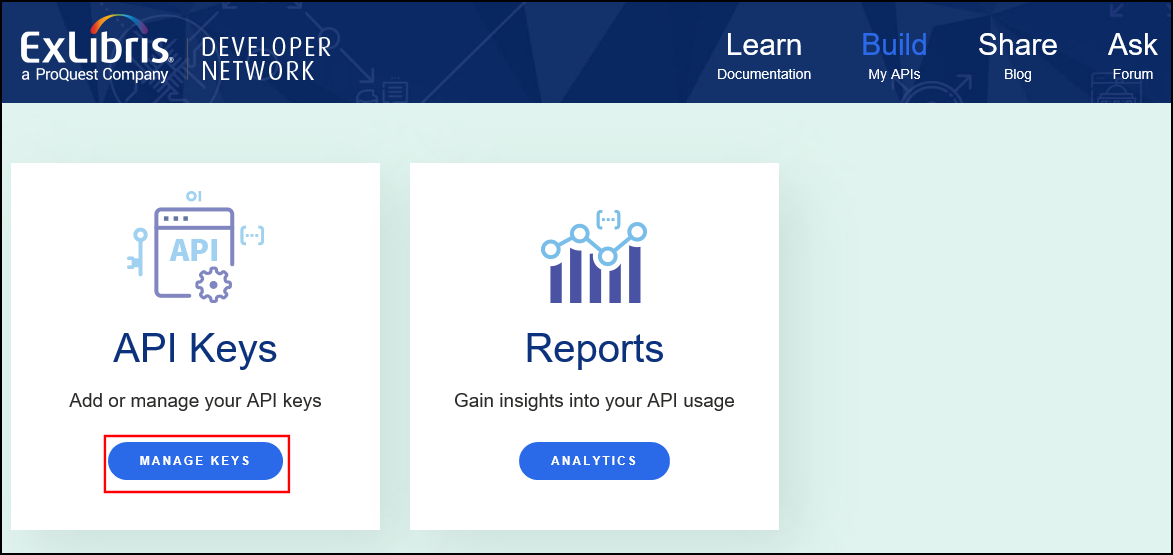 My APIs Page
 -
On the Manage API Keys page, select Add API Key to open the Add/Edit API Key dialog box.
 Add/Edit API Key Dialog Box
 -
In the Add/Edit API Key dialog box, specify a Name and Description and then select Add Permission.
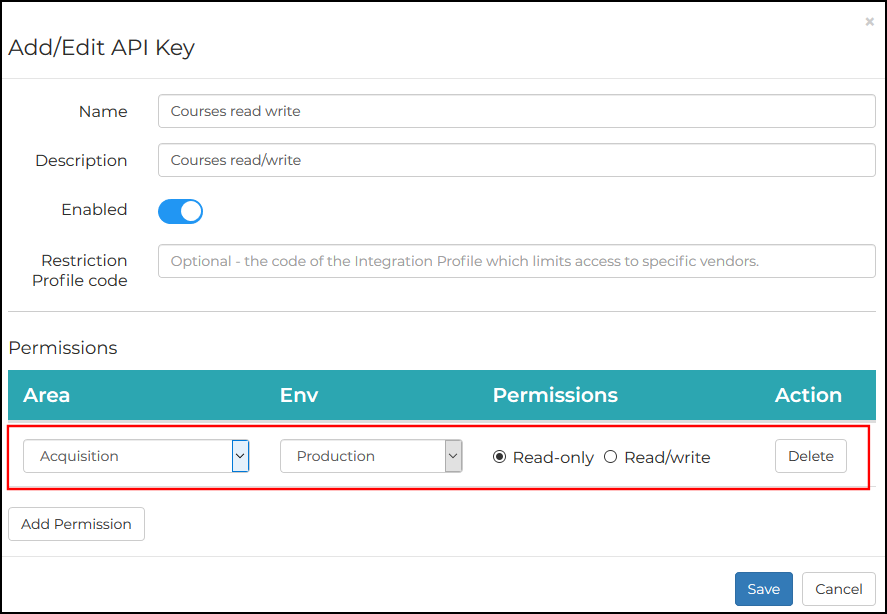 Permission Added
 -
For the new permission, specify the following fields:
-
Area – Select Courses.
-
Env – Select either Production, Sandbox, or Guest Sandbox.
-
Permissions – Select either Read-only or Read/write.
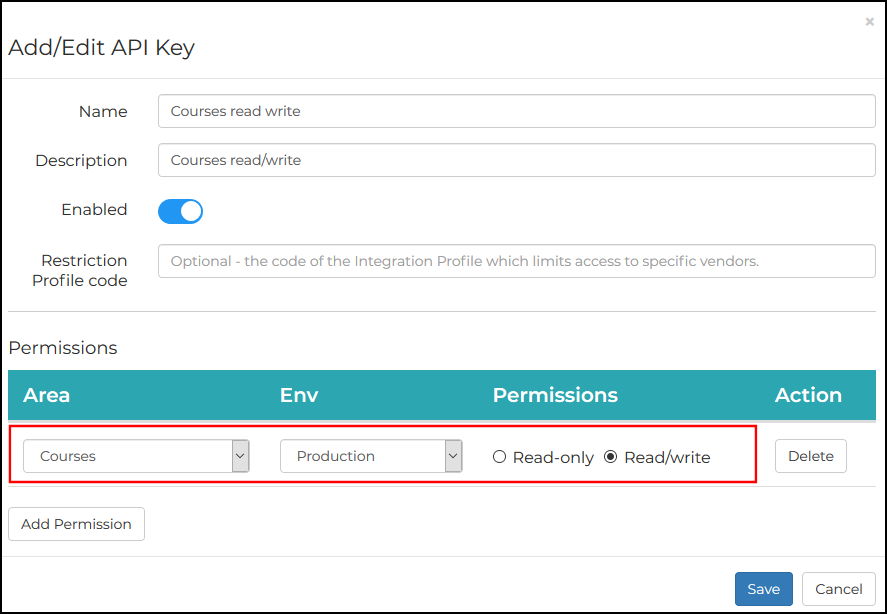 Permission Configured for the Courses Area
 -
-
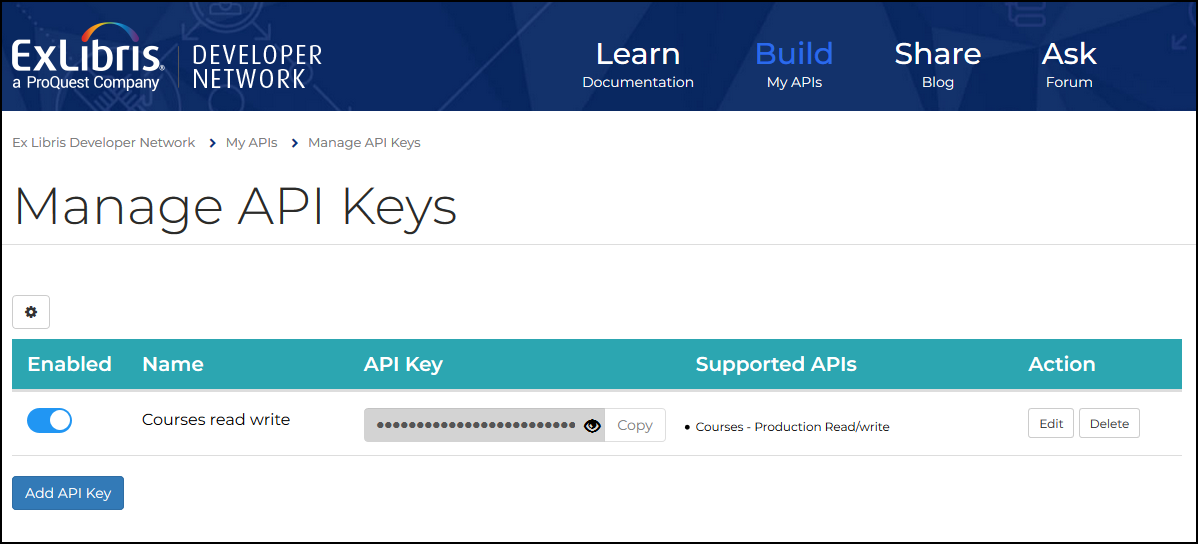
Select Save to create your API key and to return to the Manage API Keys page.
-
On the Manage API Keys page, select Copy to use the API Key for later pasting.
 Copy API Key for Later Use
 -
Using your API key, enter the following the URL to see that the Courses API is able to retrieve course reserves information from your institution:
https://api-na.hosted.exlibrisgroup.com/almaws/v1/courses?limit=10&offset=0&order_by=code%2Csection&direction=ASC&apikey=[api_key]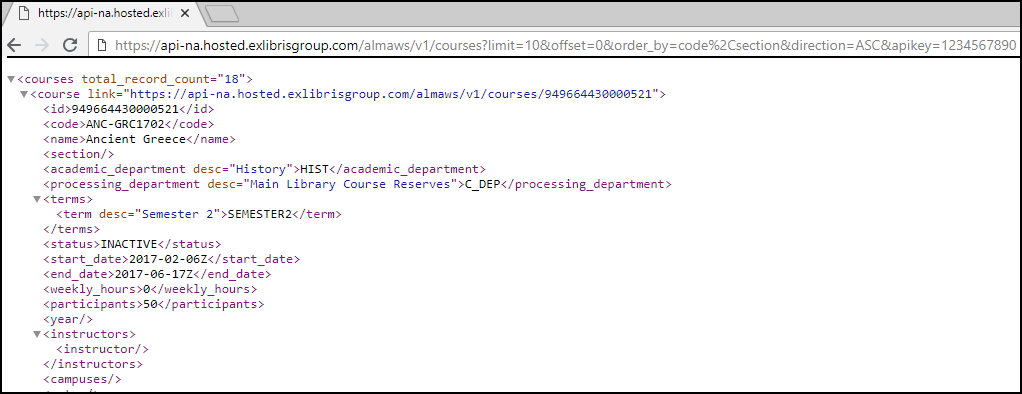 Example Test Results
Enabling the Course Reserves Page
After you have created the Courses application in the Ex Libris Developer Network, you must integrate it with Summon by adding the API key to the Course Reserves settings in the Summon Administration Console.
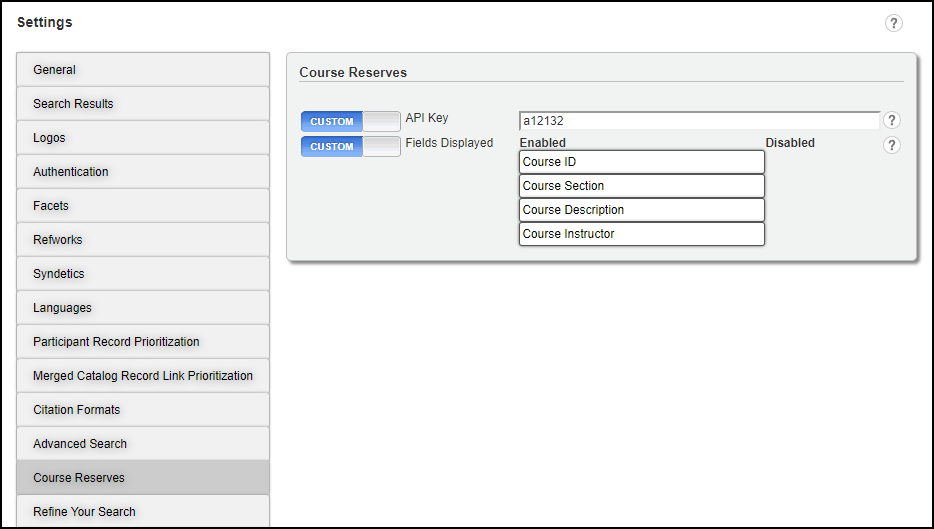
Configuring the Display Fields
Summon allows you to configure the following information on the Course Reserves page:
-
The display of the following Course Reserve fields: Course ID, Section, Description, and Instructor.
-
The order in which the fields appear on the page.
-
Open the Summon Admin Console (Discovery > Summon Admin Console).
-
Select the Settings tab.
-
In the Course Reserves section, move the fields that you want to display to the Enabled column. The fields appear in order starting with the field at the top of the Enabled column. All disabled fields will not appear, but their information is still searchable.
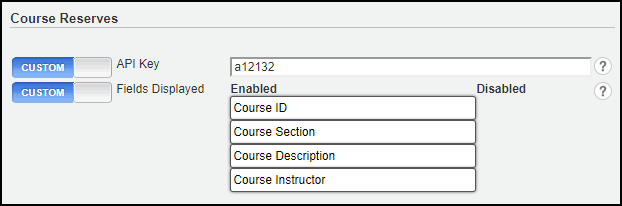 Fields Display Option
You must enable at least one display field.
-
Save your settings.
Prioritizing Merged Catalog and Provider Links
In situations where an electronic record in Alma merges with a provider's record, both links appear in the Summon UI. This option allows you to suppress or prioritize the display of these links in the Summon UI.
-
Open the Summon Admin Console (Discovery > Summon Admin Console).
-
Select the Settings tab.
-
In the Merged Catalog Record Link Prioritization section, perform the following actions as needed:
-
If you want to suppress a type of link (Catalog or Provider), move it to the Disabled column.
If both types of links are disabled, neither will display in the Summon UI.
-
If you would like to display a type of link (Catalog or Provider) first, move it to the top of the Enabled column.
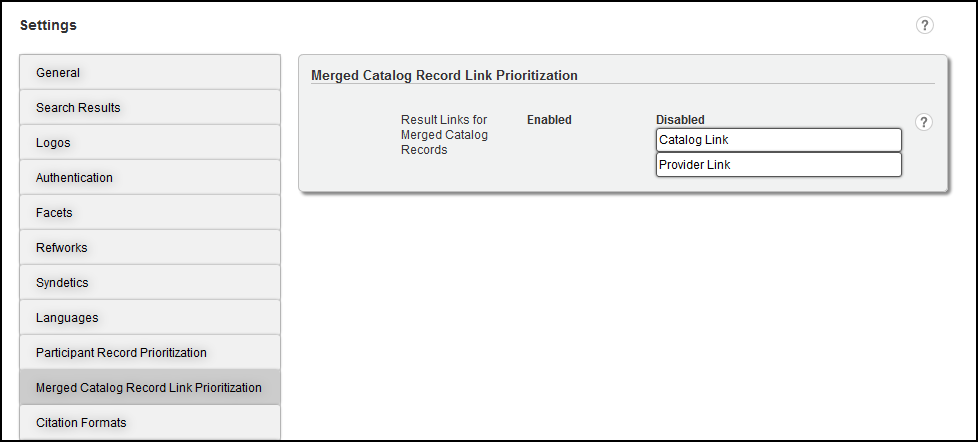 Merged Catalog Record Link Prioritization Settings
 -
-
Save your settings.