Webhooks
To configure a webhooks definition profile, you must have the following role:
- General System Administrator
Webhooks are user-defined HTTP callbacks that are usually triggered by some event, and include information on the results or status of that event.
Alma is able to send a webhook when one of the following occurs:
- A job run has finished running (using either the Alma UI or an API).
- A user is updated.
- One of the following notifications is sent:
- Ful Cancel Request Letter
- Borrowing Activity Letter
- Loan Status Notice
- On Hold Shelf Letter
- A hold, booking, move, digitization, or work order request is created, closed, or placed on the hold shelf.
- A loan is created, returned, or declared lost.
- A bibliographic record is changed.
- A physical item is changed.
- An item from a continuous PO line was received.
For a complete list of events that trigger webhooks, see Supported Events in the Developer Network.
For a webhook to be activated, Alma must have a Webhooks Integration Profile configured (see below).
For webhooks that use notifications, as part of the integration profile creation, you will activate the desired webhooks in the Letter Activity code table. However, once the integration profile has been created, to activate additional webhooks or de-activate webhooks, you don't have to open the Letter Activity code table - you can easily do that in the Letters Configuration table:

For detailed information on these webhooks, see https://developers.exlibrisgroup.com/alma/apis/xsd/rest_webhook_notifications.xsd.

For detailed information on these webhooks, see https://developers.exlibrisgroup.com/alma/apis/xsd/rest_webhook_notifications.xsd.
Configuring a Webhooks Integration Profile
To configure an integration profile of Webhooks type:
- On the Integration Profile List page (Configuration Menu > General > External Systems > Integration Profiles), select Add Integration Profile. The first page of the integration profile wizard opens.
- From the Integration type drop-down list, select Webhooks and enter a code and name for the profile.
- Select Next. The second page of the wizard opens.
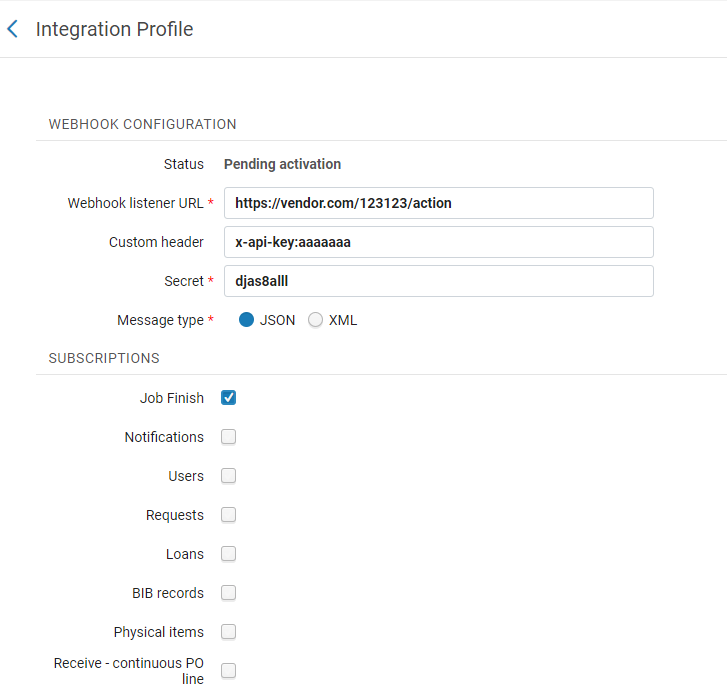
 Webhook Configuration
 - Select Activate to activate the webhooks integration profile. Until the profile is activated, the status reads Pending activation.
- Enter the listener URL for the Webhook Listener URL and secret code in Secret. For information on the values to be entered here, see the Security section in Webhooks.
- Select whether the message type should be XML or a JSON.
- Under Subscriptions:
- Select Job finish to send a webhook when a job run has finished running (using either the Alma UI or an API).
- Select Notifications to send a webhook when one of the notifications listed above is sent.
Select Configure Notification Types to open the Letter Activity code table, and scroll to the very bottom to activate the webhooks for these notifications. The webhooks that were previously activated (either here or in the Letters Configuration table) show as activated; and the webhooks you activate here will show as activated in the Letters Configuration table. Select Save when you have activated the desired notifications to go back to the integration profile.

- Select Users to send a webhook when user information is updated. This includes all user changes for which history is registered, including changes made by the Users job. Note that user changes using an API do not cause a webhook to be sent. In the User groups box, select the the user groups that will trigger a webhook to be sent. If no user groups are specified, a webhook will be sent for all user groups.
- Select Requests to send a webhook when a hold, booking, move, digitization, or work order request is created, closed, or placed on the hold shelf.
- Select Loans to send a webhook when a loan is created, returned, or declared lost.
- Select BIB records to send a webhook when a bibliographic record is changed.
- Select Physical items to send a webhook when a physical item is changed.
- Select Receive - continuous PO line to send a webhook when a continuous PO line is received.
- Select Save. The profile you configured appears in the Integration Profile List.
-
After the integration profile has been defined, you can select View Log from the list of integration profile actions. This option enables you to view a log of webhook events. The URL and payload elements of the table may then be searched. You can display the request body for each webhook request (the display will be truncated after 4000 characters, but the full request body is sent to the listener).
- If webhook attempts fail, emails are sent to all the email addresses stipulated in the Webhooks profile's Contact Information tab.
- In Premium Sandbox environments, the Webhook Listener URL is removed and the profiles are set to inactive. This is because the webhook actions that take place in the Sandbox environment land on the listener server the same as production data, which results in mixing test data and production data. If you want to activate the integration profile on a Sandbox environment, proceed as instructed in steps 4 and 5 above.

