
Consortia Central Configuration Dashboard
Alma introduces the Consortia Central Configuration Dashboard for Network Zone Institutions.
This feature is exclusively relevant to an Alma Network Zone.
The Consortia Central Configuration Dashboard enhances the experience of Consortia Central Office operators responsible for managing Consortia members' configurations. The dashboard provides easy access to all Consortia members' configurations within the Network Zone, eliminating the need to log in to each member individually. It facilitates the management of members' configurations when the Central Office acts on behalf of a member and allows the distribution of Network Zone configurations to Consortia members, ensuring unified configurations across all or selected members.
This configuration management dashboard is designed to streamline the management of configurations across all Alma levels: Network Zone (NZ) Level, Institution Zone (IZ) Level, and Library Level (when applicable).
This overview explores the various features of the Consortia Central Configuration Dashboard, tailored for the Network Zone institution.
Key elements of this dashboard include:
- Network Zone configuration section: An icon under the Alma Configuration menu for an easy access to the Consortia Central Configuration Dashboard.
- Table-Level Inheritance: A whole holistic configuration is being pushed at once.
- Row-Level Inheritance: Enhanced capability to distribute configurations at the row level.
- Distribute All Action: Option to distribute all table rows at once (available in both Table and Row-Level views).
- Distribute Selected Action: Button to distribute selected rows, complete with a confirmation message detailing (available only in Row-Level inheritance).
The dashboard empowers Network Zone operators to manage configurations comprehensively, including the following main capabilities:
- Define Network Zone Configurations: Accessible through the Network Zone icon in the Alma Configuration sidebar.
- Navigate Between Member Configurations: Easily move between consortia member configurations at both Institution and Library levels.
- Pre-Defined Dashboard Distribution Mode: Proposed, Imposed and Hybrid.
- Selective Distribution: Distribute entire tables or specific rows to selective members of the consortia.
- Institution Selection: Operators can specify distribution targets, whether single or multiple institutions or groups.
The selection title is "Select The Institution/s to Distribute To".
- Distribution Indication: Clear indicators show to which Institution Zone an entity has been distributed at either table or row level.
- Institution vs. Network Creations: When viewing institution configurations, it is clear which table/rows were created by the institution and which by the network.

A real-time distribution mechanism enables configurations to be distributed. Network Zone operators can select and distribute specific configurations to the desired members, with the Distribute All or Distribute Selected buttons visible only when managing the Network Zone configuration.

Accessing the Consortia Central Configuration Dashboard
Accessing the Consortia Central Configuration Dashboard is done as follows:
- From the Alma UI, select Configuration Menu > Network Zone.
The Consortia Central Configuration Dashboard is displayed.
 Consortia Central Configuration Dashboard
A zero results search in the Alma configuration search returns a link to the Dashboard to access the configuration.

Understanding the Consortia Central Configuration Dashboard
The dashboard displays three main sections; Dashboard Tabs, and Dashboard Sections and Drawers.
Dashboard Tabs

The tabs enable the network zone operator to select and view the configuration options for:
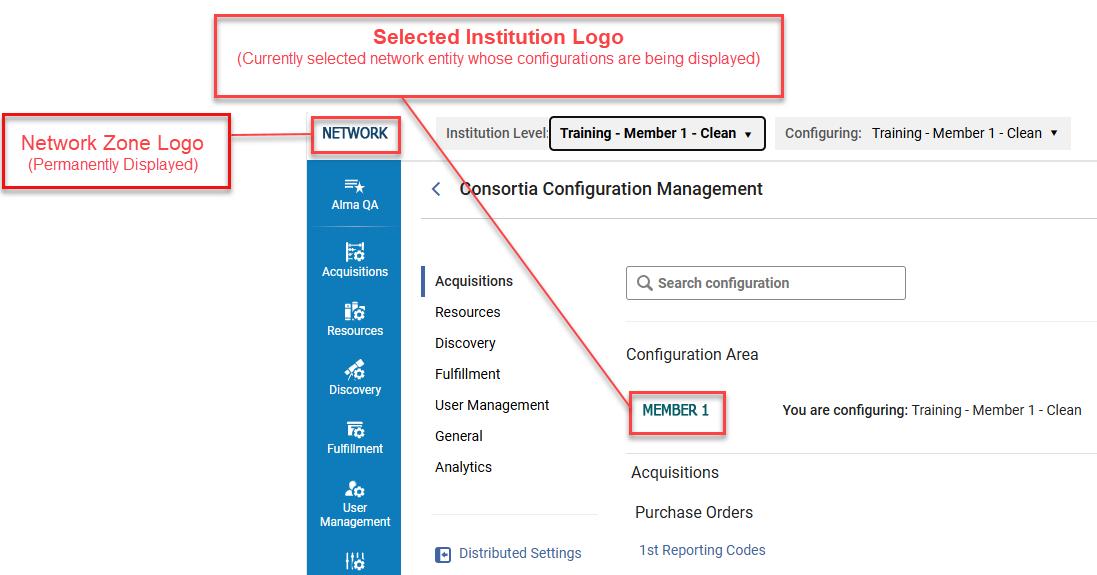
- Institution Level: Drop-down list of all the consortia members, Network and Institutions, where the Network Zone operator selects the institution where they want to work on.
- Configuring: Drop-down list of all the libraries of the selected institution.
The network zone operator can easily and instantly swap managing of the configuration at the Network Zone level, Institution level and the library level.
Once an institution is selected in the Institution Level tab, the Configuring tab appears, and when selecting the drop-down arrow (![]() ) displays the libraries belonging to the selected institution.
) displays the libraries belonging to the selected institution.

Institution and Network Member Logos
The network institution's logo is permanently displayed in the top left corner of the Alma page, while the logos of the network's members are displayed in the Configuration Area section of the dashboard.
The Configuration Area section displays the logo of the network entity (such as a Network or Institution) whose configurations are currently being viewed by the network zone operator. This section's logo dynamically adjusts to the currently selected network entity.
Dashboard Sections and Drawers
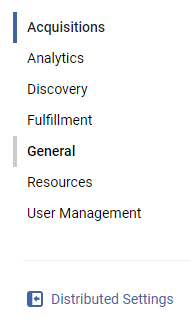
Sections enable network zone operators to easily navigate through the various management configuration options for the selected institution or network in Alma (for example; Acquisitions, Fulfillment, Resource Sharing, and so forth).
Only configuration options that pertain to Code Tables, Mapping Tables, and Rules (partial) in Alma are currently embedded in the dashboard!
Additional configuration options will be gradually added in upcoming releases.
Selecting a section displays the section's configuration options in the section's drawer to the right of the screen.
Configuration options in each section may differ according to the institutions' and libraries' system configurations and depending on the role of the network zone operator.
For a full list of configurations available in the dashboard, see Sections and Configuration Options.
Managing the Consortia Configurations
The network zone institution is the institution that manages all configurations for its network members. A network zone operator can access the Consortia Central Configuration Dashboard to manage the configuration options of the Consortia members. To view the members' configurations, see Member Configurations.
Network Zone Configurations
- From the Alma UI, select Configuration Menu > Network Zone.
The Consortia Central Configuration Dashboard is displayed.
 Consortia Central Configuration Dashboard - Network Institution Configuration Settings
 - In the top left tab, labeled Institution Level:, the managing network zone institution is displayed.
- All of the configuration options (that are currently available) are displayed.
On the left pane of the screen is the sections pane. Administrators can select a section, for instance, Acquisitions, and view all the configuration options for the selected section in the drawers section on the right side of the screen.
For more information on the sections and the configuration options, see Sections and Configuration Options.
For more information on how to manage the configuration options for the network members, see Member Configurations.Only configuration options that pertain to Code Tables, Mapping Tables and Rules (partial) in Alma are currently embedded in the dashboard!
Additional configuration options will be added in upcoming releases. Consortia Central Configuration Dashboard
 - The network administrator can manage its' configurations for the network's overall operation or distribute configurations to its members.
Member Configurations
The members are the individual institutions that belong to a consortia. Each member can have multiple libraries. For example, an institution named University-Main can have many libraries that it manages, such as Law-Dept, Art-Dept, Psychology-Dept, and so forth.
- From the Alma UI, select Configuration Menu > Network Zone.
The Consortia Central Configuration Dashboard is displayed.
 Consortia Central Configuration Dashboard - Network Institution Configuration Settings
 - In the top left tab, labeled Institution Level:, by default the network zone institution is displayed.
- Once an institution is selected, a second tab (Configuring:) is displayed, enabling users to remain focused on the institution or select one of its libraries.
Switching between institutions in the dashboard does not log out of the Network Zone environment. Network Zone administrators remain logged in and can manage the configuration options for each network member without leaving the Network Zone institution.
- In the Configuring tab, select the desired library from the drop menu.
The selected member's configurations are displayed in the screen's right pane.
For more information on the sections and the configuration options, see Sections and Configuration Options.
For more information on how to manage the configuration options for the members, see Member Configurations. Network member configuration options
Distributing Configurations to Members
Network Zone administrators can push or apply updated configuration changes to a selected or all of their members in one of three modes: Proposed, Imposed, and Hybrid. For more information, see Distribution Modes.
- Access the Consortia Central Configuration Dashboard; Configuration Menu > Network Zone.
- In the Institution Level: tab, select the Network Zone institution to view its configuration settings.
For more information, see Network Zone Configurations. Institution selected in the Consortia Central Configuration Dashboard
 - In the right pane of the screen, select the configuration option to update.
The selected configuration option's settings are displayed in the sliding panel. Institution Level Configuration Options in sliding panel
 - Update the configuration by either doing one or both of the options below:
- Add Row (
 ):
):
- Select Add Row.
- In the drop-down menu list, select the field to add in the Name section.
- Select True or False for the Default value.
The fields and values listed in the Add Row drop-down menu are dynamically displayed according to the configuration option selected.
- Select Add Row (
 ).
).
The field and its values are added Added Row in Configuration Options
- Delete a Row.
- In the list of fields and values for the selected configuration option (for instance, Currency Subset), locate the field to delete and click the More actions button (
 ) and select Delete.
The selected row is deleted.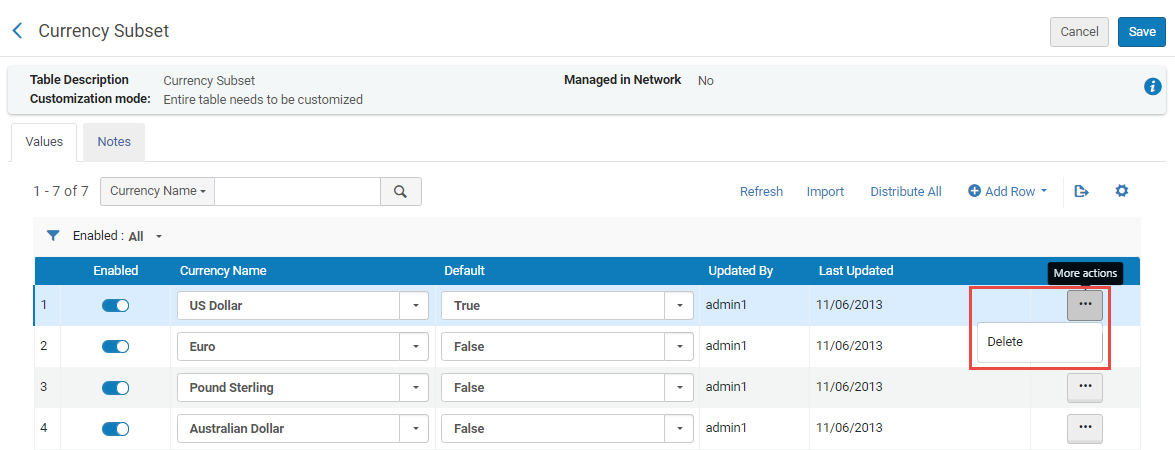 Delete Row
- In the list of fields and values for the selected configuration option (for instance, Currency Subset), locate the field to delete and click the More actions button (
- Add Row (
- Select Save.
The changes made to the selected configuration option is saved. - Select Distribute All (table/row inheritance configurations) or Distribute Selected (only row inheritance configurations).
The Confirm Distribution screen is displayed. Confirm Distribution
 - Define the following fields:
Field Description Distribution mode Depending on the Mode defined in the Distributed Settings, the following appears: Only in Hybrid mode, Network zone administrators have the option to select one of the modes before it is distributed to members.
- If Proposed mode was defined, Network zone administrators receive the following disabled field selected:
Do not override member institution customizations
This means that any configuration option alterations (by the network administrator) are not demanded but proposed. If any member has made customizations or changes to the out-of-the-box configurations in their environment, the Network Zone administrator's proposed alterations will NOT take effect. - If Imposed mode was defined, Network zone administrators receive the following disabled field selected:
Override member institution customizations
This means that any configuration option alterations (by the network administrator) ARE demanded. Regardless of any customizations or changes to the out-of-the-box configurations in their environment, the Network Zone administrator's imposed alterations will override any member configurations. - If Hybrid mode was defined, Network zone administrators receive the following two options to select from in the drop-down menu:
- Do not override member institution customizations (Proposed mode)
- Override member institution customizations (Imposed mode)
Distribute to all Selecting this checkbox distributes the configuration changes or updates to ALL of the member institutions. Members Click in the field, select the member(s) listed in the drop menu, or type the individual member's name to add them to the distribution list.
Multi-selection is enabled. Members Selection field
Groups If groups are defined, they are displayed and can be selected by Network zone administrators from the field's drop-down menu.
For more details about groups, see Creating Network Management Groups. - If Proposed mode was defined, Network zone administrators receive the following disabled field selected:
- Select Confirm.
The updated configuration(s) are instantaneously distributed to the selected members.
To distribute another configuration option update or change to members, repeat steps 1-8 for each configuration option.
Distribution Information and Status
After Network Zone administrators distribute configurations to members, they can view their status. Information and status can be viewed in the following ways:
- Distribution Status at Network Zone Level
Enables Network Zone administrators to view the information and the status of the distributed configurations from the Network zone.
- Distribution Information at Member Level from the Dashboard
Enables Network Zone administrators to view if the distributed configuration to the members were successfully applied, by whom and on what date.
- Distribution Information at Member Level from the Institution Environment
Enables local institution administrators to view the distributed configuration pushed by the Network.
- Automatic Notification to Members Regarding Distribution from the Network Zone
The Consortia Distribute Notification Letter enables automatic notification to members regarding Network Zone updates that were distributed to them. Network Zone administrators can configure this.
Distribution Status at Network Zone Level
To view the distribution status at Network Zone level, do the following:
- In the Network Zone, select the configuration that was distributed to the members, for instance; Currency Subset.
- Any configuration option distributed by a network administrator indicates "Yes" in the Managed in Network field.
- The member institutions to which the configuration was Distributed for is indicated at the top of the progress bar with a counter (for table-level inheritance) or in the Distributed for column marked with an 'i' (for row-level inheritance).
- In the top description bar, an additional status line appears; Distribution status.
- The status progress bar indicates (in percentages) how much of the distribution to the members is completed.
- A Refresh button, available below the progress bar, enables the network administrator to track the progression of the distribution.
- The Updated By column indicates the Network operator user. The Last Updated column indicates the distribution date.


After the distribution process is complete, the Distribution status line indicates "Completed Successfully" with a date and time stamp.
Also, a notification message is displayed to notify network administrators that the distribution process is completed.

Distribution Information at Member Level from the Dashboard
To view the distribution information and status at the Member level from the dashboard, do the following:
- Select the member from the Institution Level: drop-down.
- Select the configuration that was distributed, for instance, Currency Subset.
- Note that the new updates are displayed in the table.
- The Managed in Network field indicates "Yes".
- In the Updated By column, the Network zone operator name is displayed in the form of <user>@Network.
- In the Last Updated column, the date when the distribution was completed is displayed.


Distribution Information at Member Level from the Institution Environment
To view the distribution information and status at the Member level from the institution environment, do the following:
- Log in to the Institution Zone.
- Go to the Alma configuration menu and Select the distributed configuration, for instance, Currency Subset.
- In the Updated By column, the indication states "Network" to inform of the origin of the change.
- In the Last Updated column, the date when the distribution was completed is displayed.
- The Managed in Network field indicates "Yes".
- The information available for the local Institution administrator at the member institution environment depends on the distribution mode selected by the Network Zone administrator.
- If the distribution mode is Proposed, then the local administrator can enable or disable each row of the table and change the default information if needed.
 Distributed configuration from the Institution view when in Proposed Distribution Mode
 - If the distribution mode is Imposed, then the local administrator cannot enable or disable table rows and cannot change the default information. All the elements in the configuration are disabled and managed by the network.
 Distributed configuration from the Institution view when in Imposed Distribution Mode - Table Level Inheritance
 Distributed configuration from the Institution view when in Imposed Distribution Mode - Row Level Inheritance
- If the distribution mode is Proposed, then the local administrator can enable or disable each row of the table and change the default information if needed.
Automatic Notification to Members Regarding Distribution from the Network Zone
New for May
If enabled, the Consortia Distribute Notification Letter is automatically sent to members when Network Zone updates are distributed to them from the Central Configuration Dashboard. Network Zone administrators can switch off this letter and modify the content (see Centrally Managing Letters in a Network Zone). The letter is also setup to notify members when the Network Zone administrator stops managing the configuration for them (see Stop Network Management).
See also Configuring Alma Letters.
Stop Network Management
Network Zone administrators can at any time cease managing the configurations for members. Selecting this option keeps all the configurations set by the administrator until this point, and (New for May) automatically triggers the Consortia Distribute Notification Letter if enabled (see Automatic Notification to Members Regarding Distribution from the Network Zone). Any configuration customizations that individual members apply (from this point on) are not managed by the network institution's administrator.
Stopping network management is done for each individual configuration.
- Access the desired configuration, for instance Currency Subset, that was distributed.
- Select the Stop Network Management button.
A Confirmation Message is displayed. - Select Confirm.

Request Release of a Configuration Managed by the Network
In a Collaborative Network with a Network Zone (NZ) setup, configurations managed by the Central Office are sometimes distributed to Institution Zones (IZs) in Imposed Mode, restricting local modifications. To enhance flexibility, Institution Zone administrators (at the Member level) can request the release of Imposed Mode for specific configurations, enabling local customization while maintaining centralized control.
This functionality is integrated directly into configuration pages where Imposed Mode is applied. Institution Zone administrators can submit a release request, triggering a notification to the Network Zone administrator, who then decide whether to approve the request. If approved, the Network Zone administrator can selectively stop network management for the requested configuration, rather than releasing it for all members.
To support this process, a "Request Release" button is introduced at the code, mapping, or rule level for configurations under Imposed Mode. When triggered, an automated email notification is sent to the relevant Network Zone administrators, informing them of the request and guiding them through the approval process. Additionally, the Stop Network Management process is enhanced to enable selective configuration releases for specific members, improving governance and customization capabilities.
Request Release by an Institution Member
Institution members that receive new configurations from the Network Zone in Imposed Mode cannot edit or modify the configuration. The configuration is displayed disabled. The member can request a release of the Imposed Mode for the configuration from the Network Zone administrator(s) to modify the new configuration locally.
- Access the configuration page that is Imposed by the Network Zone, for example, Currency Subset (Configuration Menu > Acquisitions > General > Currency Subset).
- In the Currency Subset configuration page, select Release Request.
 Release Request Button
 - In the Confirmation Message, select Confirm.
 Release Request Confirmation Message
 - An email notification letter is sent to all network zone administrators informing them of the request.
 Request Release Email - from Member to Administrator
 - Network zone administrators that approve releasing the configuration from Imposed Mode will need to Stop Network Management for the configuration for the specific member.
- After the network zone administrator releases the configuration from Imposed Mode, the member receives the following email notification. The member can now modify the configuration locally.
 Request Release Email - from Administrator to Member