
Approving and Assigning Deposits
To approve deposits, you must have one of the following roles:
-
Deposit Operator
-
Deposit Operator Extended
-
General System Administrator
Approving Deposits
You can also open to a specific tab directly by selecting one of the following tasks in the Tasks List in the persistent menu (see Tasks in the Task List).
-
Approve Deposits - Assigned to Me
-
Approve Deposits - Unassigned
-
Approve Deposits - Assigned to Others
-
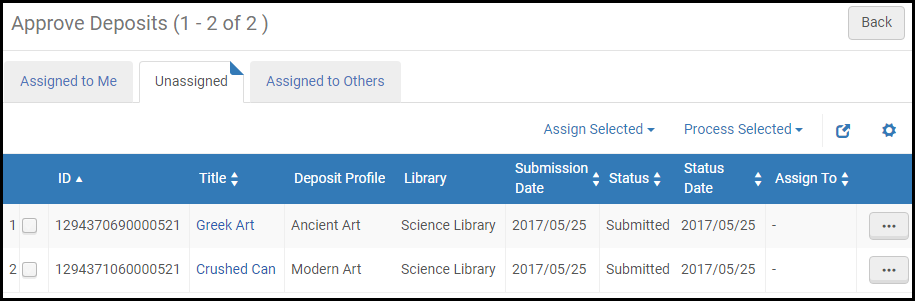
Open the Approve Deposits page (Resource Management > Deposits > Approve Deposits).
-
Select one of the following tabs: Assigned to Me, Unassigned, or Assigned to Others.
-
Select the deposits that you want to process.
-
Select Process Selected and choose one of the following actions:
-
Approve – Approve the deposits.
-
Decline – Reject the deposits. Rejection emails are sent to the depositors. To configure the available reasons, see Configuring Deposit Decline Reasons.
-
Return – Return the deposits to the depositors for correction. To configure the available reasons, see Configuring Deposit Return Reasons.
-
-
Open the Approve Deposits page (Resource Management > Deposits > Approve Deposits).
-
Select one of the following tabs: Assigned to Me, Unassigned, or Assigned to Others.
-
Select the title of a deposit. The following tab appears:
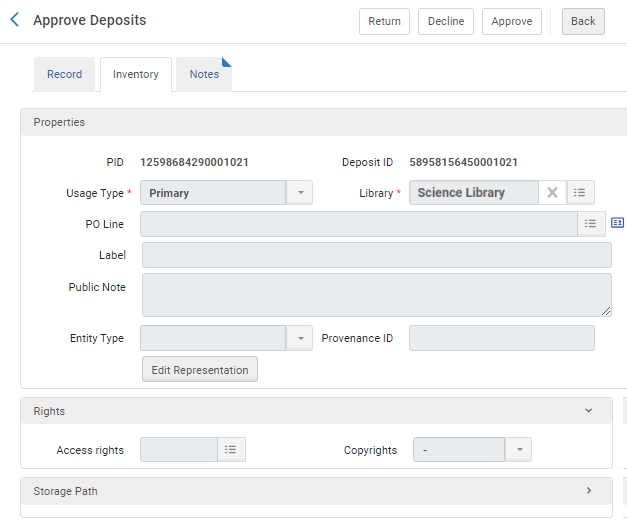 Approve Deposits Information
 -
Review the information. The following elements appear:
- Edit Representation – Open the Digital Representation Editor (requires digital inventory editing permissions), and update the information as needed. For more information, see Editing Digital Representations.
- Storage Path – View the storage location of the digital file.
- Record tab – View the bibliographic record of the deposit.
- Notes Tab – Add notes concerning the deposit.
-
Select one of the following buttons that appear on the top of the page:
- Return – Return the deposit to the depositor for correction. You can select a reason and add a note. To configure the available reasons, see Configuring Deposit Return Reasons.
- Decline – Reject the deposit. You can select a reason and add a note. To configure the available reasons, see Configuring Deposit Decline Reasons.
- Approve – Approve the deposit. You can add a note and select the Unsuppress bibliographic record checkbox to have the bibliographic record unsuppressed when the deposit is approved regardless of the setting in the deposit profile.
If you approved, declined, or returned a deposit, an email that is sent to the depositor. You can customize this email (the Deposit Status Update Letter) using the same workflow as other Alma letters from Configuration > General > Letters > Letters Configuration. For more information, see Configuring Patron Deposit Templates and Configuring Alma Letters.
Assigning Deposits
You can assign deposits to another user.
- Select the deposits that you want to assign to another user.
- Select Assign Selected > Assign to. The following appears:
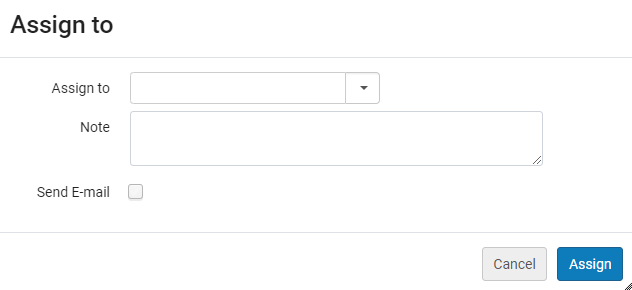 Assign To
 - From the Assign to drop-down list, select the user to which you want to assign the deposit.
- Enter a note, if desired.
- To send an email notification to the person to which you assigned the deposit, select Send Email.
- Select Assign.
The deposit is assigned.
You can release an assigned deposit and make it unassigned.
- Select the deposit you want to release.
- Select Assign Selected > Release Assignment.
The deposit is unassigned and appears in the Unassigned tab.