
Authority Control Rules
- Cataloger
- Catalog Manager
- Catalog Administrator
- Repository Manager
- General System Administrator
To create and configure the Link BIB Headings rules and preferred term correction rules, you must have one of the following roles:
- Catalog Administrator
- General System Administrator
Linking Bibliographic Headings Rules
- Authority ID - Refers to the authority ID information stored in the MARC 21 $0 or UNIMARC $3, for example (for details, see Using Originating System IDs for Linking Bibliographic Records to Authority Records).
-
Bibliographic Headings Value - Use to evaluate the value of the displayed bibliographic headings, to determine if linking should be skipped.
For example, if the Bibliographic Headings Value is configured as contains "Human History" (see below) and the displayed bibliographic headings contains "Human history," the linking would be skipped.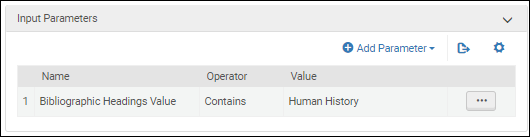 Bibliographic Headings Value Parameter
- Diacritics - When this rule is set, Alma does not normalize diacritics, and instead considers their UTF-16 encoding value when matching. Only diacritics with the same UTF-16 value are considered a match. For example, bib heading ‘650 $$a Tröll’ are considered as “Diacritics = not identical” when matched against the authority record with ‘150 $$a Troll’.
- Field - When you select this parameter, you can specify a field number as the value.
- Language - This parameter refers to the information cataloged in $9 (MARC 21) or $7 (UNIMARC).
- Subfield Codes - When this rule is set, Alma compares both the content and the subfields used for matching. For instance, the bibliographic heading ‘700 $$a Shakespeare, William, $$d 1564-1616 $$t Tragedies’ will be considered as "Subfield codes = not identical" when matched against authority record with ‘100 $$a Shakespeare, William, $$d 1564-1616 $$x Tragedies’.
- Source Code - When this parameter is selected, you may choose from the following drop-down list of values: authority type such as call number/classifications, chronological term, corporate name, genre/form, geographic name, meeting name, personal name, topical name, or uniform title.
- Undifferentiated Personal Name - This parameter exams the following:
- MARC 21 authority 008 control field, position 32 = "b"
- UNIMARC authority 120 control field, position 1 = "a"
When this parameter is selected, you may select True or False.
- Vocabulary - When this parameter is selected, you may select any of the local authority or Community Zone vocabulary codes to which you have access.
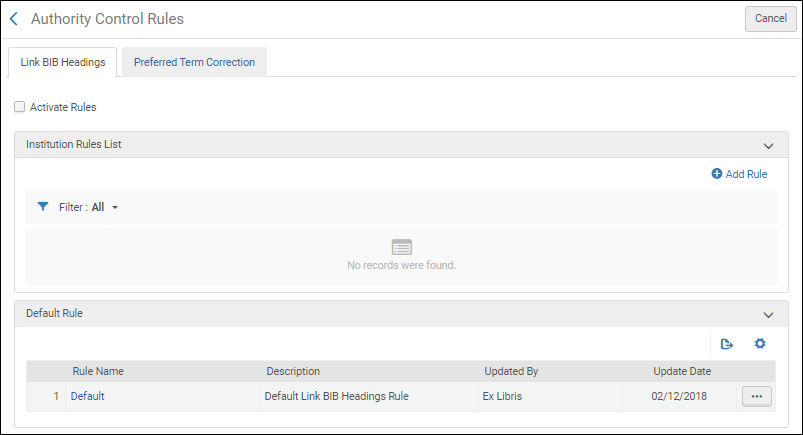
- If not active, make sure to activate the rules by checking the "Active" checkbox.
- Verify that the default rule is set up according to your institution's preference. Alma checks the rules starting from the top and applys the first rule where all input parameters are met. If none of the rules apply, the default rule is used. We recommend setting up the default rule to link.
- Set up the first rules with input parameters that should always apply – use a single parameter per rule to make sure this parameter always applies, without depending on other parameters. For example, if an institution never wants a record to link if subfields are mismatched, it could set its top rule to be:
- Input parameter: Subfield codes = not identical
- Workflow setup: Do not link
- Below these, set up rules that should only apply otherwise, if certain other conditions are met. You can combine parameters to have these apply only for a specific mix of circumstances. For example, if a library wants to prevent normalizing diacritics for a specific vocabulary, it could set up a rule such as:
- Input parameters:
- Vocabulary = Finnish Name Authority File
- Diacritics = not identical
- Workflow setup: Do not link
- Input parameters:
- If there is a specific sub-case in which the institution would like linking to happen – add a rule with “Workflow setup: Link” above the rule that would prevent the general case from linking. You can also add a tag when linking, to help catalogers identify these headings in the Authority Control Task List.
Authority Control – Exclude Heading from Linking
Users can exclude specific headings from being linked to an authority record by automatic processes, by adding $$9 no_linkage to the authorized field.
This is especially useful when a field contains data that is similar to an existing heading but is not really related to that heading. This prevents the field from incorrectly getting associated with the heading and improves the integrity of the library's metadata.
This is advantageous in cases where a creator's name is identical to an authorized creator, and not enough data exists to distinguish the two and prevent linking (for example, a library catalogs an old thesis work by John Smith and has no further biographic information on the creator).
This functionality is not available for Community Zone records or Community Zone-linked bibliographic records.
Creating Link BIB Headings Rules
- Open the Authority Control Rules page (Configuration Menu > Resources > General > Authority Control Rules), and select the Link Bib Headings tab.
- In the Institution Rules List section, select Add Rule.
- Enter a name and description for the rule.
- Enter input parameters.
- In the Input Parameters section, select Add Parameter.
- From the drop-down lists, select an option (for Name), and select an operator.
- Enter or select a value and select Add Parameter.
- Enter workflow setup parameters.
- Select one of the following application methods:
- Link – Select this option when you want the Authorities - Link BIB Headings job or linking upon Save (in the MD Editor) to link the bibliographic headings when the criteria of one of the Link BIB Headings rules is met.
- Do not link – Select this option when you want the Authorities - Link BIB Headings job or linking upon Save (in the MD Editor) to not link the bibliographic headings when the criteria of one of the Link BIB Headings rules is met.
-
Select a tag from the Tag as drop-down list (optional).
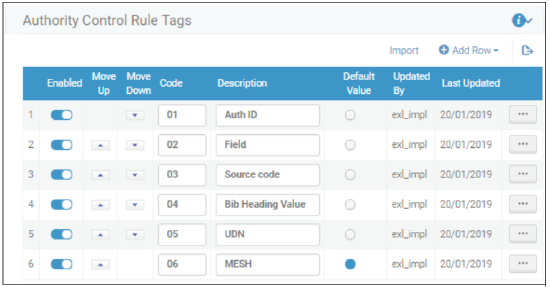
Note that the Authority Control Rule Tags appear for both Link BIB Headings rules and preferred term correction rules (when enabled for your system; see Managing Preferred Term Correction for more information).
Tags are only used for automatic link bibliographic headings jobs (when you select the Link option) and helps streamline the process for working with records in the Authority Control Task List. Note that when you select Do not link, there is no option to specify a tag.If no tags exist, add them by doing the following:- Select Add Tag.
- Select Add Row.
- Enter a tag code (that appears in the Authority Control Task List in the Tag column and as a facet), description, and select Yes or No to indicate if this is the default tag.
- Select Add Row.
- Repeat this process to add other tags.
- Select Customize or Save. Note that all the tags that you create appear in the Tag as drop-down list.
- Select one of the following application methods:
- Select Save.
Your rule is added to the Institution Rules List section. After a rule is created, you can select to edit, duplicate, or delete it. When there are multiple rules, you can also change the order of the rules using the Move Up and Move Down features. Each rule can be individually enabled or disabled.
- Select the Activate Rules checkbox for the rules that you create to be applied when records are saved or when the Link Bibliographic Headings job attempts to automatically link bibliographic headings. Note that both the Link BIB Headings and Preferred Term Correction tabs have an Activate Rules checkbox so that each type of rule can be activated / deactivated independently.
Use Case Examples
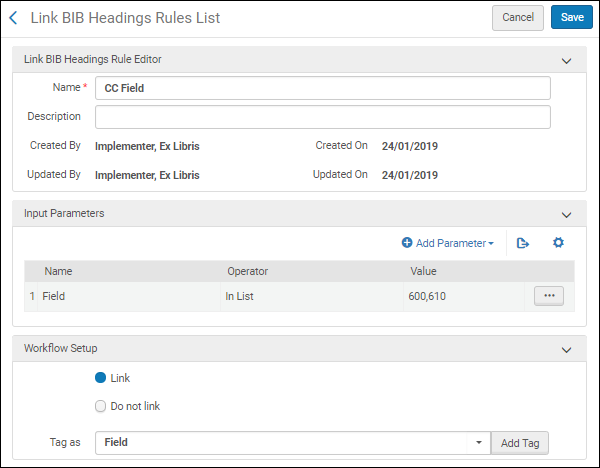
Link When Specific Field Values Are Met
If you want a rule to have the Authorities - Link BIB Headings job link bibliographic headings when specific field values occur, the configuration could be entered as shown below.
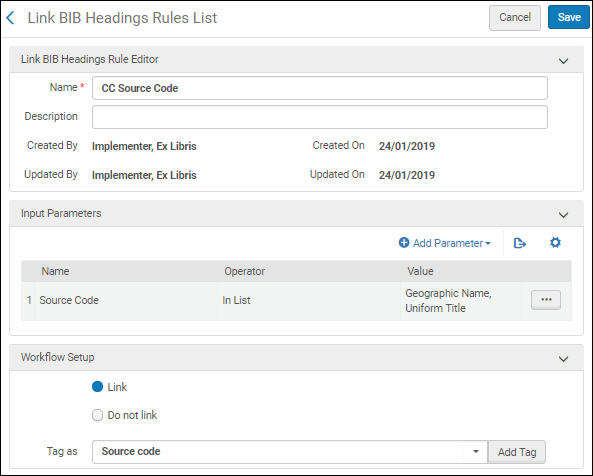
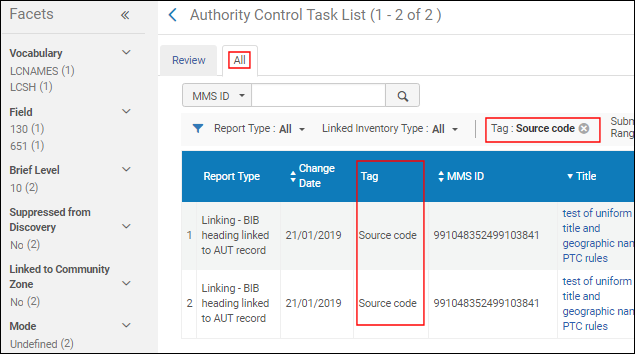
Link When Source Code Values Are Met
If you want a rule to have the Authorities - Link BIB Headings job link bibliographic headings when source code values are met, the configuration could be entered as shown below.
Authority Control Task List
Using Tags
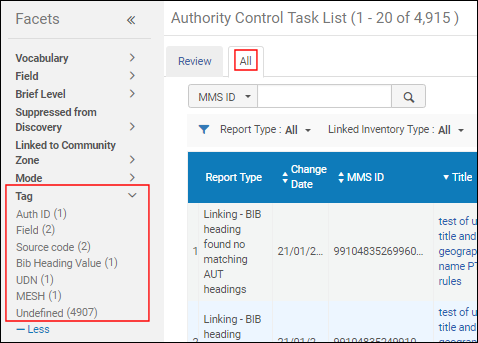
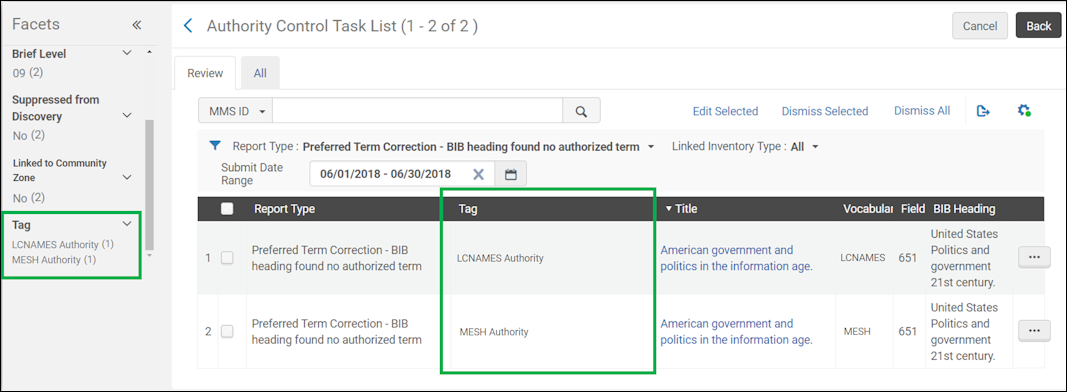
With Link BIB Headings rules, you can configure tags for managing records in the Authority Control Task List (see the Creating Link BIB Headings Rules procedure). For a list of Authority Control Rule Tags, see the example below. Note that these tags appear for both Link BIB Headings rules and, when enabled, preferred term correction rules (see Managing Preferred Term Correction for more information).
When the tags are used in the Link BIB Headings rules, they appear as facets that you can use to filter the list of records on the All tab in the Authority Control Task List (Resources > Cataloging > Authority Control Task List).
Managing Preferred Term Correction
- Which records should be corrected automatically
- Which records should not be corrected at all
- Which records should be suggested in the Authority Control Task List for correction but not done automatically (held for mediation/manual review)
- Authority ID — This parameter refers to the authority ID information stored in the MARC 21 $0 or UNIMARC $3, for example (for details, see Using Originating System IDs for Linking Bibliographic Records to Authority Records).
- Field — When you select this parameter, you can specify a field number as the value.
- Indication rules — When you select this parameter, all the indication rules that you have created appear in a drop-down list from which you can select. Indication rules are executed in the authority record’s metadata.
For more information, see Working with Indication Rules. - Language — This parameter refers to the information cataloged in $9 (MARC 21) or $7 (UNIMARC).
- Normal and linked fields are linked to different authority records — This option appears if the 880 field is enabled (by Ex Libris) as an authorizing field. This option can be used to identify cases where a field and its linked 880 field are linked to different multilingual authorities. Your options are to select true or false.
- Source Code — When this parameter is selected, you may choose from the following drop-down list of values: authority type such as call number/classifications, chronological term, corporate name, genre/form, geographic name, meeting name, personal name, topical name, or uniform title.
- Vocabulary — When this parameter is selected, you may select any of the local authority or Community Zone vocabulary codes to which you have access.
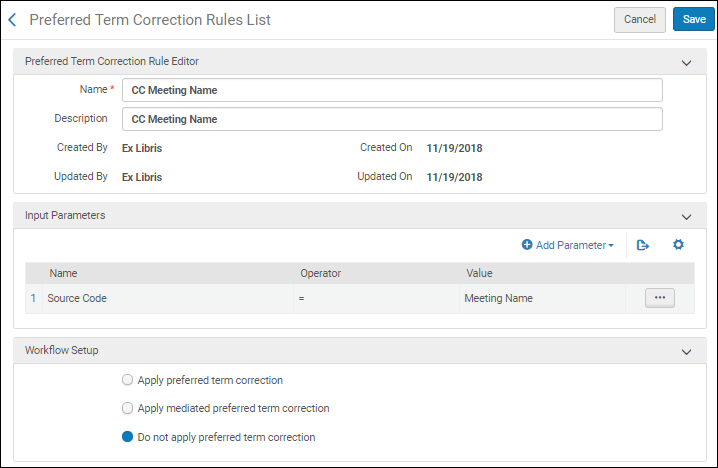
Creating Preferred Term Correction Rules
- Open the Authority Control Rules page (Configuration Menu > Resources > General > Authority Control Rules), and select the Preferred Term Correction tab.
- In the Institution Rules List section, select Add Rule.
- Enter a name and description for the rule.
- Enter input parameters.
- In the Input Parameters section, select Add Parameter.
- From the drop-down lists, select an option (for Name), and select an operator.
- Enter or select a value and select Add Parameter.
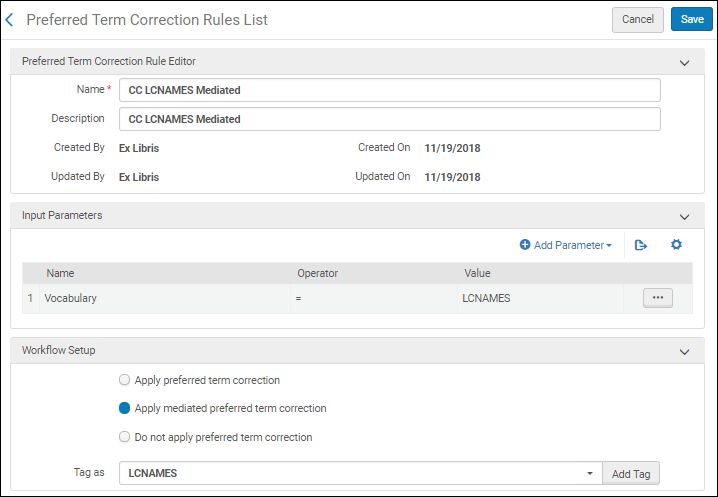
- Enter workflow setup parameters.
- Select one of the following application methods:
- Apply preferred term correction
- Apply mediated preferred term correction
- Do not apply preferred term correction
-
Select a tag from the Tag as drop-down list (optional). Note that when you select Do not apply preferred term correction, there is no option to specify a tag.If no tags exist, add them by doing the following:
- Select Add Tag.
- Select Add Row.
- Enter a tag code (that appears in the Authority Control Task List in the Tag column and as a facet), description, and select Yes or No to indicate if this is the default tag.
- Select Add Row.
- Repeat this process to add other tags.
- Select Customize. Note that all the tags that you create appear in the Tag as drop-down list.
- Select one of the following application methods:
- Select Save.
Your rule is added to the Institution Rules List section. After a rule is created, you can select to edit, duplicate, or delete it. When there are multiple rules, you can also change the order of the rules using the Move Up and Move Down features. Each rule can be individually enabled or disabled.
- Select the Activate Rules check box.
This check box must be selected in order for the rules that you create to be applied when records are saved or when the link bibliographic headings job attempts to automatically link bibliographic headings. Note that both the Link BIB Headings and Preferred Term Correction tabs have an Activate Rules check box so that each type of rule can be activated / deactivated independently.
Use Case Examples
Skip Certain Records for Preferred Term Correction
Identify Certain Records for Mediation
Selectively Automate Certain Corrections While Identifying Others for Mediation


Authority Control Task List
Using Modes and Tags
With Preferred Term Correction rules, you can specify that changes are made automatically or that they should be identified for mediation. The options in the Authority Control Task List provide a method for filtering the records using these specifications. Tags that you specify in your preferred term correction rules can also be filtered in the Authority Control Task List. See the examples below.
-
ModeMode identifies when rules were applied automatically or specified mediation.
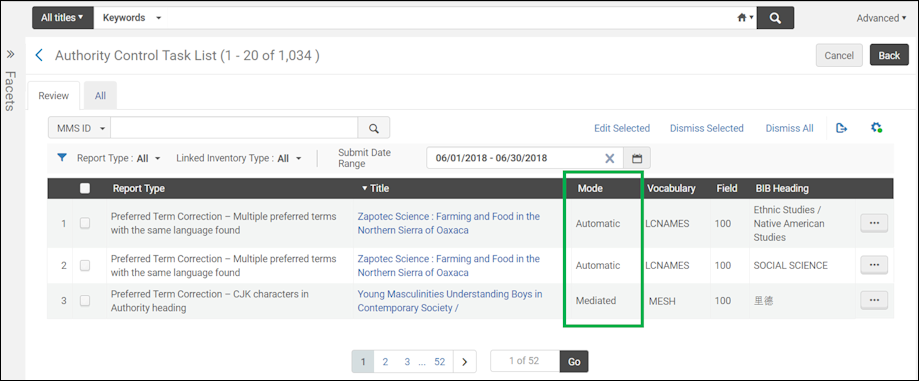 Mode Column
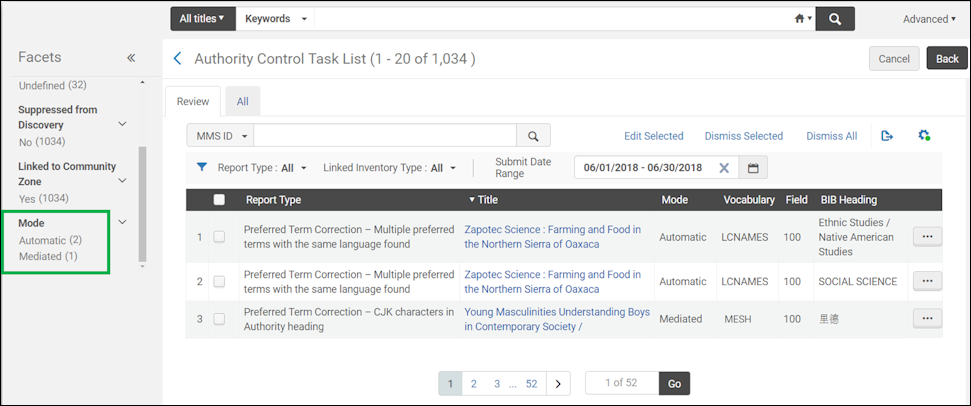 Mode Facet
Applying Changes for Mediated Corrections in the Authority Control Task List
After reviewing mediated corrections in the Review tab of the Authority Control Task List, you can apply the corrections for the bibliographic headings that you want to correct. This results in the bibliographic record being corrected with the authority record data. The mediated corrections may be applied in the following manner:
- Individual rows
- Multiple rows
- All mediated rows