
Working with Indication Rules
- Delete holding records with no items job – See Delete holding records with no items.
- General Publishing Profile (Resources > Publishing > Publishing Profiles > select Add Profile > General Profile) – See Filter Records.
- Import Profile Details – See Filter out the data using.
The same indication rules cannot be used for all areas and workflows in Alma.
Creating Indication Rules
- Open the MD Editor.
- Select New > Indication. The Indication Rules Properties dialog opens.
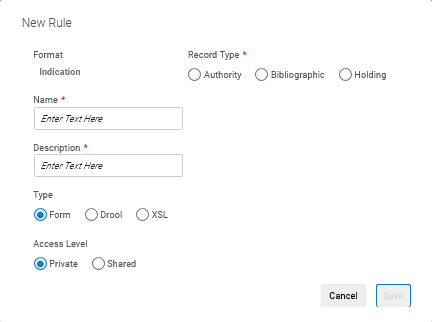 Properties Dialog Box
 -
Indicate the name for the rule and a description that would help other users to know what the rule does.
- In "Type" , select whether to create the rule as Drool (for MARC bibliographic records) or as XSL (for Dublin Core records).
- Indicate whether to create the rule as Private or Shared. This determines in which folder the indication rule is saved. You may want to save indication rules to the Private folder and test them first, before moving them to the Shared folder (by changing the Properties). Private indication rules cannot be used in the "Filter Set" functionality invoked from the Manage Sets page. Note that the Community folder has indication rules that you can copy to create your own indication rules.
- Select Save in the dialog. The MD Editor editing pane opens.
- Create your rule as per the below:
- If you selected to create an indication rule for MARC records, enter the Drools logic for your indication rule. Refer to the section Normalization Rules – Syntax and Examples for the syntax to use when creating indication rules. The following indication rules are provided in Alma:
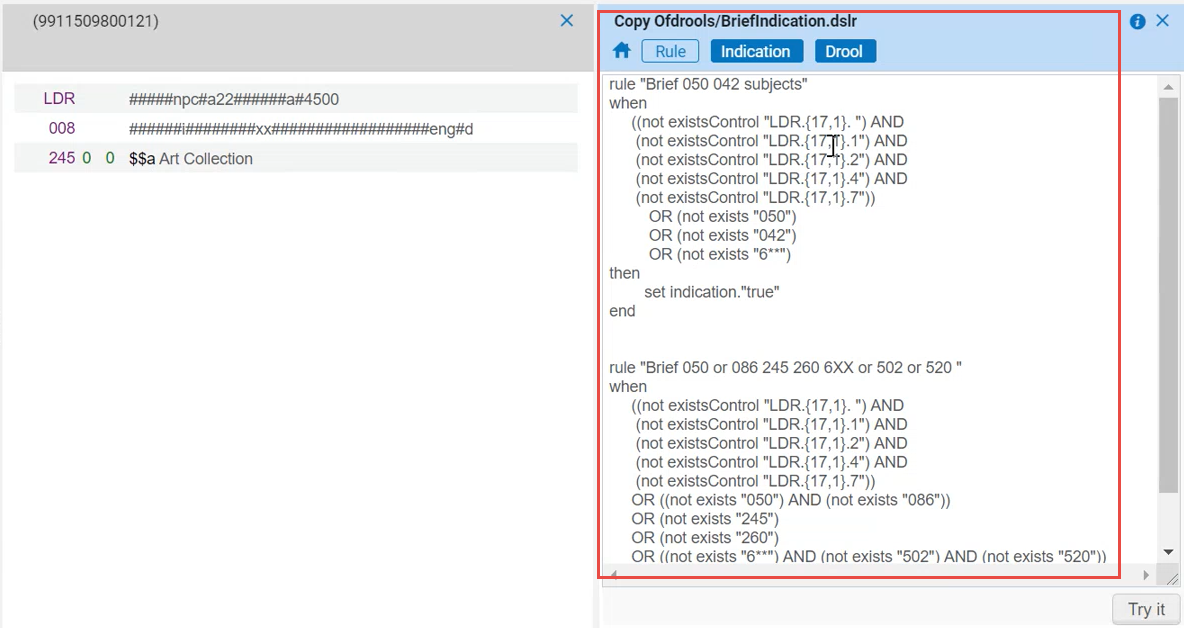
MultiTitleIndication.dslr BriefIndication.dslr 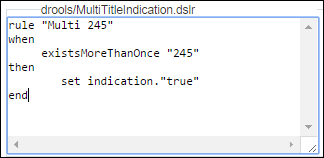 Indication Rule Provided (Multiple Titles)For this rule, conditions do not exist for the control fields.
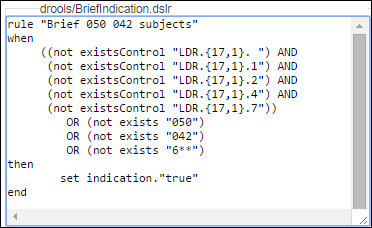 Indication Rule Provided (Brief Subjects)
See the Indication Rules Syntax Examples section for more examples.While it is permissible to include multiple Boolean Operators in the rules, when a large number of Boolean operators are selected, slower performance is likely to result. Thus, each rule should include no more than 200 Boolean operators. - If you selected to create an XML indication rule for Dublin Core records, enter the indication rule in XML format.
- If you selected to create an indication rule for MARC records, enter the Drools logic for your indication rule. Refer to the section Normalization Rules – Syntax and Examples for the syntax to use when creating indication rules. The following indication rules are provided in Alma:
- Select Save.
Testing Indication Rules
- Open a bibliographic record in the MD Editor.
- Select
 Split Editor.
 - Select the Rules tab in the left pane and expand the Indication rules folder.
- Locate the rule that you want to test in the Private or Shared (not the Community) folder. Select the rule to see a list of actions:
- Edit
- Delete
- Contribute to CZ
- Duplicate
- Properties
- Select Edit. The indication rule opens in the split screen next to the bibliographic record.
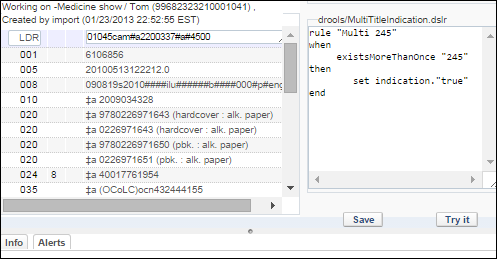
 Indication Rule Open in the Split Screen
 - Select Try it . Depending on the results, a pop-up appears with either True or False response indicating that the bibliographic record either met or did not meet the Drool logic in the indication rule.
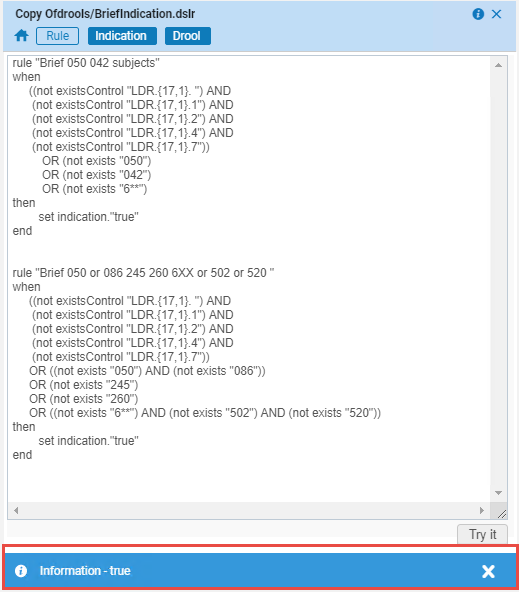 Indication Rule - Try It response
Indication Rules for MARC Records - Syntax Examples
In rules that search for a certain term, use an asterisk to find the exact term. If the subfield contains anything in addition to the term, it will not find it, unless there is an asterisk. Note that you only need to place the asterisk at the end of the term, no need to place it at the beginning.
when
exists "130.a.Bible*"
then
set indication."true"
end
The line exists "130.a.Bible" works as an "Equals" search, thus if the subfield contains anything in addition to the term, it will not find it, unless there is an asterisk..
when
exists "949.a.*"
then
set indication."true"
end
when
((exists "1**.0.*") OR (exists "6**.0.*") OR (exists "7**.0.*"))
then
set indication."true"
end
when
exists "65*.0.*"
then
set indication."true"
end
when
exists "6**.0.*"
then
set indication."true"
end
when
existsMoreThanOnce "300.a"
then
set indication."true"
end
when
recordHasDuplicateSubfields "630,650" "xz" ".,"
then
set indication."true"
end
XML Indication Rules for DC Records - Syntax Examples
<xsl:output method="text" encoding="UTF-8"/>
<xsl:template match="/">
<xsl:variable name="indication" select = "boolean(//dc:subject)" />
<xsl:value-of select="$indication" />
</xsl:template>
</xsl:stylesheet>
<xsl:output method="text" encoding="UTF-8"/>
<xsl:template match="/">
<xsl:variable name="indication" select = "not(boolean(//dc:subject='Theology'))" />
<xsl:value-of select="$indication" />
</xsl:template>
</xsl:stylesheet>
<xsl:output method="text" encoding="UTF-8"/>
<xsl:template match="/">
<xsl:variable name="indication" select = "boolean(//dc:creator[contains(.,'Tolstoy')] or //dcterms:creator[contains(.,'Tolstoy')])" />
<xsl:value-of select="$indication" />
</xsl:template>
</xsl:stylesheet>
Form-Based Indication Rules
All users can create indication rules.
Ex Libris provides the ability to create indication rules in the MARC format using a structured form, thus making the process easy and intuitive (this new functionality is in addition to the existing abilities to create Drool rules in the MARC format and create XML rules in the DC format manually, both of which remain unchanged). For complete information about indication rules, see Working with Indication Rules.
The structured form allows to enter the different fields and subfields and values in a wizard-like fashion, and provides pop-up assistance when entering tags and tag names. Once you have created a rule, the structured form enables testing that the rule works as you expect it, before deploying it.
This functionality is disabled by default. To enable it for your institution, contact Customer Support.
Limitations
- Currently you can create only MARC21 and UNIMARC form-based indication rules.
- The form-based rules can only be used for filtering sets at this time, and the ability to use them in other workflows that use indication rules is on our roadmap and will be added in the future.
New Form-Based Indication Rules
The "Form" type of indications rules was introduced. This type has the same rule actions as the other indication rules (New, Edit, Delete, Duplicate, Contribute to CZ, etc.). When creating a new form-based rule, this rule receives the badge 'Form' in the Metadata Editor.
![]()
Creating a Form-Based Indication Rule
- Open the Metadata Editor > Rules area.
- Select New > Indication. The Indication Rules Properties dialog opens.
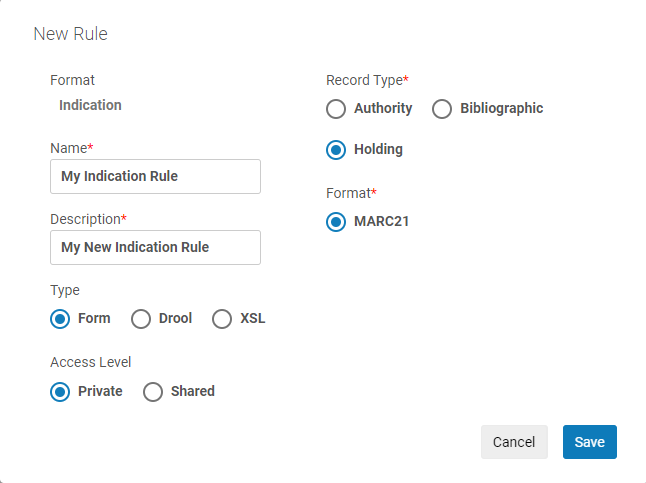
- Under "Name", name your rule and under "Description" (optionally) provide a description that will help other users to understand what this rule does.
- Under "Type", select whether to create the rule as Drool (for MARC bibliographic records), as XML (for Dublin Core records), or as Form.
- Under "Access Level", indicate whether to create the rule as Private or Shared. This determines in which folder the indication rule is saved. You may also want to save indication rules to the Private folder and test them first, before moving them to the Shared folder (by changing the Properties). Private indication rules cannot be used in the "Filter Set" functionality invoked from the Manage Sets page. Note that the Community folder has indication rules that you can copy to create your own indication rules.
- Under "Record Type", select whether the rule will be used to create sets of Bibliographic, Authority, or Holding records.
- Under "Format", select the registry for the type of sets. The available options are determined by the formats active in your system.
- Select Save in the dialog. The MD Editor editing pane opens.
- In the right-hand panel of the Metadata Editor, configure your rule as per the Configuring the Indication Rules section below.
- Select Save.
Configuring the Indication Rules
Once you created the form-based indication rule, a panel opens where you can configure its conditions. An indication rule can be composed of one or more conditions.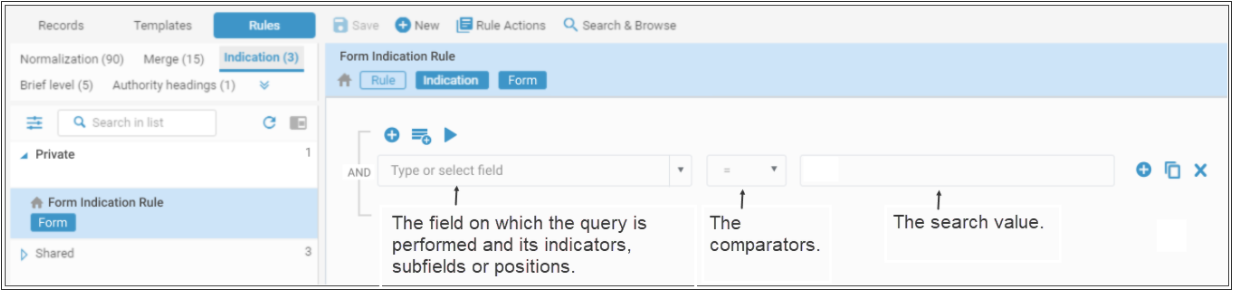
Creating Indication Rules Manually or with System Assistance
You can create an indication rule in one of these ways:
- Manually typing in the information of the field on which the query is performed.
- Using pop-up assistance to help you select the desired field. The pop-up assistance derives its information from the metadata profile defined in your system (see Configuring Cataloging)
| To manually type in the information: | To use the pop-up assistance: |
|---|---|
|
|
Defining Fields for Form-Based Indication Rules
For the different types of fields, different rule syntax is displayed.
- In the conditions, define the fields as follows:
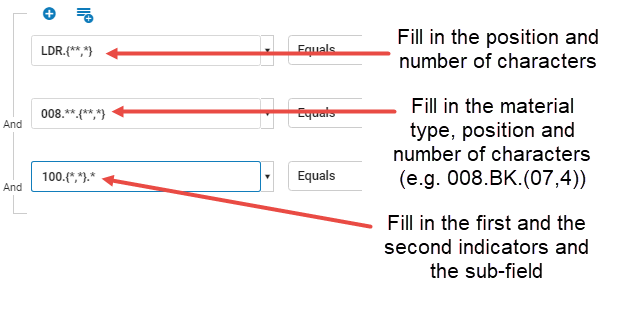
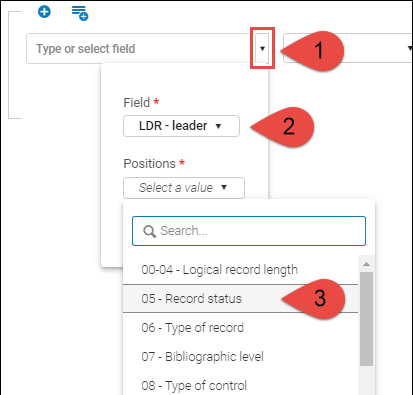
Field Type Inputting fields of this type Control fields 001 / 003 / 005 / 009 To input a control field 001 / 003 / 005 / 009:- Type in (or select using the pop-up assistance) the field's tag.
- Select the desired comparator.
- Enter free text.

All other control fieldsTo input other control fields:- Type in (or select using the pop-up assistance) the field's tag.
- If you are inputting the LDR, 006, 007, or 008 field, from the "Positions" dropdown, select the relevant position and select Done.

The indication rules for the 007 field require two conditions, one for the "Category of material" and another for the "Specific material designation."

- Select the desired comparator.
- Enter free text.
Data fields — including fields that are not in the metadata profile (e.g. fields defined locally) To input a data field:- Type in (or select using the pop-up assistance) the field's tag.
- Select the desired indicators and subfields and select Done.
- Select the desired comparator.
- Enter free text.
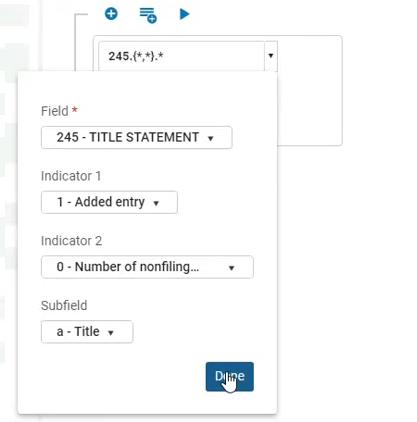
- If you do not specify any value for an indicator/subfield in the condition, this is displayed as * and is interpreted by Alma as any value.
- To indicate an empty (undefined) value for indicators (in the fields that allow it), type in the # value.
- When you enter text in the Value field, Alma does not attempt to validate the text. This enables you to choose a non-valid value for data correction purposes.
- To add more conditions, or groups of conditions, Working with Indication Rules see below.
- Select Save on the toolbar to save the indication rule.
Testing a Form-Based Indication Rule
Prior to running a job to filter a set using an indication rule, it may be a good idea to validate that your rule may works as desired; and if it does not, to edit it some more. You can test the entire rule or only a single group of conditions within the rule.
- Once you have created and saved your rule, click
 above the rule.
Depending on the results, a pop-up appears with either a True or False response, indicating that the bibliographic record either met or did not meet the logic specified in the indication rule.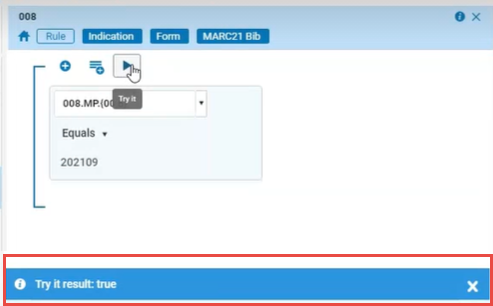
Working with Form-Based Indication Rules
Option Description To add additional condition to the rule - Select
 above the condition to add another condition.
 - Select
 to the right of the condition and duplicate this condition ; then edit the new condition as necessary.
To add a group of conditions to the rule When creating an indication rule, you can either add individual conditions or create groups of conditions. Select  above the condition lines and add as many conditions as necessary.
However, not that you can only add up to 3 nested levels of conditions in the form-based rules.
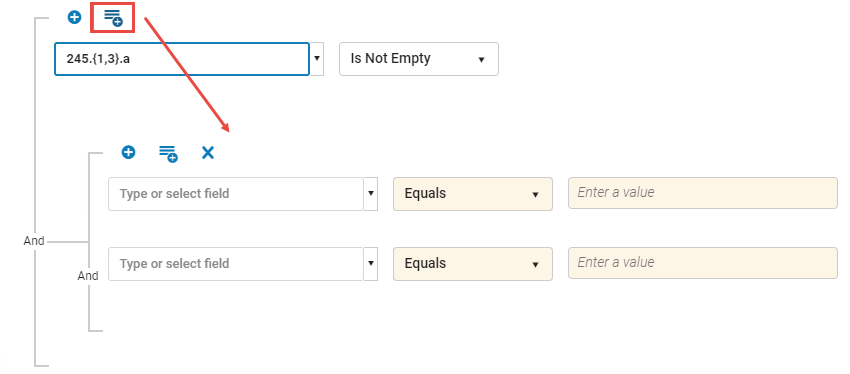
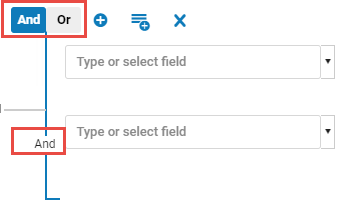
To change the relationship between groups of conditions Baseline conditions default to an AND relationship, meaning that each condition must be true to retrieve the bibliographic record. When adding a group of conditions, you can change the relationship within the group to OR. In this case, the bibliographic record will be retrieved when either of these conditions is true.
Note that only the fields that you included in the rule are used to retrieve records. Fields that you did not include in the rule do not affect the retrieval, meaning that records with any values in these fields will be retrieved.
Click on any Boolean operator between the conditions. Flags for AND and OR will appear at the top of the list. Click a flag to select this type of relationship. To stop displaying these flags, click again on the Boolean operator.
While it is permissible to include multiple Boolean Operators in an indication rule, when many of Boolean operators are selected, slower performance is likely to result. Thus, each rule should include no more than 200 Boolean operators.
To remove a condition Select the X right of the condition to remove it from the rule. - Select