Working with Authority Records
- Cataloger
- Catalog Manager
- Catalog Administrator
- Repository Manager
- Physical Inventory Operator
- Purchase Operator
- Purchase Manager
- Editor Full (not functional)
- Digital Inventory Operator
Authority Vocabularies in the Community Zone
| Authority Vocabulary | Subject/Name Authority | Update Frequency | Vocabulary Code |
|---|---|---|---|
| AIATSIS Place Names | Subject | When available | AIATSISP |
| AIATSIS Topical | Subject | When available | AIATSISS |
| Art & Architecture Thesaurus | Subject | TBD - provider is currently working on MARC updates schedule | AAT |
|
BARE (Norwegian Authority System) – BIBSYS Authority Registry
(See Working with Norwegian Authority System (BARE) Records for more information.) |
Subject and Name | Daily | BARE |
| BK Basisklassifikation Classification | Subject and Name | When available | BKL |
| BNC - Catàleg d’autoritats de noms i títols de Catalunya (CANTIC) | Name | Every 6 hours | CANTIC |
| BNC - Llista d'encapçalaments de matèria en català (Lemac) | Subject and Name | Every 6 hours | LEMAC |
| BNF – Bibliothèque nationale de France - MARC 21 Version | Subject and Name | Monthly | FRBNF |
| Canadiana Name Authorities in French | Name | Every 2 weeks | LACNAF |
| CSIC | Subject and Name | Daily | CSICAU |
| Czech National Authority Database / Databáze národních autorit | Subject and Name | Every 6 hours | CZENAS |
| EMBUS | Subject | Monthly | EMBUS |
| EuroVoc – the EU's multilingual thesaurus | Subject | When available | EUROVOC |
| FAST – Faceted Application of Subject Terminology – OCLC | Subject | When available | FAST |
| Finnish Genre and Form Vocabulary (Finnish) | Subject | Weekly | SLM/FIN |
| Finnish Genre and Form Vocabulary (Swedish) | Subject | Weekly | SLM/SWE |
| Finnish Name Authority File | Name | Every 6 hours | FINAF |
| Finnish Work and Expression Authorities | Name | When available | TEKA |
| French MeSH UNIMARC Version | Subject | When available | FMESH |
| General Finnish Ontology (Finnish) | Subject | Weekly | YSO/FIN |
| General Finnish Ontology (Swedish) | Subject | Weekly | YSO/SWE |
| GND – German National Library | Subject and Name | Daily | GND |
| GSAFD Genre Terms | Subject | When available | GSAFD |
| Haifa Children Library Subjects | Subject | When available | HAIFACH |
| Homosaurus | Subject | When available | HOMOIT |
| Hong Kong Chinese Authority Name | Subject and Name | Daily | HKCAN |
| IdRef - Version MARC21 | Subject and Name | Every 6 hours | IDREF |
| IdRef – Version UNIMARC | Subject and Name | Every 6 hours | RAMEAU |
| IHPAF | Subject and Name | Daily | IHPAF |
| Jurivoc - Multilingual thesaurus of the Swiss Federal Supreme Court | Subject | When available | JURIVOC |
| LCDGT (Library of Congress Demographic Group Terms) | Subject | When available | LCDGT |
| Library and Archives Canada (LAC) – Canadian Subject Headings | Subject | When available | CSH |
| Library of Congress Children's Subject Heading | Subject | When available | LCSHKIDS |
| Library of Congress (LoC) – Genre/Form Terms Thesaurus Records | Subject | Weekly | LCGFT |
| Library of Congress (LoC) – Medium of Performance Thesaurus for Music | Subject | When available | LCMPT |
| Library of Congress Name (LCNAF) | Name | Daily | LCNAMES |
| Library of Congress Subject (LCSH) | Subject | Weekly | LCSH |
| List of Chinese Subject Terms | Subject | Quarterly | LCSTT |
| Maori Subject Headings | Subject | 3 times a year | REO |
| National Agricultural Library subject authority file | Subject (English Terms) | Annually | NAL |
| National Library of Israel – Multilingual Thesaurus | Subject and Name | Every 6 hours | NLI |
| National Library of Spain | Subject and Name | When available | EMBNE |
| New classification scheme for Chinese libraries | Classification | Quarterly | NCSCLT |
| NLM MeSH – United States National Library of Medicine | Subject | Annually | MESH |
| NUKAT | Subject and Name | Daily | NUKAT |
| Nuovo Soggettario | Subject | Twice a year | NSBNCF |
| PUC – Pontificia Universidad Católica de Chile | Subject and Name | When available | CLSAPUC |
| RAMEAU – MARC 21 Version | Subject | Monthly | RAM |
| RVK Classification
(See Working with the RVK Authority Record Classification for more information.)
|
Subject and Name | Twice a year | RVK |
| SpMaBN | Subject | When available | EMBNE |
| Taiwan Name Authority File | Subject and Name | Weekly | TWNAF |
| Termes de gènere / forma en català | Subject | Daily | TGFC |
| Thesaurus de la Universitat de Barcelona | Subject | Every 6 hours | THUB |
| VLK | Subject and Name | Every 6 hours | VLK |
| VND | Subject and Name | Every 6 hours | VND |
Jobs Related to Authority Records
To search Alma and Primo VE by non-preferred terms, the parameter enable_extender_index_linked_aut at Configuration > Resources > General > Other Settings must be set to true. For more information, see Non-Preferred Terms in Repository Search.
- Authorities - Link BIB Headings – This job searches all authority (and local authority, if enabled by Ex Libris Support) record fields, including subdivision fields, for complete terms listed in bibliographic records (giving priority to local authorities, if enabled). If exact matches are found, the bibliographic records are linked to the corresponding authority records. If exact matches are not found, a search of all authority records is performed once again but the subdivision fields are disregarded, and the bibliographic records are linked to the matching authority records that are located during the second search. On a subsequent run of the Authorities – Link BIB Headings job, a bibliographic record that was linked to an authority record without subdivision fields may be re-linked to a better matching authority record (with subdivision fields). If a match is found on the main part of the heading, the subdivisions are still retained in the bib record. For MARC 21, partial matching for subdivisions is done on $v $x $y $z in 6XX fields. For UNIMARC and CNMARC, partial matching for subdivisions is done on $$j, x, y, z ,on fields 410, 600, 601, 602, 605, 606, 607, 610, 616, 617, 620, 675, 680, 711, 713, 730, 740, 741, 742.
Over time, you may have local authority records that you’ve created that subsequently become available as Community Zone authority records. When these records are added to the Community Zone, nothing happens to the records attached to your local authority records. The local authority records will still be local without any connection to the Community Zone. A bibliographic record that is already linked to your local authority record will not have its link switched to the Community Zone authority record.However, when the authority records that are the same as your local authority records are added to the Community Zone, you can choose to delete the local authority records. If you choose to delete the local authority records, all the headings will be linked to the Community Zone authority record with the same preferred term (1XX field) by Alma’s nightly linking job.
When there are authority records where the same term is preferred in one instance, and in another this term is non-preferred, a multiple match will be detected.
For more information, please see List of Changes in the Authority Control Task ListFor CJK content, bibliographic records are linked to authority records based on CJK content (not transliterated Latin content). - Authorities - Preferred Term Correction – This job performs preferred term correction on all bibliographic records that are linked to authority (and local authority if enabled by Ex Libris Support) records using the Authorities - Link BIB Headings job. For example, if a bibliographic record contains the non-preferred term “Narcotics, Control of,” and the associated authority record contains the preferred term “Drug control,” the Authorities – Preferred Term Correction job replaces “Narcotics, Control of” with the preferred term “Drug control.” Bibliographic records are also updated with any subsequent updates to authority records. For example, if a bibliographic record authority-controlled field 100 $aXXX $d1926- is linked to an authority’s preferred term 100 $aXXX $d1926-, and this term was updated to 100 $XXX $d1926-2022 in the authority record, the bibliographic record’s 100 is updated to 100 $XXX $d1926-2022. If there were any failed records in the job's run, the job handles them in its next run.
This job is disabled by default. To enable it, set the disable_preferred_term_correction_job parameter (see Configuring Other Settings (Resource Management)) to false. However, changing this parameter only affects whether preferred terms are corrected. Subsequently, view the Scheduled tab of the Monitor Jobs page (see Viewing Scheduled Jobs) and confirm that the Authorities - Preferred Term Correction job is active. If it is disabled, contact Ex Libris support to enable it.
- The best practice for following authority record updates is working with the Authority Control Task List (see Using the Authority Control Task List for more details).
- It is highly recommended to disable the Preferred Term Correction job when planning to run a large authority update.
The Authorities - Preferred Term Correction job does not handle preferred term correction on migrated bibliographic records retroactively. Since migrated bibliographic records may be linked to authorities in Alma, any change (to the bibliographic record authorized fields, or to the authority record in the Community Zone to which the bibliographic record is linked) that occurs in Alma after the record is initially migrated, triggers future preferred term corrections on the records after the Authorities - Preferred Term Correction job is enabled.Community Zone linked BIB records are not updated by the Preferred Term Correction job. - Authorities - Authority Search by Subdivisions - Conducts comprehensive searches within authority records enabling users to search for subdivisions across a wide array of fields. This enhances the search process, making it easier to locate specific information within the authority records database by subdivision subfields v/x/y/z.
- Authorities – Handle Local Authority Record Updates - Updates $0 in the bibliographic record and performs relinking for local authority records.
- Authorities - Linking BIBFRAME Records – BIBFRAME records are linked to the following authorities for names and subjects:
-
Library of Congress Name (LCNAF)
-
Library of Congress Subject (LCSH)
-
Library of Congress Children's Subject Heading
-
Library of Congress (LoC) – Genre/Form Terms Thesaurus Records
-
Library of Congress (LoC) – Medium of Performance Thesaurus for Music
-
FAST – Faceted Application of Subject Terminology – OCLC
-
NLM MeSH – United States National Library of Medicine
-
SpMaBN – National Library of Spain
Records with URIs from the above mentioned authorities as part of <bf:contribution> or <bf:genreForm> or <bf:subject>, can link the records to the authority as part of the daily job Authorities – Link BIB Headings. This enables users to search for BIBFRAME records by non-preferred terms.The option to search by non-preferred terms depends on the activated customer parameter: enable_extender_index_linked_aut.The preferred term correction job (Authorities - Preferred Term Correction) is not activated for BIBFRAME records as they are currently managed externally and are not editable in Alma. -
Alma-Based Authority Management
Alma supports Alma-based authority management. For an institution that manages local authority records and publishes them to the Community Zone, there is the option to have the Alma community contribute to these authority records (like the National Library of Israel (NLI) implementation). If you are an institution that 1) currently manages an authority file locally, 2) publishes it to the Community Zone, and 3) wants to have other authorized members of the Alma community contribute changes to this authority file, contact Ex Libris to analyze the feasibility of your request. If your authority requirements match the criteria for this functionality, Ex Libris will work with you to implement this capability. See Working with NLI Integrated Authority Records for more information.
Adding a Local Authority Definition
Multiple subject authorities can be used by Alma. If you wish to use more than one name authority vocabulary, you would need to define priority between authority vocabularies for authority control. To configure this option, contact Ex Libris Support.
Unless you asked to configure authority priorities for your system, only one Names authority vocabulary can be used (global or local). For example, if Alma is defined to use LCNAMES, it cannot also use GND names authorities or a local names authority vocabulary. Given these considerations, we recommend defining only one type of Name or Names and Subjects local vocabulary.
Note that you can manage a local extension of a global authority vocabulary. To do so, enable the Managed Locally indication for it in the Configuration > Resources > Metadata Configuration. When enabled, an institution can create a local authority record that is attached to the global vocabulary. Alma will always prefer the local record over a matching global record - in order to link to a global authority record, the local record will need to be deleted.
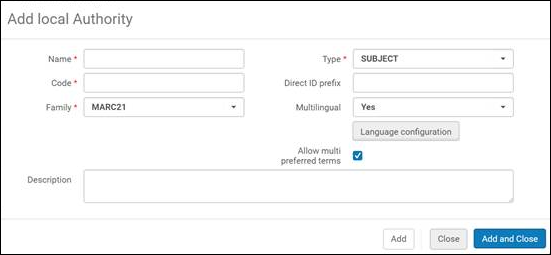
For information on the code to be used for the defined names authority, see the Code entry in the Add Local Authority dialog box below.
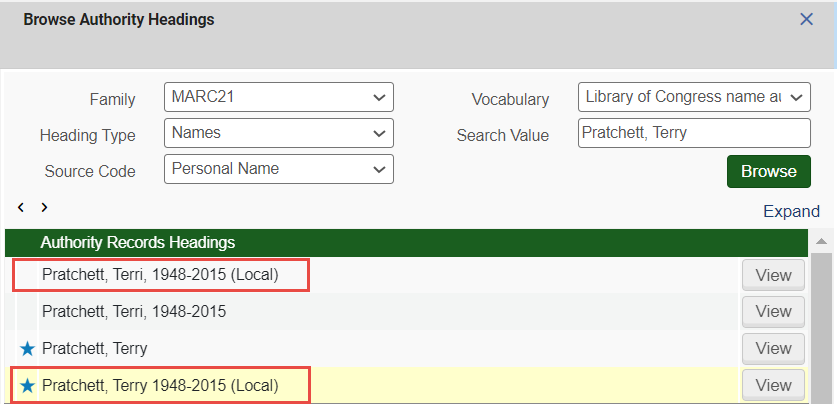
Local authorities added by libraries that manage local authority records as part of a global vocabulary can easily identify the local record in the Browse Authority Headings screen with a (Local) indication.
Note that when you add a local authority configuration, if you want to use the functionality provided by the Language Configuration option, you first need to contact Support to configure that capability for your system.
- On the Metadata Configuration List page (Configuration Menu > Resources > Cataloging > Metadata Configuration), select Add Local Authority. The Add Local Authority dialog box appears.
- Complete the information in the Add Local Authority dialog box (see the table below for more information).
Parameter Description Name Enter a name to identify this local authority. This name appears in the Vocabulary Name column. Code Enter an identifying code for this local authority that appears in the Code column in the Authority Vocabularies section on the Metadata Configuration List page and the Vocabulary code drop-down list on the Import Profile Details page for authority profiles. If the authority indication is in the bibliographic record’s second indicator 7, subfield 2, the code must match what is in this subfield 2. This is relevant for Subject and Names and Subjects types of local authorities.For the Name type of local authority (see the note above, at the beginning of this section), the code must match the authority_names customer parameter value that was entered for your institution by Ex Libris staff. If you are unsure of the defined value for this parameter (the default for which is LCNAMES), contact an Ex Libris representative.Type Select from the following options available in the drop-down list: - Subject
- Name
- Names and subjects
- Classification
No more than one name type of local vocabulary should be created.Direct ID Prefix Enter one or more prefixes in this field to be used for bibliographic to authority record matching and linking when there are multiple $0 entries (or $3 in UNIMARC or CNMARC records). For more information, see Authority Control Based on Multiple Authority Identifiers in a Bibliographic Record and Using Originating System IDs for Linking Bibliographic Records to Authority Records. The prefix must be entered with parentheses surrounding it. If more than one prefix is required, separate them by commas. For example: (CCL1),(CCL2),(CCL3). Notice that there are no spaces separating these entries. The maximum number of characters for this field is 255. The sequence in which you enter the prefixes determines the priority order in which they are evaluated for a match when there are multiple 035 entries in the authority record to match against.For Community Zone managed authority records, the Direct ID Prefix needs to be configured by Ex Libris. For example, the DE-588 Direct Prefix ID used in the GND (German National Library Names and Subjects) records is configured at the Community Zone level.Family
Select the cataloging standard (such as MARC 21, UNIMARC, or CNMARC) that you plan to use for entering the local authority records with this profile. This name displays in the Family column. Multilingual Select Yes from the drop-down list to indicate that the authority record may contain multiple language entries. See step 4 below for more information. For Community Zone managed authority records, the Multilingual parameter (and its associated components, Language Configuration and Allow multi preferred terms) needs to be configured by Ex Libris at the Community Zone level.See Working with Multilingual Authority Records for more information.Description Use this option to more fully identify the local authority that you are creating. - Select Add and Close. The local authority configuration that you created appears in the Authority Vocabularies section of the Metadata Configuration List page.
- (Optional) If you selected Yes for the Multilingual option above, select the Edit row action for the local vocabulary that you created in the steps above and complete configuring the local vocabulary using the information provided in the table below.
Parameter Description - This is only available for multilingual authorities.
- If you want to use the functionality provided by the Language Configuration option, you first need to contact Support to configure this capability for your system.
This button appears when you select Yes for the Multilingual parameter.
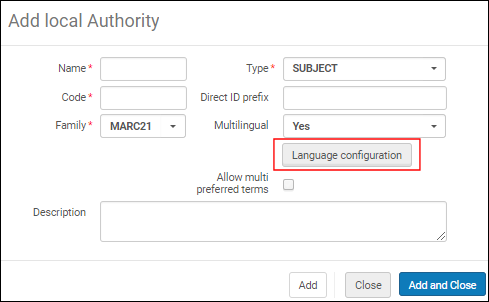 Language Configuration Button
Select the Language Configuration button to open the Language Code mapping table.
This configuration defines all the possible languages that are defined in the authority records. With this mapping table, when no language is specified in $9 of the bibliographic record, the system looks for an authority heading with text that matches exactly to the text in the bibliographic field. The system will look for a match in each language in the order defined in the Order column of the configuration. See the example below.
In this example, if an exact text match is found in Chinese, the link is created between the bibliographic and authority record and $9 with the correct language is added when the preferred-term correction is done. If no Chinese text match is found, the system continues to look for an exact text match using the next language in numeric order as specified in the Order column of the mapping table. If no text match is found and the end of the list is reached, no link is made. Notice, in this example, that an empty Language Code setting in the mapping table is a valid option.
 Language Code Mapping Table
Select Add Row and enter Vocabulary Code, Language Name, Language Code, and Order. Note that the language code entries are free-text fields. Add these based on the codes that the authority file uses.
Select Add Row to add these settings to your Language Code mapping table.
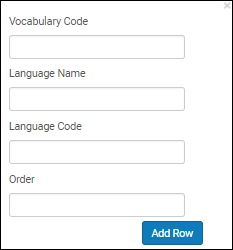 Add Row Options
In addition to local authority records, this capability is also available for global authority records when Ex Libris configures the Multilingual parameter in the Community Zone.
This feature is only relevant for multilingual authorities where the matching is done by text and not by ID.See Working with Multilingual Authority Records for more information.
Allow multi preferred terms This parameter appears when you select Yes for the Multilingual parameter. - Use this option to set the record validation in Alma for accepting multilingual authority records with multiple preferred terms when the same language is identified in $9.
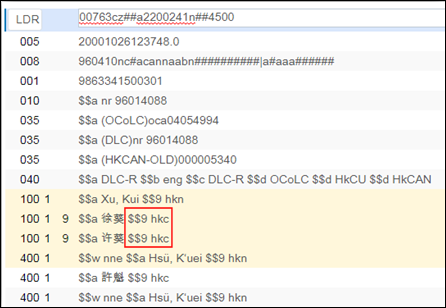 Multiple Preferred Terms with the Same $9 (Authority Record)If Allow multi preferred terms is not selected, a warning or block validation occurs for multilingual authority records with multiple preferred terms and the same language is identified in $9.See Subfield 9 with the Same Language Code for more information.
 - Use this option to set the record validation in Alma for accepting multilingual authority records with multiple preferred terms when there is no $9 specified. With Allow multi preferred terms selected, the MARC 21 Auth validation on save process will allow records without $9 specified. See Working with Validation Exception Profiles for more information.
 MARC 21 Auth validation on save ProcessSee No Subfield 9 Specified for more information.
See Working with Multilingual Authority Records for more information.
- Select Save.
Creating Local Authority Records
- Using the MD Editor (see Creating Local Authority Records Using the MD Editor)
- Using an import profile (see Managing Import Profiles)
- To use local authorities in Alma, Ex Libris Support/your Ex Libris Professional Services representative must enable local authority functionality for your institution.
- To create a local authority record (either via the MD Editor or via an import profile) for authority vocabulary that exists in the Community Zone, you must first create this local authority (vocabulary) in your institution (if it does not already exist). For example, if the Community Zone has a defined authority (vocabulary) for REO, but is missing a specific authority record that you want to create locally, ensure that the local authority (vocabulary) for REO exists in your institution before you create the authority record locally. For information on creating local authorities (vocabulary), see Adding a Local Authority Definition.
- You can delete local authorities using the Delete Local Authority Records job – see Delete Local Authority Records.
- Unless you have configured authority priorities for your system (see Resource Management - November 2016 Enhancements for information on this feature), multiple subject authorities can be used by Alma, but only one type of names authority can be used. For example, if Alma is defined to use LCNAMES, it cannot also use GND names authorities. For more information, see Adding a Local Authority Definition.
Creating Local Authority Records Using the MD Editor
- Open the MD Editor.
- Select New and select from the list of local vocabularies that have been created/implemented for your system (see Adding a Local Authority Definition or, if the local authority vocabulary is an extension of a global one, it appears here automatically as an option with no predefinition required), such as:
- (local) Library of Congress Subject Headings
- (local) Library of Congress name authority records
- (local) U.S. National Library of Medicine, Medical Subject Headings 2013
- (local) German National Library of Names and Subject Headings
- Choose a template (see Working with Record Templates) and enter the authority record data/terms.
-
Select Save > Save and Release Record.If the system identifies another record in the Alma repository with duplicate headings content, it presents a confirmation pop-up message. You need to select Yes or No to indicate how to handle the duplicate. If you select Yes, the duplicate information is presented for you to view and/or edit.
 Duplicating Handling ConfirmationAfter the record is saved, you can view the record you entered using an Authorities search. You can create a bibliographic record that uses the local authority record/terms that you created/saved. Preferred terms are marked with a star. (Note that if you select a non-preferred term, the MD Editor automatically populates the bibliographic record with the preferred term.)
Viewing Authority Records
Exporting Local Authority Records
Changing the Placement of an Authority Record
- Open the MD Editor (Resource Management > Cataloging > Open Metadata Editor).
- Select New and select the vocabulary name.
- Select Record Actions > Change Authority Placement.
The New Authority Record Placement dialog box appears. The options provided vary depending on the vocabulary that you selected for your draft authority record (Local or Network) and how your Metadata configuration is set for locally-managed or community-managed authority records (see Controlling the Display and Access of Global Authorities in the MD Editor). One or more of the following options are provided: -
- Community Zone
- Network (Zone)
- Local (Institution Zone)

- Select the placement location and select OK.
You may select the Change Authority Placement option and change the placement location, again. However, once you have saved the record, you can no longer change the placement. The Change Authority Placement option appears as disabled after the record has been saved.
Performing Global Changes on Locally Managed Authority Records
- Open the Metadata List Configuration page (Configuration Menu > Cataloging section > Metadata Configuration).
- Select the relevant profile. For example, for the local authority Metadata Configuration, select the MARC 21 Authority link. The Fields tab of the Profile Details page opens.
- Select the Normalization Processes tab.
 Normalization Processes Tab
 - Select Add Process. The Process Details wizard step 1 page opens.
- Enter the Name, Description, and Status.
- Select Next. Wizard step 2 of the Process Details page opens.
- Select Add Tasks, select the MARC Normalization Rules process, and select Add and Close.
- Select Next. Wizard step 3 of the Process Details page opens.

- From the Drools File Key dropdown list, select the normalization rule you have previously created in the Metadata Editor.
- Select Save. The new normalization rule displays in the Normalization tab of the Profile Details page and can be edited, copied, or deleted using the Actions options.
- Run the normalization job you created above. For more information, see Running Manual Jobs on Defined Sets.
Managing Authority Records in the MD Editor
Authority Controlled Fields
The bibliographic authorized fields listed below are used for authority control (applied for F3 and linking functionalities):
Standard bibliographic authorized fields are enabled by default. However, less commonly used fields require activation by Ex Libris support.
MARC21
| Type | Bibliographic Tag | Authority Tag |
|---|---|---|
| Personal Name | 100, 600, 700, 800 | 100, 400, 500 |
| Corporate Name | 110, 610, 710, 810 | 110, 410, 510 |
| Meeting Name | 111, 611, 711, 811 | 111, 411, 511 |
| Uniform Title | 130, 630, 730, 830 240, 440, 490 |
130, 430, 530 |
| Event Name | 647 | 147, 447 |
| Chronological Term | 648, 388, 748 | 148, 448, 548 |
| Topical Term | 650, 654, 385 | 150, 450, 550 |
| Geographic Name | 651, 751 | 151, 451, 551 |
| Genre Form Term | 655, 380, 386 | 155, 455, 555 |
| Medium of Performance | 382 | 162, 462, 562 |
For more information on MARC21 format for Bibliographic data, click here.
UNIMARC
| Type | Bibliographic Tag | Authority Tag |
|---|---|---|
| Personal Name | 600, 700-703 | 200, 400, 500 |
| Corporate Name |
601, 610, 711, 712, 713 (1st indictor=0) |
210, 410 (1st indictor=0) 510 |
| Meeting Name | 601, 610, 710-713 (1st indictor=1) | 210, 410 (1st indictor=1) 511 |
| Family Name | 602/720-723 | 220, 420 |
| Uniform Title | 410, 411, 500, 506, 605, 730, 740-742 | 230, 231, 430, 431, 530, 531 |
| Topical Term | 606 | 250, 450, 550 |
| Trademark | 716 | 216, 416 |
| Geographic Name | 607, 617 | 215, 415, 515 |
| Genre Form Term | 608, 616 | 280, 480, 580 |
| Name Collective Title | 501 | 245, 445, 545 |
| Classification Number | 676, 680, 686 | 250 $a, $j, $z |
| Publication Place | 620, 621 | 260 |
| Name Title | 604 | 240, 440 |
For more information on UNIMARC format for Bibliographic data, see:
Linking an Authority Record to a Bibliographic Record
- 130 – Main Entry – Uniform Title
- 630 – Subject Added Entry – Uniform Title
- 730 – Added Entry – Uniform Title
- 830 – Series Added Entry – Uniform Title
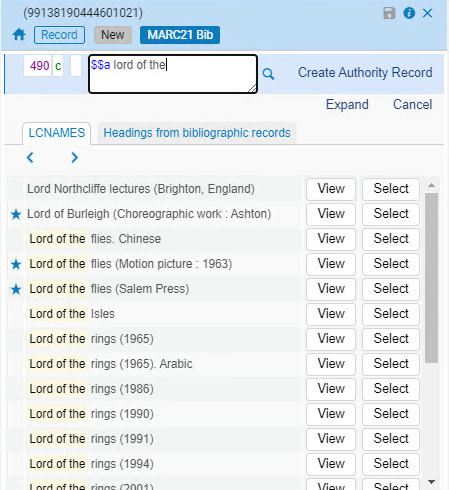
Viewing and Linking to an Authority Record
- Open a new or existing bibliographic record in the MD Editor.
- In an authority-controlled field, press F3 OR type at least three characters of the author’s name or subject heading for a new bibliographic record and then press F3 to display a list of suggestions.
 Suggested Terms ListLocal authorities are indicated by (Local) to the right of the title. A star to the left of the title indicates the preferred term. With any selection, the preferred term immediately replaces the non-preferred term.If you do not see the desired name or subject heading in the list, type additional characters in the field to narrow the results.
 - Select one of the following buttons:
- Select – Links the selected authority name or subject heading to your bibliographic record.
- View – Opens a read-only version of the full authority record on the right side of the split screen in the Authority tab. For authorized headings, clicking View opens the right side of the split screen, with the bib record(s), linked and unlinked, in one sub-tab, and the linked authority in the other tab. For unauthorized headings, clicking the View option displays the bibliographic record on the right side of the split screen.
- Add record to editing list – If the authority record that appears when you select View is local, not locked by another user, and not already included in the authority draft list, use this option to add it to your authority draft list. Select Add record to editing list to add the local authority record to your working records list. After the record was added to your working records list, you can edit this local authority record in the MD Editor.
-
Edit – If the authority record that appears when you select View is local and not locked by another user, you can select Edit to modify the local authority record. Note that this capability is also available from Browse Bibliographic Headings (Resources > Cataloging > Browse Bibliographic Headings).
 View / Edit Local Authority Record
 Browse Bibliographic Headings Local Authority EditingIf you do not want the Bib heading to be linked to an existing, matching authority record, adding $$9 no_linkage to the authorized field prevents automatic linking processes from creating such a link. See Authority Control – Exclude Heading from Linking.
Viewing Bibliographic Records Linked or Available for a Suggested Authority Record
When you use F3, bibliographic headings may be presented in addition to the authority headings. Note that the list of authority headings and Headings from bibliographic records that appear with using F3 originate from the Network Zone or the Institution Zone based on the scope of the record that you are editing. Use the procedure below to view the available bibliographic records.
- Open a new or existing bibliographic record in the MD Editor.
- In an authority-controlled field, type at least three characters of the author’s name or subject heading for a new bibliographic record and then press F3 to display a list of suggestions or press F3 in the authority-controlled field.
- Select the View button for one of the rows that appears in the authority records list. The right pane opens with the Authority and Bibliographic Records tabs.
- Select the Bibliographic Records tab (in the right pane of the MD Editor).
-
Use the Include filter to select one of the following options:
- Matching Headings – Select to view all the possible available bibliographic headings that match the text of the authority heading that you selected to view in the left pane.
- Linked Records – Select to view only the linked bibliographic headings that are linked to the authority record that you selected to view in the left pane.
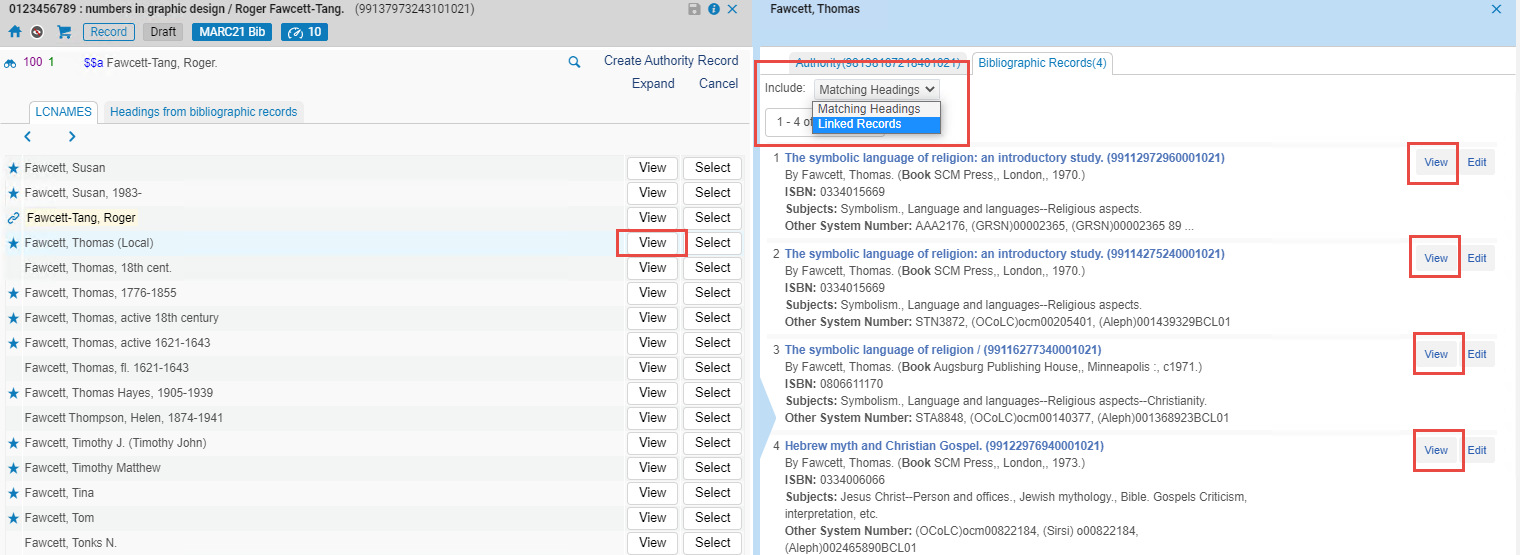 View Linked or Available Bibliographic Records
Note that in a Network Zone, when you use F3 (or the
 linking icon) from a Network Zone record, the bibliographic headings that appear on the Bibliographic Records tab are Network Zone records. When you use F3 from a local record, the bibliographic headings that appear on the Bibliographic Records tab are local records.
 - Select the View link from the Bibliographic Records tab for the bibliographic record that you want to see that is linked or available for the selected authority record. When you select the View link for a result, Alma displays a full, read-only bibliographic record.
ID-Based Linking
The MD Editor allows you to directly link names or subject headings to an authority record by assigning an ID to the bibliographic field corresponding to the authority record. Unlike text-based linking, where a match is made between a bibliographic field and authority headings (either preferred or non-preferred terms), and a link is created based on that match, ID-based linking connects the ID placed in the bibliographic field to the entire authority record. Specifically, the ID in subfield $0 of the bibliographic field is linked to the authority record by the ID in the 035 field. If an ID is not assigned to the bibliographic field, no linking will occur, and any subsequent processes, such as corrections, will not be applied. The tag of the specific bibliographic field containing the ID does not have any particular significance.
ID-based linking can be accomplished in the following ways:
-
By explicitly placing the authority ID in subfield $0 of the bibliographic field. A subsequent correction job will copy the corresponding authority heading to the bibliographic record.
-
By using F3 browsing (text search) and selecting a specific authority. This creates a link between the bibliographic and authority records, and the authority heading, including the ID from the 035 field, is copied to the bibliographic field.
For example, a MARC tag 110, which represents a corporate name, can hold an ID and be linked to an authority record with a MARC tag 100, which represents a personal name. This means that the bibliographic field and the authority record may differ in type. The binocular icon next to the linked bibliographic field indicates a connection to the authority record, established automatically when a match is found based on the ID. However, since the F3 function browses based on text, the suggestion for a corporate name from the authority will not be presented as an option, as the bibliographic field represents a personal name.

- The choice between text-based linking or ID-based linking is made during the implementation phase. If you prefer to use ID-based linking, please contact Ex Libris support.
- ID-based linking does not support partial linking.
Deriving an Authority Record from a Bibliographic Record
- Open a new or existing bibliographic record in the MD Editor.
-
In an authority-controlled field, enter headings information that you know does not exist in an authority record and press F3. The field appears in the normal manner with the addition of the Create Authority Record option.
 Create Authority Record Option
 -
Select Create Authority Record. The new authority record is created and displays in the MD Editor in the side-by-side, split screen format.
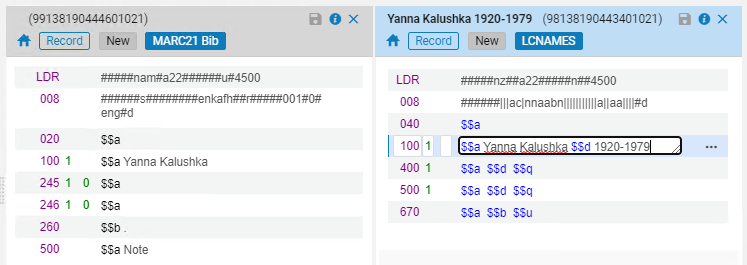 Quick Authority Record Created
 -
The list of authority records in the MD Editor also shows the new authority record that you created.
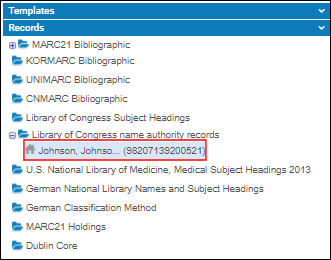
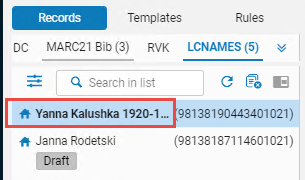 List of Authority Records in the MD EditorWhen you create authority records using Create Authority Record and the focus field when you press F3 is a non-preferred field such as the 600 field, the content is placed in the preferred field 100 in the new authority record that is created.
 - Complete processing the bibliographic record as you normally would.
Viewing Linked Names/Subject Headings from a Bibliographic Record
-
Open a bibliographic record in the MD Editor.If an authority-controlled field is linked to a name/subject heading, an icon appears next to the field: the
 icon appears for full linking, and
  appears for partial linking. Partial link is a link between a bibliographic heading with subdivision to an authority record without subdivision.
 -
Select the icon to display the linked name/subject heading in split-screen mode.
 View Name/Subject Heading in Split-Screen Mode
Using F3
Editing Bibliographic Records with F3
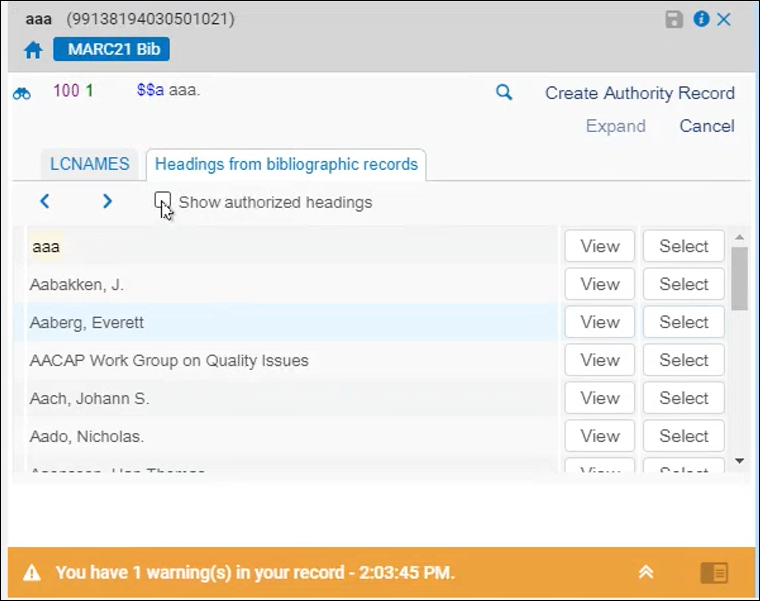
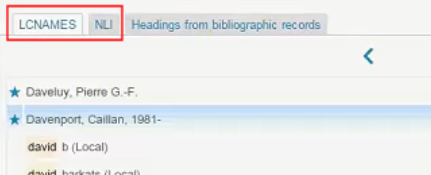


Headings from Bibliographic Records Tab
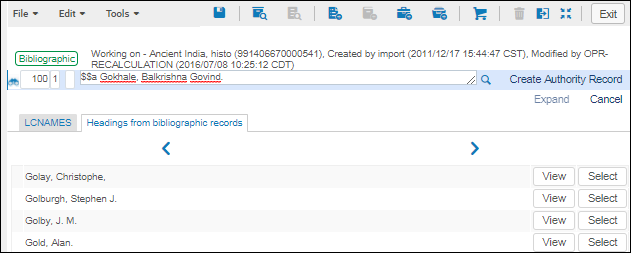

- View - The full bibliographic record is displayed.
- Select - The entire bibliographic heading is copied into the current bibliographic record field you are working on.
This functionality differs from the Select option in the F3 search for authority headings, which follows a distinct logic. In this case, not all subfields are copied from the Authority to the Bibliographic record.
- When the Show authorized headings checkbox is clear, then upon pressing F3 the Bibliographic Headings tab shows only unauthorized headings. Unauthorized headings appear in the list without an icon.
- When the checkbox is selected, all bibliographic headings are displayed for the vocabulary of the bibliographic field. If there are several vocabularies defined for the field, the list includes bibliographic headings linked to all of them. Authorized headings have the binocular icon next to them. This indicates which headings are authorized and the type of authorization (
 full or
  partial).
Note that the heading of the currently edited record does not appear in this list - only headings from other bib records appear. If no match is found in Headings from bibliographic records when F3 is pressed, the list of results is presented with no indication of relative placement as with the authority vocabularies that indicate Your entry would be here.
The View and Select buttons in the authority headings list work as previously described on this page. See the Viewing and Linking to an Authority Record and Viewing Bibliographic Records Linked or Available for a Suggested Authority Record sections for more information.
| $9 in the Record Being Edited | $9 in the Bibliographic Headings Record | Resulting $9 in the Record Being Edited |
|---|---|---|
| lat | lat | lat |
| lat | none | lat removed |
| none | lat | lat |
| lat | cyr | cyr |
751 Field
When you use F3 in the 751 field, names headings and subject headings are presented in the authority headings results. With this implementation of F3 for the 751 field, subject headings results are presented in addition to names headings results, when a second indicator is cataloged in the bibliographic record. If no second indicator is specified, only names headings results appear in the F3 results.
The 751 field can also be linked to names headings and subject headings depending on how you have cataloged the record.
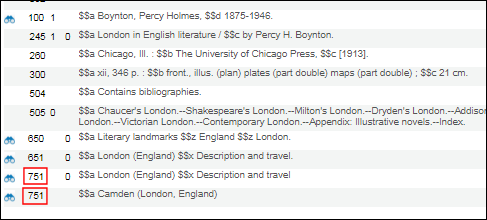
This implementation of F3 does not affect the options presented in Browse Bibliographic Headings (Resources > Cataloging > Browse Bibliographic Headings). The Geographic Name source code option only appears when the Subjects heading type is selected and presents all 651 and 751 geographic names. See Subjects for more information.
View Contributor Page
Within the Authority tab, users are presented with the option (when available) to view the Contribuitor Page. This page assists catalogers in identifying the correct authority for MARC records, as well as displays detailed information from both external resources (Wikidata and Wikipedia) and the local catalog. This information can assist catalogers in selecting the correct authority record to link to when using authority selection. Catalogers can navigate from the Metadata Editor to a full-page view of the Contributor Page and back to the Metadata Editor. Accessing the Contributor Page in the Metadata Editor is done by selecting (F3 > View > View Contributor Page) or selecting the View Contributor Page button in the Authority tab.
If the description in the Contributor Page is extensive, a link labeled "See More in Wikipedia" is displayed.

Full support for generating a new search based on the ID of the authority will be fully functional after the November 2024 indexing.

When working in a network, the navigation and linked data is derived according to the record's position, so that:
- For network records, the information on linked authority records comes from the network, and searches for records linked to the same contributor or subject are done in the network catalog.
- For local records maintained by the member, the information on linked authority records comes from the local catalog, and searches for records linked to the same contributor or subject are done in the institution's catalog as well.
The Contributor Page is a combination of data from the Library of Congress Name Authority and Wikidata. From the Contributor Page, users can:
- Select the Wikidata link that opens the Wikidata entry in a new browser tab
- Select the Generate New Search link that executes a search based on the Authority ID

Wikidata Page
Select the Wikidata link in the Contributor Page. Upon selecting the Wikidata link, a new tab in the browser opens with the relevant Wikidata entry.

Generate New Search
Select the Generate New Search button in the Contributor Page. Upon selecting the Generate New Search button, a new search is executed based on the Authority ID.

3XX Bibliographic Record Control Fields
| Bibliographic Tag | Authority Headings Tag |
|---|---|
| 380 | 155, 455 |
| 385 | 150, 450 |
| 386 | 155, 455 |
| 388 | 148, 448 |
- F3 linking in the MD Editor
- Linking when saving or loading records
- Linking via the linking job
Editing Authority Records with F3
5XX Authority Record Control Fields

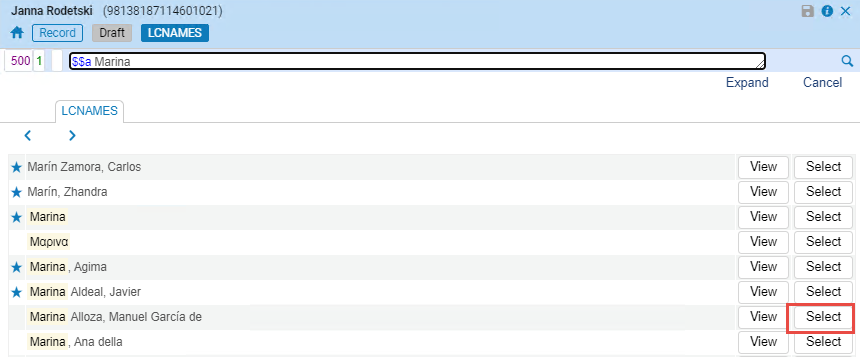

- MARC 21 – Subfield 0
- UNIMARC – Subfield 3
3XX Authority Record Control Fields
| Authority Tag | Authority Headings Tag |
|---|---|
| 368 | 150, 450 |
| 370 | 151, 451 |
| 372 | 150, 155, 450, 455 |
| 373 | 110, 410 |
| 374 | 150, 450 |
Copying Community Zone Authority Records to Your Local Authority Database

- Select Copy (or Copy to Network). The Authority Record Copy Cataloging dialog box prompts you to select the vocabulary code and originating system for the authority record that you are copying.
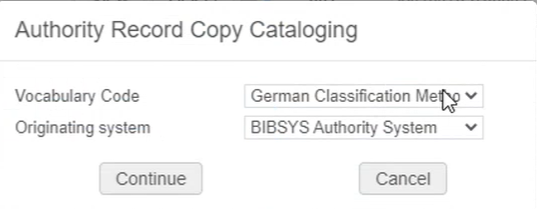
- Select Continue. The record that is copied to your local authority database opens in the right pane. When the record is copied, a 035 field with the originating system and the MMS ID of the Community Zone record is added to it. You can edit this record as you normally would and save it.
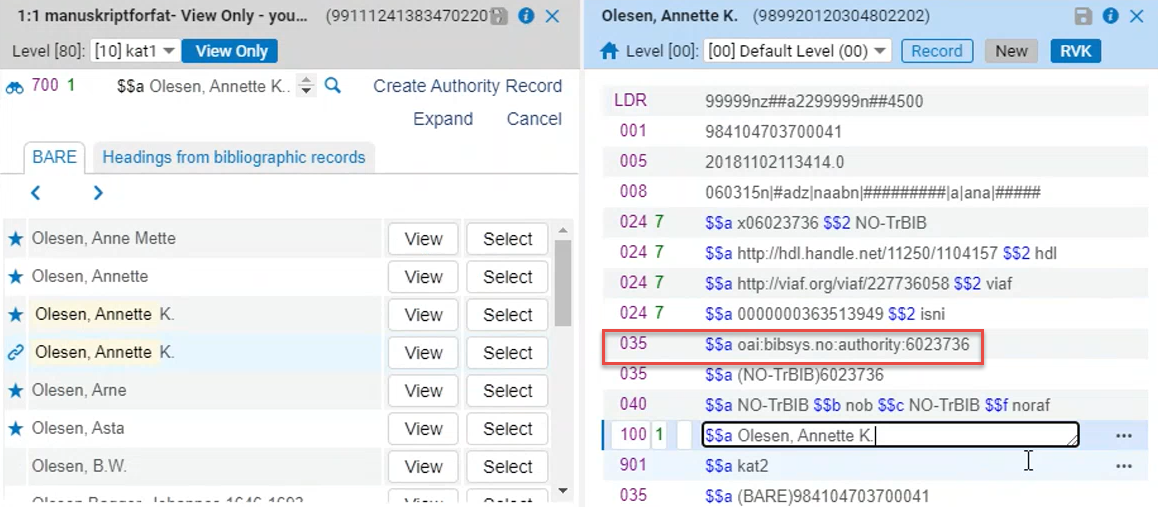
Authority Record Copied to Local Authority Database
Working with GND Records in the MD Editor
GND Bibliographic Control Fields Used with F3
| Bibliographic Field | Authority Heading Type |
Entity Type of the GND Authority Record Identified in the 075 $b
|
|---|---|---|
| 100 | Personal Name | n or p |
| 110 | Corporate Name | g or b |
| 110 | Geographic Name | g or b |
| 111 | Meeting Name | f |
| 130 | Uniform Title | u |
| 240 | Personal Name | u |
| 240 | Corporate Name | u |
| 240 | Meeting Name | u |
| 600 | Personal Name | p or u |
| 610 | Corporate Name | u |
| 611 | Meeting Name | f or u |
| 630 | Uniform Title | u |
| 650 | Topical Term | s |
| 651 | Geographic Name | g |
| 689 | Any | All except n |
| 700 | Personal Name | n or p or u |
| 710 | Corporate Name | b or u |
| 710 | Geographic Name | g |
| 711 | Meeting Name | f or u |
| 730 | Uniform Title | u |
| 751 | Geographic Name | g |
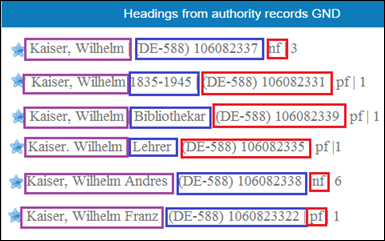
GND Special Sorting Routine Used for Browsing Headings with F3
- The text from the name and subject headings is used to build the string for sorting the headings browse list.
- Each subfield is treated as a separate sorting block.
- Under certain conditions, the 548 $a and the 550 $a are added to the string built for sorting the headings browse list.
- When building the filing value for GND records with the 548 and 550 fields, the 548 field is appended with a single space as a delimiter; and the 550 field is appended with three spaces as a delimiter.
- When there are repeatable occurrences of the 548 and 550 fields, the filing text concatenates all entries into a single component.
German Language Sorting Used with F3
Implemented Punctuation Rules for Updated Bibliographic Records
| (1) Tag & Indicators | (2 Subfield to Which Punctuation Is Added | (3) Subfield Following the Subfield in Column (2) | (4) Punctuation to Be Added | (5) If Punctuation Exists/Does Not Exist Condition |
|---|---|---|---|---|
| 1#### | a | . | . | |
| 1#### | d | . | -. | |
| 100## | a | 4 | . | |
| 100## | a | d | , | , |
| 100## | a | e | , | , |
| 100## | c | e | , | , |
| 100## | q | e | , | , |
| 100## | d | 4 | , | |
| 100## | d | e | , | -. |
| 110## | b | . | . | |
| 110## | a | e | , | -. |
| 110## | b | e | , | ., |
| 110## | d | e | , | , |
| 600## | a | . | . | |
| 600## | b | a | , | ,، |
| 600## | d | a | , | ,، |
| 600## | d | . | .,، | |
| 600## | q | . | ). | |
| 600## | t | . | ). | |
| 6#### | a | . | -). | |
| 6#### | v | . | . | |
| 6#### | x | . | ). | |
| 6#### | y | . | . | |
| 6#### | z | . | . | |
| 7#### | a | . | -). | |
| 7#### | a | 4 | . | |
| 7#### | a | e | , | |
| 700## | a | d | , | , |
| 7#### | d | e | , | -).,، |
| 7#### | c | e | , | -).,، |
| 7#### | q | e | , | |
| 7#### | b | . | .,، | |
| 7#### | b | e | . | , |
| 710## | b | e | , | , |
| 7#### | d | . | .,،-? | |
| 7#### | d | t | . | -. |
| 7### | t | . | -. | |
| 800## | t | v | _; (space before semicolon) | ; |
| 810## | t | v | _; | ; |
| 811## | t | v | _; | ; |
| 83### | a | v | _; | ; |
| 8#### | n | v | _; | ; |
| 8#### | p | v | _; | ; |
| 8#### | f | v | _; | ; |
| 8#### | l | v | _; | ; |
| 8#### | s | v | _; | ; |
| 8#### | x | v | _; | ; |
- If any of the punctuation specified in this column exists, the punctuation specified in column (4) is not added.
- If there is no punctuation specified in this column (the cell is blank), the punctuation in column (4) is added if all other conditions are met.
Handling Deleted Authorities During Metadata Imports
Working with the Norwegian Authority System (BARE) Records
Contributing BARE Records
- Open the MD Editor (Resources > Cataloging > Open Metadata Editor).
-
Select New > BARE to create a new record.
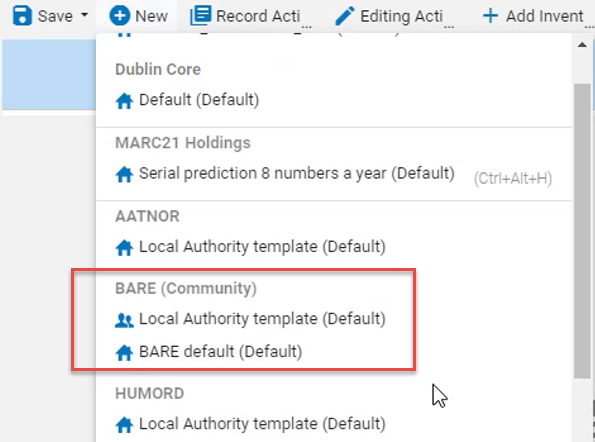 BARE Contribution Option
 - Enter the authority record details.
-
Select the Save icon.Alma submits the record to BARE for approval. If there is an error, Alma displays an error message in a dialog box and asks if you want to reload the record from scratch or continue editing. Select Yes to reload the record and discard your changes or select No to return to the MD Editor and continue editing. If the contributed record is approved, it is stored in the Community Zone and the primary BARE database.
Working with the Regensburger Verbundklassifikation (RVK) Authority Record Classification
- Open the MD Editor (Resources > Cataloging > Open Metadata Editor).
-
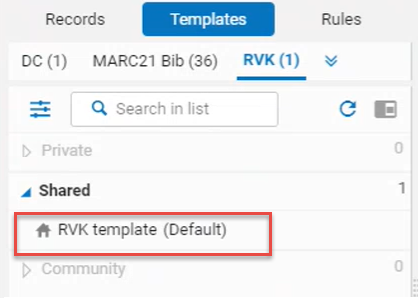
Select the Templates tab. The list of template folders appear.
 Folder with the RVK Template
 - Open the folder to work with the default RVK template provided. See Working with Record Templates for instructions.
- Open the MD Editor (Resources > Cataloging > Open Metadata Editor).
-
Select New > RVK template.Alma loads the RVK form in which you can enter the RVK local authority record.
 RVK Local Authority Record
 - Enter the data for your authority record.
-
Select File > Save and Release Record.Using the repository search, you should be able to locate the RVK authority record with an Authorities search.
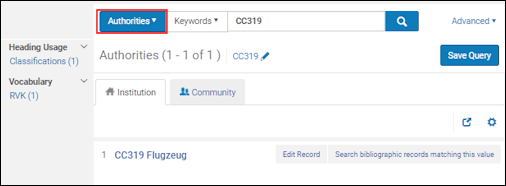 RVK Authority Record
- Use a search to locate the bibliographic record with which you want to work, and select Edit to open the record in the MD Editor.
- Select Edit > Add Field to add the 084 field.
- Enter $2 with rvk.
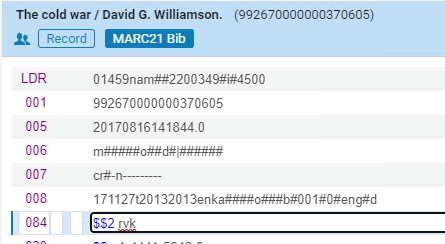 Entering the Bibliographic 084 Field
 -
When you enter $a, press F3 to check for preferred terms. The system finds authority records based on the classification number (153 $a) or classification caption (153 $j). See Classification Search Indexes for more information.
Using Originating System IDs for Linking Bibliographic Records to Authority Records
| Type | Authority-Controlled Data Fields |
|---|---|
| Parameter
The originating system is determined by the authority_names setting that Ex Libris defines in your Customer Parameters mapping. For example, if authority_names is set to LCNAMES, the originating system is the Library of Congress.
|
100, 110, 111, 130, 700, 710, 711, 730, 800, 810, 811, 830 |
| Second indicator The originating system is determined by the field’s second indicator as identified in the following list:
|
600, 610, 611, 630, 648, 650, 651, 654, 655 |
- Open the bibliographic record to which you want to add $0 in the MD Editor.
-
Make the authority-controlled data field to which you want to add the $0 the active row and press F3. The headings from authority records are displayed.
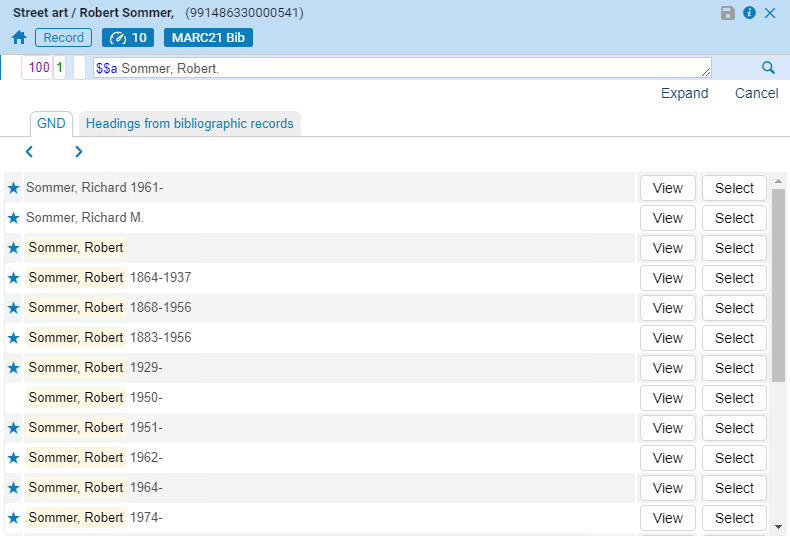 F3 Authority Suggestions List
 -
Select View for the authority record you prefer. The MD Editor displays the details of the authority record in Split Editor mode.
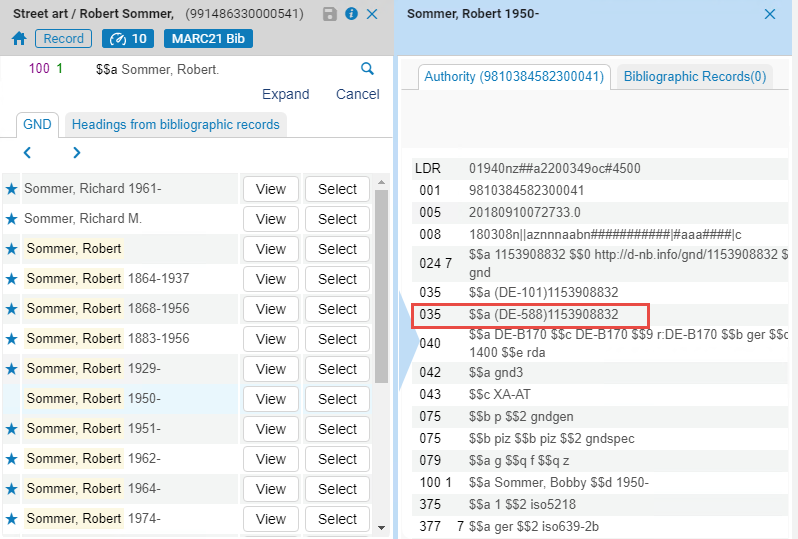 Authority Record Details in Split Editor Mode
 -
Review the authority record details, confirm that this is the authority record to which you want to link the bibliographic record, and select Select from the list of suggestions.
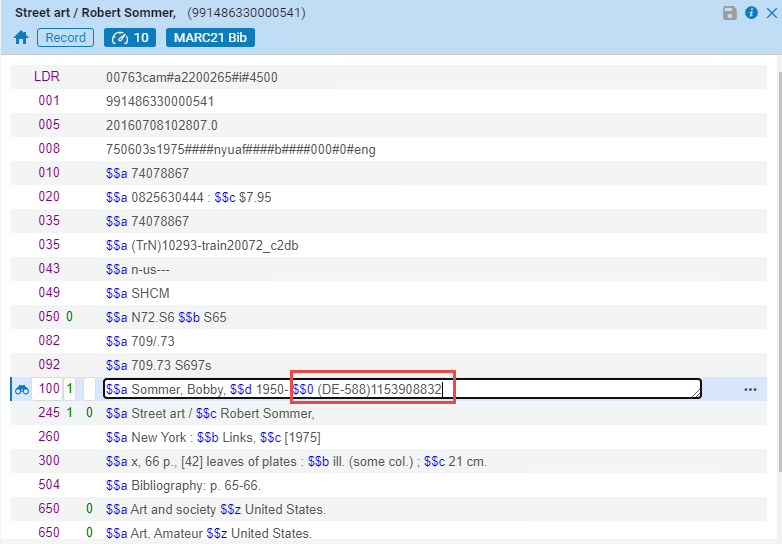 $0 Created
 -
Save your bibliographic record. Now that this authority-controlled data field contains $0, pressing F3 displays only the authority record with the originating ID that is stored in $0.
 Only the Authority Record with the Originating ID stored in $0 is Displayed
Authority Control Based on Multiple Authority Identifiers in a Bibliographic Record


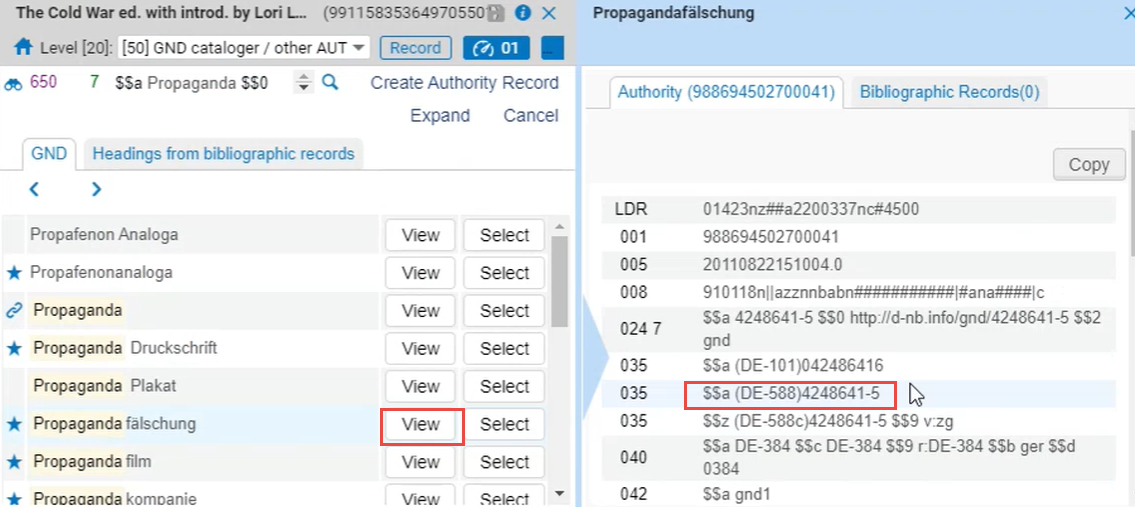
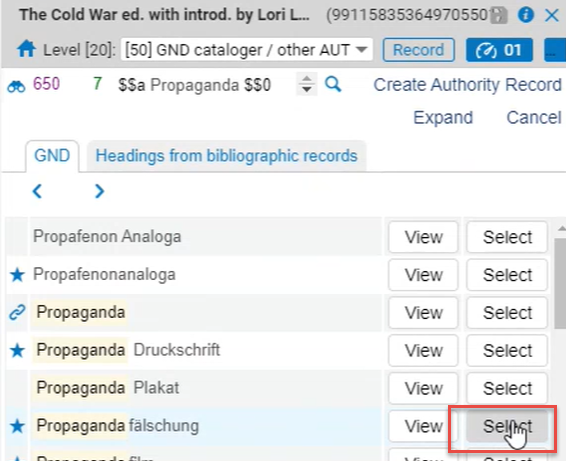
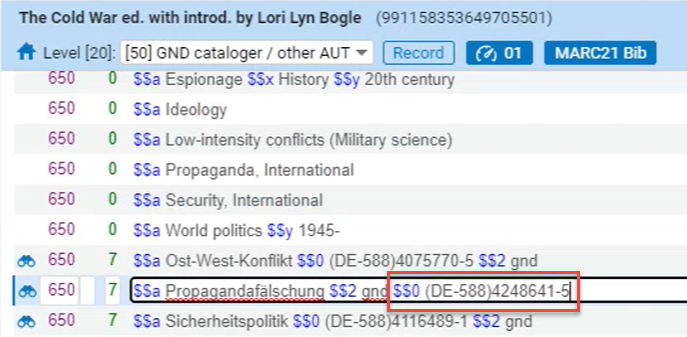

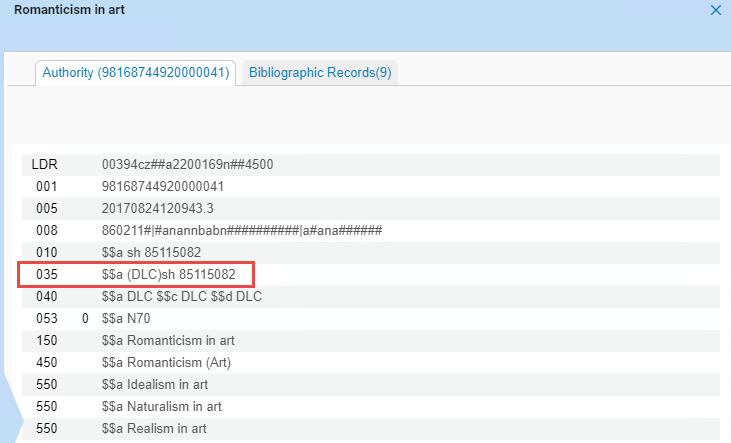

Navigating from the Authority Record to the Linked Bibliographic Record
- Authority vocabulary and the linked originating system ID
- Direct IDs
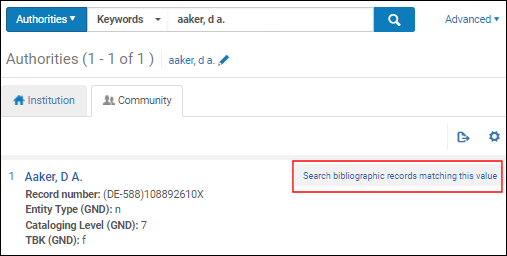

Working with Multilingual Authority Records
Processing Preferred-Term Correction for Multilingual Records
-
The Multilingual parameter needs to be set to Yes for multilingual authority records. For local authority records, you need to specify this parameter in the Metadata Configuration. For Community Zone managed authority records, this setting needs to be configured by Ex Libris at the Community Zone level. For more information, see Multilingual in the table in the Adding a Local Authority Definition section.
-
For MARC 21 records, the language code (such as lat, heb, ara, and so forth) for all preferred, non-preferred, and related terms is entered in $9.
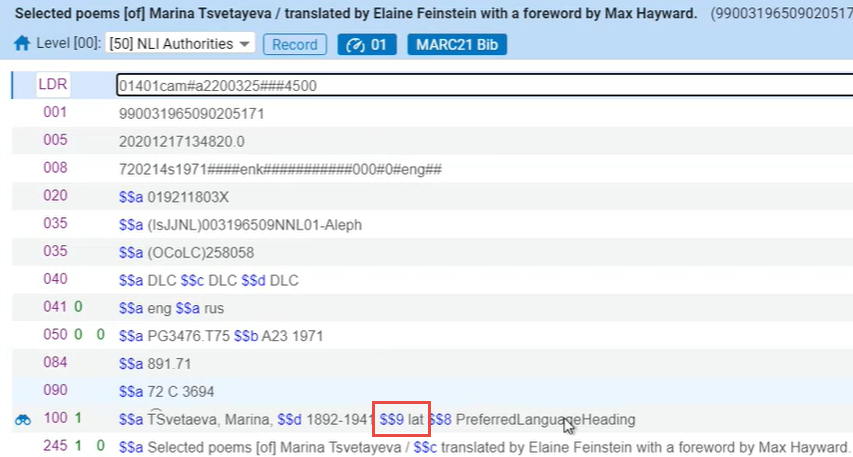 Subfield 9 Record Entry
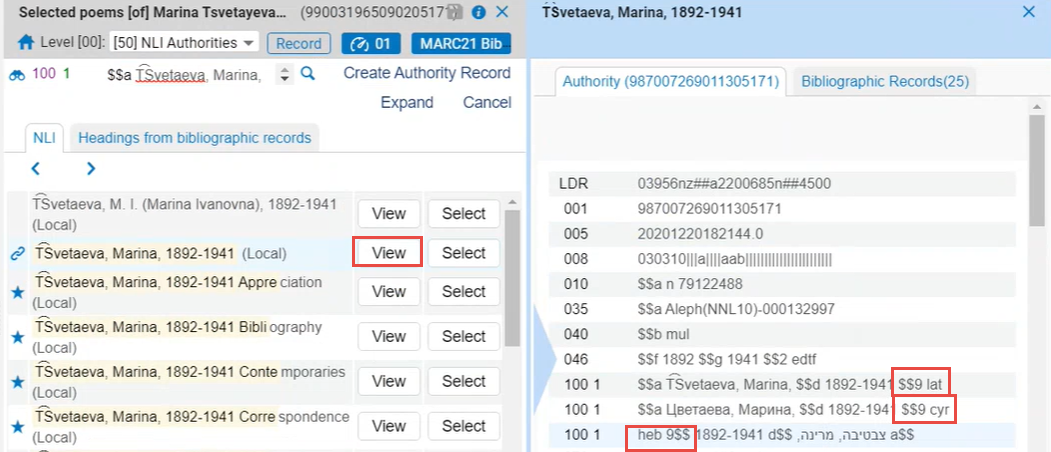 Subfield 9 Headings Display
 -
For UNIMARC records, the language code for all preferred, non-preferred, and related terms is entered in positions 5 and 6 of $7.
 Positions 5 and 6 in $7
 -
In a multilingual authority record, the preferred term is duplicated for each language. Non-preferred terms are entered as necessary for each language.
 Multiple $9 Entries with Duplicated Terms for Each Language
 -
When a non-preferred term is used in a bibliographic record, Alma updates the bibliographic record using the preferred term of the same language.
-
When F3 is used (from the appropriate bibliographic fields) in the MD Editor to display a list of headings, the headings list is displayed as follows:
-
If there is a language code (specified in the MARC 21 $9 or the UNIMARC $7) in the bibliographic record, only the headings that match the language appear.
-
If there is no language code specified in the bibliographic record, all of the matching headings in all languages are displayed. The language code in the authority/bibliographic headings records is ignored.
-
-
Validation of records is handled in the following manner:
-
For authority records, Alma checks for the Multilingual setting. If the Multilingual setting is No, only one preferred field is allowed in the MARC 21 1XX or the UNIMARC 2XX. If the Multilingual setting is Yes and there is more than one preferred term, Alma checks for a language indication in the MARC 21 $9 or the UNIMARC $7, positions 5 and 6.
-
For bibliographic records, validation of $9 has been enhanced to include $9 in the fields specified in the table below.
MARC 21 Bibliographic Fields KORMARC Bibliographic Fields 084 084 382 100-199 440 382 490 440 648 490 650-651 600 654-655 610-619 748 630 751 648 810-819 650-651 830 654-655 700 710-719 730 748 751 800 810-819 830
-
- Publishing to Primo enriches the bibliographic records with the preferred, non-preferred, and related terms of all languages.
Handling of Multiple Preferred Terms with the Same Language
When you are doing preferred-term correction from the MD Editor using F3 in an authority controlled field of a bibliographic record, and you select a non-preferred term, the system checks for a preferred term to link to; if it finds multiple preferred terms with the same language, the system prompts you to select which preferred term to use. See the example below.
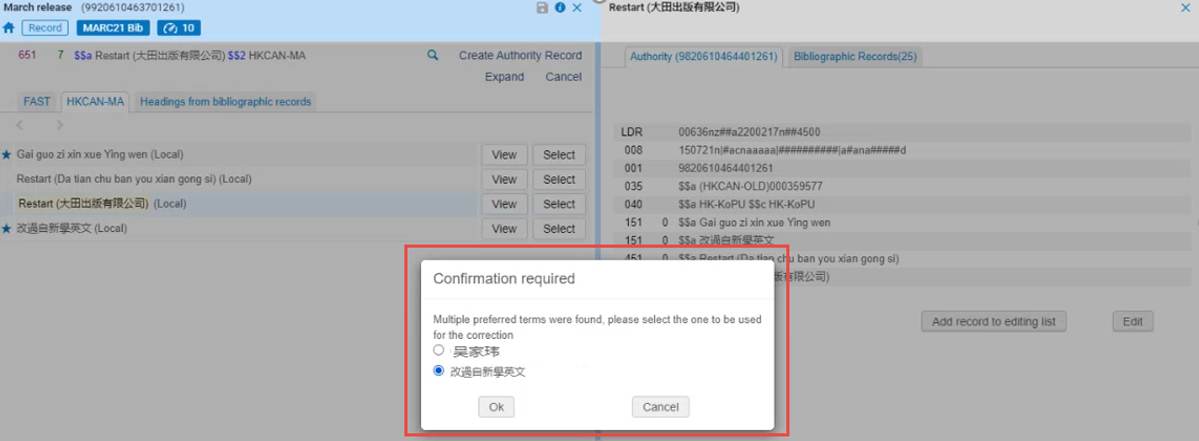
After selecting the preferred term, the system updates the bibliographic record in the MD Editor with the preferred term that you selected and identifies it with the binoculars icon indicating that the field is showing the preferred term for that authority controlled field.

Subfield 9 with the Same Language Code
With the appropriate configuration, Alma enables saving a multilingual authority that has multiple preferred terms with the same language code in subfield 9 without a validation warning or block. See Allow multi preferred terms for more information.
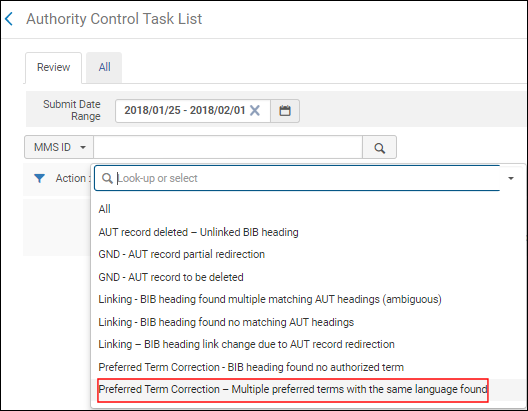
When the Authorities – Preferred Term Correction job is run and it finds multiple preferred terms with the same language code in subfield 9, the bibliographic record is not corrected and the following message is reported in the Authority Control Task List:
Preferred Term Correction – Multiple preferred terms with the same language found
For these records, use the Authority Control Task List (see Using the Authority Control Task List) and make the changes manually. Use the Preferred Term Correction – Multiple preferred terms with the same language found Action option in the Authority Control Task List to locate these tasks.
No Subfield 9 Specified
Authority records with no $9 can be processed in Alma. Specific validation and preferred-term correction processes have been implemented to handle these cases. See Validation with No Subfield 9 and Preferred-Term Correction with No Subfield 9 for more information.
Validation with No Subfield 9
With the appropriate configuration, Alma enables saving a multilingual authority that has no $9 without a validation warning or block when using the MARC 21 Auth validation on save process. See Allow multi preferred terms for more information.
Preferred-Term Correction with No Subfield 9
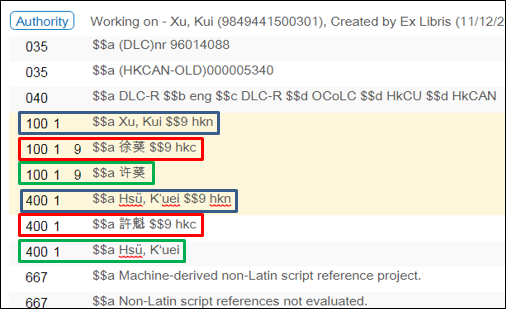
If a field in a bibliograhic record is linked to a non-preferred term that has no subfield 9, the system attempts to identify a preferred term with no subfield 9 and uses that preferred term to correct the bibliographic record. If no such preferred term is found, the bibliographic record is not corrected; and it is reported in the Authority Control Task List (see Using the Authority Control Task List). See the example below in green.
Display of Authority Search Results with Multiple Preferred Terms
When there is more that one preferred term in an authority record, each preferred term appears in the Authorities search results. See below for an example.
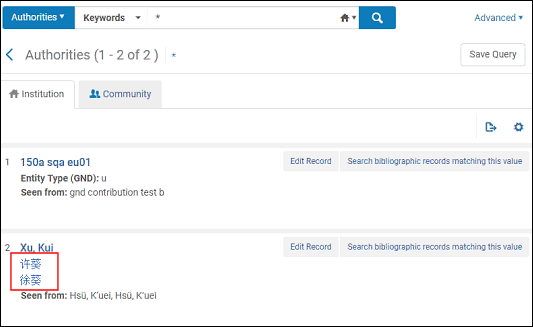
Preferred Term Correction for ID Linked Bibliographic Records with No Language Indication
When bibliographic record linking (to authority records) is done by ID, preferred term correction is completed for cases where there is no language indication in the bibliographic record and multiple preferred term options exist due to multilingual differences. As part of the preferred term correction process, the language indication in addition to the preferred term is copied to the bibliographic record. For MARC 21, the language indication is copied to $9; and for UNIMARC, it is copied to $7 positions 0-1.
Updating the Authority Record ID Automatically in Bibliographic Records
Processing Automatic ID Changes
-
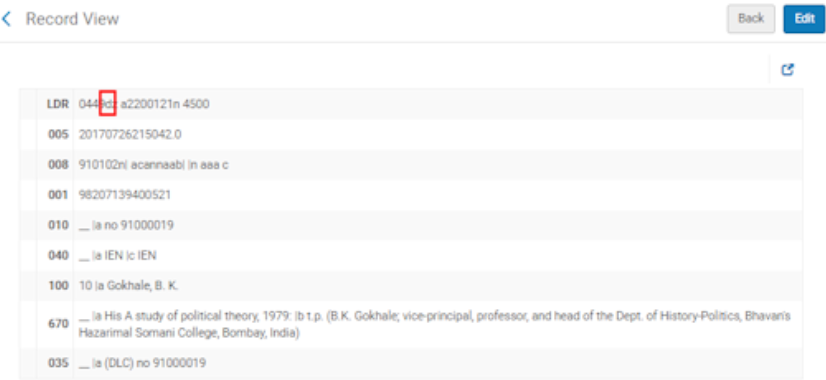
New authority records with authority record ID changes are loaded into the Community Zone. The new authority records that are replacing existing authority records in the Community Zone have the new authority record ID stored in the 035 $a, and the previous authority record ID is stored in the 035 $z.There may be more than one previous record ID and, therefore, multiple 035 $z entries in a single authority record. In the example below, the (DE-588) entries are highlighted because (DE-588) is identified as the Direct ID Prefix in the Metadata Configuration List.
-
The following scheduled jobs update the bibliographic records:
-
Synchronize Changes from CZ (and/or Authorities – Handle Local Authority Record Updates for local authority records)The Synchronize Changes from CZ job updates $0 in the bibliographic record and performs relinking to the authority record in the Community Zone.The Authorities – Handle Local Authority Record Updates job updates $0 in the bibliographic record and performs relinking for local authority records.
-
The Authorities – Preferred Term Correction job updates the bibliographic records with the new preferred terms based on the new authority record for both Community Zone linked records and local authority-linked records (when local authorities have been implemented).
See the Viewing Scheduled Jobs page for more information. -
- Changes are identified in the Authority Control Task List. See Reporting in the Authority Control Task List (below) for more information.
Reporting in the Authority Control Task List
- Old authority record ID pulled from the authority record's 035 $z
- New authority record ID pulled from the authority record's 035 $a
- Failed to enrich bib heading and record with URI.
- BIB heading and record enriched with URI successfully.
- Replaced existing URI in heading.
Cataloging Externally Managed Authority Records
- Assignment of cataloging levels (see Assigning Cataloging Levels Upon Save)
- Cataloging level user preferences (see cataloging_level_user_preferences)
- Automatic record version check (see Checking Record Version Automatically)
Assigning Cataloging Levels Upon Save
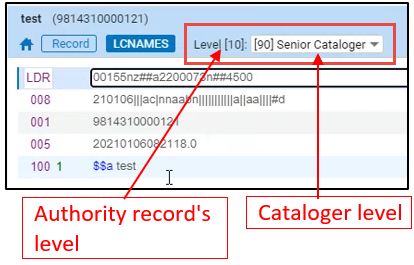

Checking Record Version Automatically

Extending Authority Fields to be Used for Authorized Bibliographic Field
When catalogers press F3 on one of the authority-enabled fields in the Metadata Editor, a list of headings coming from the relevant authority field appears. This functionality can be extended so that pressing F3 displays the list of headings from several authority fields. Catalogers can then select any of the terms in the list and have the preferred one copied to the bibliographic record.
For example: Pressing F3 on MARC field 650 with the second indicator '7' for vocabulary DBN displays a list of headings from either 150/450 or 155/455 fields. This is done by combining the authority headings from all 150, 450, 155, and 455 fields into one list.

Authority fields 180,181,182,185 are not supported by this functionality, as they are not part of the authority control mechanism.
This functionality fully supports authority control:
- Linking to global and local authorities
- All bibliographic record formats
- Preferred Term Correction (PTC) job – The preferred term is copied from the Authority record to the Bibliographic record
- Authority enrichment in general publishing and publishing to Primo
- Search by Non preferred terms in Alma and in Primo VE
Contact Ex Libris Customer Support to enable this functionality for your institution.

