
Ex Libris Cloud MFT User Guide
- Product: Cross-Product
What is MFT?
Ex Libris MFT (Managed File Transfer) provides secure and reliable file transfer infrastructure to support the different Ex Libris products.
Accessing Ex Libris MFT
Depending on the use case, you can use either HTTPS or SFTP to access Ex Libris MFT services. HTTP, FTP, and FTPS are not supported.
Ex-Libris has hardened the MFT security policy and removed the support of CBC (Cipher block chaining) encryption cipher family.
MFT was designed to support multiple use cases, access is different for each use case. You should be provided with the required access details by the Ex Libris team who handles your case/request.
Before you begin, make sure that your network can reach the following IPs on the required ports:
| Region | IPs | Ports |
|---|---|---|
| NA | 216.147.208.23 |
HTTPS (443) SFTP (10022) |
| 216.147.212.33 | ||
| 216.147.212.35 | ||
| EU | 216.147.214.21 | |
| 216.147.218.23 | ||
| APAC | 216.147.220.23 | |
| 216.147.221.10 | ||
| CA | 216.147.222.23 | |
| CN | 124.251.9.9 |
Please avoid using spaces in folder and file names. Please use underscores instead of spaces.
Access MFT with User Name + Two-Factor Token (OTP)
Using a Web Browser
You should receive an email with the required access details from Ex Libris staff.
-
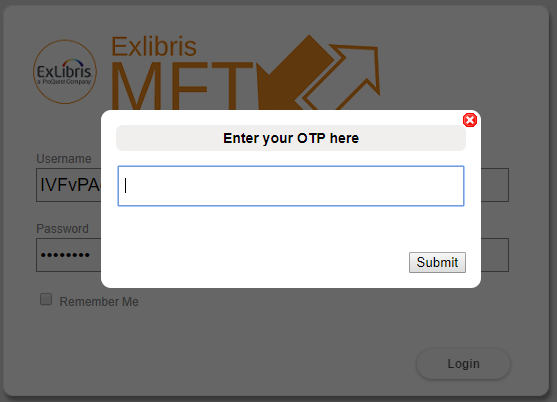
Click the URL provided in the email body, your default web browser will launch and you’ll be prompted for OTP (One-Time Password):
-
A second email, containing the OTP token, should be sent to your email address. Enter the token in the OTP prompt to complete the authentication and access the file.
-
The link provided in the email will be available until the expiration date is reached, during this period you can access the file any time by repeating the above steps.
Using the WinSCP Client
-
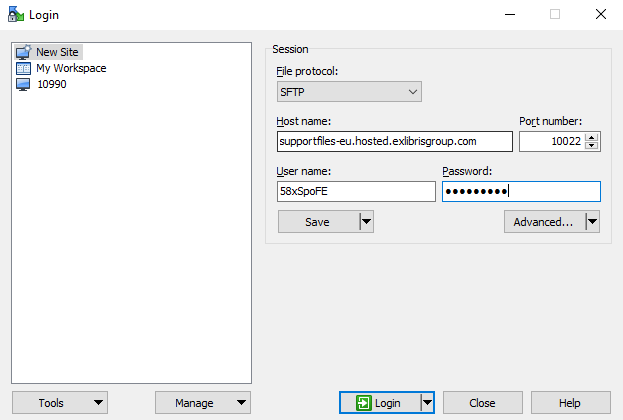
Connect with any SFTP client using the following parameters provided in the email you received:
-
Hostname = <HOSTNAME>
-
Port number = 10022
-
Username = <USERNAME>
-
Password = <PASSWORD>
-
-
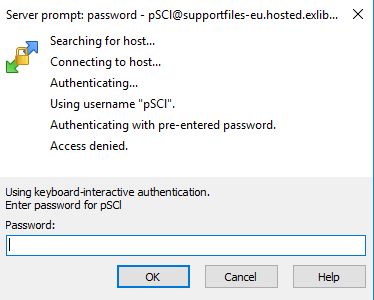
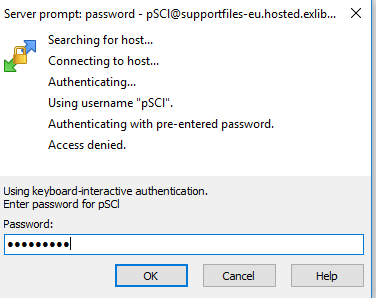
The initial authentication will fail and a secondary email containing the token is sent to your address.
-
Copy and paste the token in the password prompt to complete the authentication.
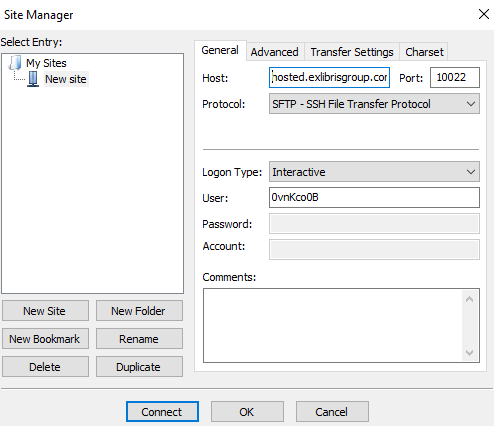
Using the FileZilla Client
-
Click File > Site Manager.
-
Enter the following parameters provided in the email that you received:
-
Hostname = <HOSTNAME>
-
Port number = 10022
-
Protocol = SFTP
-
Logon Type = Interactive
-
Username = <USERNAME>
-
-
Click Connect. The initial authentication will fail and you will receive a secondary email that contains a new token.
-
Enter the token in the password prompt to complete authentication and to access the file.
Connect with the SFTP Client from Bash Shell
-
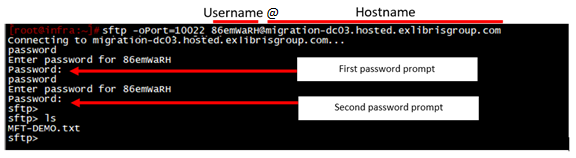
Run the SFTP command with the following syntax (use the username, password and host values provided in the access details email):
sftp -oPort=10022 <USERNAME>@<HOST>Example:
sftp -oPort=10022 86emWaRH@migration-dc03.hosted.exlibrisgroup.com -
The initial authentication will fail and a secondary email containing token will be sent to your address. In the second password prompt, enter the token sent to your email.
Access MFT with User Name and RSA Key
For some of the use cases, MFT supports access with a user name and key only. In such cases, the process involves the following steps:
-
Download your private key – This is a one-time step. You are sent an email with details on how to retrieve the key file. The email includes a link to the MFT web page with two-factor authentication. Once logged in, you should be able to download your private key file.
-
Log on to MFT using the username provided in the email and the private key downloaded in the previous step. Note that you must use SFTP since a Web browser (HTTPS) is not supported.
Converting the Key to a PPK File
Some SFTP clients require the use of a .ppk key format when connecting with the key.
-
If you have not already done so, download and install Putty key generator.
-
Run Putty key generator, click Conversions on the top menu, and then select Import key.
-
Select the key downloaded in the previous step.
-
If you want to protect the key with passphrase, provide it in the Key passphrase field.
-
Click Save private key to save the .ppk file. You will need this file for SFTP clients that require a .ppk file.
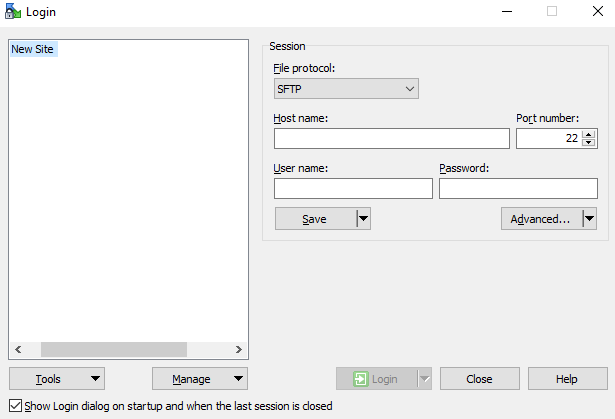
Using the WinSCP Client
-
Open WinSCP and then select New Site in the left pane of the Login dialog box.
-
Enter the following fields. You can find this information in the email that you received.
-
Hostname = <HOSTNAME>
-
Port number = 10022
-
Username = <USERNAME>
-
-
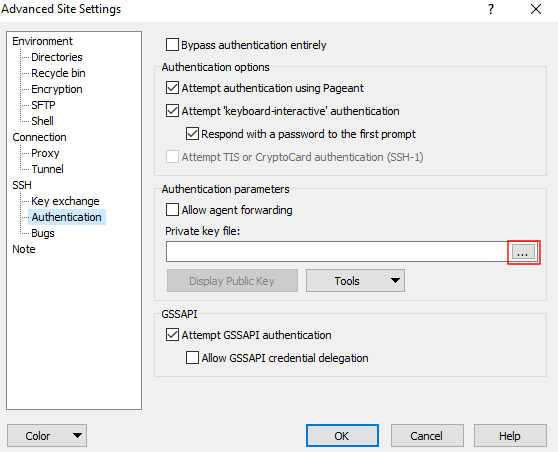
Select Advanced > SSH > Authentication to configure the authentication options in the Advanced Site Settings dialog box.
-
In the Private key file field, select the ellipsis icon to browse for the .ppk file that you created previously,
-
Select OK to save your advanced settings and to return to the Login dialog box.
-
Select Login to connect to MFT.
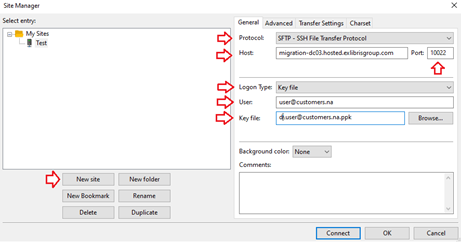
Using the FileZilla Client
-
On the top menu, select File > Site Manager.
-
Select New site and provide a name.
-
Enter the following details:
-
Protocol = SFTP
-
HOST = hostname provided in the email.
-
Port = 10022
-
Logon Type = key file
-
User = Username provided in the email.
-
Key file = Browse for the .ppk file that you created previously.
-
-
Select Connect.
Connect with the SFTP Client from Bash Shell
-
Save the key to the server that you are using to connect to MFT.
-
Run the SFTP command with the following syntax:
sftp -o Port=10022 -o IdentityFile=<Private_Key_Path> -o User=<User_Name> <MFT_Server>
- Article last edited: 13-Dec-2022