
CSV Researcher Loader Cloud App
The CSV Researcher Loader simplifies the process of updating researcher information from a CSV file. This efficiency tool allows the operator to add and update researchers' data quickly and easily from within the Hub. It makes use of the API, but the operator does not have to know anything about the API in order to use it. In the cloud app, you create a profile that specifies whether you are adding additional researchers or updating the data about existing researchers, and which fields are being updated via the CSV file. Your CSV file need only contain the researchers' IDs and the values of the fields specified in the profile. You can create multiple profiles, and save them for reuse. To use the app, you select the profile, upload the CSV file containing the data, and run the app.
For general information about working with Cloud Apps, see Configuring Cloud Apps.
Once the app is installed and activated, you can open it by selecting the ![]() icon to open the Cloud App Center menu, and then selecting CSV Researcher Loader.
icon to open the Cloud App Center menu, and then selecting CSV Researcher Loader.
![]()
 to expand it to fill the main Esploro panel.
Creating a Profile
The profiles you create for the CSV Researcher Loader describe the data in the CSV file, so that the app will know what to do with it.
Required Fields
All profiles must include the Primary ID field, because this field identifies the researchers.
If the profile you are creating will be used to add new researchers to the system, certain other fields are also required:
- General > Default Publication Language
- General > Has an Active Public Profile
- General > Has Access to the Researcher Profile
- General > Include In Smart Harvesting
- Researcher Name > Last Name
If you are adding researchers, they must already exist in Esploro as users.
In addition, certain fields are required if you are assigning a value to any field in their category. For example, if you include any field in the Current Affiliations category, you must also include the Current Affiliations > Affiliation field. The required fields for specific sections are indicated in the table under Field Names and Values, below. In addition, when you create a profile, the app tells you if you need to add any required fields (see below).
Matching a Profile to a CSV File
Other than the required fields, you can choose from a wide range of Researcher fields that can be populated from a CSV file.
For example, this CSV file contains researcher data for five fields – the Primary ID and four other fields:

A profile for updating the researcher records specified in this CSV file would list all five fields, specifying the name of each field as it appears in the header row (row 1) of the file (Header), the default value for that field if no value is specified in the CSV file (Default), and the field of the researcher record in Esploro to which each field should be mapped (Field Name), as in the following example:

The list of fields does not have to be in the same order as the columns in the CSV file. The CSV file should not contain any blank columns between the columns that contain data.
Adding Additional Default Values to a Profile
If all of the researchers will have the same value for a particular field, the field does not have to be included in the CSV file. Instead, you can add the field to the profile, leave the Header value for the field blank, and fill in the value under Default. When the Loader runs, it will populate the field with the Default value for all of the researchers it processes. Thus, in the example above, since all of the researchers are being assigned the Honors > Title value Visiting Scholar, you could actually leave the column out of the CSV file entirely, and then, in the profile, you could leave the Header of the Honors > Title field blank and enter Visiting Scholar as its Default value, and the result would be the same.

Adding Multiple Values to a Field
Some fields can contain multiple values. For example, a researcher can have multiple current affiliations, or know multiple languages. If you want to add multiple values for fields that support this option, you can do so by creating multiple columns in your CSV file, each with a different header, and configuring the profile accordingly.

The profile would then have multiple rows with the same Field Name but different Headers.

Creating a New Profile
- In the app, select
_button.png?revision=1) to open the Actions menu, and then select
to open the Actions menu, and then select  to open the Settings. The profile configuration form opens under Profiles. If any profiles already exist, one of them is automatically selected under Select a profile, and its properties appear below it, under Field Mapping.
 - Beside the Select a profile field, select the
 . A dialog box opens.

- Under Profile name, enter a name for the new profile, and then select OK. The new profile is created. The Primary ID field is already mapped under Field Mapping, since it is a required field. (You can modify its Header if necessary, to suit the header that appears in the CSV file, as explained in the next step.)

- Under Profile Type, select Update if this profile will be used to update the data of existing researchers, or Add if this profile will be used to create new researchers.
- If the Profile Type is Add, below the list of fields, select
 to add all the required fields to the Field Mapping list. (Using this button is optional – you can add them manually, if you prefer.) Edit the Header and/or the Default values for each of the fields, as required, as explained in the next step.
 - Below the list of fields, select
 to add a mapping to the list. Fill in the information as follows:
- Header – Enter the header of another column in the CSV file (the column after the Primary ID column).
- Default – Optionally. enter the value to assign to the field for researchers in the CSV file for whom the field is not defined (i.e., is blank). If the field should be left blank in this case, leave this value set to Default.
- Field Name – From the dropdown list, select the field of the Researcher record in Esploro in which the value in this column should be saved. Because fields in different sections of the record sometimes have the same name, the fields in the dropdown list are arranged by category. After you add a field to the profile, the name of the category appears above the name of the field. For example, General is the category under which the Primary ID field appears.
In some cases, selecting a particular field means that you also have to include certain other fields from the same category. For example, if you select the Current Internal Affiliations > Position field, you must also include the Current Internal Affiliations > Organizational Code field in the CSV file. When requirements of this sort exist, a message appears below the Field Mapping area.

- Repeat the process in the previous step for each additional field that appears in the CSV file.
- Select Save. The profile is saved.
Generating a Template for a CSV File from a Profile
If you wish, you can generate a CSV template file from an existing profile. The CSV file will have the Headers at the top of each column, as they are defined in the profile. You can then fill in the data for each researcher you are adding or updating. In addition to saving you the time and effort of typing the headers manually, using this option ensures that the CSV file will match the specifications in the profile.
- In the app, select to open the Actions menu, and then select to open the Settings.
- Under Share, select Export CSV template.
Field Names and Values
The names of fields that appear in the Field Mapping under Field Name are those that appear in the UI. Nonetheless, the CSV Researcher Loader actually runs by using the API. Therefore, the values you assign to fields must be those recognized by the API. In addition, if the app returns any error messages when you run it, the error messages are taken from the API. As a result, the names of the fields that appear in the error messages are based on the fields' internal names, which are not necessarily the same as those that appear in the UI.
Below is a list of the fields that can be configured using the CSV Researcher Loader, showing the following information:
- Category Name – The category under which the field appears in the CSV Researcher Loader
- Field Name – The name of the field, as it appears in the researcher record in the Hub, and in the CSV Researcher Loader, under field Name
- Internal Field Name – The name of the field in the API
- Notes – Information about the values that can be assigned to the field in the CSV file
| Category Name | Field Name | Internal Field Name | Notes |
|---|---|---|---|
| General | Primary ID | researcher.primary_id | Primary Identifier of the researcher's user account |
| Default Publication Language | researcher.default_publication_language | 3-character language code | |
| Display Title | researcher.display_title | Free text | |
| Has An Active Public Profile | researcher.portal_profile |
One of the following values:
|
|
| Has Access To The Researcher Profile |
researcher.research_center |
true/false | |
| Include in Smart Harvesting | researcher.auto_capture | true/false | |
| Position | researcher.position |
One of the following values:
|
|
| Description (Areas of interest) | researcher.researcher_description | Free text | |
| Languages | researcher.researcher_language | 3-character language code | |
| Associations | researcher.researcher_association | The Code of an organization , as defined in the External Research Organizations page (Research Management > Organization > Manage External Organizations); see also Configuring the Organization. | |
| Alternate Emails | researcher.researcher_alternate_emails |
An alternative email address for the researcher. This field is used during Author Matching to increase the accuracy of author identification. (This is a free-text field; values entered are not checked to ensure they are actually email addresses.) Values in this field are not incorporated into the researcher's contact information and are not displayed in the researcher's record in the Hub or in the researcher's profile in the Portal. |
|
| Research Topics | researcher.researcher_research_topic | A topic code; see Appendix - Research Topics | |
| Keywords | researcher.researcher_keyword | Free text | |
| Researcher Name | First Name | researcher.researcher_first_name | Free text |
| Middle Name | researcher.researcher_middle_name | Free text | |
| Last Name | researcher.researcher_last_name | Free text | |
| Suffix | researcher.researcher_suffix | Free text | |
| Title | researcher.researcher_title | A code from the User Titles code table ( Configuration > Researchers > Researchers > Researcher Titles) | |
| Name Variants | First Name | researcher.researcher_name_variant.first_name | Free text |
| Middle Name | researcher.researcher_name_variant.middle_name | Free text | |
| Last Name | researcher.researcher_name_variant.last_name | Free text | |
| Suffix | researcher.researcher_name_variant.name_suffix | Free text | |
| Current Internal Affiliations | Organization Code | researcher.researcher_organization_affiliation.organization_code |
The unique code of the Organizational Unit For help locating the required code, please contact support. |
| Start Date | researcher.researcher_organization_affiliation.start_date | A date in the format YYYY-MM-DD (e.g. 2023-12-31) | |
| End Date | researcher.researcher_organization_affiliation.end_date | A date in the format YYYY-MM-DD (e.g. 2023-12-31) | |
| Position | researcher.researcher_organization_affiliation.position | See the Position field, above. | |
| Title | researcher.researcher_organization_affiliation.title | Free text | |
| Order | researcher.researcher_organization_affiliation.positionOrder | Integer | |
| Previous Internal Affiliations | Organization Code | researcher_previous_internal_organization_affiliation |
The unique code of the Organizational Unit For help locating the required code, please contact support. |
| Start Date | researcher_previous_internal_organization_affiliation.from_date | A date in the format YYYY-MM-DD (e.g. 2023-12-31) - can be partial | |
| End Date | researcher_previous_internal_organization_affiliation.to_date | A date in the format YYYY-MM-DD (e.g. 2023-12-31) - can be partial | |
| Position | researcher_previous_internal_organization_affiliation.position | See the Position field, above. | |
| Title | researcher_previous_internal_organization_affiliation.title | Free text | |
| Order | researcher_previous_internal_organization_affiliation.order | Integer | |
| Current External Affiliations | Organization Code | researcher_current_external_organization_affiliation | The Code of the Organizational Unit , as defined in the External Research Organizations page (Research Management > Organization > Manage External Organizations), in the Central tab. For example, 41___1675_FOUNDATION_(ARDMORE). (See Configuring the Organization.) |
| Start Date | researcher_current_external_organization_affiliation.from_date | A date in the format YYYY-MM-DD (e.g. 2023-12-31) - can be partial | |
| End Date | researcher_current_external_organization_affiliation.to_date | A date in the format YYYY-MM-DD (e.g. 2023-12-31) - can be partial | |
| Position | researcher_current_external_organization_affiliation.position | See the Position field, above. | |
| Title | researcher_current_external_organization_affiliation.title | Free text | |
| Order | researcher_current_external_organization_affiliation.order | Integer | |
| Previous External Affiliations | Organization Code | researcher_previous_external_organization_affiliation. | The Code of the Organizational Unit , as defined in the External Research Organizations page (Research Management > Organization > Manage External Organizations), in the Central tab. For example, 41___1675_FOUNDATION_(ARDMORE). (See Configuring the Organization.) |
| Start Date | researcher_previous_external_organization_affiliation.from_date | A date in the format YYYY-MM-DD (e.g. 2023-12-31) - can be partial | |
| End Date | researcher_previous_external_organization_affiliation.to_date | A date in the format YYYY-MM-DD (e.g. 2023-12-31) - can be partial | |
| Position | researcher_previous_external_organization_affiliation.position | See the Position field, above. | |
| Title | researcher_previous_external_organization_affiliation.title | Free text | |
| Order | researcher_previous_external_organization_affiliation.order | Integer | |
| Engagements | Type | researcher.researcher_engagement_type | A code from the Researcher Engagement Types List table (Configuration Menu > Researchers > Researcher Engagement Types) |
| End Date | researcher.engagement_end_date | A date in the format YYYY-MM-DD (e.g. 2023-12-31) | |
| Educations | Organization Code | researcher.researcher_education.organization_code | The Code of the Organizational Unit , as defined in the External Research Organizations page (Research Management > Organization > Manage External Organizations), in the Central tab. For example, 41___1675_FOUNDATION_(ARDMORE). (See Configuring the Organization.) |
| Degree | researcher.researcher_education.degree | Free text | |
| Field Of Study | researcher.researcher_education.field_of_study | Free text | |
| From Date | researcher.researcher_education.from_date | A date in the format YYYYMMDD (e.g. 20231231) | |
| To Date | researcher.researcher_education.to_date | A date in the format YYYYMMDD (e.g. 20231231) | |
| Additional Details | researcher.researcher_education.additional_details | Free text | |
| Honors | Organization Code | researcher.researcher_honor | The Code of the Organizational Unit , as defined in the External Research Organizations page (Research Management > Organization > Manage External Organizations), in the Central tab. For example, 41___1675_FOUNDATION_(ARDMORE). (See Configuring the Organization.) |
| Title | researcher.researcher_honor.title | Free text | |
| Time Period | researcher.researcher_honor.time_period | Free text | |
| Webpages | URL | researcher.researcher_webpage.url | URL |
| Type | researcher.researcher_webpage.type |
One of the following codes:
|
|
| Title | researcher.researcher_webpage.title | Free text | |
| Identifiers | Value | researcher.user_identifier.value |
An identifier value of the kind specified under Identifier > ID Type (see below). The value must be unique for the specified ID Type among all Esploro researcher records in your system. You can add multiple value-id_type pairs; see ID Types, below. |
| ID Type | researcher.user_identifier.id_type.value |
A code to identify the type of the Identifier > Value specified (see above). For a list of the codes, see ID Types, below. |
ID Types
The following Identifier > ID Types can be used in the ID Types field. The value of the specified ID Type should be entered in the adjacent Identifier > Value field.
If your researcher data contains multiple ID Types and Values, you can add pairs of columns to the CSV file and its matching profile for each ID Type - Value pair.


Some of these codes may be disabled in your system. If a code you want to use is disabled, the processing of the row in which it appears will fail. Contact Support to enable disabled codes in the system configuration. See also, Working with User Identifiers.
| Code | Description |
|---|---|
| Wikidata | Wikidata ID |
| GoogleScholarID | Google Scholar ID |
| LCNAF | Library of Congress Name Authority File Number |
| ILLIAD_ID | Illiad ID for export |
| 00 | System number |
| 02 | Additional ID 02 |
| 03 | Additional ID 03 |
| 04 | Additional ID 04 |
| 05 | Additional ID 05 |
| 06 | Campus Access |
| Google ID for social login | |
| Facebook ID for social login | |
| 01 | Barcode |
| ORCID | ORCID |
| INSI | ISNI |
| Scopus | Scopus ID |
| ResearcherID | Researcher ID |
| arXiv | arXiv ID |
| ERA | eRA ID |
| Pivot | Pivot ID |
| Pubmed | Pubmed author ID |
| Other | Other |
| LTI_SELF_REGISTERED | Learning Tools Interoperability ID of a self-registered user |
| Twitter (X) ID for social login | |
| VIAF | Virtual International Authority File ID |
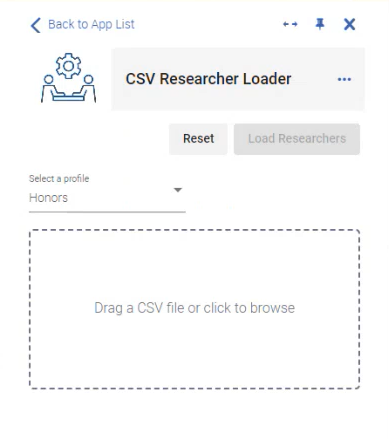
Running the App on a CSV File
When a profile matching the CSV file you want to load exists, you can run the app by selecting the profile and the CSV file.
- In the app, under Select a profile, select the profile you want to use.
- In the Drag a CSV file or click to browse region, select the CSV file you want to use.

- Select Load Researchers. You are prompted to confirm that you want to run the process. The confirmation message indicates how many research records are included in the CSV file.

- Select OK. The updates are implemented in the researcher records. When the process is completed, a Results message appears, and indicates how many records were successfully processed and how many failed due to errors. Select Show log to see more details.

Managing Profiles
You can export and import profiles, either individually, or as a set including all of the profiles in your system. The file format used for exporting and importing profiles is JSON.
- In the app, select to open the Actions menu, and then select to open the Settings.
- Under Share, select the required import or export option.
