Pivot-RP Admin: Creating and Updating Profiles on Behalf of Faculty and Researchers
Introduction
As a Pivot-RP administrator with Edit Profile rights, you can update profiles on behalf of your faculty and researchers. When managing profiles, an administrator can see the number of suggested publications for the user at the top of the Publications tab.
The following fields can be modified:
- Name
- Email address(es)
- Webpages (with publications, CV or other information)
- ORCID id – New ORCID IDs are not immediately visible in your profile and will become visible at a later date.
- Expertise
- Affiliations (both past and present)
- Education
- Keywords
- Languages
- Associations
- Honors
Unless specified above, changes are immediately visible after saving them.
To update a profile for a member of your institution:
-
Conduct a profile search and locate the profile you want to edit.
-
From the search results, select the scholar’s name.
-
Select the Edit profile link to the far right the name.

-
Select Continue to return to our profile editing system.
-
Select Edit .

-
You will see various buttons or icons that will allow you to edit, add and re-order information related to your profile. Click the edit button or edit icon to modify the information in a specific section of your profile. You must click the Save or Add button for each field after making changes, adding new information or removing information. You cannot move to another field until you either save or cancel your changes.
-
Click the Done button at the top to exit the edit view and review the changes you have made.
Your submissions will be immediately viewable in Pivot-RP. The profile will be time-stamped with the date updated and the name of the person who edited the profile. Pivot-RP editors will not edit any profile information (with the exception of the automated publication linking) for at least one year when a profile has been updated by a scholar or a Pivot-RP Administrator.
To Claim or Create a Profile for a Member of your Institution
-
Click on your Admin tab in Pivot-RP.
-
Click User Accounts.
-
Search for the name of the individual that you wish to claim a profile for.
Creating profiles on behalf of users requires the Manage Profiles permissions. If you are not able to complete the following steps, you do not have the proper permissions to be able to complete this task.
-
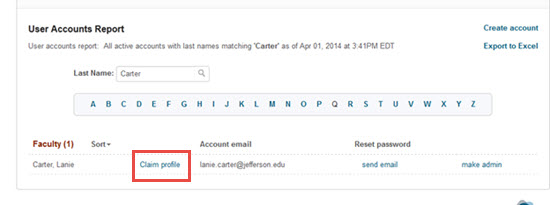
When you find the individual for whom you are looking, select the Claim Profile link next to their name.
If you do not see a claim profile link next to the name of the individual you are looking for that means that they already have a profile claimed in Pivot-RP and no further action is required.
-
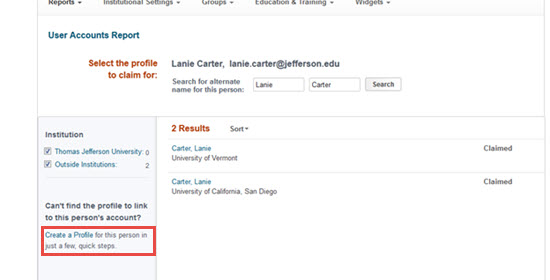
Pivot-RP searches all profiles for any names matching the name of the person for whom you are looking. If there is a match, the user is sent an email from Pivot-RP prompting them to select a link to verify who they are and claim their profile. If there are no matches, you can select the Create a Profile to create one for for this person.
-
A new profile browser tab or window will open to allow you to create a new profile in Pivot-RP. Click Continue.

-
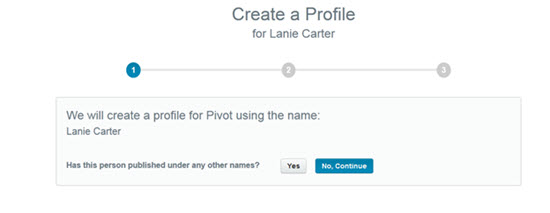
Pivot-RP will verify the name of the individual that you wish to create a Pivot-RP profile for and you will be able to enter any other names that they may have published under.
-
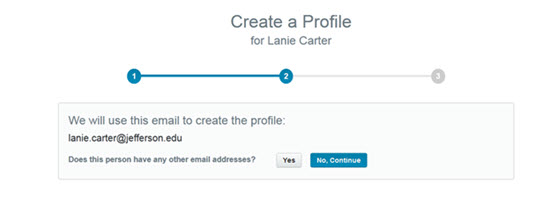
Pivot-RP will confirm the email address listed on the individual’s Pivot-RP account and allow you to add any other email addresses they may have.
-
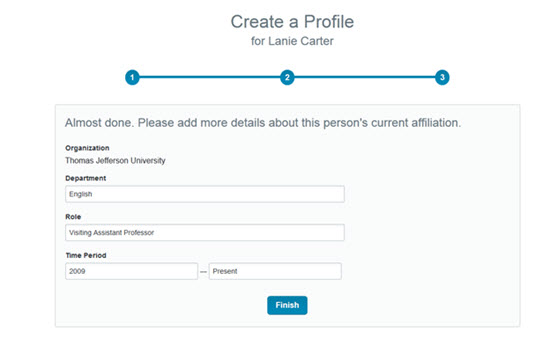
You can add more details about this person’s current affiliation. Click Finish when done.
-
This profile has been added and linked to this user’s Pivot-RP account. You can add more information to the profile by clicking Edit Profile.

- Article last edited: 11-Dec-2021
- Old Article Number: 10590

