Pivot Profiles: Creating and Updating Your Profile
- Product: Pivot
Creating and Updating Your Profile
One of the benefits of Pivot is that we have over 3 million faculty profiles created and maintained by our Editorial Team. This takes the creation burden off you! We review profiles on average every 12 to 18 months, however, if you have pertinent information you need added or changed in your profile, you can make certain updates or additions on your own. These updates and additions will be immediately visible in Pivot. You can even attach certain types of files that Pivot will index and make searchable.
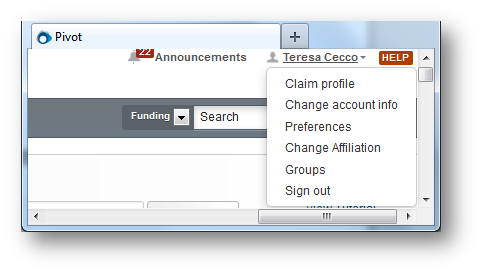
Once you log in to Pivot, you can click on your name to see a drop down list of account options. If you have a profile linked to your account, you will see the option, Your profile. Click on this link to view your profile in full. If you wish to update your profile, click on the Update profile link. If you do not have a profile linked to your account, when you click on your name you will see the Claim profile link to either claim an existing profile or create a profile.
Claiming an Existing Profile
Claiming an existing Pivot profile is not required in order to use Pivot, however, there are certain benefits you receive by doing so:
Pivot Advisor: The Advisor makes funding opp recommendations for you based on your profile. These recommendations are automatically available on your Pivot Homepage when you have claimed your profile and a set of funding opp recommendations will be included in your weekly Funding Alert email. If you do not claim or create a profile, you will not see the Advisor recommendations on your homepage.
Updating your profile: If you do not Claim your profile, you cannot update it. Why make sure your profile is updated? Your profile is viewed by thousands of Pivot users who may be looking for potential collaborators for a research project. You may be overlooked because your profile is missing critical information.
To claim an existing profile:
- Log in to Pivot.
- In the upper right-hand corner, your name is displayed. Click on the arrow to display the options. If you see a Claim profile link, you know there is not a profile linked to your Pivot account. Click the Claim profile link. A list of potential profile matches may be displayed.

- If you locate your profile from the results list, click the “This is me” button to the right of the profile name. If no results display or none of the possible matching profiles is yours, click the Create a Profile link that is located either in the center of the page when there are no results or located to the left of the results list.
- After clicking on the “This is me” button, a message will be displayed informing you that you that a new window will be opening to complete the profile claim process.
- If the email on the profile you are claiming matches the email on your Pivot account, you will see a message that a verification email has been sent to you. Otherwise, you will then be asked to confirm whether or not you still have access to the email address listed on your Pivot profile.
- If you confirm that you still have access to the email on your profile, you will receive verification email at that address that will link your profile to your account and will grant you access to update your profile.
- You must click through on the link in the verification email to complete the claiming process.
- If you do not have access to one of the emails displayed, select I no longer have access to any of the above email addresses and hit the submit button and you will be taken to a form to complete to request access to edit your profile. The information submitted is reviewed by our editorial team and once validated, you will receive an email at the new email address submitted which links your profile to your account and grants you access to update your profile.
Updating your Pivot profile:
Pivot provides the capability for you to update all fields or areas of your profile. Updating your profile can increase the quality of the funding matches recommended for you from the Pivot Advisor.
You can currently update the following sections of your profile:
- Name
- Email address(es)
- Photo: Add or change a photo
- Webpages or documents (with publications, CV, or other information)
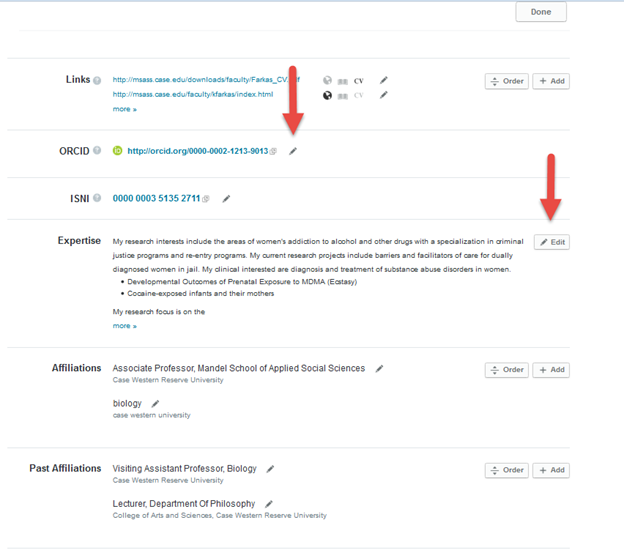
- ORCID: ORCID® (Open Researcher and Contributor ID) is an open, non-profit, community-driven effort to create and maintain a registry of unique researcher identifiers and a transparent method of linking research activities and outputs to these identifiers.With your ORCID ID added to your Pivot profile further enhances funding recommendations for you. Linking your ORCID IDis easy:
- Create or add your ORCID iD using the ‘Edit’ profile button.
- Authorize ProQuest to link your ORCID Profile to your Pivot Profile
Learn more at www.orcid.org.
- ISNI: Click the edit icon to enter your ISNI ID. Not sure what an ISNI ID is? ISNI (International Standard Name Identifier) is an ISO standard developed as a global identification system of public identities across all fields of creative activity. Simply put, it’s a unique identifier that is used by libraries, publishers, databases, and rights management agencies as a way to identify millions of contributors to creative works including researchers, inventors, writers, and more. Learn more at www.isni.org.
- Expertise: Add information here to improve your Pivot Advisor.
- Affiliations (both past and present): Listing all your previous and current affiliations will assist in the publication linking process.
- Education
- Keywords
- Languages
- Associations
- Honors
- Publications
- Patients
- Grants
Publications are updated through our linking process. In addition, you can upload a document that reflects your publication link. These also are indexed and discoverable immediately.
Change submissions are immediately visible once you save them.
To change or update your Pivot profile:
- Log in to your Pivot account.
- Click on your name to display the options.
- Click the Your profile link. You will be brought to your Pivot profile.
- Click the Update your profile link to the far right of your name.

- Clicking the Continue button will take you out of Pivot and into our profile editing system.
- Click the Edit button.

- You will see various buttons or icons that will allow you to edit, add, and re-order information related to your profile. Click the edit button
 or edit icon
  to modify the information in a specific section of your profile. You must click the Save or Add button for each field after making changes, adding new information, or removing information. You cannot move to another field until you either save or cancel your changes.
 - You can add (or update) a photo in your Pivot profile as well. Click here for more information on adding a photo.

- Click the Done button at the top to exit the edit view and review the changes you have made.
Your submissions will be immediately viewable in Pivot. The profile will be time-stamped with the date updated and the name of the person who edited the profile. Pivot editors will not edit any profile information (with the exception of the automated publication linking) for at least one year when a profile has been updated by a scholar or a Pivot Administrator.
To create a Pivot profile for yourself:
- You will begin by trying to claim an existing profile following the steps outlined under “To Claim an Existing Profile”. If you do not find a profile for yourself, click the Create a Profile link on the Claim Profile results page.
- Clicking the continue button will take out of Pivot and to the profile creation tool.
- The first step in the process will show your name as we have it from your Pivot account and you will be prompted to add any additional names that you have used to publish under.
- Pivot will confirm the email address on file for this account and will allow you to enter any additional email addresses you may have.
- You will also have the opportunity to add more details to your affiliation.
- Click the Finish button when done.
- Your profile has been created and claimed. You can add more information to your profile by clicking on the Edit Profile button. Or, you can click Return to Pivot to continue working elsewhere in Pivot.
- Article last edited: 16-Sep-2017
- Old Article Number: 11661

