
Central Management in Collaborative Networks
Central Package
The Central Package, which is managed from the NZ, provides a standard look and feel that member institutions in collaborative networks can use either as is without further customizations or as a template to make modifications specific to their institution. In addition, the NZ can configure local fields, resource types, and code and mapping tables to share with member institutions.
Creating the Central Package
To aid in the customization of the Central Package, Primo Studio can be used to interactively customize it. All Primo Studio changes must then be uploaded to the view in Alma. For more information, see Primo Studio for Primo VE.
-
From the NZ, open the Manage Central Customization Package page (Configuration Menu > Discovery > Display Configuration > Manage Customization Package) and define the CENTRAL_PACKAGE view.
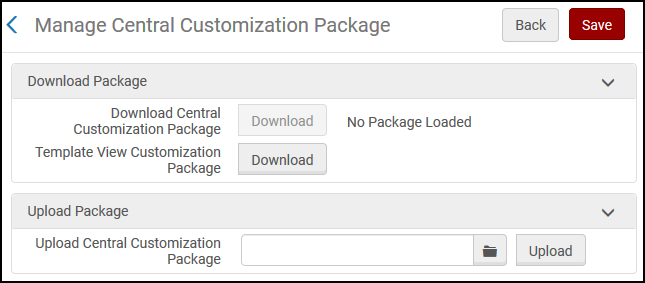 Define the CENTRAL_PACKAGE View
 -
Create your customization package using either of the following methods:
-
Primo Studio:
In the Create Customization Package section, select Go to Primo Studio to create the customization package using Primo Studio. For more information, see Primo Studio for Primo VE.
Ensure that the name of the package's root directory has the following format: <institution_code>-CENTRAL_PACKAGE. For example, PRMO_NZ_INST-CENTRAL_PACKAGE.
-
Manual:
-
In the Download Package section, download the Template View.
-
Extract the package.
-
Rename the VIEW_CODE directory using the following format: <institution_code>-CENTRAL_PACKAGE. For example, PRMO_NZ_INST-CENTRAL_PACKAGE.
-
Make your customizations to the package. For more information, see Branding Your View.
-
Compress the package, ensuring that the root directory of the package is the directory that you previously renamed.
-
-
-
In the Upload Package section, upload the compressed customization package that you either created manually or created with Primo Studio.
-
Select Save.
Using the Central Package Directly
Primo VE enables you to use the Central Package directly if you do not want to make any customizations for your institution. With this option, your view receives updates automatically from the Central Package.
-
For each member institution, open the Views List page (Configuration Menu > Discovery > Display Configuration > Configure Views) and edit your institution's view.
-
Select the Manage Customization Package tab.
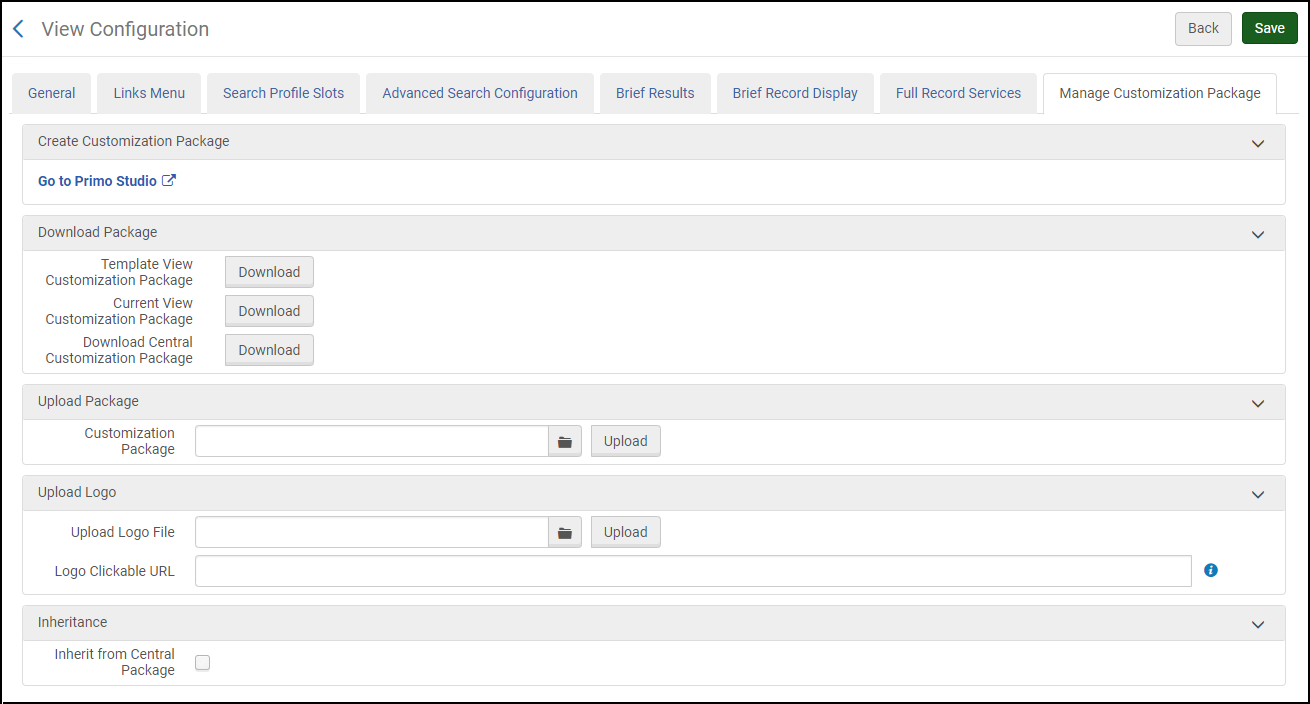 Manage Customization Package Tab
 -
In the Inheritance section, select the Inherit from Central Package checkbox to use the look and feel of the Central Package for your view.
Regardless of this setting, any package uploaded to the UI will override the Central Package's customizations.
-
Select Save.
Using the Central Package as a Template
Primo VE enables you to use the Central Package as a template so that you can make specific customizations for your institutions.
With this option, you can also inherit changes to the Central Package, but changes in your local customization package will override changes to the same elements.
-
For each member institution, open the Views List page (Configuration Menu > Discovery > Display Configuration > Configure Views) and edit your institution's view.
-
Select the Manage Customization Package tab.
Manage Customization Package Tab -
Create your customization package using either of the following methods:
-
Primo Studio:
-
In the Create Customization Package section, select Go to Primo Studio to open Primo Studio.
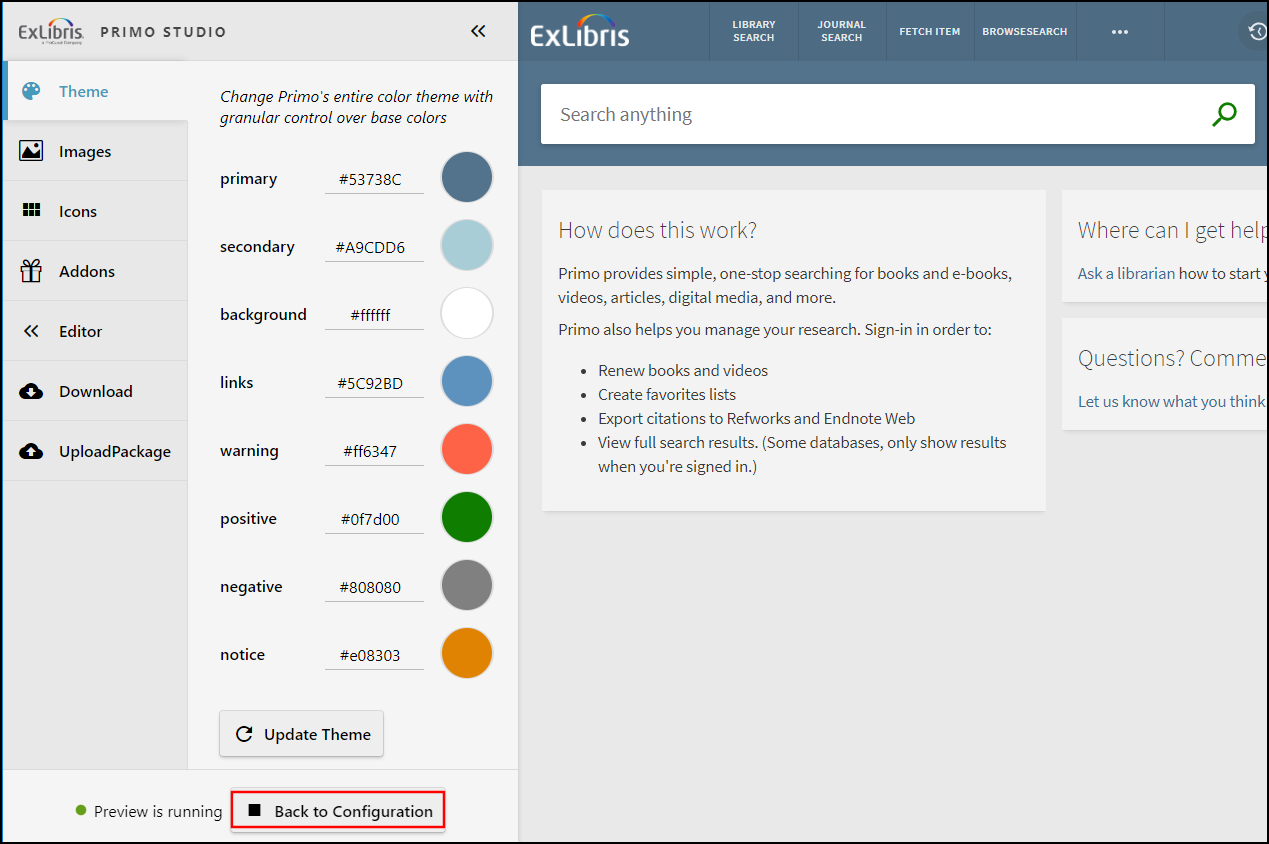 Primo Studio - Using Standard Template
 -
Select Back to Configuration to open the Primo Studio Login page.
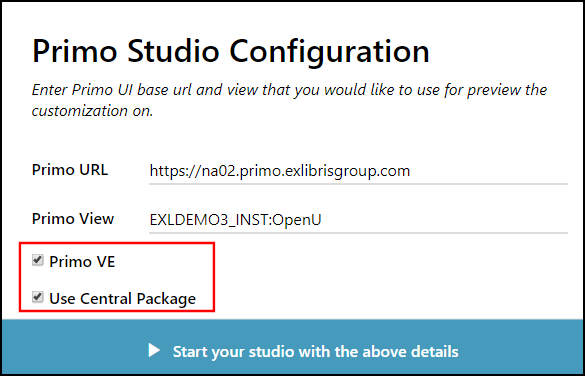 Primo Studio Login Page
 -
Select the Primo VE and Use Central Package options, and then select Start your studio with the above details to open Primo Studio and to create the customization package. For more information, see Primo Studio for Primo VE.
Ensure that the package's root directory is the view's code, which uses the following format: <institution_code>-<view_code>. For example, PRMO_MY_INST-OpenU.
-
-
Manual:
-
In the Download Package section, download the Central Customization Package.
-
Decompress the file so that you can edit the Central Package.
-
Rename the root directory of the package to the view's code, which uses the following format: <institution_code>-<view_code>. For example, PRMO_MY_INST-OpenU.
-
Make your customizations to the package. For more information, see Branding Your View.
-
Compress the package.
-
-
-
In the Upload Package section, upload the compressed customization package that you either created manually or created with Primo Studio.
-
In the Inheritance section, select the Inherit from Central Package checkbox if you want to continue to receive updates made to the Central Package.
Changes to elements in your package override updates to these elements in the Central Package.
-
Select Save.
Define Local Fields Centrally
The NZ can manage local fields centrally for distribution to member institutions at the IZ level. The local fields (local_field_51 – local_field_100) can be used for this purpose. Prior to distribution, the NZ has the ability to decide whether to override a member institution's customizations of a local field in the IZ.
-
The NZ and member institutions can still use local_field_1 through local_field_50 as they had previously.
-
When local fields are used for facets and search, member institutions can have a maximum of 10 locally defined fields and 10 centrally defined fields.
Additional Primo VE Training > Local Fields for Consortia (4 min)
Configuring Local Fields from the NZ
The following table lists the configuration settings that are supported in the NZ and member institutions (IZ) for this functionality.
| Element | Description |
|---|---|
| Configuration in NZ: | |
|
Manage Display and Local Fields page |
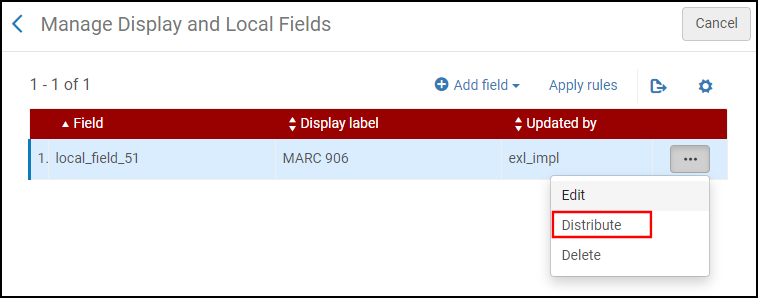
For each local field that you want to manage centrally (local_field_51 through local_field_100 only):
|
|
Monitor Jobs > Scheduled Jobs page |
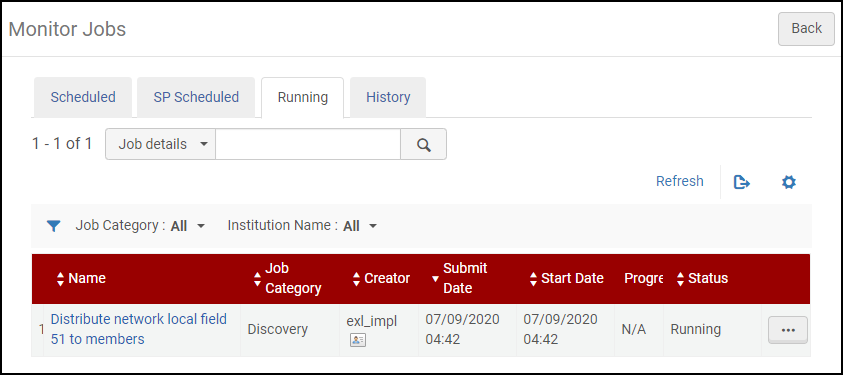
You can use the Distribute network local field <local_field_number> to members job to monitor the progress and history of a local field's distribution to member institutions.
Monitor Distribution of Local Field
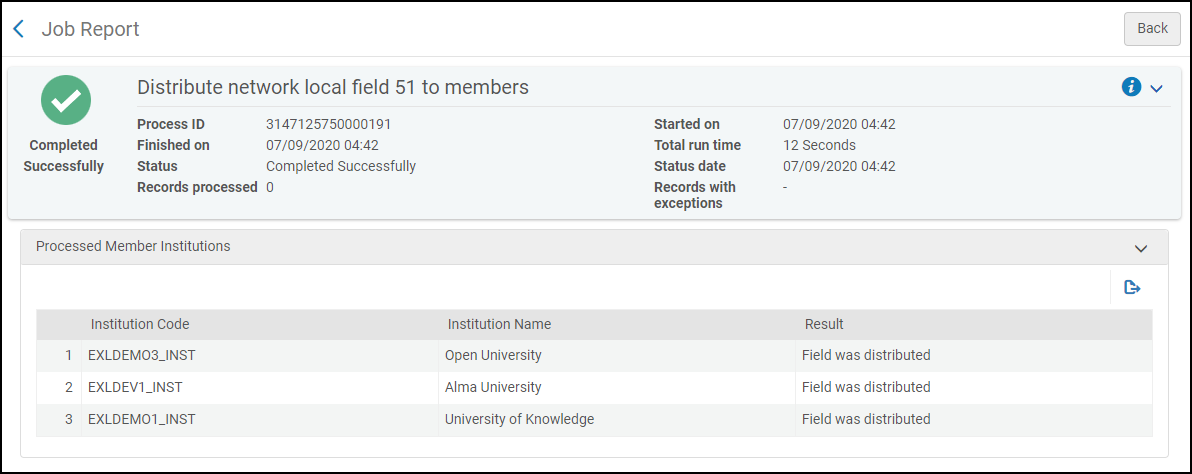
In addition to the overall status information (such as status and start and end timestamp), this job's report includes the following result statuses per member institution:
Report for Local Field's Distribution Job
|
| Configuration in Member Institutions (IZ): | |
|
Manage Display and Local Fields page |
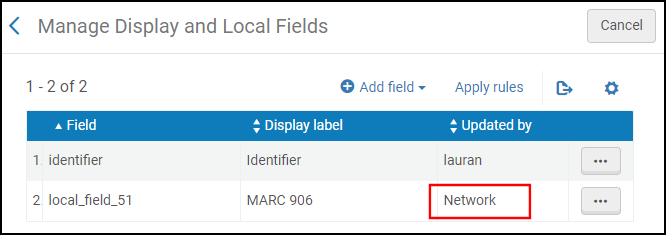
If the distribution was successful from the NZ, the local field will appear in the list of local fields on this page. Local fields added from the NZ can be identified by the Updated by field which will have a value of Network.
Local Field Inherited from NZ |
Define Resource Types Centrally
The Network Zone (NZ) institution can create local resource types to share with member institutions so that configuration is not needed at the Institution Zone (IZ) level. If member institutions decide to configure the same resource type, their customizations will override the settings of the NZ. If a code is not found in either the NZ or the member's institution, the system will display the code for the local resource type as it did in previous releases.
Define Code and Mapping Tables Centrally
The Network Zone (NZ) institution can define code and mapping tables to share with member institutions so that configuration is not needed at the Institution Zone (IZ) level. If member institutions decide to configure the same tables, their customizations will override the settings of the NZ.
Manage Complete Keys for Dedup and FRBR Centrally
After you have made changes to the Dedup/FRBR complete keys in the NZ, you can distribute the changes to the member institutions. The Distribute action creates and executes the Distribute Network Zone configuration table changes to member institutions job, which can be monitored in the Running or History tabs on the Alma Monitor Jobs page (Admin > Manage Jobs and Sets > Monitor Jobs). For information on how to customize the complete keys, see Configuring the Dedup and FRBR Complete Keys in Primo VE.
To distribute complete key changes in the NZ to the members:
-
Open the Dedup/FRBR Complete Key Combination page (Configuration Menu > Discovery > Other > Dedup/FRBR Complete Key Combination).
-
Select the tab of the process (Dedup or FRBR) from which you want to distribute complete keys to the member institutions.
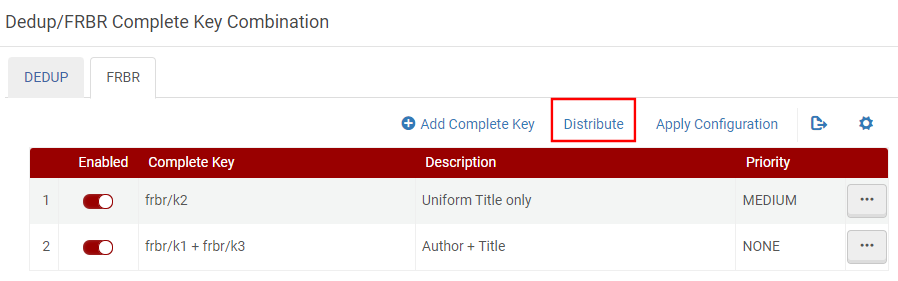 Distribute Action
 -
Select Distribute.
-
Select one of the following distribution options:
-
Do not override member institution customization – When selected, the complete keys are distributed only to member institutions who have not made local changes to their complete keys.
-
Override member institution customization – When selected, the complete keys are distributed to all member institutions and will override any customizations to complete keys in the IZ.
-