Go VE: Moving CDI Features in Primo to Primo VE
This guide provides information on how to configure the following CDI-related functionality and features in Primo VE using your settings from Primo: Customer ID, Proxy settings, Newspaper Search and Featured Newspapers.
Preparation: Gathering CDI-Related Functionality and Features from Primo
Before you begin this task in Primo VE, gather the following information from the Primo Back Office:
-
Log on to the Primo Back Office.
-
Open the Institution Wizard (Primo Home > Ongoing Configuration Wizards > Institution Wizard).
-
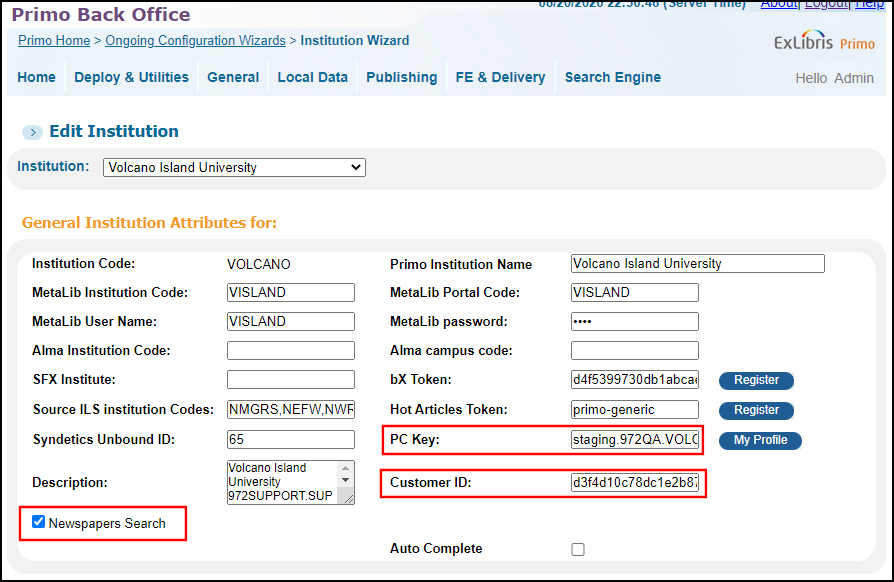
In the General Institution Attributes for section, retrieve the Customer ID and determine whether Newspaper Search is enabled for the institution.
 Institution Wizard - General Attributes
If you created additional Primo institutions to support libraries and campuses in Alma multi-campus environments, you will need to retrieve their PC Keys, Customer IDs, and Newspaper Search settings.
-
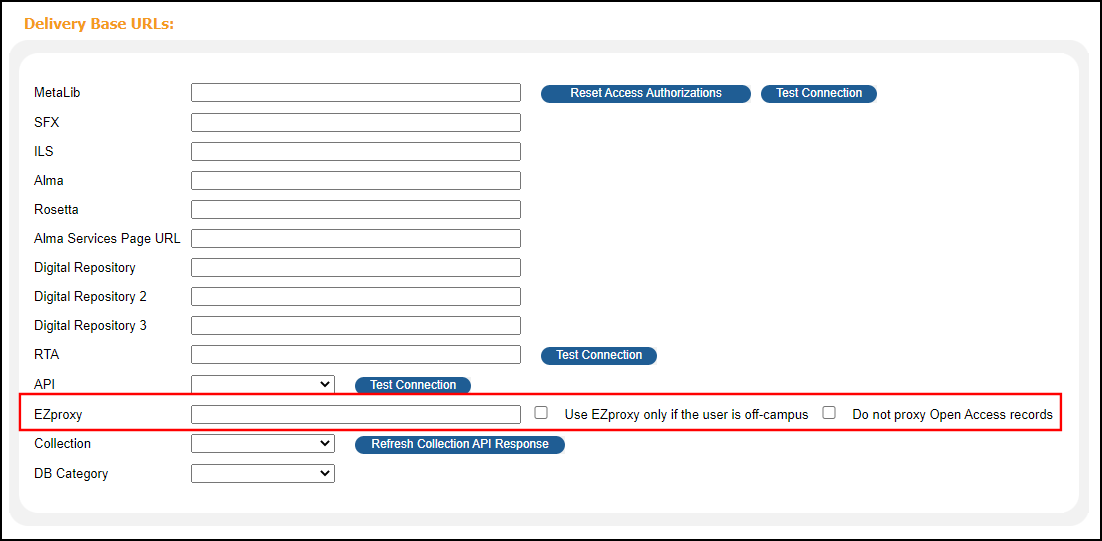
In the Delivery Base URLs section, retrieve the EZproxy settings.
 Institution Wizard - EZproxy Settings
If you created additional Primo institutions to support libraries and campuses in Alma multi-campus environments, you will need to retrieve their EZproxy settings.
-
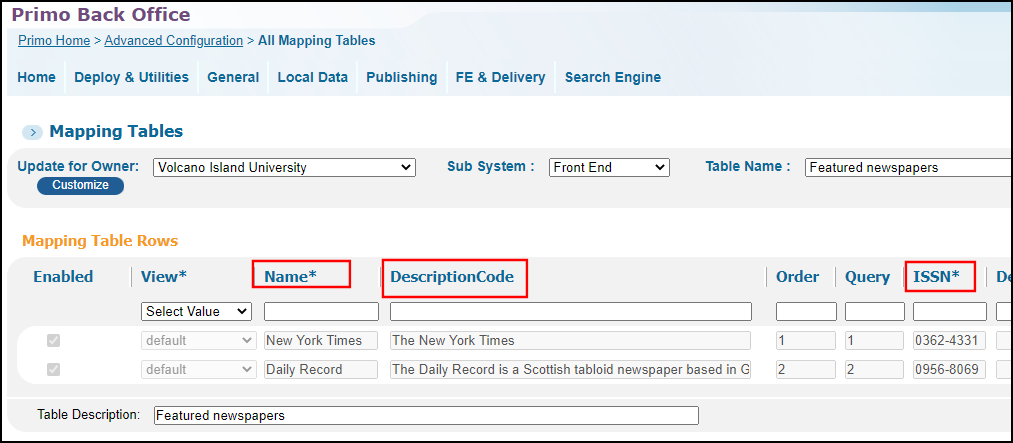
Open the Featured Newspapers mapping table (Primo Home > Advanced Configuration > All Mapping Tables) and gather the newspaper information for later configuration in Primo VE.
 Featured Newspapers Mapping Table
Configuring: Enabling the CDI-Related Functionality and Features in Primo VE
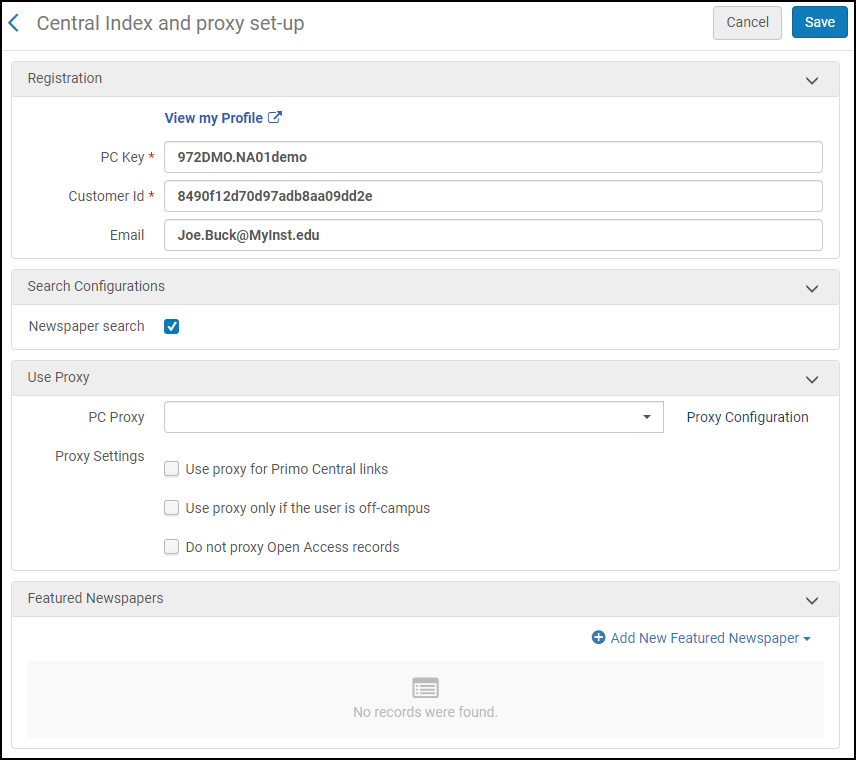
The Central Index and proxy set-up page allows you to register and configure additional settings and features associated with CDI. For more details, see Configuring Central Index and Proxy Settings for Primo VE.

For multi-campus environments in which electronic subscriptions are managed at the campus/library level, you will need to create a separate CDI profile for each campus/library. For more details, see Enabling the Primo Central Index for Environments with Distributed Access to Electronic Resources.
-
Open the Central Index and proxy set-up page (Configuration Menu > Discovery > Other > Central index and proxy set-up).
-
In the Registration section, complete the registration information to integrate your Primo VE institution with the CDI service. During the Enablement phase, your PC Key is copied automatically from Primo, but you will need to specify the same customer ID that was configured in the Institution Wizard on the Primo Back Office
-
In the Search Configurations section, select the Newspaper search check box If you want to enable Newspaper Search in Primo VE. For more information, see Configuring Newspaper Search for Primo VE.
-
In the Use Proxy section, configure the following proxy information:
-
PC Proxy – If you want to allow off-campus users to access full text services at different vendor sites, select a resolver proxy profile from the drop-down list. If your proxy has not not been configured in Alma, select Proxy Configuration and follow the instructions in Resolver Proxies.
-
Proxy Settings – Specify the following proxy settings:
-
Use proxy for Primo Central links – Select this check box if you want to use the selected proxy for direct links in CDI records
-
Use proxy only if the user is off-campus – Select this check box if you want to use the selected proxy when the user is off-campus only.
-
Do not proxy Open Access records – Select this check box if you do not want to use the selected proxy for open access records.
-
-
-
In the Featured Newspapers section, select Add New Featured Newspaper and specify the following information in the dialog box: Code, Name, and ISSN. For more information, see Configuring Newspaper Search for Primo VE.
For Primo VE, this is an institution-level configuration that applies to all views that have Newspaper Search enabled.
-
Save your Central Index settings.

