Go VE: Moving Additional Features in Primo to Primo VE
This guide provides the information to move miscellaneous features used in Primo to Primo VE.
Preparation
Before you begin the configuration in Primo VE, it is recommended that you check to see which features that you are using in Primo and gather all the necessary configuration information for use in Primo VE.
In the Primo Back Office:
-
Open the Resource Recommender page (Primo Home > Advanced Configuration > Resource Recommender) and export your recommendations for each resource type to Excel. To add this information to Primo VE, see Configuring Resource Recommender in Primo VE.
-
Open the Results Boosting section on the Search Engine Configurations page (Primo Home > Advanced Configuration > Search Engine Configuration) and gather any information necessary to configure the fields and date boosts in Primo VE. To add this information to Primo VE, see Boosting Records in Primo VE Results.
-
In the Ranking section of your normalization rules (Primo Home > Advanced Configuration > Full Normalization Rules), check to see whether either of the two boosters are based on Type. To add this information to Primo VE, see Boosting Records in Primo VE Results.
-
Open the Hypertext Linking Definitions page (Primo Home > Advanced Configuration > All Mapping Tables > Hypertext Linking Definitions) and gather any information necessary to configure the hypertext linking fields in Primo VE. To add this information to Primo VE, see Configuring Hypertext Linking Definitions in Primo VE.
-
Open the Holdings Record Configuration page (Primo Home > Advanced Configuration > All Mapping Tables > Holdings Record Configuration) and gather any information necessary to configure the holdings fields in Primo VE. To add this information to Primo VE, see Configuring Holdings Display Fields for Primo VE.
-
Open the Loans Brief Display page (Primo Home > Advanced Configuration > All Mapping Tables > Loans Brief Display) and gather any information necessary to configure the brief display lines in Primo VE. To add this information to Primo VE, see Configuring My Library Card Options in Primo VE.
-
Open the Loans Detailed Display page (Primo Home > Advanced Configuration > All Mapping Tables > Loans Brief Display) and gather any information necessary to configure the detailed display lines in Primo VE. To add this information to Primo VE, see Configuring My Library Card Options in Primo VE.
-
Open the My Account Links page (Primo Home > Advanced Configuration > All Mapping Tables > My Account Links) and gather any information necessary to configure the online payment link in Primo VE. To add this information to Primo VE, see Configuring the Online Payment Link in Primo VE.
Configuration
For each feature that you are using in Primo, use the associated procedure below to apply the information gathered during the preparation of this task. In some cases, it is simpler to start with a fresh configuration. This section includes the following configurations:
Configuring Resource Recommender in Primo VE
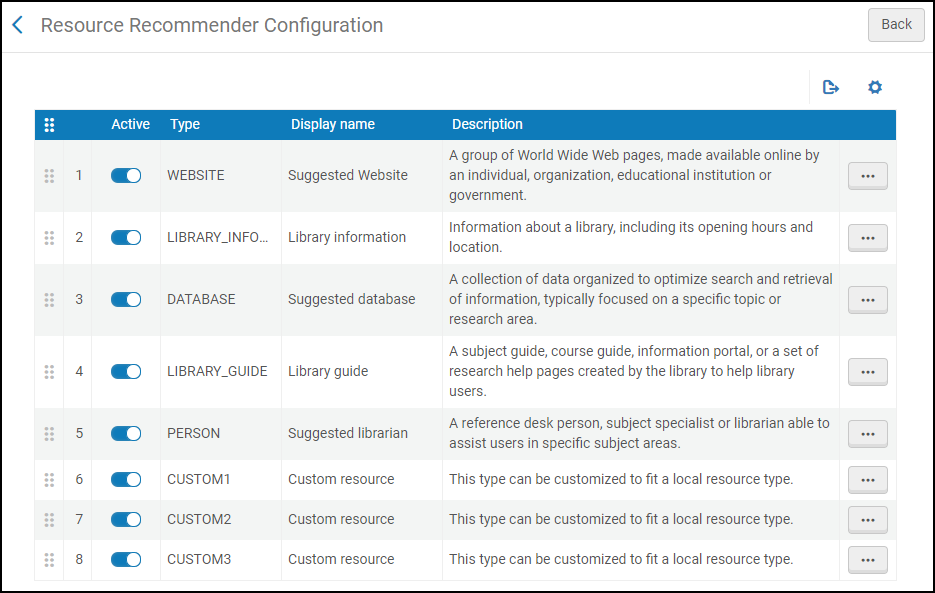
The Resource Recommender Configuration page allows you to import recommendations per the selected resource type using an Excel file. For more information, see Resource Recommender for Primo VE.
-
Open the Resource Recommender Configuration page (Configuration Menu > Discovery > Other > Resource Recommender Configuration).
-
Edit the resource type to which you want to import recommendations.
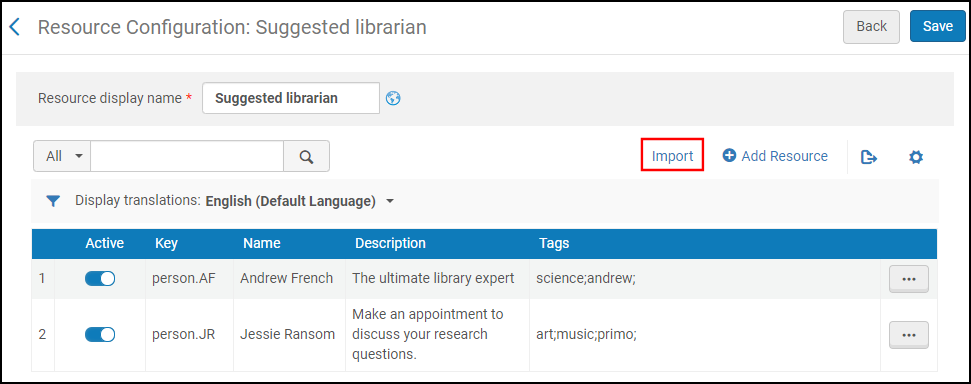 Resource Configuration Page - Suggested Librarian
 -
Select Import to open the Import dialog box.
-
Select the import file and one of the following options:
-
Add Resources – Adds recommendations to the existing list of recommendations for this resource type.
-
Replace Resources – Replace all recommendations for this resource type.
-
Cancel – Closes the Import dialog box without importing.
-
Database type recommendations can be added from existing electronic collections in Alma to which your library has a subscription. With this option, the system configures the default settings (such as delivery URL and tags) for the electronic resource, which you can modify as needed later. To use this function, select Add resources from electronic collections.
Boosting Records in Primo VE Results
The Ranking Configuration page allows you to boost records in search results based on field, date, and resource type. Boosting factors are specified as follows:
-
Positive boost: Enter a value greater than 1 (such as 2.5).
-
Negative boost: Enter a value between 0 and 1 (such as .5).
For more information, see Configuring the Ranking of Search Results in Primo VE.
-
Open the Ranking Configuration page (Configuration Menu > Discovery > Search Configuration > Ranking Configuration).
-
In the Fields Boosting section, select Add New Field and then specify a field and its boosting factor. Out of the box, the system provides boosting factors for the following fields: title, creator, subject, TOC, ISBN, language, and additional title.
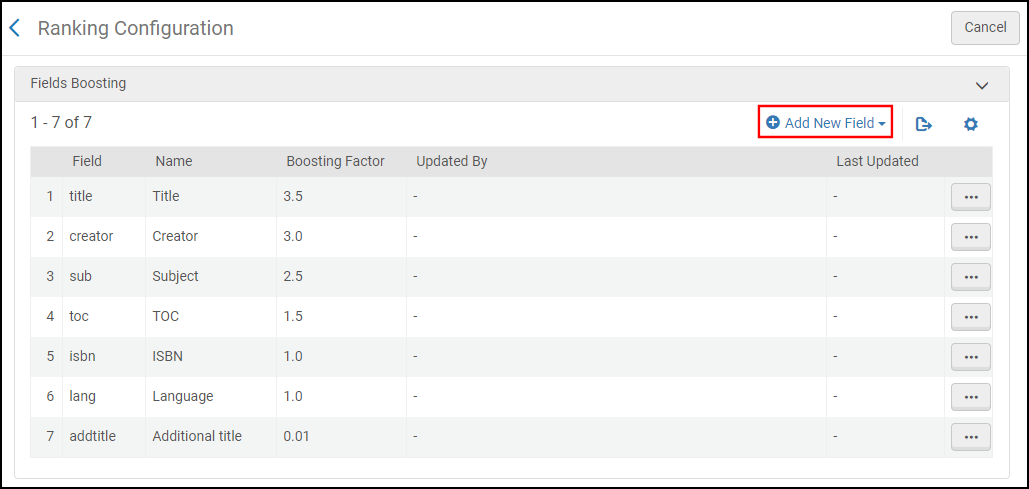 Ranking Configuration Page - Fields Boosting
 -
In the Date Boosting section, select Add Year and then specify a date and its boosting factor. This is useful if you want to boost newer titles.
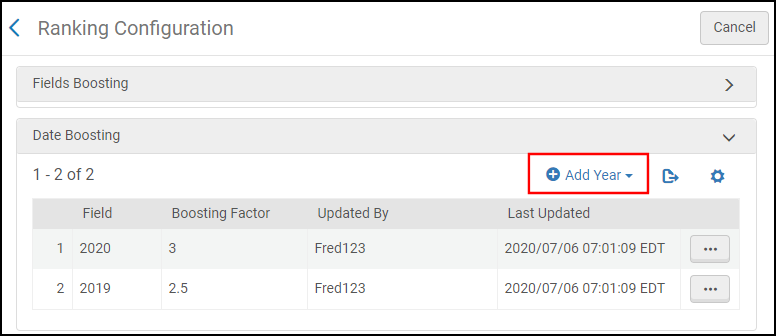 Ranking Configuration Page - Date Boosting
 -
In the Resource Type Boosting section, select Add Resource Type and then specify a resource type and its name and boosting factor.
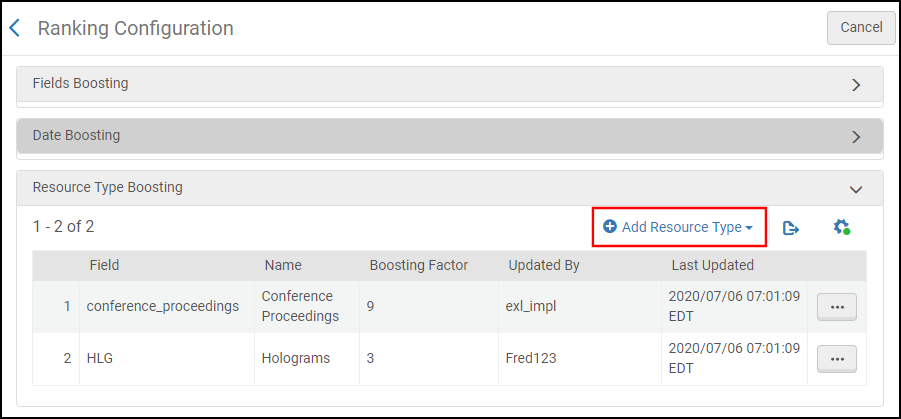 Ranking Configuration Page - Resource Type Boosting
Configuring Hypertext Linking Definitions in Primo VE
This configuration is relevant if you want to provide hypertext linking for display fields (such as creator, contributor, and so forth) and lateral links using local fields. In Primo VE, the Hypertext Linking Definitions page enables hypertext linking and its associated options. For more information, see Configuring Hypertext Link Definitions for Primo VE.
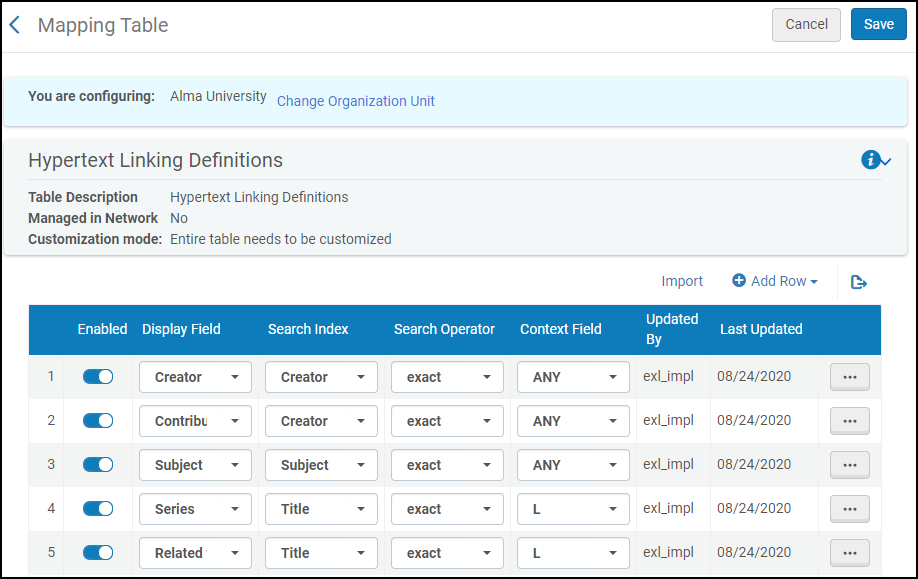
-
Hypertext search fields must be configured for Advanced Search.
-
Primo offers a Facet Exact search operator that provides a more precise search than the Exact operator by adding the value of the corresponding facet field to the advanced search query when users select an enhanced hypertext link in the record's full details. For the Creator search index in Primo VE, the Exact operator is designed to act as a Facet Exact operator.
Configuring Request Forms in Primo VE
Alma allows users to submit various requests that include additional information when requesting an item with the Full Display or Services page in Primo VE. The displayed request types are based on the inventory type of the record and display logic rules. These requests are placed by filling out the following types of request forms: Hold and Booking Request, Digitization Request, Purchase Request, and Resource Sharing Request. For more information, see Configuring Request Forms for Primo VE.
Open the following mapping tables to configure the associated request form for each request type:
-
Request (Hold and Booking) Optional Parameters (Configuration Menu > Discovery > GetIt Configuration > Hold and Booking Request)
-
Digitization Optional Parameters (Configuration Menu > Discovery > GetIt Configuration > Digitization Request)
-
Purchase Request Optional Parameters (Configuration Menu > Discovery > GetIt Configuration > Purchase Request)
-
Resource Sharing Form Customization page (Configuration Menu > Discovery > GetIt Configuration > Resource Sharing Request).
For Alma-Primo environments, the above forms are configured under Configuration Menu > Fulfillment > Discovery Interface Display Logic menu and have no effect on the settings in Primo VE.
Configuring Item Display in Primo VE
Primo VE allows you to configure the information that appears in the following areas under the Get It section on the record's full display page: brief item display and full item display. For more information, see Configuring Item Display for Primo VE.
-
Open the Display Items page (Configuration Menu > Discovery > GetIt Configuration > Items Display Configuration).
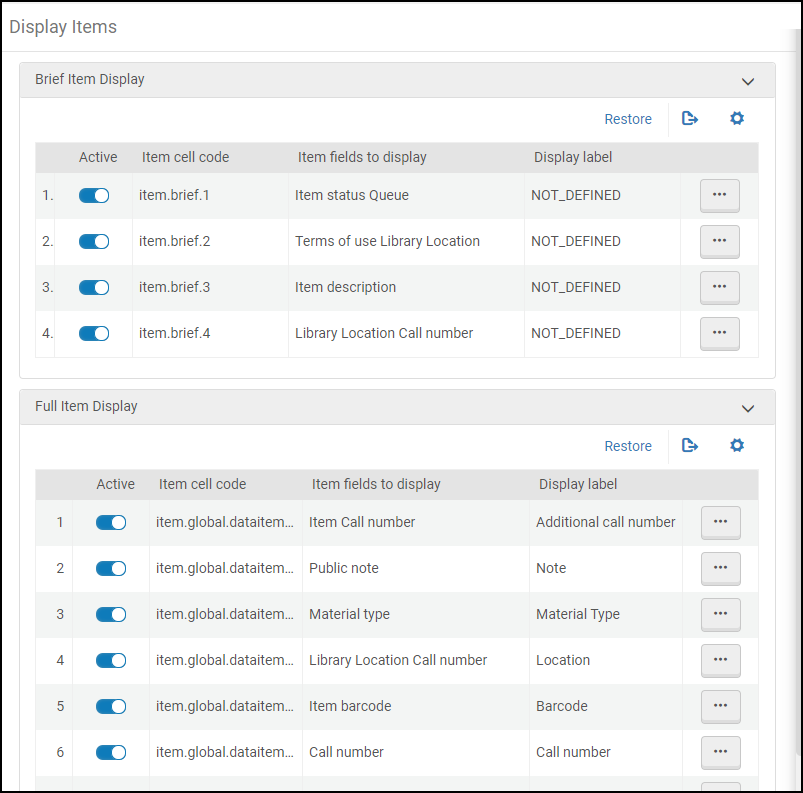 Display Items Page
 -
In the Brief or Full Item Display section, select Customize to allow you to edit its display lines. You can perform operations such as the following: activate/deactivate a display line, add a field to a display line, define the display line's label and more.
Configuring Holdings Display Fields for Primo VE
Out of the box, Primo VE supports the following holdings fields in the Get It service of a record's full display:
-
Summary holdings (866 a,z)
-
Supplements (867 a,z)
-
Notes (852 z)
If you want to include additional holdings fields or customize the mapping and display of the default holdings fields, you must set the uresolver_enable_getit_holding_configuration customer parameter to true (Configuration Menu > Fulfillment > General > Other Settings) and configure the following tables in Primo VE:
-
Holdings Display Labels and Order code table – For more information, see Configuring the Display Holdings Fields.
-
Primo Customized Holding mapping table – For more information, see Configuring the Mapping for Display Holdings Fields.
Configuring My Library Card Options in Primo VE
The My Library Card page in Primo VE displays each patron's account and fulfillment details (such as loans, requests, fines, and so forth) from Alma. You can customize the information that displays on the My Library Card page. For more information, see Library Card Configuration. and Configuring the Pay Fine Link for Primo VE.
For more information on how to integrate Primo VE with PayPal using Alma REST APIs, see Integrating with Primo VE
-
Open the Loans Brief Display page (Configuration Menu > Discovery > Library Card Configurations > Loans Brief Display) and configure which fields will appear on the first two lines of the loan description. By default, each field per line is separated by a non-breaking space, which can also be configured.
-
Open the Loans Detailed Display page (Configuration Menu > Discovery > Library Card Configurations > Loans Detailed Display) and configure which fields will appear in the loan's full display.
Configuring the Online Payment Link in Primo VE
The WPM Education E-Payment System allows Alma users to pay fines and fees using My Library Card in Primo VE. Once the request is initiated in Primo and processed in the payment system and Alma, both Alma and the WPM Education E-Payment System send payment receipt emails to the user. For more information, see Configuring the WPM Education E-Payment System for Primo VE.
-
If you are using the WPM Education E-Payment System (whose integration is built into Alma and Primo VE), open the page (Configuration Menu > Discovery > Other > Customer Settings) and set the online_payment_link parameter to true.
-
If you are using a different online payment system, open the Library Card Links page (Configuration Menu > Discovery > Library Card Configurations > Library Card Links) and set the online_payment_link parameter to access your Web service. When enabled, a Pay Fine link displays on both the Overview and Fine and Fees tabs in My Library Card. For more information on setting up the Pay Fine links, see Configuring the Pay Fine Link for Primo VE.
For more information on integrating Alma, Primo VE and PayPal using Alma REST APIs, see Integrating with Primo VE.

