
Primo August 2017 Highlights
Primo August Release Highlights Webinar
To download the Webinar, right-click the following link: Primo August 2017 Release Highlights
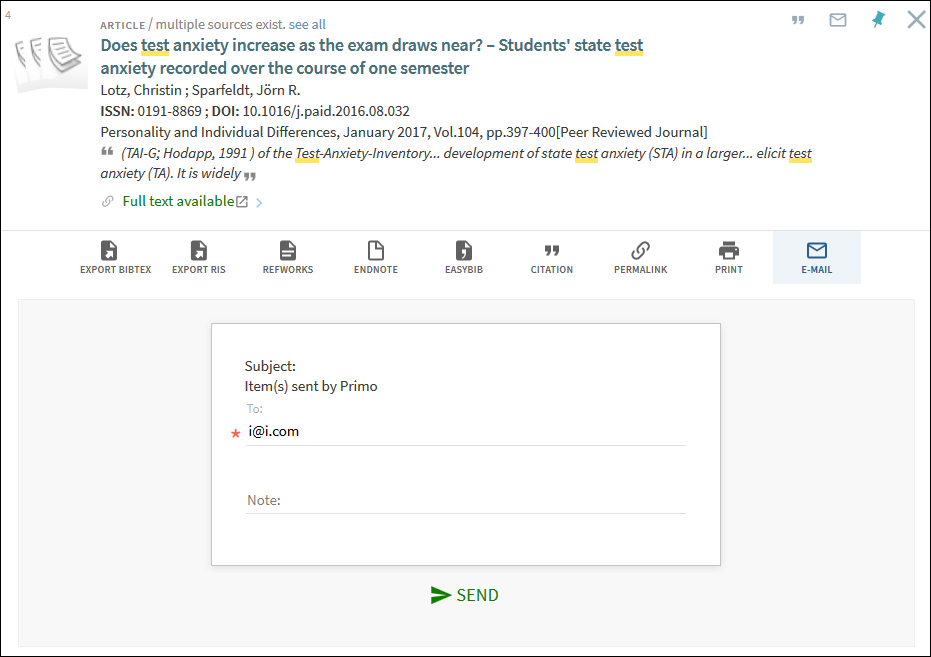
E-Mail Security Improvements
This enhancement improves the security of emails sent from the classic and new Primo UIs and includes the following modifications:
-
Captcha functionality already exists in the Classic UI and has now been added to emails in the new UI. For locally-hosted environments, customers can enable/disable this capability with the Activate Captcha [Y/N] parameter under the E-mail and SMS Configuration subsystem on the General Configuration page (Primo Home > Advanced Configuration > General Configuration Wizard).
-
Only signed-in users are permitted to add a note to the email.
-
Signed-in users can specify 1 to 10 email addresses (which must be separated by a semicolon), but un-signed users are limited to a single email address. As an email address is added, the system validates its format.
-
The subject of the email cannot be modified.
Email Action Shown in the New UI
New UI Enhancements
This section describes the enhancements that have been added to the new UI only. Note that some of these features are already available with Primo's classic UI.
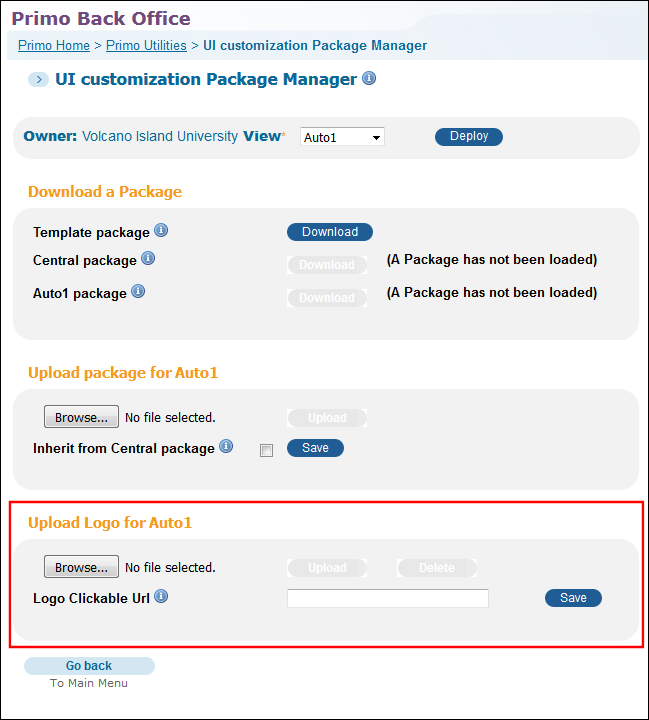
Clickable Logo Upload
The UI Customization Package Manager has been modified to allow you to upload a clickable logo, which redirects users to a specified URL when it is clicked in the new Primo UI. When using this method, no other configuration is needed to make your logo clickable.
Updated UI Customization Package Manager
To upload a clickable logo:
-
Open the UI Customization Package Manager (Primo Home > Utilities > UI Customization Package Manager).
-
In the Upload Logo section, click Browse to locate and select the uncompressed image file that you want to use for your institution's logo.
-
Click Upload to upload your selection the to Front End server. If you want to remove the logo, click Delete.
-
If you want to redirect users to a page other than the Primo Home page, specify a URL in the Logo Clickable URL field.
-
Click Save to save your changes.
-
Deploy the changes to the Front End.
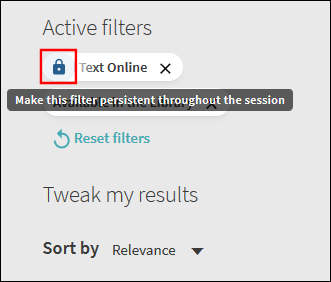
Sticky Facets
This enhancements allows users to make active facets persistent for an entire session. To make a facet persistent, the user must hover the cursor over the facet in the Active filters section of the new UI and then click the facet's padlock  .
.
.
Add Sticky Facet
To remove a facet's persistence, the user only needs to click the facet's padlock  or delete the facet.
or delete the facet.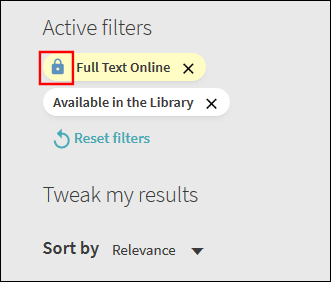
Remove Sticky Facet
Back Office Configuration
No configuration is necessary to enable this functionality. The following code table configurations allow you to modify or translate the sticky facet labels:
| Code Table | Code and Value |
|---|---|
|
Facet Labels
|
The following code defines the label that appears when the user hovers the cursor over the facet in the Active filters section:
default.nui.facets.set_persistent - Make this filter persistent throughout the session
The following code defines the label that appears when the user hovers the cursor over a persistent facet in the Active filters section:
default.nui.facets.cancel_persistent - Cancel persistence
|
|
Error Messages
|
The following code is used if no results are returned when persistent facets are used:
default.nui.noresultswithfilter.description - No results were found for this search with your current filter selections. Try clearing your filters to improve your results
|
Sort in Favorites
This enhancement allows users to sort their saved entries on the My Favorites page. The following Sort by options are valid: Title, Author, and Date added.
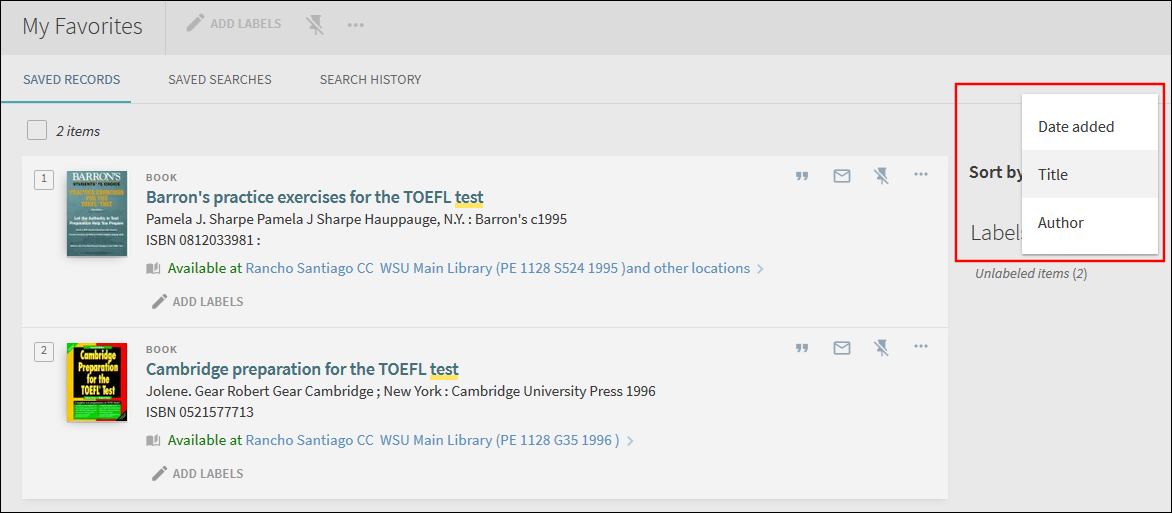
Saved Records - Sort Options on My Favorites Page
Back Office Configuration
No configuration is necessary to enable this functionality. The following code table configurations allow you to modify or translate the Sort by labels:
| Code Table | Code and Value |
|---|---|
|
Favorites Labels
|
The following code defines the label for the Sort by field:
default.nui.favorites.sortby - Sort by
The following code defines the label that appears when the user hovers the cursor over the Sort by field (default value):
default.nui.favorites.sortby.tooltip - Sort
The following codes define the labels for the Sort by options:
default.nui.request.sort.date - Date added
default.nui.request.sort.author - Author
default.nui.request.sort.title - Title
|
Featured Results
The Featured Results feature, which is already available with the classic Primo UI, is now supported in the new Primo UI. This functionality allows your institution to include additional relevant results that may not be included in the search scope that the user has selected for their search. For example, the user may be searching local records only, but there may be relevant records in Primo Central as well. In the new Primo UI, the format of the Featured Results Bar is based on the resource type that you have configured:
-
Articles – The Featured Results Bar in the new UI displays up to 10 items that include only the title. Users can scroll left or right to see the items in the horizontal list. If the title exceeds seven rows, an ellipsis is added to the end of the seventh row to indicate that the title is incomplete.
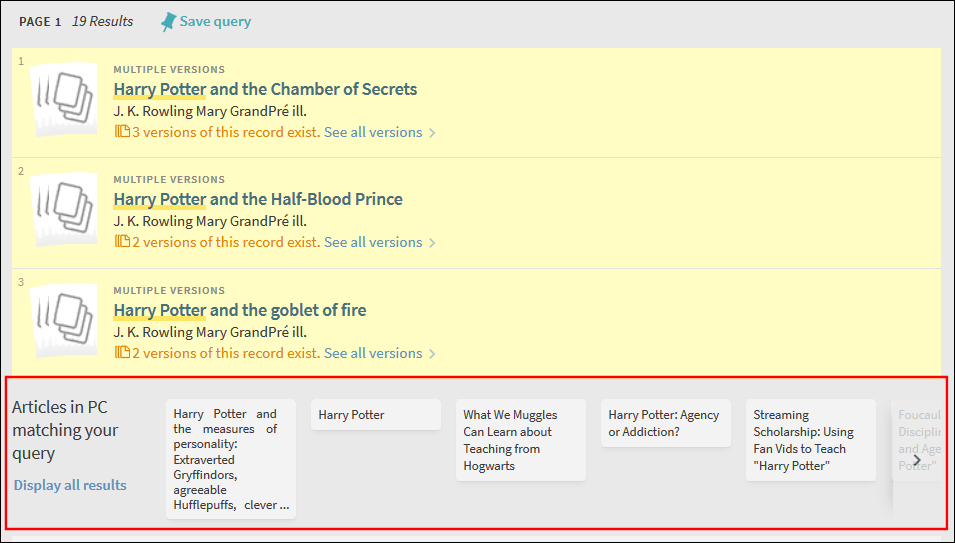 Format for Articles
 -
Other types – The Featured Results Bar in the new UI displays up to 10 items that include a constant size thumbnail with the title below it. Users can scroll left or right to see the items in the horizontal list. If the title exceeds four rows, an ellipsis is added to the end of the fourth row to indicate that the title is incomplete.
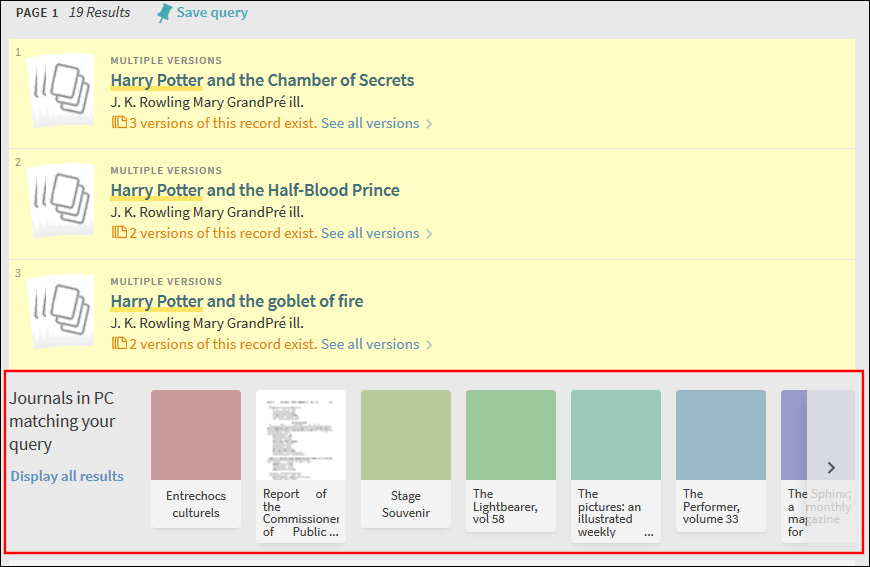 Format for All Other Resource Types
In the new UI, the Featured Results Bar appears after the third record in the list instead of after the fourth record.
From the Featured Results bar, users can perform the following operations:
-
Click the item to display the title's record.
-
Click Display all results to see a list of all featured titles on the Advanced Search page.
-
Scroll horizontally to see up to 10 items in the Featured Results Bar.
Back Office Configuration
For the August release, the new and classic UIs will use the same configuration (see Featured Results Bar), but the Format column in the Featured Results mapping table is not relevant to the new UI since the format is based on the resource type in the new UI.
In an upcoming release, the new UI will utilize the Tabs configuration in the Views Wizard.
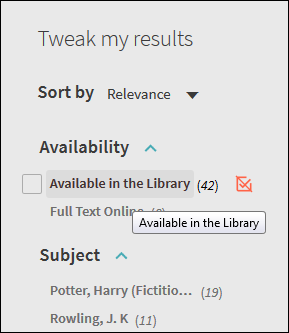
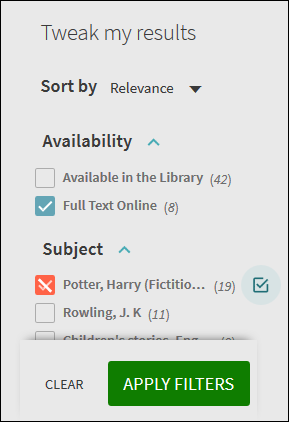
Multiple Facet Selection
This enhancement allows users to include/exclude multiple facets at a time to filter their search results. Previously, users could add only one facet at a time in the new UI.
With multiple facet selection, users can select values from multiple facets, but the system treats the values from other facets differently. For example, if the user selects Subject facet values Agriculture and Botany and Resource Type facet values Book and Other, the system returns results that include all records that match the following criteria:
-
The records must contain either Agriculture or Botany subjects.
-
And the records must be either Book or Other resource types.
When facets are added one at a time, the system returns the remaining results that match the selected facet value.
To include/exclude multiple facets at a time:
-
Perform a search.
 Tweak My Results Section on the Brief Results Page
 -
For each facet that you want to include and exclude, hover over the facet in the Tweak my results section of the UI and then perform one of the following actions:
-
Include facet – Select the check box on the left side of the facet. If you want to include a facet that has already been marked for exclusion, click the
 button on the right side of the facet.
 -
Exclude facet – If you have already included a facet, click the
 button on the right side of the facet to mark it for exclusion. If you have not already marked a facet for exclusion or inclusion, you must first select the facet's check box and the click the button on the right side of the facet. Otherwise, a single facet will be excluded immediately.
-
-
Click Apply Filters to filter your results. The selected facets will appear in the Active filters section.
 Active Filters Section
Back Office Configuration
No configuration is necessary to enable this functionality. The following changes have been made to the Results Tile code table to allow you to modify or translate the display labels for multiple facet selection:
| Code and Value | Description |
|---|---|
|
default.nui.facets.include.tooltip: Include <facet_name>
|
This code defines the label that appears when the user hovers the cursor over the include facet button
. |
|
default.nui.facets.exclude.tooltip: Exclude <facet_name>
|
This code defines the label that appears when the user hovers the cursor over the exclude facet button . |
|
default.nui.facets.applyfilters: APPLY FILTERS
|
This code defines the label for the Apply Filters button. |
|
default.nui.facets.clear: CLEAR
|
This code defines the label for the Clear button, which clears all selected facets. |
Support of RSS Feeds
Rich Site Summary (RSS) functionality, which is already available with the classic Primo UI, is now supported in the new Primo UI. An RSS feed allows Primo users to be informed of updates to records in their saved searches.
To enable RSS for a saved search:
-
Open the My Favorites page by clicking the My Favorites button in the top menu of the new UI.
-
On the My Favorites page, select the Saved Searches tab.
 RSS Selection on Saved Searches Tab
 -
Click the RSS button
 for the saved search that you want to monitor.
 -
Subscribe to the feed if your browser has an RSS reader.
Back Office Configuration
No configuration is necessary to enable this functionality. The following code has been added to the Favorites Labels code table to allow you to modify or translate the tooltip for the RSS button:
default.nui.favorites.search.rss.tooltip - set an RSS for this search
Silent Login Authentication
Primo's new UI now supports a silent login. If this functionality is enabled within a PDS, SAML, or CAS authentication profile, users who are already signed on to another library system are automatically signed on to Primo when a new session is opened with the same browser in a new window or tab.
To enable silent login:
-
On the Login Profiles page (Primo Home > Ongoing Configuration Wizards > User Authentication Wizard), edit your Login Profile.
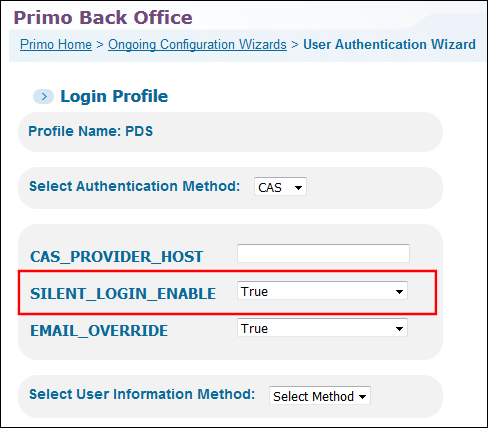 Login Profile Page
 -
Set the SILENT_LOGIN_ENABLE parameter to True.
-
Click Save to save your changes to the profile.
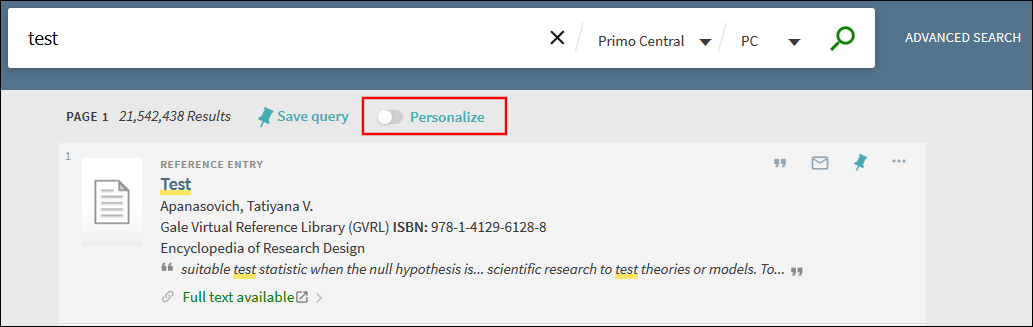
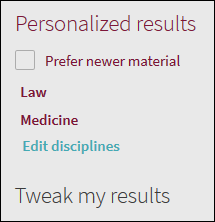
Personalized Results
The Personalized Results feature, which is already available with the classic Primo UI, is now supported in the new Primo UI. This enhancement boosts the rankings of Primo Central records that match the users personalized settings.

Personalized Results Enabled in the New UI
The Personalized results section lists the active preferences and allows users to remove selected disciplines, edit selected disciplines, and give preference to newer material.
Setting the Personalized Results Preferences
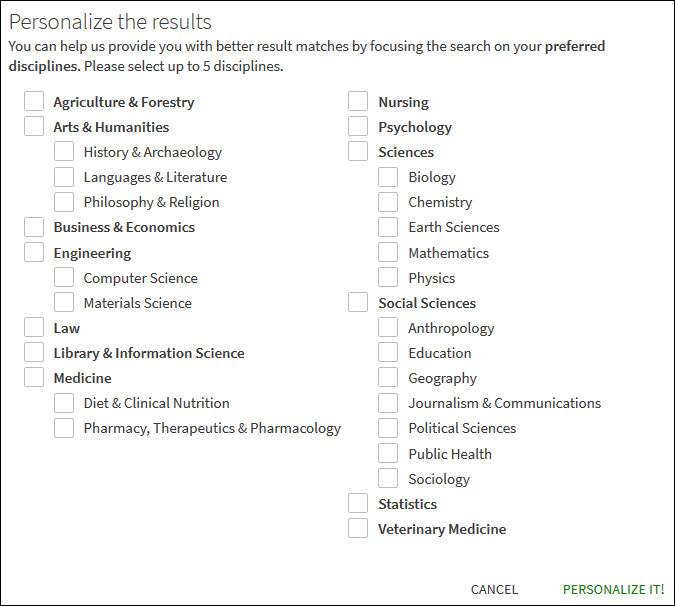
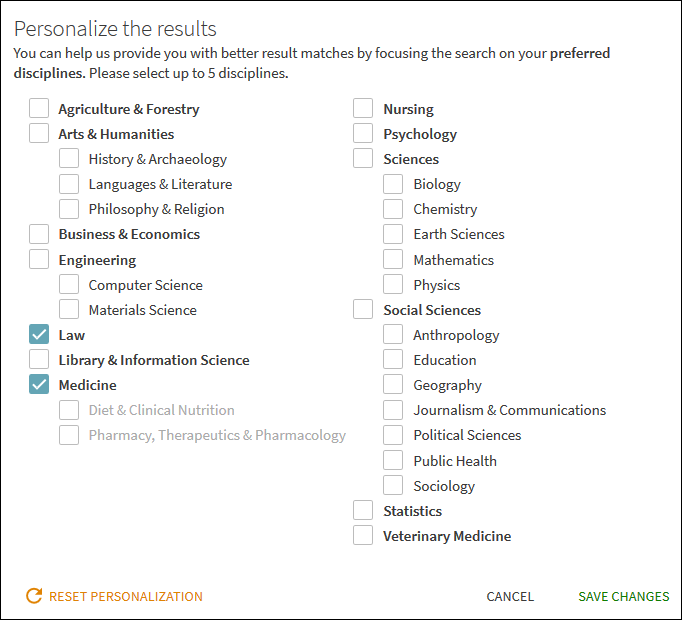
The Personalize the Results dialog box allows users to set their discipline preferences, which are retained during the session for guests and unsigned users and between sessions for signed-in users.
Personalize the Results Dialog Box
The list of disciplines are defined by Primo Central, but they can be translated locally using a code table in the Back Office. For more information, see Back Office Configuration.
To enable personalized settings in the Front End:
-
Perform a search within a search scope that includes Primo Central records.
 Enable Personalized Results
 -
Click the Personalize button that appears above the list of results.
-
In the Personalize the results dialog box, select up to five disciplines.
-
Click PERSONALIZE IT.
To edit personalized settings in the new UI:
-
Perform a search within a search scope that includes Primo Central records to display the Personalized results section.
 Personalized Results Section
 -
If you want to give preference to newer records, select the Prefer new material check box.
-
Click Edit in the Personalize the results section to open the Personalize the results dialog box.
 Personalize the Results Dialog Box
 -
In the Personalize the results dialog box, select up to five disciplines.
-
Click SAVE CHANGES.
Back Office Configuration
This section describes the Back Office configurations used to display personalized results in the new UI.
Enabling Personalized Results
The Enable the "Personalize Your Results" service field on the General Attributes page in the Views wizard (see Views Wizard - General Attributes Page) allows you to display the Personalized Results area on the Brief Results page in the new UI.
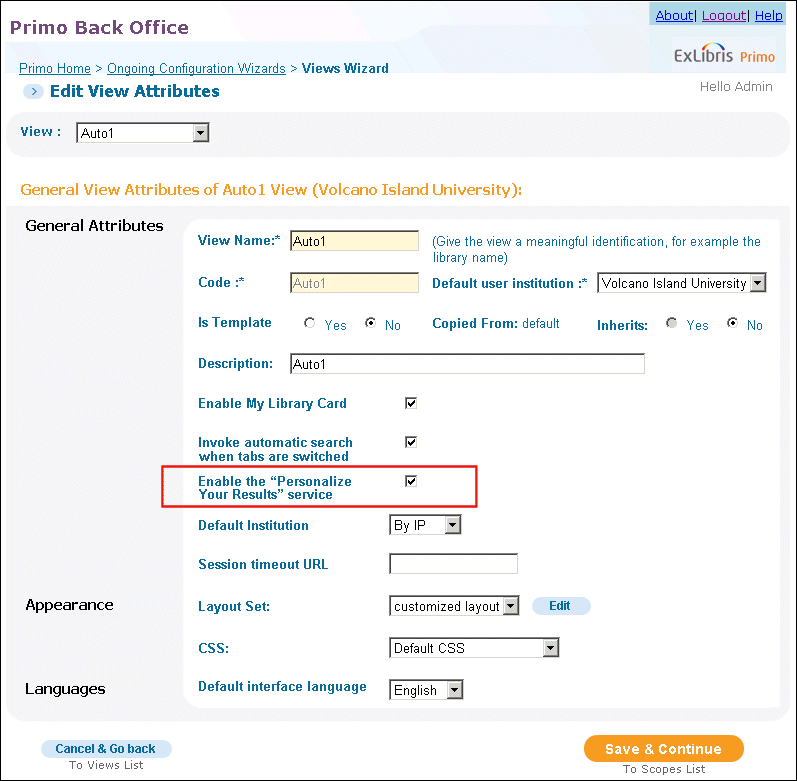
Views Wizard - General Attributes Page
Customizing the Display of Personalized Ranking
The following tables allow you to configure how personalized results display in the new UI:
-
Personalize Your Results Disciplines code table – This table allows you to translate the disciplines and modify display names and categories.
-
Personalize Your Results Labels code table – Contains all labels used by the Personalize Your Results area on the Brief Results page and the Personalize Your Results dialog box. The code associated with the new UI contain the following prefix: default.nui.
-
Personalize Your Results Disciplines Fields mapping table – Contains the list of valid disciplines per view, which are defined by Primo Central. If you do not want to display specific disciplines in the Personalize the results dialog box, you are permitted to delete those rows from the table.
-
Error messages code table – The following code displays a message when the maximum number of disciplines has been selected in the new UI:default.nui.validation.pyr.maxDisciplines – Please edit your selection to include <b>no more than 5 disciplines</b>.
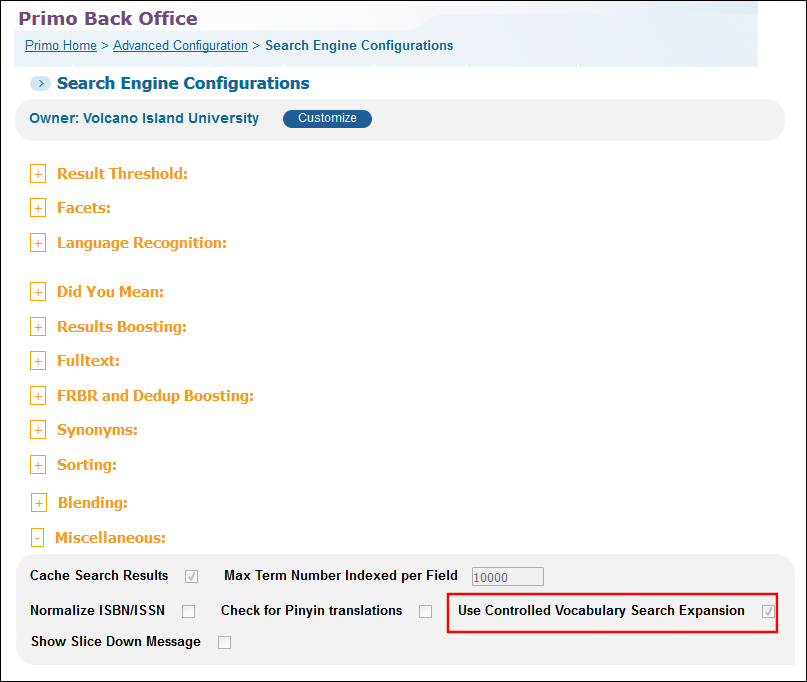
Search Expansion with Controlled Vocabulary
This new service expands the search with words and phrases that constitute variations of the search term with the same meaning and thereby increases the accuracy of the user’s search. This feature is similar to the expansion with synonyms but more robust. The expansions are visible on the screen and add, for example, variations of the search term with the same meaning (example ADHD and attention deficit disorder, or name variations such as assata shakur and asata shakur). Users are provided with the option to revert to using only their original search term. In this first release, you will see this expansion above the results in only a few searches that include the Primo Central search scope. Over time, the controlled vocabulary repository will be extended so that users will see more expansions in their search results. This feature is based on vocabularies such as LC subjects and MeSH.
This feature will be available on August 3, 2017 after the August release of Primo Central. It is applicable to both local and SaaS environments, but is available only in the new Primo user interface. With a later release, it will be available in the classic user interface as well.
For example, if the user enters heart attack in the query, Primo also returns results that include myocardial infarction. If the user is interested only in results that include heart attack, the user can click the link to the right of the recommendation.
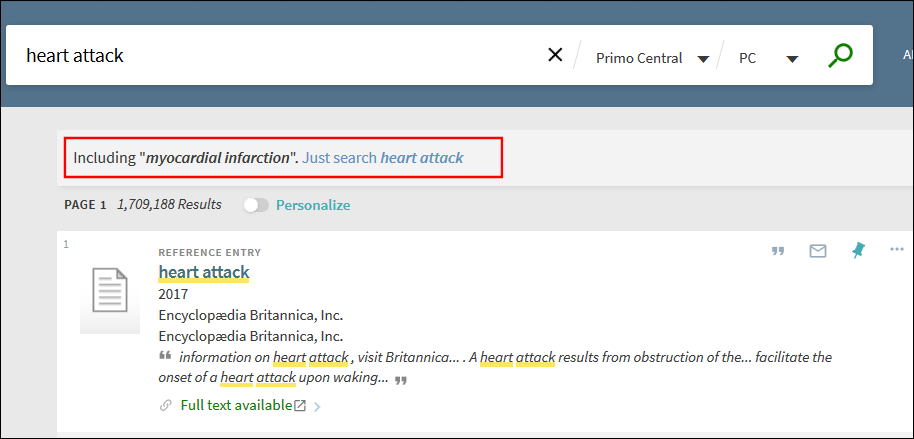
Example of the Controlled Vocabulary Service in Primo Central
Back Office Configuration
Out of the box, this service is enabled. If you would like to disable it, clear the Use Controlled Vocabulary Search Expansion check box in the Search Engine Configuration Wizard (Primo Home > Advanced Configuration > Search Engine Configurations).
Enable/Disable Controlled Vocabulary Expansions
The following codes have been added to the Results Tile code table to allow you to modify or translate the labels for this service:
-
default.nui.results.controlVocabulary.including – Including {{equivalentTerm}}.
-
default.nui.results.controlVocabulary.searchOnly – Just search {{query}}
Resource Recommender
The Resource Recommender service allows you to recommend the following resources based on searchable tags that you configure in the Primo Back Office: database, website, person, library information, and library guide.
When a user performs a search in which the query exactly matches the searchable tag (which may be a word or phrase), the new Primo UI displays up to three associated recommendations at the top of the brief results.
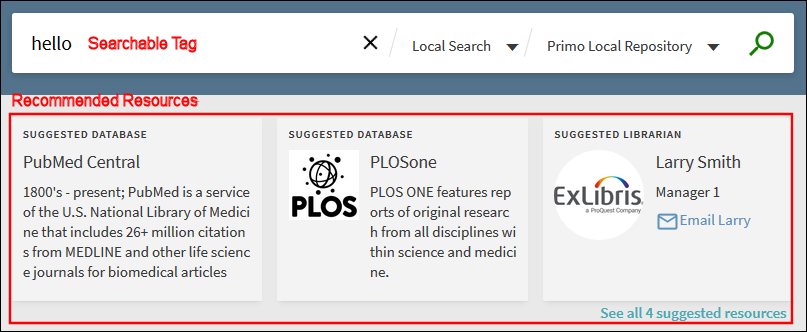
Resource Recommender Service on the Brief Results Page
The user may view additional recommendations by clicking the See all suggested resources link.
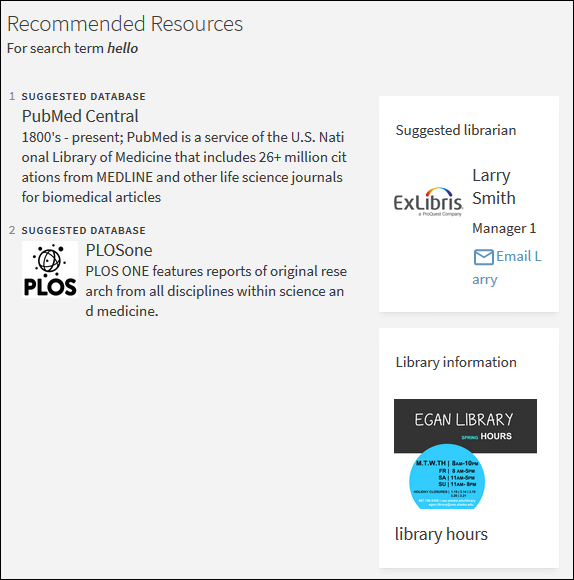
All Suggested Resources Page
- You can display a maximum of ten recommendations on the All Suggested Resources page.
- All recommendations appear on the left side of the page unless they are based on the following resource types: Person, Library Information, and Library Guide.
Back Office Configuration
The following table describes the configuration that supports this functionality.
| Page | Description |
|---|---|
|
Resource Recommender
|
This page has been added to the Advanced Configuration page in the Primo Back Office. It allows you to define the resource recommendations. For more details, see Resource Recommender.
|
|
Resource Recommender Codes code table
|
This new table defines the display labels that are associated with Resource Recommender.
|