
Configuring Facets
If you are working with Primo VE and not Primo, see Configuring Discovery Views for Primo VE.
In general, the basic configuration is the same for all kinds of facets. Additional configuration is needed to configure static facets.
To configure facets to display in the Front End:
-
Configure the facets in the Facets section of the normalization rules. For more information, see Facets Section in The PNX Record.
-
Configure static facets as needed. For more information, see Configuring Static Facets.
-
Configure top-level facets as needed. For more information, see Configuring Top-Level Facets.
-
Configure the views to display facets in the Front End. For more information, see Displaying Facets.
-
Configure the facet labels that display in the Front End and Back Office. For more information, see Modifying Facet Labels.
Facets Section in The PNX Record
Displaying Facets
-
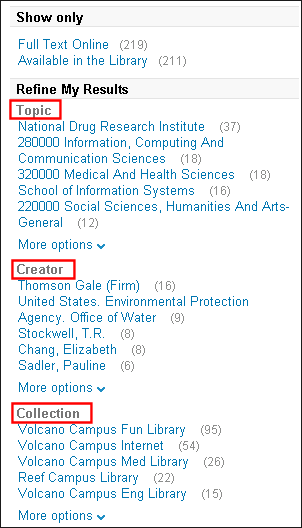
Tweak My Results (new UI) or Refine My Results (classic UI) – This section displays static and dynamic facets.
-
Availability (new UI) or Show only (classic UI) – For more information, see Displaying Top-Level Facets in the Show Only Section.
-
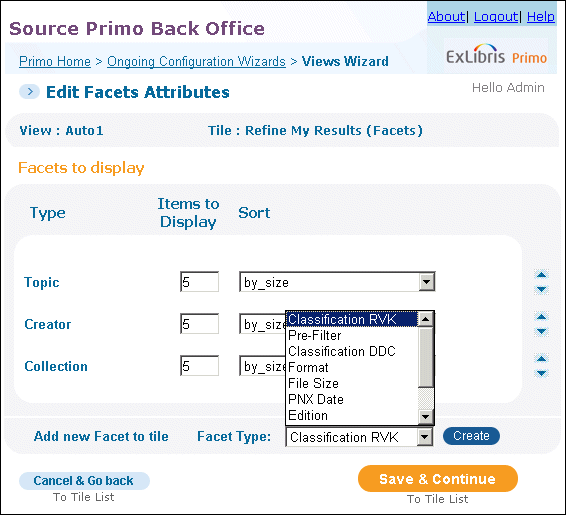
On the Primo Home > Ongoing Configuration Wizards > Views Wizard > Tiles Configuration page, select Brief Display in the Page drop-down list.
The tiles that configure the Brief Results page appear in the list (see Tiles Configuration Page (Brief Display Tiles)).
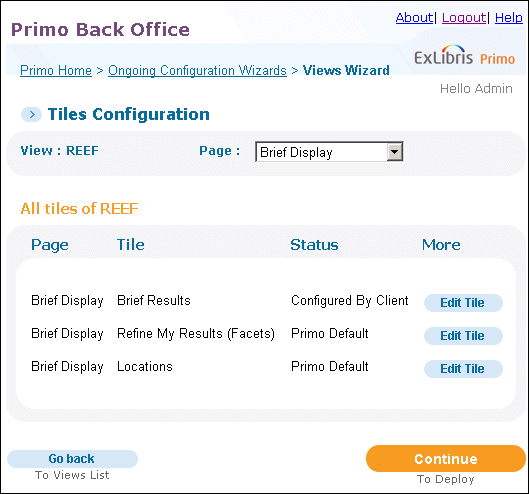 Tiles Configuration Page (Brief Display Tiles)
 -
Click Edit Tile in the row that contains the Refine My Results (Facets) tile.
The Edit Facets Attributes page opens (see Edit Facets Attributes Page).
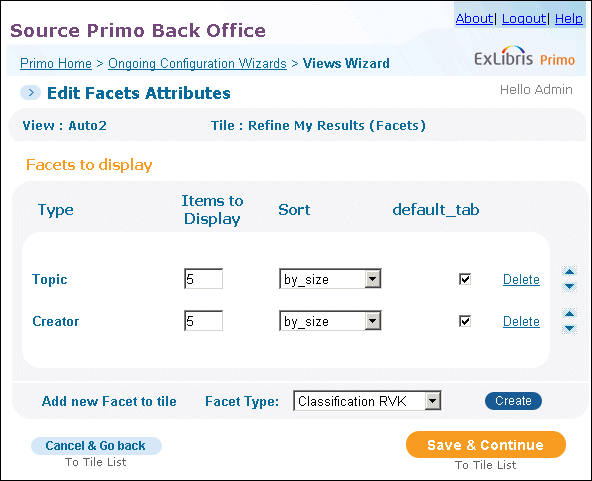 Edit Facets Attributes Page
 -
In the Facets to display section, select a facet on the Facet Type drop-down list and click Create.
-
Update the following columns for the new facet:
-
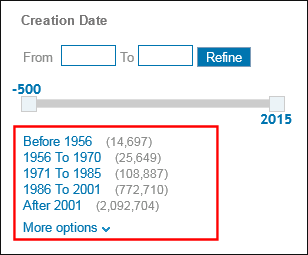
Items to display – Specify the number of items that you want to display for the facet. The default value is 5.
Because the system creates five groups for the Creation Date facet, a value greater than 5 will only display five groups. For information on how facet groups are created for the Creation Date facet, see Facets Section in the Primo Technical Guide.
-
Sort – Specify the type of sort for the facet. The following values are valid:
-
alpha_numeric – Sorts the facet’s values alphabetically.
-
by_size – Sorts the facets by the number of matching records, in descending order.
-
-
Tabs – Select the check box for each tab in which you want to display the facet.
-
Click Save & Continue.
The Tiles Configuration page opens (see Tiles Configuration Page (Brief Display Tiles)).
-
Click Continue to deploy the changes to the Front End.
Modifying Facet Labels
Primo allows you to modify the facet labels that display above each list of facets in the Front End (see Facet Labels in the Front End), the labels and buttons that display in the More options lightbox in the Front End (see Facet Labels in the Front End), the items in the Facet Type drop-down lists in the Back Office (see Facet Type drop-down list in the Back Office).
The following code tables allow you to modify the facet labels that display in the Front End and Back Office per view and language:
-
Facet Labels – Configures the facet labels that display on the results page in the Front End (see Facet Labels Code Table).
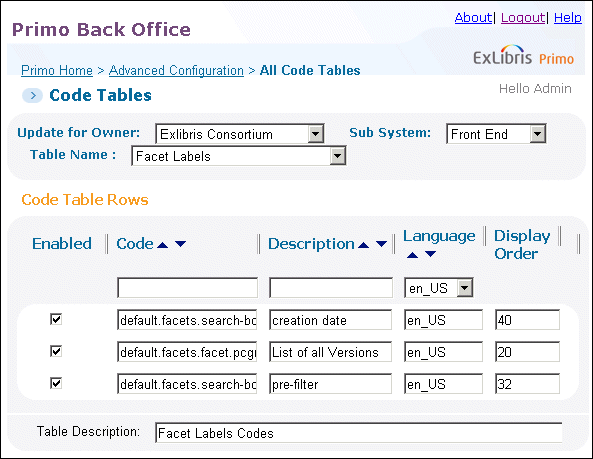 Facet Labels Code Table
 -
Results Tile – Configures the labels and buttons that display in the More options lightbox (see Facet Labels Code Table).
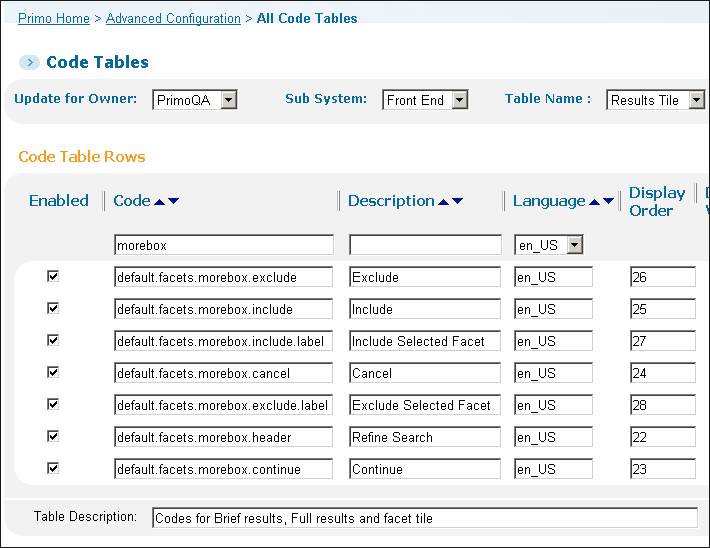 Results Tile Code Table
 -
Facet Code Fields – Configures the facet labels that appear in the Facet Type drop-down list in the Back Office (see Facet Code Fields Code Table).
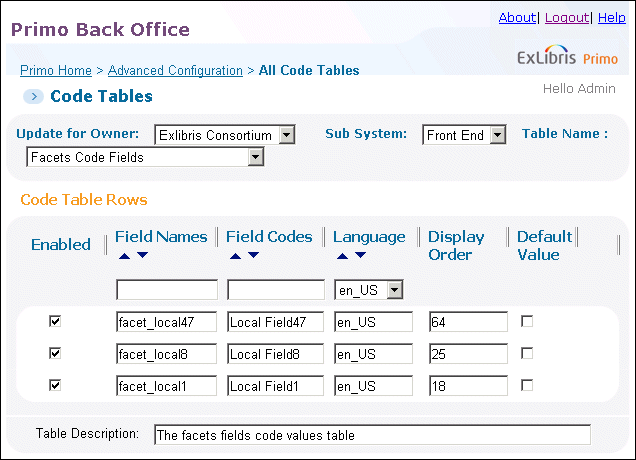 Facet Code Fields Code Table
Enabling the Creation Date Facet Categories
Primo allows you to enable the Creation Date facet categories, which are disabled out of the box. In its place, Primo displays the date slider, which provides more precision.
-
Log on to the Back Office server as the primo user.
-
Enter the following commands to access and open the CSS file that is used to customize your view:
fe_webcd cssvi <custom_css/>.cssIt is not recommended to modify the default Primo CSS, which can be overwritten during updates. For more information regarding the customization of Primo views, see the Primo Technical Guide.
-
Change display: none to display: block in the following element in the CSS file:
.EXLFacetContainer ol li.EXLHiddenFacetCreationDatedisplay: block;} -
Save the changes to the CSS file.
-
On the Primo Home > Deploy All page, select all options and click Deploy.
-
Perform a search to verify that the Creation Date facet appears in the view.
Facet Search Engine Parameters
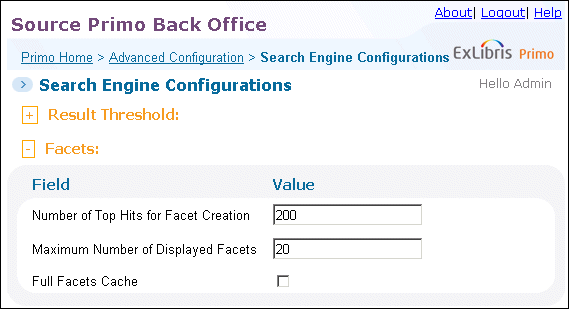
The following parameters on the Primo Home > Advanced Configuration > Search Engine Configurations page (see Facet Parameters on Search Engine Configurations Page) allow on-premises customers to control how the system builds and displays facets:
-
Number of Top Hits for Facet Creation – This field specifies the number of top-ranked records the system will use to create the list of facet values that are displayed in the Refine My Results section of the Front End. Currently, this field is no longer configurable and is set to 2000 internally. For CDI, all records in the results set participate in facet count calculation for the top 20 values displayed for CDI.
-
Maximum Number of Displayed Facets – This field specifies the maximum number of facets that can be displayed in the FE (for example, when More is invoked).
-
Full Facets Cache – This field indicates whether cache is used to increase the maximum value of the Number of Top Hits for Facet Creation field to 5000. For more information on adding additional memory, see Full Facets Cache (on-premises installations only). For multi-tenant customers, this value may be set as high as 10,000.
Sorting Facets
The system uses custom sort definitions for both search results and facets if you configure custom sorting in the Sorting section on the Search Engine Configuration page and store the necessary sort definitions in the following directory, which is accessible to on-premises customers only:
The system uses the SE Char conversion mapping table to normalize the sort keys that are stored in the Sort section of the PNX for search results only. This mapping table is not used for sorting facets.
For more information on the normalization of characters, see the Primo Technical Guide.