How can I create and delete *Research Professional accounts as an institutional administrator?
- Product: Research Professional
Question
How can I create and delete *Research Professional accounts as an institutional administrator?
Answer
Automated account creation (bulk upload)
If you need accounts to be created for a large number of academic staff, we can expedite the process for you - all we need is for you to provide some information about each prospective user. To ensure an expedient user upload process, the preferred way to present this information is a Microsoft Excel spreadsheet with user information separated into columns for:
First Name
Last Name
Institutional Email Address
Note: if your institution has a Networked-level subscription, you can also include a column with respective workgroups for each user.
Bulk uploads of users can be requested by submitting a request via our support portal. Once users are successfully created, we will send a welcome email to each user – to be approved by you, of course - with instructions to claim their account, in addition to quick-start guides and links to our Knowledge Centre.
Manual account creation
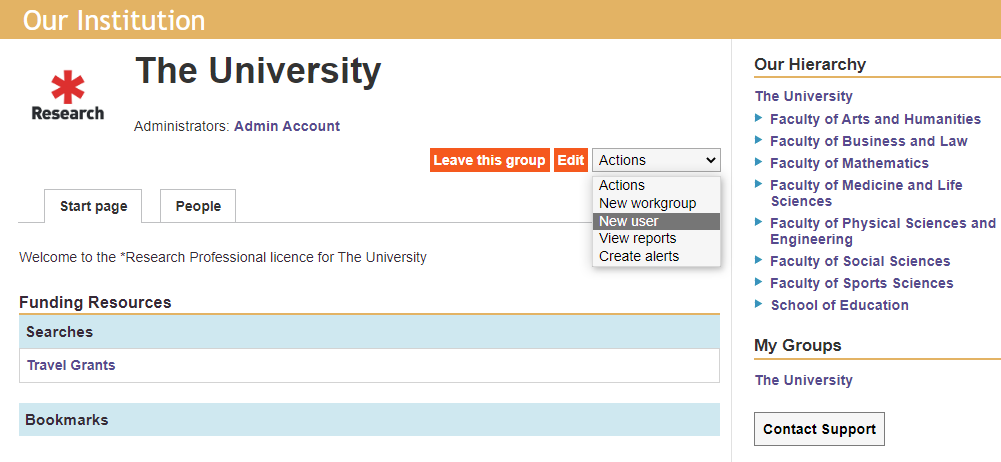
If you only need to create a few accounts, then you can do this quite simply by logging into *Research Professional and clicking on Our Institution at the top of the homepage. Keep in mind that your account will need to have administrator privileges to proceed.
Once you are in the Our Institution section, click on the Actions dropdown menu (next to the orange Edit button) and select New user.

This will take you to a user registration form – all you need to do is fill out the mandatory information (indicated by*). Once filled out and successfully created, the user will receive an automated email with instructions to claim their new account (this will include an option to reset their password).
Automated account creation (bulk upload)
If you need accounts to be created for a large number of academic staff, we can expedite the process for you - all we need is for you to provide some information about each prospective user. To ensure an expedient user upload process, the preferred way to present this information is a Microsoft Excel spreadsheet with user information separated into columns for:
First Name
Last Name
Institutional Email Address
Note: if your institution has a Networked-level subscription, you can also include a column with respective workgroups for each user.
Bulk uploads of users can be requested by submitting a request via our support portal. Once users are successfully created, we will send a welcome email to each user – to be approved by you, of course - with instructions to claim their account, in addition to quick-start guides and links to our Knowledge Centre.
Manual account deletion
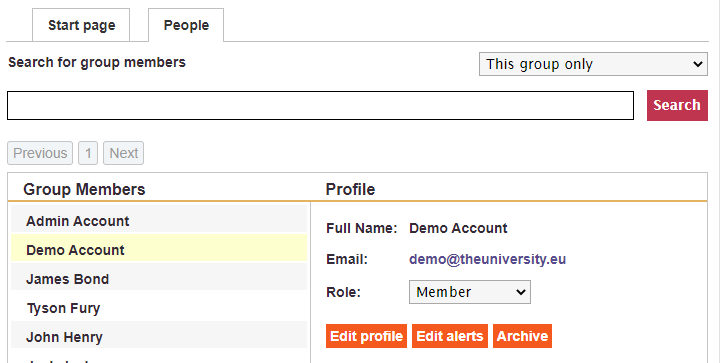
If you would like to disable or delete a user account, go to Our Institution, select the People tab (next to Start Page) and search for your user – if you cannot seem to find the user, click on the drop-down menu above the red Search button, and select Whole institution instead of This group only.
Once you find the user, click on their name – this should prompt the user’s profile to appear next to the user directory. You will then see the options to Edit profile, Edit alerts or Archive. To begin the deletion process, click Archive.

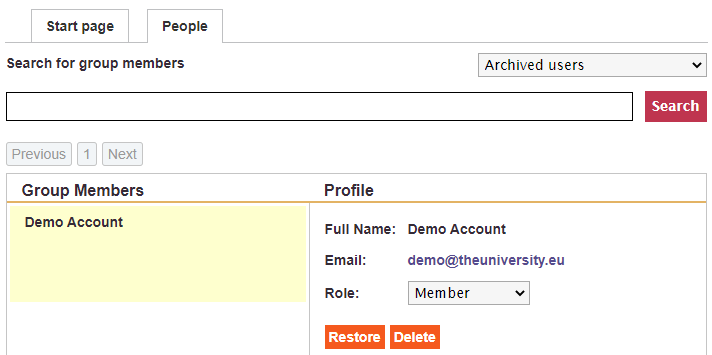
Once archived, the user can then be viewed by going back to the drop-down menu above the Search button and selecting Archived users. You will find the archived user here and upon clicking, you will see the options to Restore or Delete their account.

If you know that the user is no longer active at your institution but have reason to believe that they may return at some point, you can leave their account archived as this will only disable their account until their return, at which point you can click Restore to switch their account back on.
If you want to proceed with a full deletion, simply click the Delete button. Once a user is deleted permanently, their account cannot be recovered.
Automated account deletion
If you would like to delete many users without having to go through each profile individually, you can also request us to do this for you. All we need is a spreadsheet in the same format as the user creation form (see top of the page), with the First Name, Last Name and Institutional Email Address for each user you would like deleted.
- Article last edited: 24-Apr-2020

