
Configuring Rialto Settings
- Rialto System Administrator
- Other Settings - From here you can access a table of configurable customer parameters.
- Cart Routing - From here you can enable and define the values that will display to staff under the Cart Routing field in the cart, orders awaiting approval page, and order history.
- Rialto Vendor Codes - This page provides the ability to adjust the out-of-the-box Rialto orders mapping to another specific vendor or account code in Alma.
- Provider Configuration - This page provides a centralized location for viewing and managing Rialto platform settings.
- Purchase Request Form - From here you can adjust the settings for an embeddable purchase-request form.
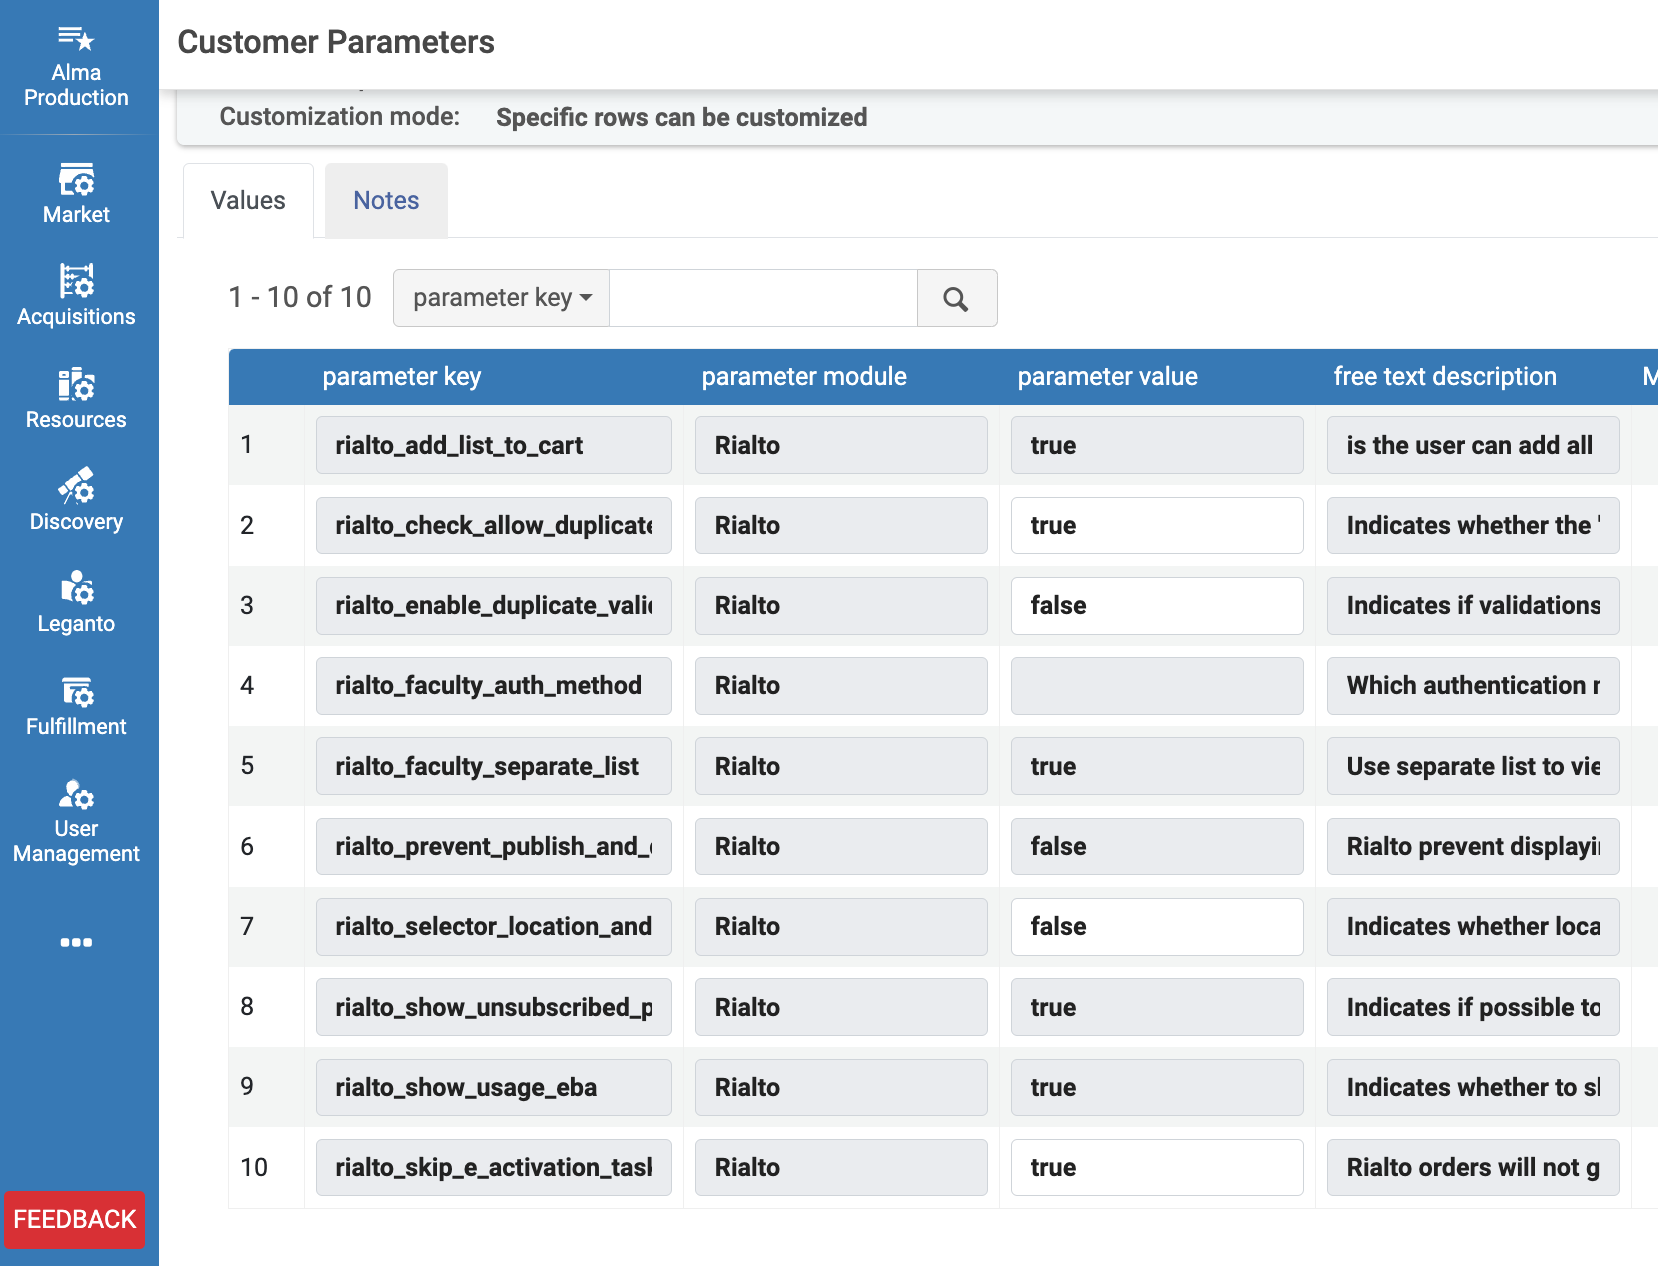
Other Settings
To access other settings, select Configuration menu > Collection Development > Other Settings.
Upon page load, you are presented with a table of customizable parameters:
| Parameter key | Parameter Value options | Description |
|---|---|---|
|
allow_citation_link_for_alternate_isbn
|
true/false |
Allows Rialto to close a Leganto citation when the purchased item uses an alternate but equivalent ISBN (such as a different format or edition) instead of requiring an exact ISBN match. This ensures that citations can be fulfilled even when selectors purchase a valid alternate format.
|
| rialto_add_list_to_cart | true/false |
When set to true, this allows for a background job to be performed when adding more than 20 items to the cart from a list. Turning bulk adds to a job frees the user to be able to perform other list and cart actions. The default is true. |
| rialto_check_allow_duplicate_checkbox | true/false |
This is paired with the rialto_enable_duplicate_validation setting. When rialto_enable_duplicate_validation is set to true, displaying the "Allow Duplicate" checkbox in the cart to staff, rialto_check_allow_duplicate_checkbox forces the "Allow Duplicate" to be checked when set to true, allowing for purchases for held titles to be submitted, and purchased. If set to false, then library staff will be prevented from submitting an order for a known held title, and either have to manually check the box, or remove the offer from the cart. If rialto_enable_duplicate_validation is set to false, preventing the display of the "Allow Duplicate" checkbox, then settings for rialto_check_allow_duplicate_checkbox are ignored. The default for rialto_check_allow_duplicate_checkbox is true. |
| rialto_enable_create_or_match_mms_on_checkout | true/false | Controls whether approvers can view record-matching information for items in the Rialto cart before checkout. |
| rialto_enable_duplicate_validation | true/false |
Indicates if system validations for duplicate purchases are executed by introducing the "Allow Duplicate" checkbox option on all Rialto cart items. For more information, see Adding to Shopping Cart and Submitting to Approval. The default setting is true, allowing for display of the checkbox to end users. |
| rialto_faculty_auth_method | empty, string |
This defines the authentication method to use for faculty login from faculty title alert emails. The field is blank by default, meaning no authentication is required. For more information, see Faculty Title Alerts. The string that is expected with this parameter option is SAML, CAS, etc. |
| rialto_faculty_separate_list | true/false | Set this value to true to separate faculty recommended titles into a unique list for review before displaying them on the orders awaiting approval page. When set to false, these titles will appear in the orders awaiting approval page only. For more information, see Reviewing Faculty-Recommended Titles. |
| rialto_hide_courses_panel | true/false | Set this value to show or hide the Leganto course information in the holdings panel. Default is set to true to show the course information. |
| rialto_local_bib_deletion_fix_apply | For Rialto Support Only - Will be removed in a future release. Indicates whether a fix for an unexpected local bib deletion applied. | |
| rialto_prevent_publish_and_display_suppressed_holdings | true/false | By default, Rialto is configured to show holdings that are suppressed and factor them into queries for holdings. To prevent displaying and querying on suppressed holdings, set to true. For more information, see Show/Hide Suppressed Holdings. |
| rialto_selector_location_and_fund_mandatory | true/false |
Indicates whether location and fund are mandatory fields in a selector's cart. Location and fund will always be mandatory for purchasers and approvers. Note that this is in addition to institution-wide mandatory fields defined by an administrator, as described in Institution-level Customizations. |
| rialto_service_page_admin_only_access | true/false | Controls who can access the Rialto Service Page within Alma. When enabled (true), only Rialto administrators can view and access the Service Page. When disabled (false), the Service Page is visible to all users who have access to Rialto. |
| rialto_show_unsubscribed_platforms | true/false | Set to true to allow visibility of titles offered by platforms your institution is not subscribed to. Titles and details will appear, but titles cannot be added to the cart or DDA. Set to false to prevent visibility of titles from unsubscribed platforms. |
| rialto_show_usage_eba | true/false | Indicates whether or not to show sushi counter usage on listed titles in your EBA feed(s). |
| rialto_skip_e_activation_task | true/false | Set to true to prevent Rialto ebook orders from generating an e-activation task. Set to false to allow Alma to create e-activation tasks for each ordered title. |
| suppress_internal_note_from_reading_list | true/false | Automatically suppresses internal notes generated when items are added to the cart from reading and citation lists. |
| update_inventory_merge_multiple_records | true/false | Allows for the Metadata Import to support the same MARC record in different files (for use when ordering multiple copies of the physical same book for different locations). |
Cart Routing
Cart Routing allows selection staff to assign a value of your creation from the cart that acquisition staff can use to filter on from the Orders Awaiting Approval page. To learn more about how your staff can take advantage of this feature, please watch the cart routing training.
To access cart routing configuration, select Configuration menu > Collection Development > Cart Routing.
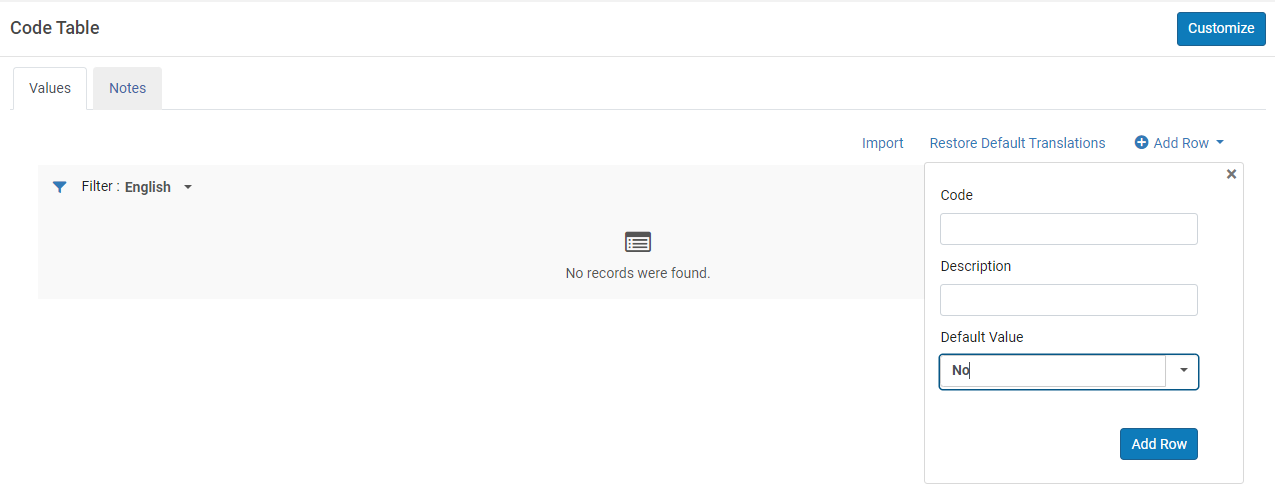
- Within this table add a row for each value you would like to add. Each row should contain a Code and Description. The Description will appear within the routing option display within Rialto.
- Select "Add Row" after entering the code and description.
- If adding multiple values you can adjust the order of appearance using the arrows within the table.
- Select the default value that will appear to users when multiple values are created.
- Click Customize in the upper right corner.
Rialto Vendor Codes
By default, Rialto orders are mapped to the Rialto vendor. The Rialto Vendor Codes table allows you to attach Rialto orders to a different vendor of choice. This table is also used to define what vendor accounts are used for different order types. To edit vendor codes for Rialto purchases, select Configuration menu > Collection Development > Rialto Vendor Codes.
A vendor and its accounts must be defined in Alma in order for this configuration to work.
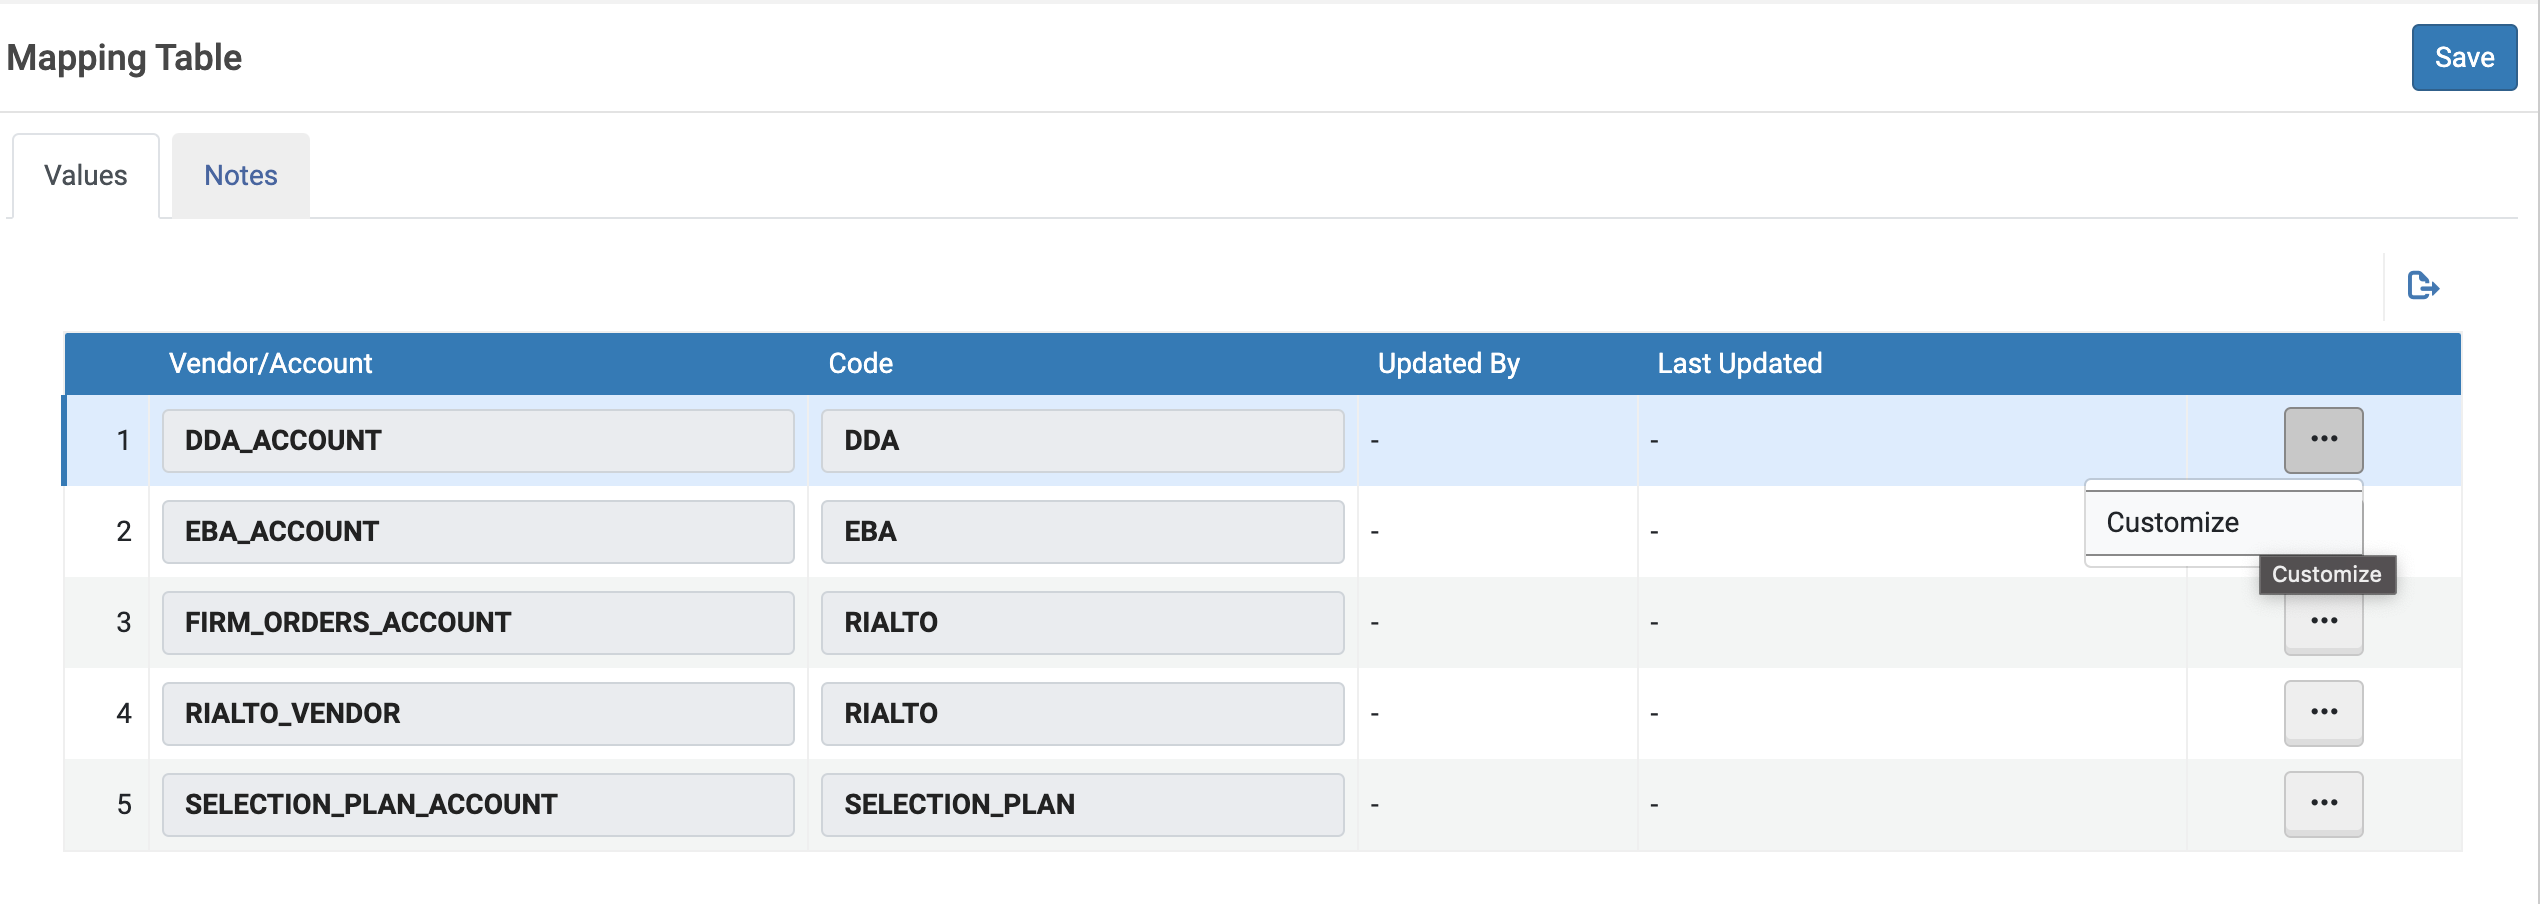
To define what vendor and accounts Rialto uses when creating new orders:
- On the RIALTO_VENDOR row, select Customize.
- In the Code column, enter the code for the vendor you would Rialto to use when creating new orders.
- Repeat for each account in order to define where to map firm orders, DDA orders, selection plan orders, and EBA orders.
Multiple different order types can reuse the same account.
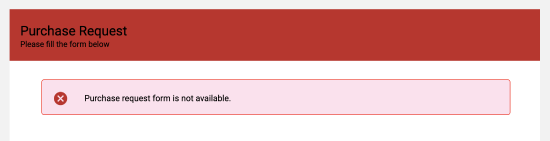
Purchase Request Form
You can customize a web-based purchase request form that can be used to link from any of your institution's pages. This Rialto-specific form allows library patrons to submit purchase requests directly to the system.
For more information on how the web form behaves, see Purchase Request Web Form Management.
You can configure a list of reasons to reject a patron purchase request. For more information, see Configuring Purchase Request Reject Reasons.
To edit the Rialto purchase request web form, select Configuration menu > Collection Development > Purchase Request Form.

- View and copy the URL of the form.
- Select Get purchase request form link. The URL is displayed. To copy it, select the Copy icon at the end of the URL.
- Enable or disable the web form
- Select the "Enable the purchase request web form" to enable the form, and uncheck the box to disable the form. The form will appear inactive to patrons when disabled.
- Select the "Enable the purchase request web form" to enable the form, and uncheck the box to disable the form. The form will appear inactive to patrons when disabled.
- Select a language for the form labels.
- Customize the header and footer.
- Rich text enabled for copy, and hex codes for background colors.
- Apply a university logo.
- These are the same logos entered elsewhere in Alma and used for emails and homepage branding.
- Alter the form title and page description (Subtitle).
- Customize the form fields.
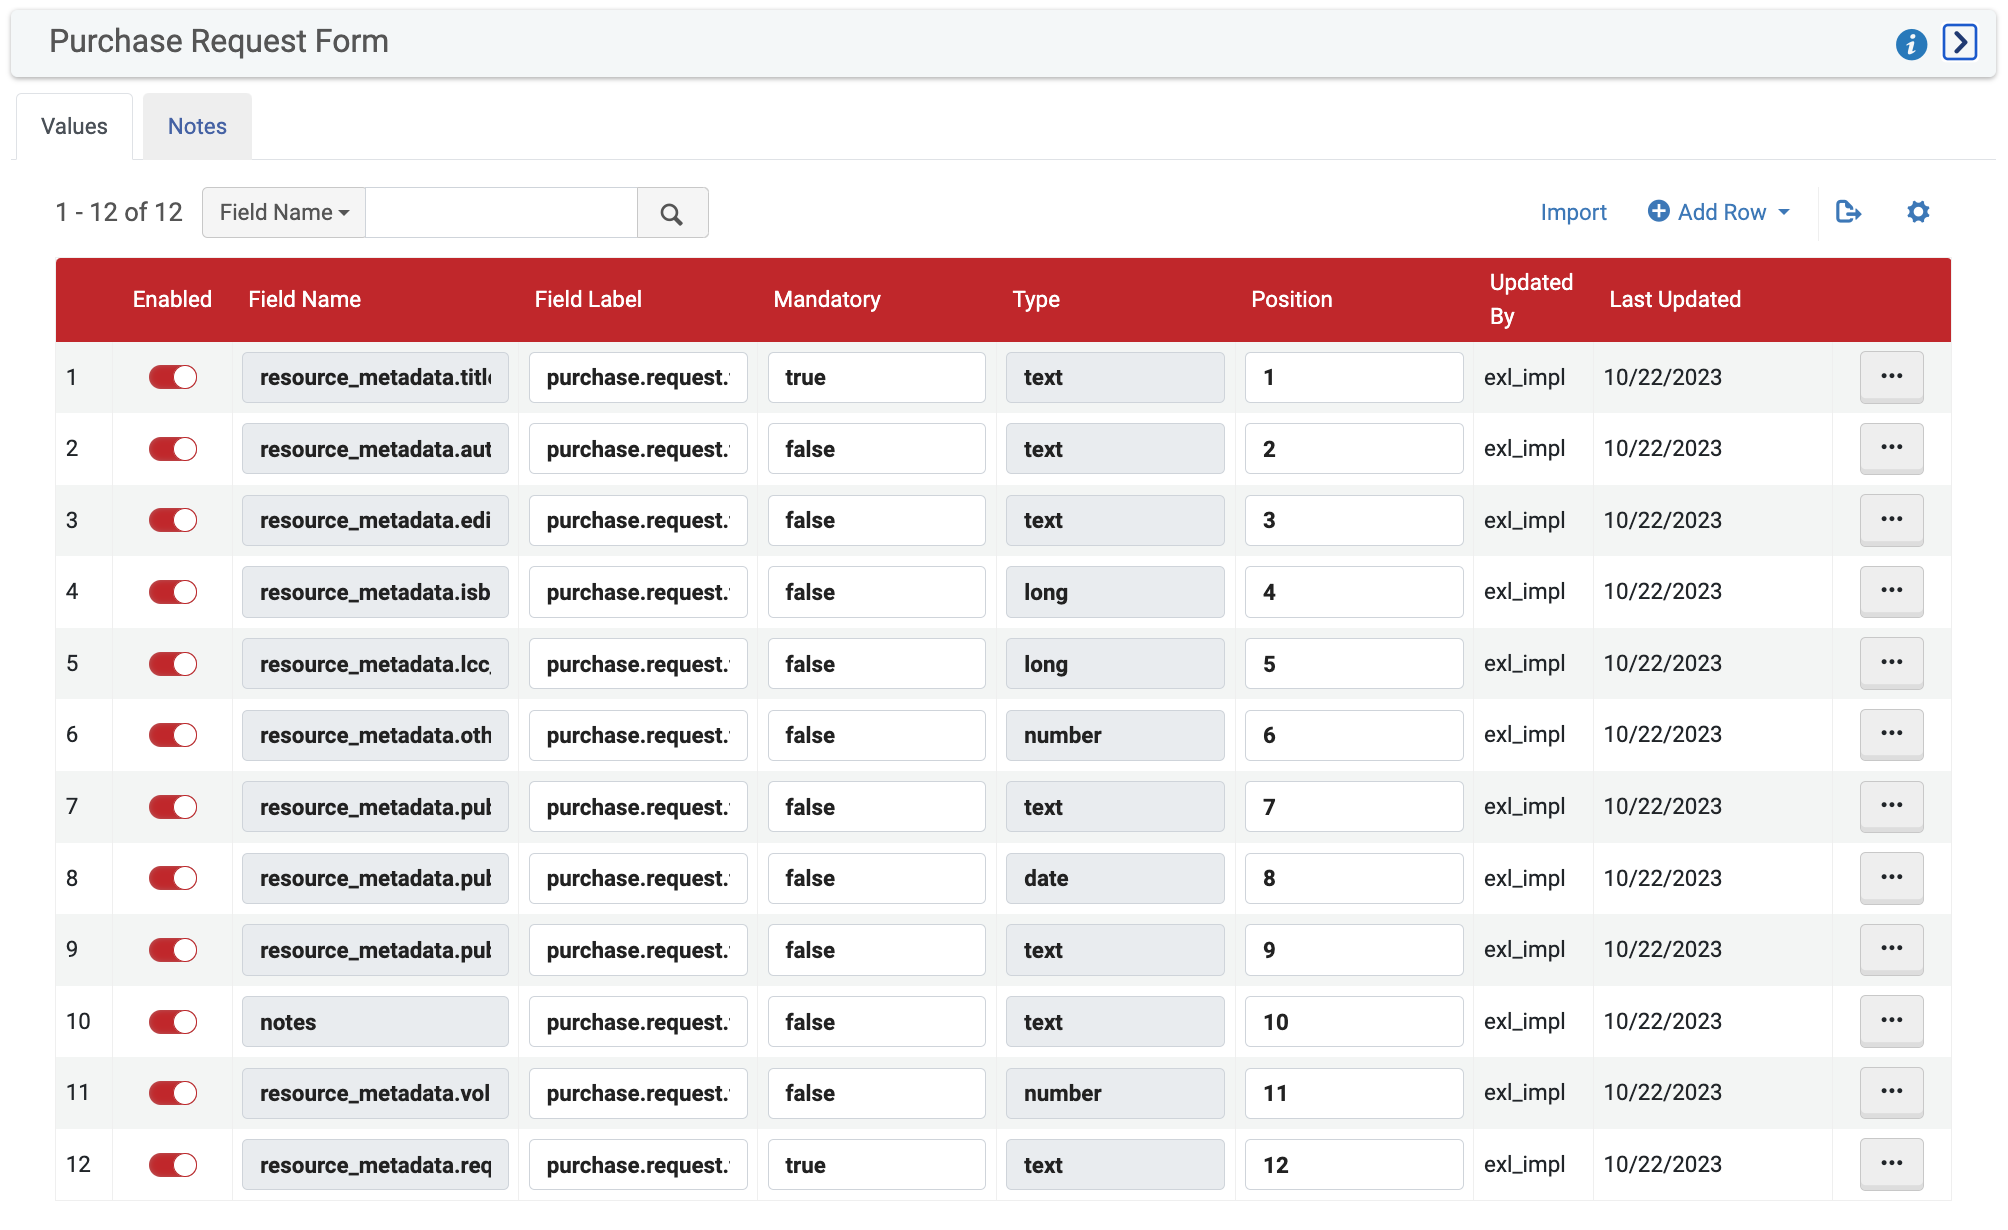
You can do the following in this table:
- Hide fields: In the Enable field, move the toggle off.
- Edit Field labels: The field label will contain a code for the default label. If you would like to customize it, remove the existing text and enter the new label you would like to see, no code is required.
- Make fields optional: In the Mandatory field enter 'true' or 'false'.
- Change the order of fields: In the Position field, indicate the numerical desired position of the field on screen.
- Add custom fields: Select Add Row. In the dialog box that opens, fill in the necessary fields.
- Select Save to save your changes.
The resource_metadata.title field is always displayed and mandatory in the web form. You cannot hide it and cannot make it optional.
Provider Configuration
The Provider Configuration page (Configuration > Collection Development > General > Provider Configuration) enables administrators to view and manage Rialto platform settings in a single, centralized location. Use this page to:
- Review which electronic platforms are configured for your institution
- Control whether content from specific providers is displayed in the Rialto Marketplace
- View transaction model and format information for each platform

The Provider Configuration page consists of two main areas. The left pane lists all electronic platforms integrated with Rialto. Each platform includes a read-only toggle indicating whether it is currently configured for your institution.
When you select a platform, detailed configuration information appears in the right pane, divided into three expandable sections:
-
General Information – This section displays general details about the selected platform, including the Platform name and Last modified date.
- Configurable Fields – This section contains editable settings that can be adjusted by administrators, including:
- Skip E-Activation Task – Determines whether the e-activation workflow is skipped for this platform (dropdown menu with default, true, and false options).
- Enable Multiple E-Books – Allows the system to display multiple e-book options when available (a true or false toggle).
- Show Provider Content – Controls whether titles from this platform are displayed in the Rialto Marketplace (a true or false toggle).
- Read-Only Configuration – This section displays informational fields that cannot be edited, including:
- Transaction Model – Indicates whether the platform operates under a Purchase or Referral model.
- Format – Specifies whether the content is Electronic or Print.
- CZ Collection ID – Displays the Alma Collection ID (if you selected an e-book platform).
- Auto-Holdings Enabled – Shows whether automatic holdings updates are enabled for this provider.
- DDA Active – Indicates whether Demand Driven Acquisition is active for this platform.
The Provider Configuration page is also where you set up providers available for referral-based print ordering. For details, see Configuring a Third-Party Provider for Print Ordering.
The History option on the Provider Configuration page only records changes that can be made directly on that page. Modifications to read-only fields made outside of the Provider Configuration page—such as CZ Collection ID and Auto Holdings Enabled—are not captured in the history.
Rialto Settings
The Rialto Settings page allows administrators to view general marketplace configurations. These are defined when Rialto is first enabled.
In the Pricing Settings section, there are three displays: Currency, Country, and Region. The populated values reflect your settings. Adjustments can only be performed by Ex Libris support.
Rialto Partner Holdings
Rialto Admin: Opt into the Rialto Partner Holdings network, select universities to follow.
All Rialto Users: View Partner Holdings in the holdings panel
Using the Rialto Partner Holdings network, Rialto users are able to compare held materials across other Rialto institutions. With this feature, staff can avoid duplicating purchases by identifying titles they can already borrow from nearby institutions that are not part of the network zone. Additionally, they can choose to purchase titles that are held by institutions whose collections they wish to emulate.
To facilitate this functionality, the following is implemented:
- Configuring Holdings Sharing: Administrators have the ability to enable the sharing of their institution's holdings with other Rialto institutions. They can define specific libraries whose holdings they want library staff to be able to view.
- Viewing Shared Holdings: All Rialto users can see holdings information from the Holdings alongside their local and network holdings. This information includes bibliographic details and the holding institution's name.
Opting into the Rialto Partner Holdings Network
To utilize this feature, libraries must opt in and enable the sharing of their own holdings. Administrators can manage the list of institutions they view and remove institutions from it as needed.
- Access the Partner Holdings Configuration page (Configuration > Collection Development > General > Opt-in to Partner Holdings).
Upon accessing and activating Partner Holdings (without selecting Save), administrators are presented with a read-only list of universities participating in the Partner Holdings network. This enables administrators to assess their decision of whether to opt in.
Partner Holdings Configuration page - Activate the following option; Opt in to share my holdings so that other libraries can add them to their Partner Holdings network.
- Select the institutions to display in Partner Holdings.
- In the Institutions section, select the institutions to include.
The institutions you selected are displayed in the Selected institutions section.
- In the Institutions section, select the institutions to include.
- Select Save.
Institution Opt Out of Rialto Partner Holdings Network Indication
Rialto informs institutions within a network when another institution opts out of the network, thereby becoming unavailable for remote holdings display. This ensures that users with configuration rights are promptly notified when viewing profiles (such as recommendations, title alerts, or selection plans) that include no-longer-available remote libraries. Additionally, users accessing recommendation feeds associated with affected profiles receive appropriate messages, guiding them on how to update their queries or contact administrators for assistance.
A notification message is triggered when an institution opts out of the network. Users with configuration rights, while viewing profiles containing such institutions, will be presented with a message specifically tailored to the situation. If a remote library defined within the network is no longer available or if the last library in the profile becomes unavailable while the institution selected the "all" option, the user will see the message: [Library Name] is no longer available for remote holdings display. Please update your query.
Likewise, when users access recommendation feeds associated with profiles featuring no-longer-available remote libraries, the message will read: [Library Name] is no longer available for remote holdings display. Please contact your administrator to update your query.
By providing these informative messages, users will be made aware of the changes in remote library availability, encouraging them to take necessary actions to update their queries accordingly.
Working with Rialto Holdings Network (Partner Holdings)
- Do a Market search (Collection Development > Market > Market Search) on a title, for example, "Outstanding Teaching: Teaching Backwards".
- The following screen displays the Holdings information from the viewed institutions alongside their local and network holdings. This information includes bibliographic details and the holding institution's name.
Partner Holdings Results