
Authenticating a group of SAML users
- Product: Rosetta
- Product Version: 6.0
Question
How to authenticate SAML users who are not registered in Rosetta?
Use case: I have a group of users in SAML IDP that I would like to assign access rights for delivery, but I would rather not create individual Rosetta user for each SAML user.
Answer
There are two ways to authenticate SAML users:
1. For each SAML user create a matching Rosetta user
2. Create a generic Rosetta user to authenticate a group of SAML users
For applying option #2, follow these steps:
1. Set up a SAML authentication Profile:
Assuming there is an existing 'saml' profile, create a new 'SAML Group' authentication profile:
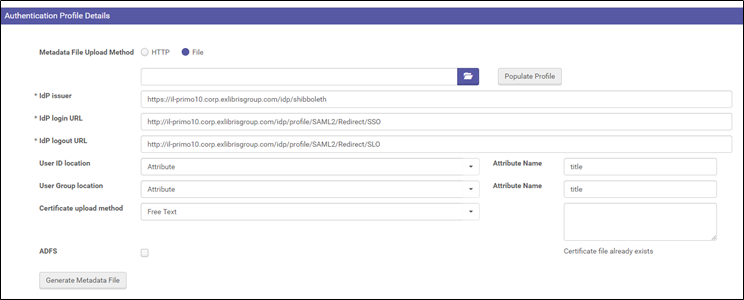
a. Go to Administration > Users: Authentication Profiles
b. Choose type SAML and click 'Add Authentication Profile'

c. Populate the relevant SAML idP (for more information, see pages 170-171 in the configuration guide)
d. One of the user-related details that are returned by the IDP should be used as a matching point in Rosetta.
The IDP returns an assertion with two parts:
– a subject part that includes a NameID (or NameIdentifier) element
– an attribute part that includes a list of user-related attributes (title, cn, etc.)
You need to decide which of the user-related details will be used as a match point.
For example, the IDP can return the following assertion:
<saml:Assertion>
<saml:Subject>
<saml:NameID SPNameQualifier="https://eu.alma.exlibrisgroup.com/mng/login"Format="urn:oasis:names:tc:SAML:2.0:nameidformat:uri">
73b393827e543cc2d8abe6f0c3df889f835b7e43</saml:NameID>
</saml:Subject>
<saml:AttributeStatement>
<saml:Attribute Name="title"NameFormat="urn:oasis:names:tc:SAML:2.0:attrname-format:uri">
<saml:AttributeValue xsi:type="xs:string">Technical Support Team Leader</saml:AttributeValue>
</saml:Attribute>
<saml:Attribute Name="cn"NameFormat="urn:oasis:names:tc:SAML:2.0:attrname-format:uri">
<saml:AttributeValue xsi:type="xs:string">Becky Orange </saml:AttributeValue>
</saml:Attribute>
</saml:AttributeStatement>
</saml:Assertion>
d1. Under 'User ID location' choose Attribute
d2. Attribute Name is "title"
2. Create the generic Rosetta user:
a. Mark the 'Shared' checkbox
b. Click 'Additional Identifiers' to open it
c. Choose the "SAML Group" Authentication profile and enter the attribute value.
In our example, the title value that is shared among a group of SAML users is 'Technical Support Team Leader'.
All SAML users with title='Technical Support Team Leader' will be authenticated in Rosetta as this generic user.
d. Under 'User Authentication' choose type 'Internal with External authentication'
e. Save

3. Update General Parameters:
a. Go to Administration > General: General Parameters
b. Select Module: Authentication
c. On 'default_authentication_mode' put the predefined Authentication Profile Name
d. Update
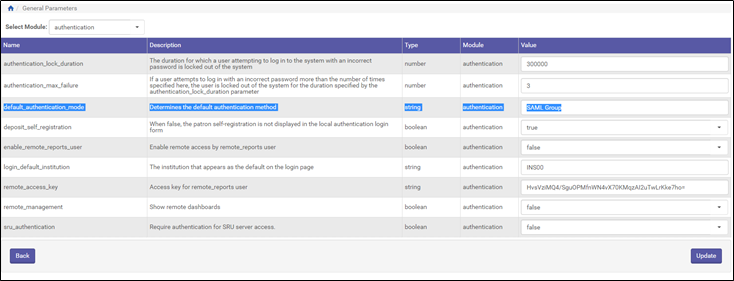
After changing the 'default_authentication_mode' parameter, the authentication will be with "SAML Group" profile.
Back office users will need to change their login url in order to authenticate by 'saml' profile:
https://<<hostname>>:<<port>>/mng?auth=saml
4. You can create access rights according to the new user created

Additional Information
Rosetta Configuration Guide, Chapter 9: pages 170-171
Authenticating Users with SAML
- Article last edited: 17-JUL-2019