
Collections
Collections in Rosetta
Collections in Rosetta enable users to aggregate IEs so that they can be preserved according to their original hierarchy.
Editors (Typical and Full) and Data Managers (Typical and Full) have access to collections from the Data Management > Collection Management menu. These authorized users can create, update, and delete collections under the correct circumstances.
Collections contain:
- one or more associated IEs (and the IEs contain the associated Collection ID in their records)
- a unique path (including collection/sub-collection)
- metadata in DC format—stored as shared metadata in the database and in the permanent repository
- optional source metadata in any format other than DC (such as EAD or MARC)
- optional sub-collections
Collections are not sets. Process automation tasks cannot work directly with collections. In order for Process automation tasks to work with collections, sets need to be created with the collection name as a criterion for the search query.
Managing Collections
Collections can be managed from the Collections Management page:
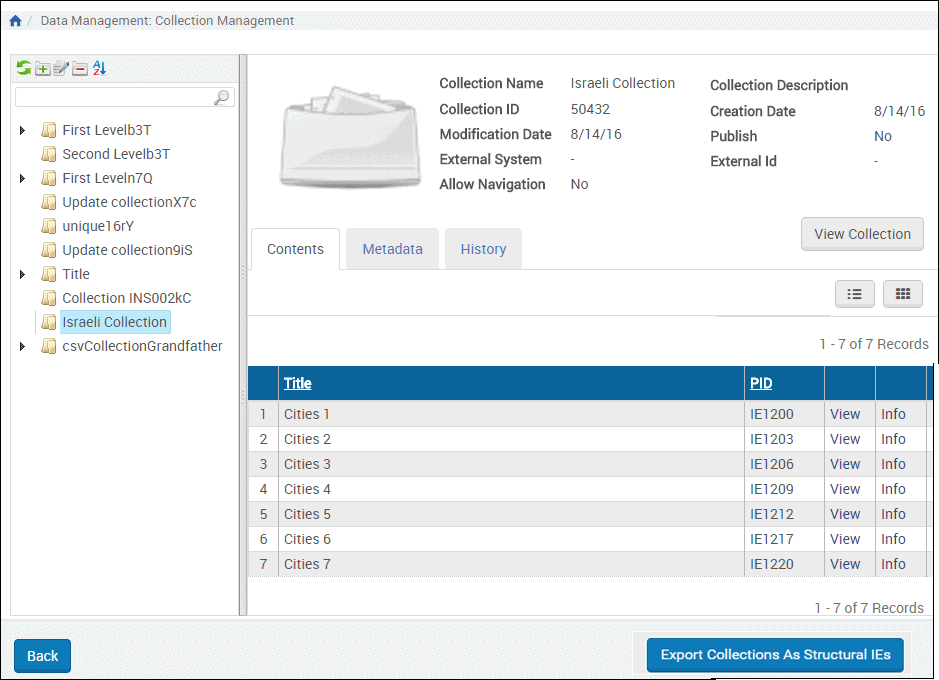
Collections Management
If you add collections with the API and want to see the results in Rosetta (for testing purposes, for example) you must refresh the collection tree by reopening the collection UI.
The Collections Management page includes a hierarchical navigation bar (left column of the page) and a main window with the Contents, Metadata, and History tabs.
The Contents tab displays the contents of the collection in terms of its IEs. IEs can be viewed in a list format or as thumbnails.
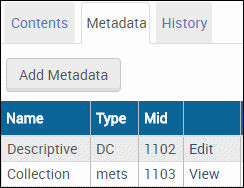
The Metadata tab (see Collections Management Page, Metadata Tab) provides an interface for users to edit the collection’s metadata. Users can edit DC records online or upload metadata from external XML file. Import formats can be either DC or source metadata in any format (such as MARC or EAD).
Collections Management Page, Metadata Tab
In the permanent repository, the descriptive metadata of the collection is stored in a METS XML document along with some control information.
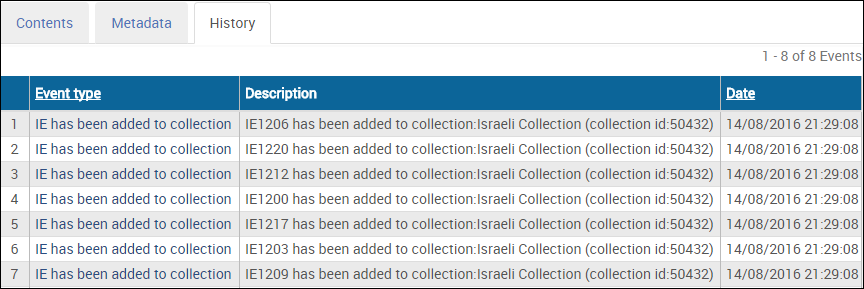
The History tab displays a list of the actions performed on the collection:
History Tab
Adding a New Collection
Adding a new collection can be accomplished in two ways:
- Manually, through the UI
- Automatically, when associating IEs with a collection. (See Associating IEs with Collections)
To add a collection manually:
First determine where, in the existing hierarchy, you want to position your collection. In the example below, Adding a New Collection, the user wants to create a collection that is a sub-collection of the existing Modern collection.
- To create a sub-collection of an existing collection, click that collection in the collection hierarchy.
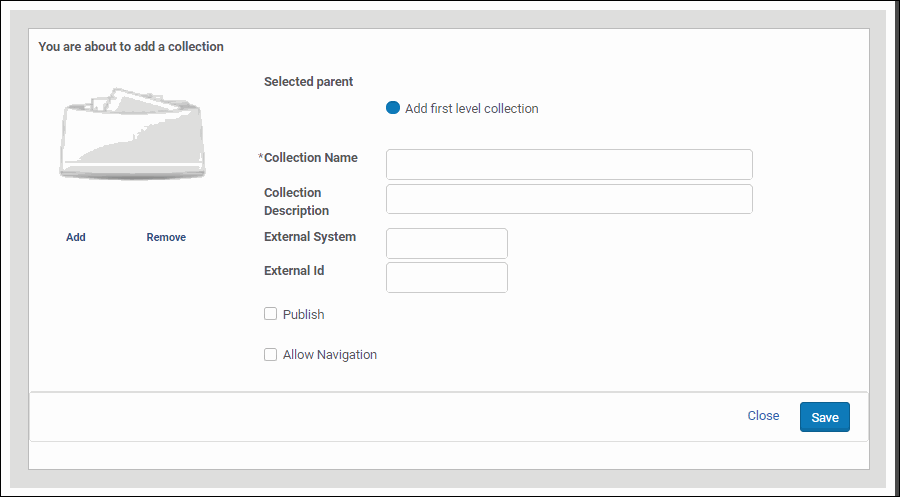
The system highlights the collection you clicked. - Click the green button with the plus sign.
A new collection form opens in a light box. The Selected parent field provides you the option of creating a first-level collection or a sub-collection of the parent collection you selected in step 1. - Click the first-level option or the parent option.
- Enter a name for the collection. This name will appear as the collection’s label in the hierarchy and will be used as part of the path when the system needs to locate the collection.
Adding a New Collection
- Enter a description for the collection. The description will appear in the basic properties information for the collection.
- Select Publish to publish the collection to Primo.
- Select Allow Navigation to:
- Display linked breadcrumbs to this collection in the collection viewer
- llow the collection to be displayed in the Collection Viewer. If the check box is cleared, the collection does not appear (if configured).
For staff users the collection is displayed even when the check box is cleared.
- Click Add under the generic thumbnail image to add a thumbnail to the collection.
- The image must be in jpg format with a maximum size of 100K.
- It is recommended that square (1:1) images be used.
- Images should be not less than 400x400px.
- Click Add to save the collection.
The collection name appears in the hierarchy where you specified in the Selected parent field.
You can change the order and level of the collection by dragging and dropping it where you want it in the hierarchy.
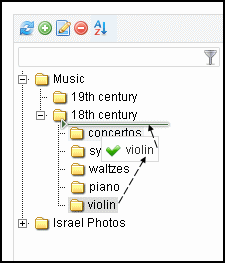 Click the Sort icon to alphabetize the list of collections.
Collection Drag-n-Drop
To create collections automatically while associating IEs with them, see Associating IEs with Collections.
Editing a Collection
To rename a collection, right-click over the folder in the left column and select Rename collection.
To update the collection description, right-click the folder in the left column and select Edit collection, then update the necessary fields.
Updating Collection Metadata
Collection metadata can be updated from the Metadata tab on the Collection Management page. Users can add metadata elements and assign values from this tab.
To add a new metadata type to a collection:
- From the Metadata tab of the collection you want to edit, click the Add Metadata button
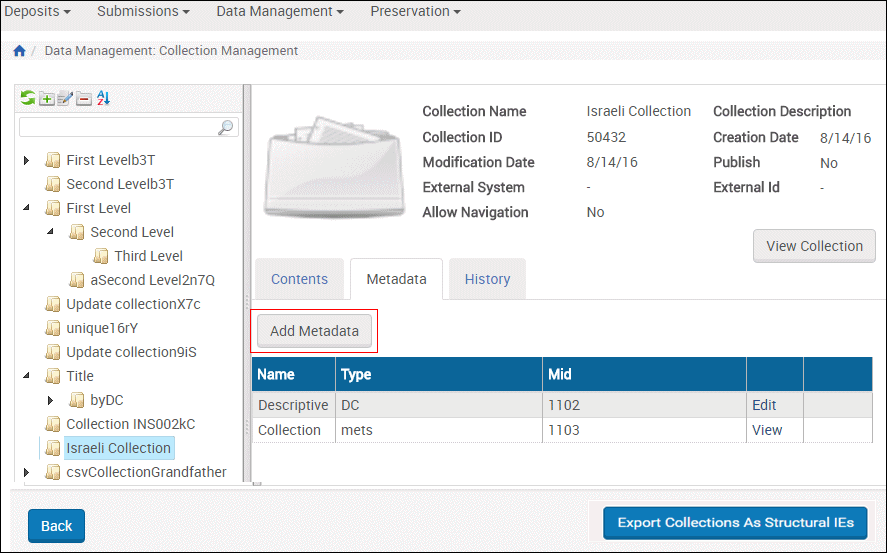
Add Metadata Button for Collection
The Choose metadata type form opens in a light box
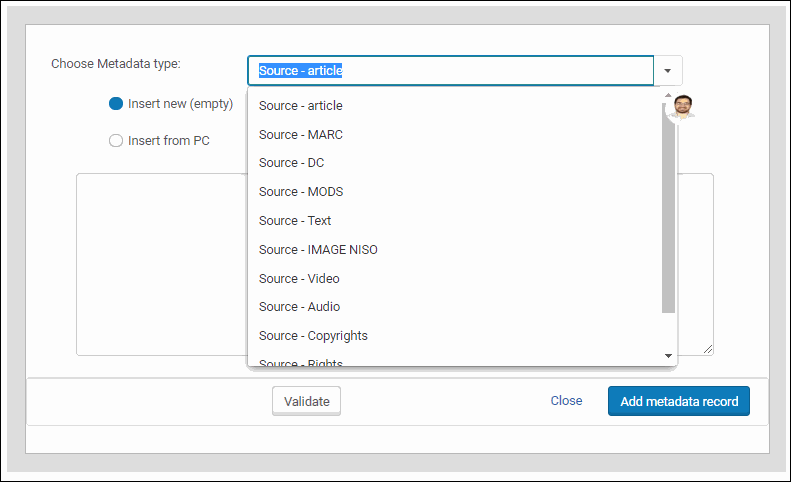
Add Metadata Light Box
- From the drop-down list of metadata types, select the type you want to add. If you do not see your type in the list, select Other.
- Select the source of the metadata:
- Insert new to copy the source into a text field
- Insert from PC to select a metadata file on your PC
- Use the Validate button to check the metadata before loading it. Any errors will display in red text as the form refreshes.
- Correct any errors and re-check the validation. When no red text displays after clicking Validate, the XML is valid.
- Click the Add metadata record button to complete the addition.
The system returns you to the Collections Management page. The new metadata appears in the Metadata tab under the existing metadata types.
For information on editing digital collections, see Editing Digital Collections.
Associating IEs with Collections
Users can associate IEs with collections even if the collection does not yet exist. Collections in this case are created during the association of IEs with collections. After a collection has been created, users can edit it and add metadata (DC or source MD).
Users can associate IEs with collections in one of two ways, both of which add a section to the IE’s DNX.
In case of failure (for example, the IE is already locked by another user or process), the Process Monitoring UI allows the user to see the details of the IEs that failed. The user can then resolve the problem.
These tasks can be configured as part of SIP processing or, after the IEs are in the permanent repository, as a maintenance process (bulk) or through the Collection tab in the Web editor (manual).
Tasks and Task Chains
Associating IEs with collections involves, in part, running the correct task chain from the Advanced Configuration > Repository > Task Chains page or creating a chain if the one you want doesn’t exist.
Two methods for associating IEs with collections are available out-of-the-box as tasks:
- The task Assign Collection by Name should be used when the collection already exists in Rosetta and the ID is known. The task verifies that the collection exists in Rosetta and assigns the IEs to this collection. The parameter for this task is the collection ID, selected by the user who schedules the process.
- The task Assign Collection by DC can be used for the following cases:
- When assigning IEs to an existing collection, identifiable by Rosetta or external ID in a specified DC field
-
When assigning IEs to a collection, identifiable by a full path in a specified DC fieldFor each field occurrence, if the field contains a colon, Rosetta tries to match by Rosetta ID, then by external ID. Match by ID is case sensitive. If no match is found, the task fails. If the field does not contain a colon, Rosetta tries to match by path.The expected syntax for assignment by Rosetta ID is rosetta:{rosetta_id}. The expected syntax for assignment by external ID is {external_system}:{external_id}. The expected syntax for assignment by path is the full collection path, delimited by a specified delimiter. The list of delimiters is configurable in the Collection Task Separators code table.
The task supports auto-generating new collections based on a collection path only.
The task supports recursive generation, that is, if the value in the DC field is a/b/c (with the delimiter being /) and root collection a does not exist, Rosetta creates collections a, b and c (and assigns the IE to c). When a collection is generated by the task, the collection's creation event the task details.Colon (:) is reserved and cannot be used in this task either as a collection name or a delimiter. The following parameters are available for this task:
Customer-Configured Task Chain—Assign by DC
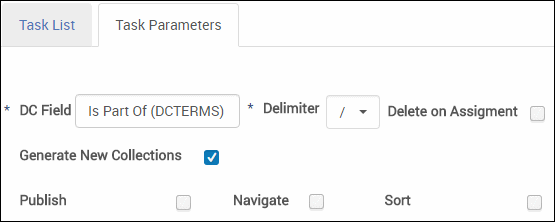
Task Chain - Task Parameters Tab View - DC Field – the field that contains the path or external ID by which Rosetta assigns the IEs to a collection.
- Delimeter – the delimeter used for the collection path.
- Delete on Assignment – used when the DC field exists solely for collection assignment. Select to have the field deleted after a successful collection assignment based on a match for the given field.
This DC update does not generate a metadata update event. The field deletion is noted in the IE's collection assignment event as DCSourceDeleted=true.
- Generate New Collections – select to have Rosetta generate a new collection according to the value in the DC field and the specified delimiter if no match by path is found. The following options are only available if Generate New Collections is selected.
- Publish – select to have the generated collections published to Primo.
- Navigate – select to display linked breadcrumbs to this collection in the collection viewer.
- Sort – select to have the generated collection's parent re-sorted (0-9A-z) after the collection is generated in order to maintain its order.
Generated collections' descriptions are not auto-populated.
Both tasks are available with Rosetta installation, but only the Assign Collection by Name has a corresponding out-of-the-box task chain. You must configure a new task chain if you want to use the Assign Collection by DC task.
Disassociating IEs from Collections
Disassociating IEs from a collection can be done using a process (bulk) or through the Web editor (manual). The action performs the following:
- Locks the IE.
- Creates a new version of the IE without the collection DNX section that held the collection ID.
- Commits the new version of the IE to the permanent repository.
The task and task chain for this procedure, Unassign Collection, are available on installation. In case of failure (for example, the IE is already locked by another user or process), the Process Monitoring UI allows the user to see the details of the IEs that failed. The user can then resolve the problem.
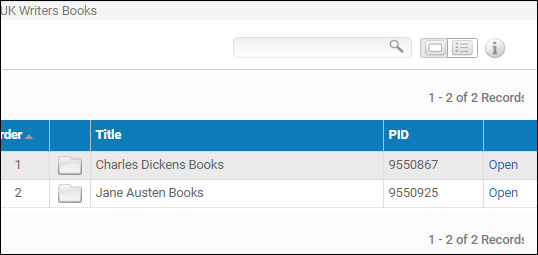
Searching IEs Within Collections
In the Data Management area, IEs can be searched based on their collection information. The user can open the list of collections, find a particular collection/sub-collection name, and review all the IEs that are associated with the collection.

IEs in a Collection
Exporting Collections as Structural IEs
Rosetta supports converting collection hierarchies to an equivalent hierarchy of structural IEs. This can be done by exporting a collection hierarchy as structural IEs and depositing the resulting export package back into Rosetta.
To export a collection hierarchy and covert it to structural IEs:
- Click Export Collections As Structural IEs and then click Add Job. The following page opens:
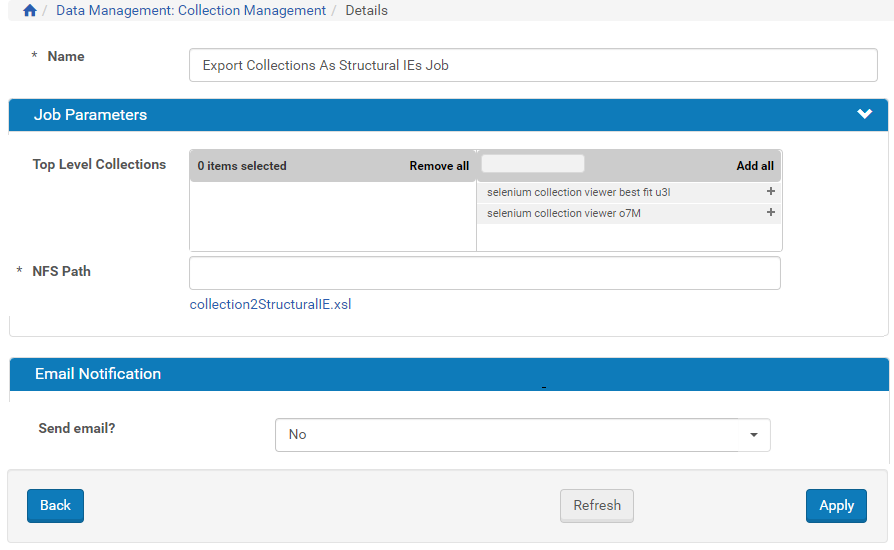 Export Collection As Structural IEs Job
 - Select the top level collections that you want to export. The whole hierarchy of the collection is exported.
- Enter the NFS path where you want the export to be placed on the server.
- Click collection2StructuralIE.xsl to display the XSL that is used to transform the collection to structural IEs. You can edit this file to customize how the conversion is done.
- Click Apply. You can repeat these steps to Jobsadd additional jobs.
-
The job appears in the list of

List of Export Collection As Structural IEs Jobs - Click Run Now. The collection hierarchy is exported and converted to a structural IEs METS XML.
- You can now deposit the METS XML as structural IEs.
Searching Collections
Users can search the list of collections by collection name. For a sub-collection, the search should start at the collection level. For example, to search for Spring semester under 2011 under Course catalogue, the user should start with Course catalogue and then 2011. In searches for 2011 or Spring semester, all the sub-collections with this name will be highlighted in the list.
Publishing Collections
Collections can be published using the OAI-PMH protocol, similar to IEs, so that they can be harvested by an OAI-PMH harvester. A published collection's metadata will appear in the OAI set.
For additional information on setting up harvesting Rosetta collections in Primo, see the Rosetta - Primo Integration Guide.
To mark a collection for publishing, right-click over the collection icon in the collection tree, select Edit and select the Publish check box. Clear the box to unpublish the collection. The collection will be published or unpublished during the next Publishing Sync Job.
- The Collections are converted to OAI format using the (institution-level) collection2DC.xsl configuration file. To edit this file, go to Data Management > Manage Sets and Processes > Publishing Configuration > Collection Publishing and click Configure. Only a single xsl configuration per institution is supported for collection publishing.
- The set_spec value will be \{institution code\}-collections.
- When the XSL file is changed, all collections of the relevant institution are published the next time the publishing job runs.
- Publishing is determined by the collection's publish dnx field (boolean, default=false) and can also be set by collection APIs, CSV collection deposit, and the Assign to Collection by DC task.
- You can schedule collection publishing from the Scheduling option at Data Management > Manage Sets and Processes > Publishing Configuration > Collection Publishing.
Deleting Collections and IEs
Collections or sub-collections can be deleted from the list of collections only if there are no IEs associated with them.
The system does not allow the deletion of collections that have associated IEs.
When an IE is deleted, it does not appear as part of any collection to which it once belonged.
To delete a collection that has associated IEs (or sub-collections with associated IEs), run an Unassign Collection process, using the relevant collection(s) as both IE search criteria and task parameter.
Restoring an IE’s Previous Version
When a user restores the previous version of an IE, the system determines whether the associated collection still exists. If it does, the system re-associates the IE with the collection.
If the collection does not exist, the IE is not re-associated with this collection. The system generates an event displaying the details of the IE and the collection so the case can be tracked and managed.
Collection Delivery
Rosetta allows viewing collections from outside of Rosetta by external patrons. It also allows managing collections by external applications using APIs.
The collection viewer is displayed in a separate browser tab or window, as shown in the figure below:
Collection Viewer
The collection viewer has the following characteristics:
- Access rights are not enforced at the collection level, only at the IE level.
- All IE titles are displayed with thumbnails (see the Thumbnail Creation Rules section in the Rosetta Configuration Guide).
- Browsing among IEs within a collection can only occur within the same collection or its sub-collection(s). In the figure above, this includes all IEs in the Israeli Collection and any IEs in the Israeli Subcollection folder, once that folder is open.
- Breadcrumbs to parent collections (up to three levels) are available depending on each collections' Allow Navigation setting (see Adding a New Collection).
Collection Metadata
Users can view the descriptive metadata of a collection by clicking the information (i) button. The metadata for the collection appears in a light box:
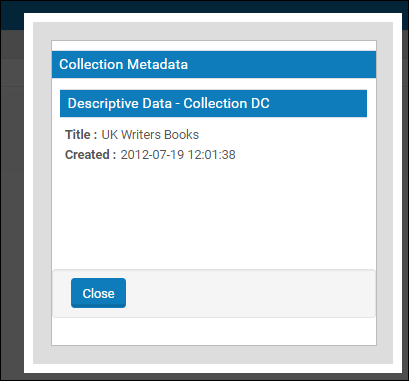
Collection Viewer with Metadata Light Box
Collection Delivery Requests
There are two possible scenarios for how a delivery request for a collection can be initiated by an external resource discovery system:
- Rosetta Collection ID: The collection ID can be published as part of the IE and extracted by the resource discovery system.
- External System ID: The ID can be stored in Rosetta as part of the collection entity (for example, a DOI). The delivery URL can use the combination of the external system name (such as Aleph) and the external system ID to deliver the collection.
The collection delivery request can include, respectively, either the parameter col_id= with the Rosetta collection ID or the parameters external_system_name and external_system_id that hold the external system name and ID of the collection.
See Collection Viewer URL for more information on requests and viewer parameters.
Collection Viewer URL
The collection can be retrieved based on:
- Rosetta Collection ID – For example, http://{server-name}:{port}/delivery/ action/collectionViewer.do?operation=viewCollection&col_pid=83542
- External System Details – For example, http://{server-name}:{port}/delivery/ action/collectionViewer.do?operation=viewCollection&externalSystem=ALEPH&externalId=83542
Currently, the only way to populate the external system name/ID in the collection record is through the collection API.
URL Parameters
To control the collection viewer features, users can use the following parameters:
- displayType – As a default, the collection viewer opens in list view. However, users calling the viewer externally can control the view mode by adding the following parameter to the URL: displayType=thumbnails.
- pageNum – The default number of objects in the viewer are defined in a general parameter. However, users can control the number of objects by setting the following parameter: pageNum=20 (which sets the number of objects on a page to a maximum of 20)