Derivative Copy Representations
- Manually – see Manually Adding a Derivative Copy Representation
- With a service – see Adding a Derivative Copy Representation with a Service
- With a job – see Adding a Derivative Copy Representation with a Job
Manually Adding a Derivative Copy Representation
- Open an IE in the Web Editor and lock it.
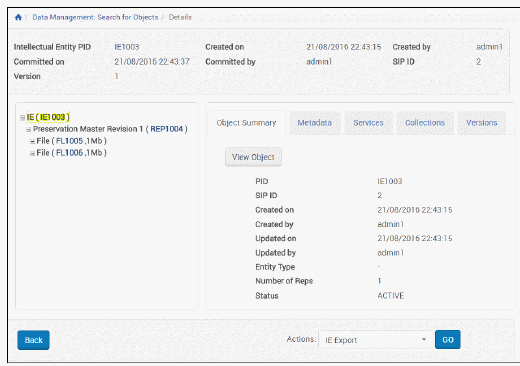
Web Editor Displaying IE Information
- From the Actions drop-down menu, click Add Representation, and then click the Go button. The Add Representation - Details page opens:
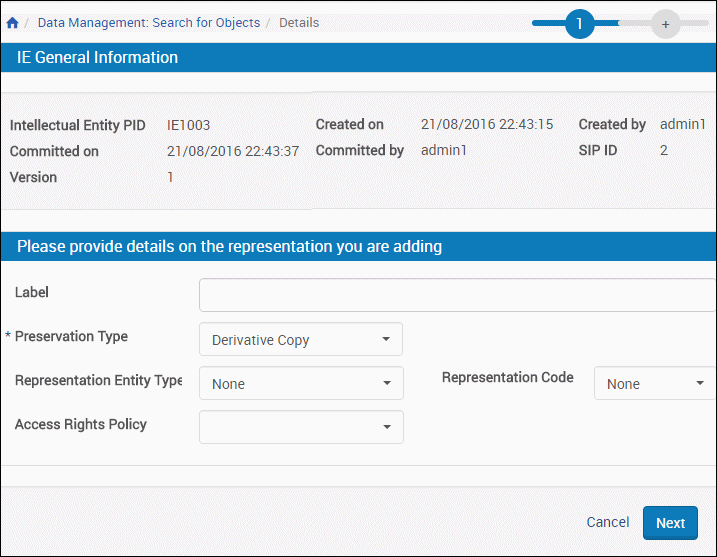
Add Representation - Details Page
- Enter information in the fields:
- Label
- Preservation Entity Type
- Representation Code
- Access Rights Policy
Only one derivative copy representation with given code and entity type values can be added to any given IE. To add multiple derivative copies to an IE, use different codes or entity type values.
- Click the Next button.
The Load Page opens. There are two options for uploading files:- Insert from Local PC – the interface that appears depends on your configuration:
-
If you are a licensed Aurigma user, the following interface appears:
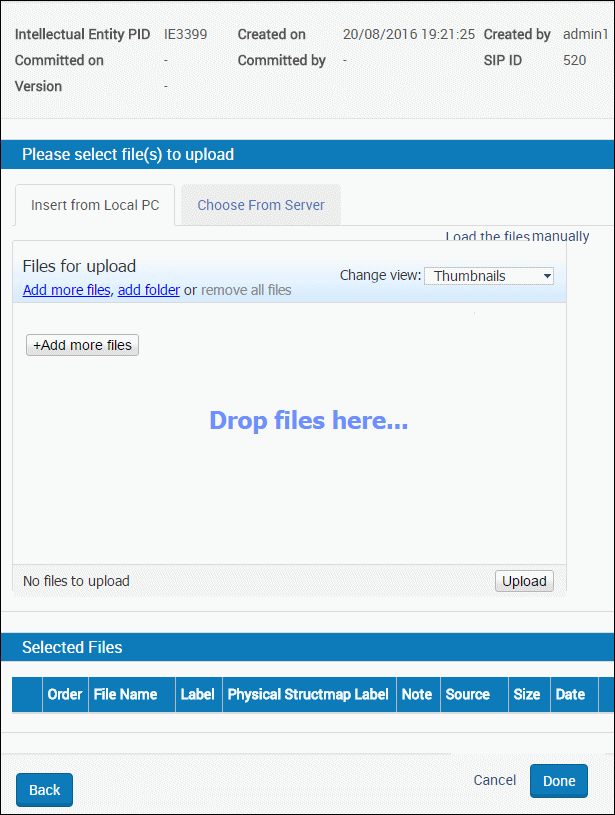 You can:
Derivative Copy Load Page – Aurigma Users - drag and drop files onto the page
- click Add more files and select the files
- click Add folder and select the folder
To use the manual interface instead, click Load Files Manually.
- click Add folder and select the folder
-
If you are not using Aurigma, the following interface appears:
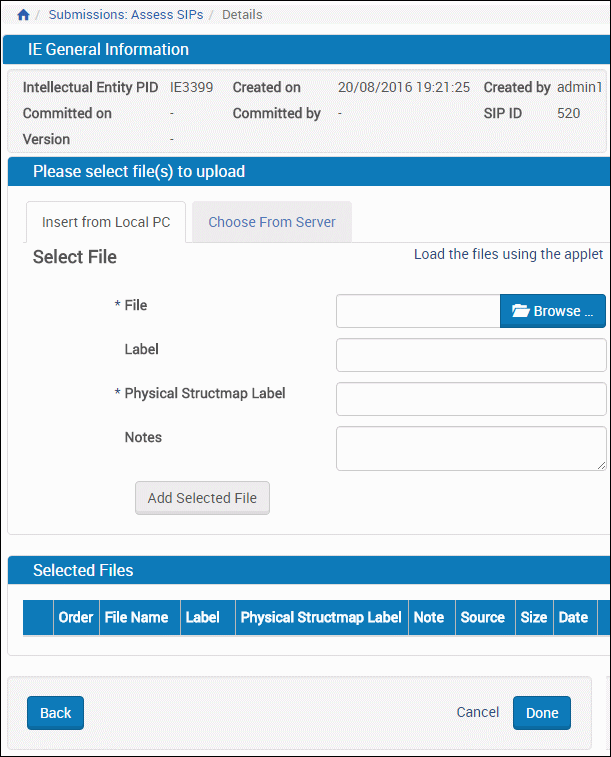 Browse to the file you want to upload and click Add Selected File. Repeat for each file you want to upload.
Manual Upload Interface
Uploaded files are listed in the Selected Files portion of the page:
 The Selected Files pane displays the selected files as described in the following table:
Selected Files Order
For multiple files, to change the order of the files, click the arrows of the rows you want to change. When you have the files in the correct order, click the Done button.Selected Files Pane Column Description # The selected files’ deposit activity priority. Set Order Use the Up and Down arrows to change the selected files’ order in the IE. File Name Displays the name of the selected file. Label Provides a field for a label to be shown when the IE is viewed in Delivery (optional). Source Displays the source of the selected file. This is either Local or URL. Size Displays the size of the selected file. Date Displays the date on which the selected file was deposited. - Choose from Server – To load files from a location on the server instead, first place the files you want to upload under the home directory on the server. Then click the Choose From Server tab on this page and enter the directory path in the Import Directory field. Rosetta takes all of the files under that directory and uploads them to the system.
-
- Insert from Local PC – the interface that appears depends on your configuration:
- When you are finished, click Done.
Rosetta creates the derivative copies.
Adding a Derivative Copy Representation with a Service
- Display an IE in the Web Editor.
- On the IE level, select the Services tab.
- Select the Create Derivative Copy Representation service. The following appears:
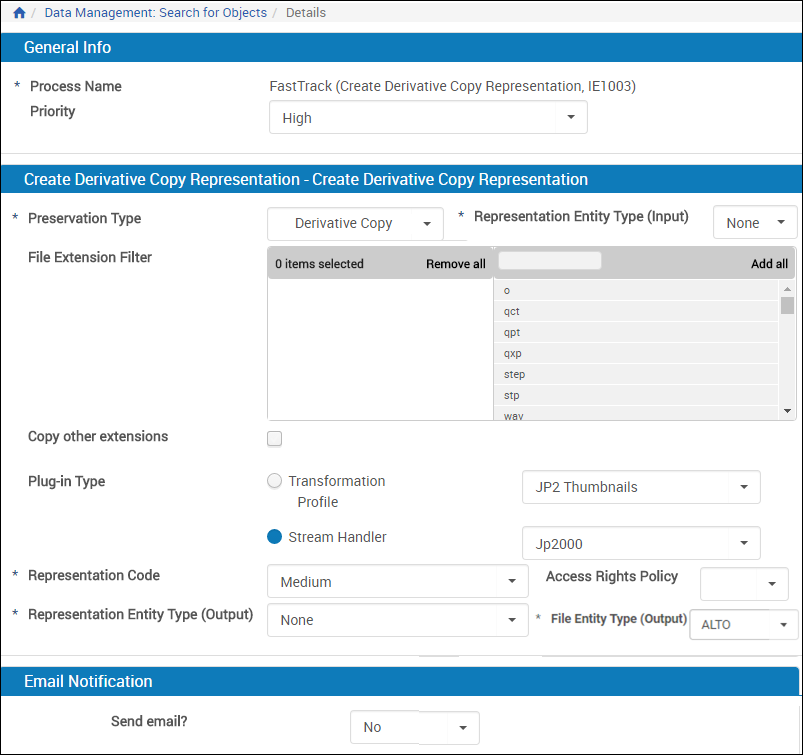
Create Derivative Copy Representation Service
- Fill in the fields:
- Priority – select the priority of the service
- Preservation Type – select Derivative Copy
- Representation Entity Type (Input) – select the representation entity type for the input
- File Extension Filter – select the file extensions on which to run the service
- Copy other extensions – copy the files with extensions not included in the filter
- Plug-in Type – select one of the following:
- Transform Profile, and select a profile from the list
- Stream Handler, and select a stream handler from the list
(For more information, see Stream Handlers and Transformation Profiles in the Rosetta Configuration Guide.)
- Representation Code – select a representation code
- Access rights policy – select an access rights policy
- Representation Entity Type (Output) – select a representation entity type for the output
- File Entity Type (Output) – select a file entity type for the output to be applied to all new files
- Send Email? – enter an email address t be notified when the service is completed
The Create Derivative Copy Representation service creates the derivative copy.Only one derivative copy representation with given code and entity type values can be added to any given IE. To add multiple derivative copies to an IE, use different codes or entity type values.
- Click Submit.
Adding a Derivative Copy Representation with a Job
- Select Derivative Copy Job (Data Management > Manage Sets and Processes > Derivative Copy Job).
- Click Add Job. The following appears:
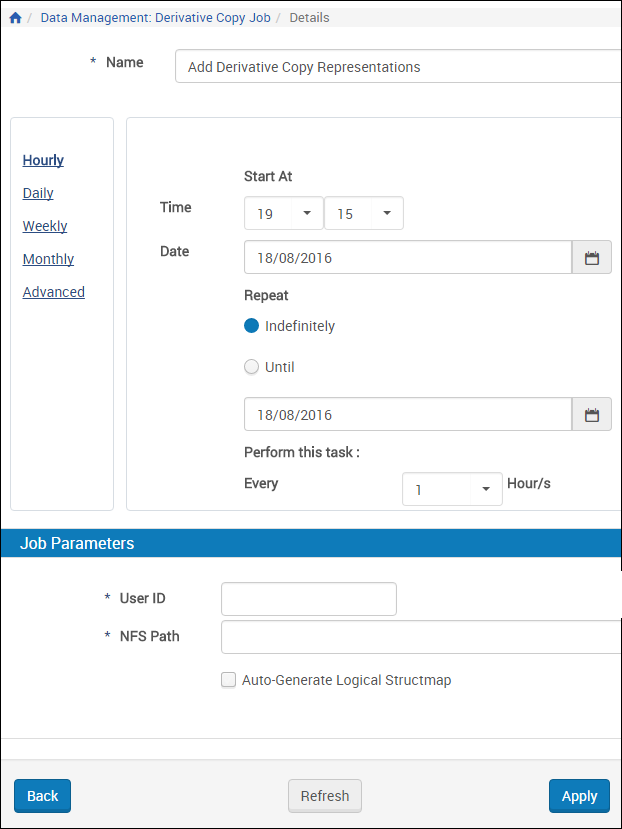
Derivative Copies Job
- Fill in the fields to schedule the job. For more information, see Submission Jobs.
- In the Job Parameters section, enter your user ID and the path of the folder that contains the files to be used to create the derivative copy representations.
The NFS path you indicate should be built in the following format:- Each folder in the NFS path indicates a separate IE.
- Each IE folder should contains a METS file that contains the information to create one or more derivative copy representations. The METS file must contain:
- An ie-amd with PID internalIdentifier (only). For example:
<mets:amdSec ID="ie-amd">
<mets:techMD ID="ie-amd-tech">
<mets:mdWrap MDTYPE="OTHER" OTHERMDTYPE="dnx">
<mets:xmlData>
<dnx xmlns="http://www.exlibrisgroup.com/dps/dnx">
<section id="internalIdentifier">
<record>
<key id="internalIdentifierType">PID</key>
<key id="internalIdentifierValue">IE13660</key>
</record>
</section>
</dnx>
</mets:xmlData>
</mets:mdWrap>
</mets:techMD>
</mets:amdSec>
- A generalRepCharacteristics section (for each REP), specifying preservation type (must be DERIVATIVE_COPY), representation entity type, and representation code. For example:
<mets:amdSec ID="rep1-amd">
<mets:techMD ID="rep1-amd-tech">
<mets:mdWrap MDTYPE="OTHER" OTHERMDTYPE="dnx">
<mets:xmlData>
<dnx xmlns="http://www.exlibrisgroup.com/dps/dnx">
<section id="generalRepCharacteristics">
<record>
<key id="preservationType">DERIVATIVE_COPY</key>
<key id="representationEntityType">JPEG Images</key>
<key id="RepresentationCode">MEDIUM</key> (for some reason this is uppercase - fix?)
</record>
</section>
</dnx>
</mets:xmlData>
</mets:mdWrap>
</mets:techMD>
</mets:amdSec>
- A generalFileCharacteristics section (for each file), containing any field that is supported when submitting as part of a SIP. For example:
<mets:amdSec ID="FL1-1-amd">
<mets:techMD ID="FL1-1-amd-tech">
<mets:mdWrap MDTYPE="OTHER" OTHERMDTYPE="dnx">
<mets:xmlData>
<dnx xmlns="http://www.exlibrisgroup.com/dps/dnx">
<section id="generalFileCharacteristics">
<record>
<key id="label"></key>
<key id="note"></key>
<key id="FileEntityType"></key>
...
</record>
</section>
</dnx>
</mets:xmlData>
</mets:mdWrap>
</mets:techMD>
</mets:amdSec>
- A fileSec, + a fileGrp(s) for each REP.
The METS file may contain: - File level descriptive (DC, source) metadata sections
- Representation level source metadata sections
- Representation level access rights policy
- Physical structmaps. If none are provided, and no other SM is provided (and flag is false), Rosetta will generate physical structmap.
- Logical (EXL/custom) structmaps
- An ie-amd with PID internalIdentifier (only). For example:
- The NFS path should contain a Streams folder that contains the files of the derivative copy representations. (Absolute NFS paths and HTTP references are also supported.)
- You can prevent the job from processing a folder. (This can be useful if you do not want it to be loaded prematurely.) To do so, create an empty file in the submission job folder and name it locked (or .locked).
- While processing a folder, the submission job adds a locked file.
- After a folder has been successfully processed, the submission job adds a done file. Folders with done files are not processed by the submission job. You can create a cron job to clean up these folders.
- After a folder has been unsuccessfully processed, the submission job adds an error file. Folders with error files are reprocessed by the submission job (and should not be deleted). Users can use this file to identify problematic submission folders.

