
Configuring Metadata Forms
About Configuring Metadata Forms
Deposit Managers configure metadata forms as one of the main components of a material flow.
After these forms are configured, a Deposit Manager can use them in a material flow in combination with additional components (such as submission formats and access rights policies). Each form or component can be associated with multiple material flows. (See About Configuring Material Flow Infrastructure)
Metadata forms contain fields that Producer Agents must complete when depositing content.
Deposit Managers work with metadata forms using the List of Metadata Forms page (see Accessing the List of Metadata Forms Page). The following activities can be performed from this page:
Accessing the List of Metadata Forms Page
The List of Metadata Forms page enables Deposit Managers to view the existing metadata forms and create new metadata forms.
To access the List of Metadata Forms page, from the Rosetta drop-down menu, click Deposits > Deposit Arrangements > Metadata Form.
The List of Metadata Forms page opens:
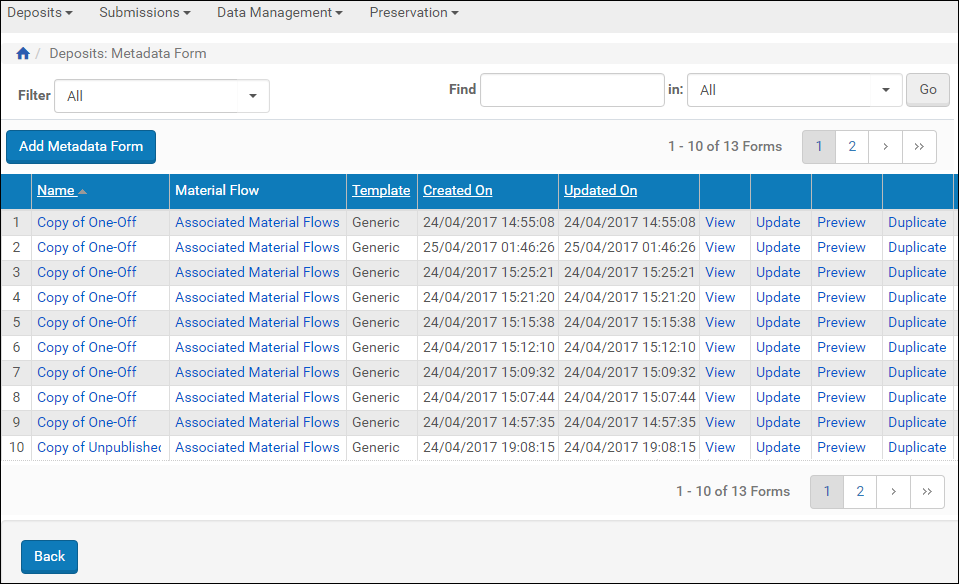
List of Metadata Forms Page
The List of Metadata Forms page displays columns containing the following information:
| Column | Description |
|---|---|
| Name | The name of the metadata form |
| Material Flow |
|
| Template | The template used for the metadata form. |
| Created On/Update On | The date on which the metadata form was created or updated |
| Available action items (no heading) |
|
Adding a Metadata Form
Deposit Managers can add a metadata form to provide Producer Agents with fields that they use to describe their content.
To add a metadata form:
- On the List of Metadata Forms page (Deposits > Deposit Arrangements > Metadata Form), above the list of the metadata forms, click the Add Metadata Form button.
The Metadata Form Details page opens to the Design Information tab:
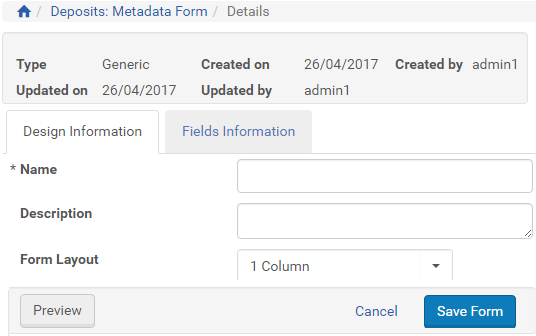
Metadata Form Details Page, Design Information Tab
- In the Name field, enter a name (required) for the metadata form. Enter additional optional information on the Design Information tab.
- When you are finished, click the Fields Information tab.
The page refreshes with a fields/properties table for entering new elements. No fields appear yet in the left column
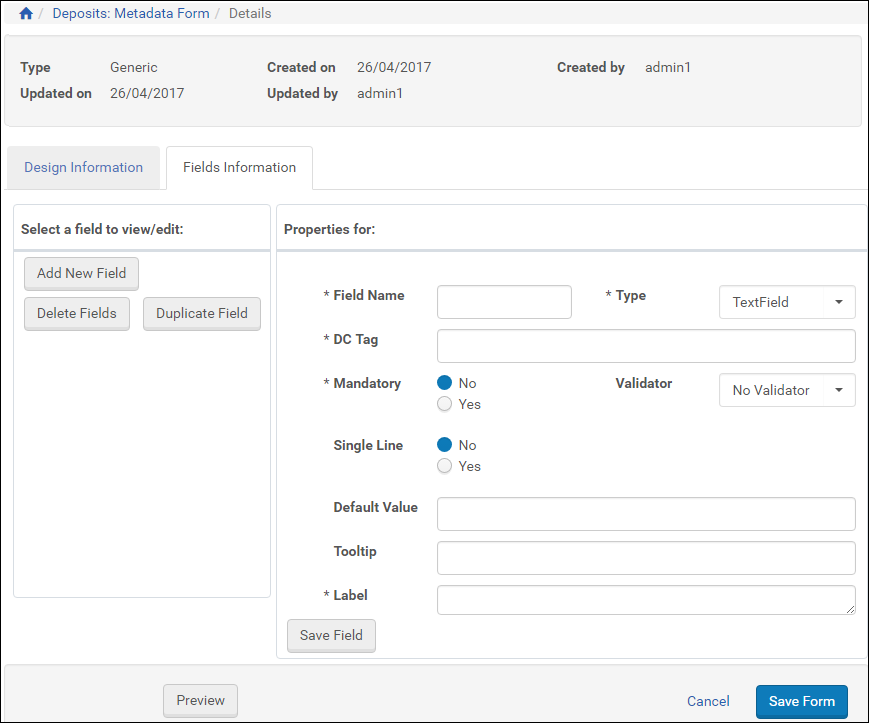
Metadata Form Details Page, Fields Information Tab
- Enter information for the new field in the form on the right. (Required fields are marked with an asterisk.)
- Field Name is for system use and is not displayed to Producer Agents.
- The Label field displays on the Producer Agent’s form. To see the form as an Agent sees it, click the Preview button.
- The DC Tag drop-down list contains the Dublin Core and DNX tags. Select the tag that corresponds to each label.
- Click Save Field. The field label is displayed in the list of existing fields on the left.
You can edit an existing field at any time by clicking the field label in the list of fields on the left.
- Click Save Form. The metadata form is saved to the Rosetta system.
- Repeat steps 4-5 to add more fields, as needed.
The metadata form is created
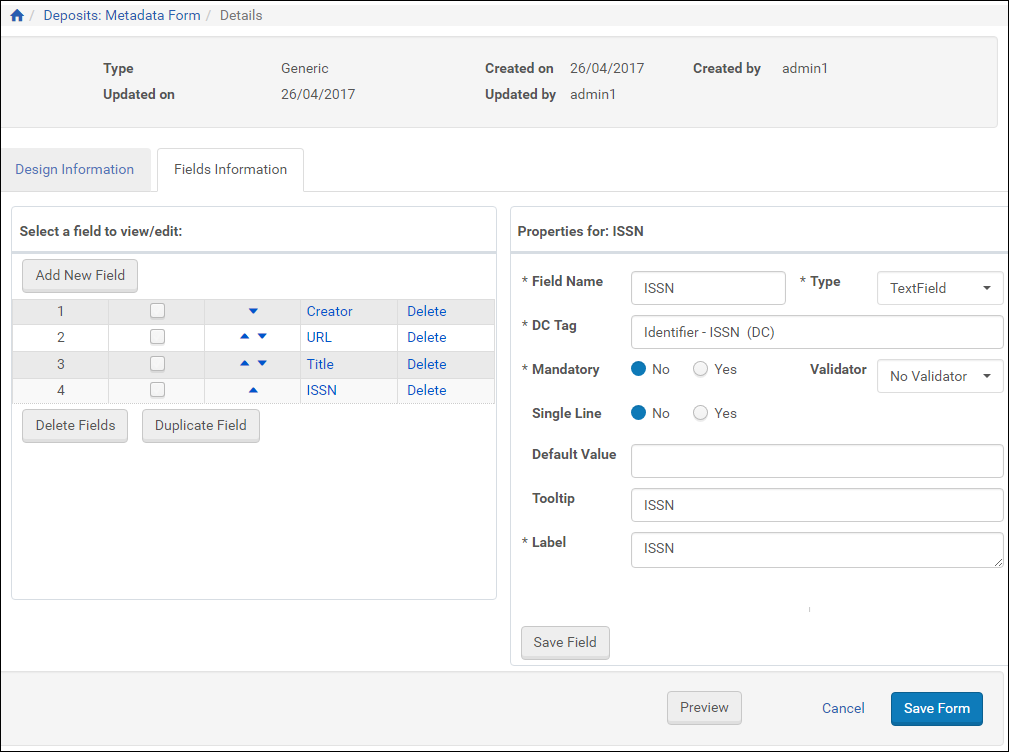
New Metadata Form with Fields
New Metadata Form with Fields
To enable Producer Agents to use the form, Deposit Managers must associate the metadata form with a material flow (see Associating Material Flow Components with Material Flows).
Adding Lists of Values to Metadata Forms
When a metadata form field requires a list of several predefined values for the user to select from, Deposit Managers can load these values from an Excel spreadsheet rather than entering them individually.
- Loading these values from Excel spreadsheets is only possible for subsystems in which creating new tables is allowed.
- The Excel spreadsheet must be formatted as two columns with the left column containing the labels for the drop-down list and the right column containing the code corresponding to each value.
- Only use Excel files with the .xsl extension (.xlsx returns an error message).
- Name the spreadsheet CodeTable.
- Name the left column Code and the right column Description.
- Before you perform the following procedure, make sure your Excel data references fields of the type radio button, check box, and/or drop-down list where the code table name is locally defined.
To load a list of values from an Excel spreadsheet:
- If you have not done so already, add a field to your metadata form that requires the drop-down list for which you have an Excel spreadsheet with a formatted list of values (labels and codes).
- Enter properties for all required fields and any optional fields.
- For the Type field, select ComboField from the drop-down menu.
The page reloads with an additional Options Fields section below the fields section.
Metadata Form for New ComboField
Metadata Form for New ComboField
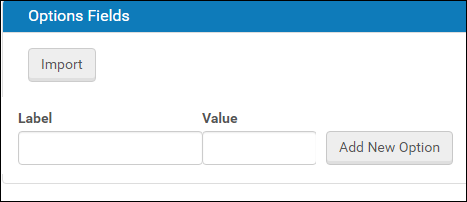
- In the Code Table Name field, select Locally Defined. This tells the system that you will be loading your own defined values for the drop-down field.
- Click the Import button.
An upload form opens:
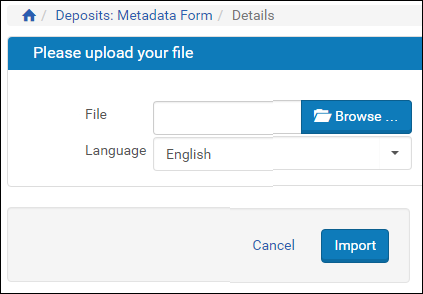
Upload Form for Excel File
Upload Form for Excel File
- Browse to the Excel file containing the list of field-value pairs.
- Click the Import button.
The system loads the data and displays it in a list for you to view and confirm. - Click the Import button if the codes match the values you want and the description contains the name of the value. (Otherwise, click the Cancel button and adjust your Excel file.)
The code table field and values display in the Options Fields section of the Update Form.Once you have imported Excel data, you will see an Export button beside the Import button. You can use this to download an Excel file and edit values on your PC, then import the file again. - Adjust the list as needed by deleting any rows (click the corresponding Delete text) or by adding an option manually (enter text in the Label and Value fields below the list and click the Add New Option button).
- Click the Preview button to see how the field displays in the final form. Use the Back button to return to editing the page.
- When the form appears the way you want it, click the Save Form button.
The system implements your edits and returns you to the List of Metadata Forms.
Generic Lists of Values
Predefined lists of values for use in drop-down fields, radio buttons, and check boxes are available to Rosetta metadata forms as generic code tables. These tables can be accessed from the Metadata Forms page.
To use generic code tables for creating multi-value fields:
- Follow the instructions for adding a list of values to a metadata form’s drop-down list. (See Metada Form for New ComboField).
- For the Type field, enter ComboField.
The page refreshes with the Code Table Name drop-down field available. - Select one of the generic code tables from the Code Table Name drop-down menu.
- Click the Save button.
The new values are added to the metadata form and made available to the user in the relevant drop-down field.
Working with Metadata Forms
From the List of Metadata Forms, Deposit Managers can perform the following actions:
- Previewing a Metadata Form
- Duplicating a Metadata Form
- Updating a Metadata Form
- Deleting a Metadata Form
- Viewing Material Flows Associated with the Metadata Form
Previewing a Metadata Form
Deposit Managers can preview how the metadata form is displayed to Producer Agents.
To preview a metadata form:
On the List of Metadata Forms page (see Accessing the List of Metadata Forms Page), locate the metadata form that you want to preview and click Preview. The Preview Metadata Form page opens.
To return to the List of Metadata Forms page, click Save.
Duplicating a Metadata Form
Deposit Managers can duplicate a metadata form. This is especially helpful when creating a new form. It is often faster to duplicate an existing metadata form and modify it than to create a new metadata form.
To duplicate a metadata form:
On the List of Metadata Forms page (see Accessing the List of Metadata Forms Page), locate the metadata form you want to duplicate and click Duplicate. The Rosetta system creates a copy of the form.
An exact copy of the metadata form is added to the List of Metadata Forms page. The Rosetta system automatically labels the new metadata form with the name Copy of followed by the name of the original metadata form.
Updating a Metadata Form
Deposit Managers can update metadata form details at any time. For example, a Deposit Manager can add new fields or specify a mandatory field.
To update a metadata form:
- On the List of Metadata Form page (see Accessing the List of Metadata Forms Page), locate the metadata form that you want to update and click Update. The Update Metadata Form Details page opens.
- Modify the fields as required.
- To save your changes and return to the List of Metadata Forms page, click Save. The List of Metadata Forms page opens.
The metadata form details are updated.
Deleting a Metadata Form
A Deposit Manager can delete a metadata form when it is not being used by any Producers and the Deposit Manager does not want to maintain the metadata form.
Deposit Managers cannot delete a metadata form when a Producer Agent is using it to deposit content. Deposit Managers can delete the metadata form only after the deposit process is complete and no other Producer Agent is using the metadata form.
To delete a metadata form:
- On the List of Metadata Forms page (see Accessing the List of Metadata Forms Page), locate the metadata form you want to delete and click More. Additional options are displayed.
- Click Delete. The confirmation page opens.
- Click OK. The metadata form is removed from the list.
The metadata form is removed from the Rosetta system. Producer Agents can no longer use this metadata form when depositing content.
Viewing Material Flows Associated with the Metadata Form
Deposit Managers can view the material flows that are associated with the metadata form.
To view the material flows:
On the List of Metadata Forms page (see Accessing the List of Metadata Forms Page), locate the metadata form for which you want to view the material flows and click one of the following:
- The Associated Material Flows link, when multiple material flows are associated with the metadata form.
- The name of the material flow, when a single material flow is associated with the metadata form.
The List of Material Flows page opens. The page displays columns containing the information described in the Accessing the List of Material Flows Page. You cannot update the material flow details.
To return to the List of Metadata forms page, click Save.