
Retention Policies
About Retention Policies
Retention policies allow libraries to place limits on the length of time particular items will be stored in a repository. Records that are required to be kept for legal or fiscal purposes, for example, may have no value to a library after the required retention time has elapsed. In such cases, Rosetta users can place retention limits on items and have them sent to recycling or purged entirely from the system after a span of time or a particular date.
Retention policies are classified as shared metadata, and, as with access rights in Rosetta, they can be applied to multiple IEs.
Retention policies can be accessed from the following areas on the Staff interface:
- To create and manage retention policies: Deposits > Policies > Retention Policies
- To associate a retention policy with a material flow: Deposits > Deposit Arrangements > Material Flows
- To work on the retention policy of a single IE: Web editor, individual IEs, Metadata tab
Retention policies also appear on deposit forms (in the Deposit module) and on the list of scheduled jobs in the Administration module.
In order to configure retention policies, you must be assigned either the Deposit Manager or Data Manager role with the Edit Retention Policies role parameter.
Creating Retention Policies
To set up retention policies, sign in to the Management module and follow the path Data Management > Policies > Retention Policies.
The Retention Policy page opens:
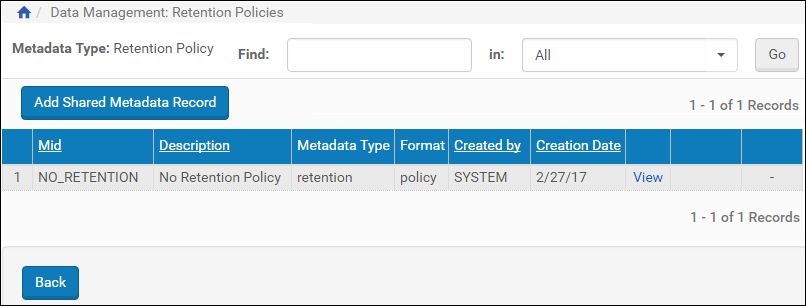
Initial Retention Policy Page
By default, only one policy is preconfigured by the system: a NO_RETENTION policy. This configuration defaults to an indefinite retention of all items in the system that do not have a specified retention policy.
To create a retention policy limit:
- From the Retention Policy page, click the Add Shared Metadata Record button.
A blank retention policy form opens:
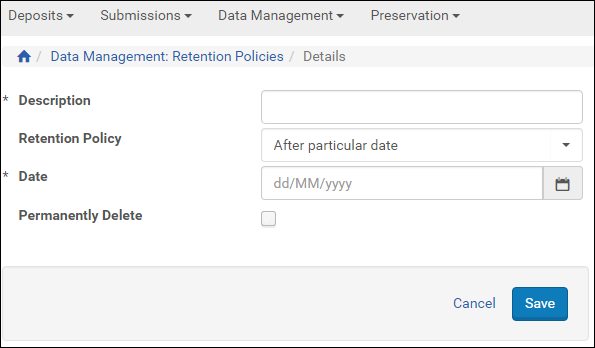
Blank Retention Policy Form
By default, the retention policy uses After particular date and the impact of the purge is not permanent (check box is cleared)—that is, all purged items for this policy are retained in a recycle bin and can be retrieved.
- OPTIONAL: To change the retention policy to a span of time rather than an exact date, use the Retention Policy drop-down menu.
Date fields will change according to the type of retention policy you select. The figure below shows one type of policy.
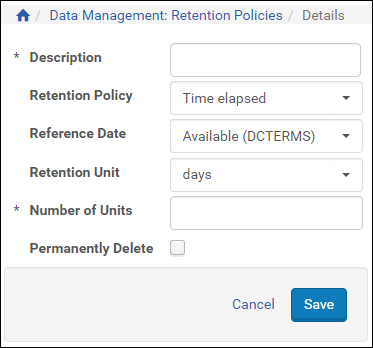
Both Types of Retention Policy
Both Types of Retention Policy
- Enter values in the form’s fields. Use the following table for definitions of fields.
Retention Policy Form Fields Field Retention Measure (Date or Span) Description Description Both Describes the policy. Shows in the list of retention policies and helps users identify it. Retention Policy Both Select a specific date in the future or a period of time to lapse from a particular date/event. Date Specific date The exact date on which the items associated with this policy can be deleted from the database. Use DD/MM/YYYY fields or drop-down calendar (as seen in the figure above). Reference Date Time elapsed The date/event on which the period of retention time begins. Retention Unit Time elapsed The unit of time used, as in days or years. Number of Units Time elapsed The number of units to equal the full time elapsed (as in 180 for days). Permanently Delete Both If checked, the items associated with this policy are purged from the system and cannot be retrieved. If left unchecked (the default), items are removed from the standard storage but remain available in a “recycle” storage area. - When you have completed the form, click the Save button.
Your new policy is saved to the system, appears in the list of retention policies, and can be assigned to an IE as shared metadata through, for example, the Web Editor, under the Metadata tab, or as part of a material flow.
Working With Retention Policies
The following actions can be undertaken to edit, delete, or assign policies to IEs.
- Editing a Retention Policy
- Deleting a Retention Policy
- Displaying a Previous Version of a Retention Policy
- Assigning a Retention Policy to an IE
Editing a Retention Policy
You can edit any of the retention policies except for the system-created NO_RETENTION policy.
To edit an existing retention policy:
- Open the List of Retention Policies page (Deposits > Policies > Retention Policies).
- Find the policy you want to change in the list.
If there are many policies and you are having trouble finding the one you want, perform a quick search in the upper right corner of the page. You can search by MID if you have the number, or by a case-insensitive search of the Description field.
- Click the Edit text corresponding to your policy’s row.
The policy form opens with its existing entries. - Make the changes you want on the form. For information on specific fields, see the table above.
Deleting a Retention Policy
You can delete any staff-created policies unless they are associated with an IE. If you attempt to delete a retention policy that is in use, you will receive a notice telling you the number of IEs to which this policy is attached.
To delete an existing retention policy:
- Open the List of Retention Policies page (Deposits > Policies > Retention Policies).
- Find the policy you want to delete in the list.
If there are many policies and you are having trouble finding the one you want, perform a quick Find search in the upper right corner of the page. You can search by MID if you have the number, or by a case-insensitive search of the Description field.
- Click the Delete text corresponding to your policy’s row.
A confirmation page opens. - Click the Confirm button to continue with the deletion.
The system returns you to the list of retention policies.
Displaying a Previous Version of a Retention Policy
You can display a previous version of a retention policy and revert to it in the same way you do so for an access rights policy. For more information, see Displaying a Previous Version of an Access Rights Policy.
Assigning a Retention Policy to an IE
Data Managers can assign a retention policy to a particular IE.
To assign a retention policy to an IE:
- Open the IE in the Web Editor (see Accessing the Web Editor).
- In the IE Tree pane, make sure the IE object (and not the File, for example) is highlighted.
- In the Actions field at the bottom right of the page, select Lock the IE from the drop-down menu and click the GO button.
The page refreshes. New buttons may appear on the display. - Click the Metadata tab.
The page refreshes with several buttons under the Metadata tab:
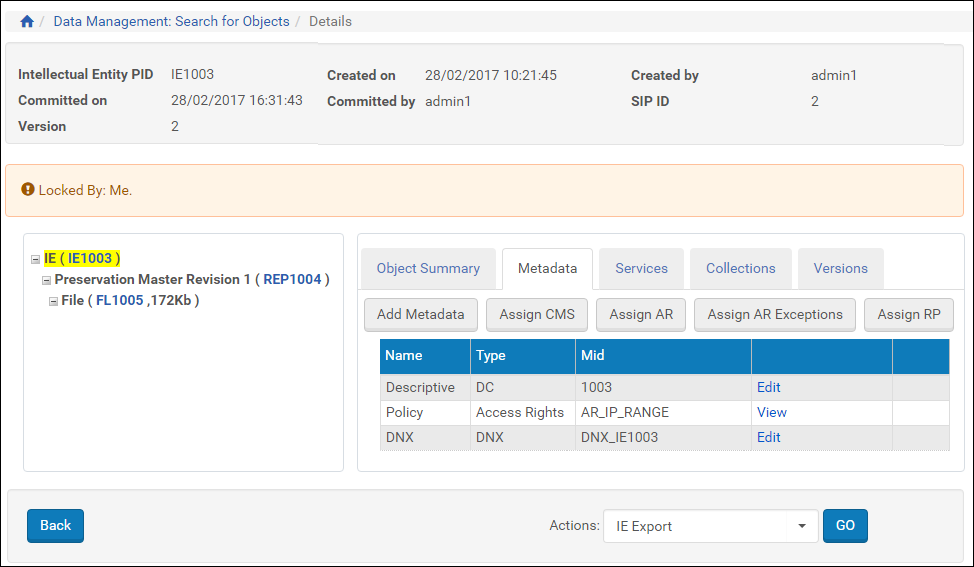
Assigning a Retention Policy to an IE
Assigning a Retention Policy to an IE
- Click the Assign RP button.
The Retention Policies list opens. Beside each option is a radio button. - Select the policy you want to add, then click the Add button.
The IE reopens in the Web editor with the retention policy appearing in the list under the Metadata tab. The IE now adheres to this retention policy.
To unassign a retention policy of an IE:
- Search for the IE whose retention policy you want to remove.
- View the metadata list for the IE and click Remove for the retention policy.
The retention policy is removed.