
SIP Processing Configuration and Routing Rules
Understanding SIP Processing
| Stage | Description |
|---|---|
| Pre-Approval | After files are uploaded to the Staging Server, the Rosetta system runs a series of tasks, known as a validation stack, to identify technical problems, such as viruses or corrupted files, and extract technical metadata. For more information, see Pre-Approval Stage. |
| Approval | The SIP is reviewed by Assessors, Arrangers, and Approvers. These staff users decide whether the SIP should be approved, returned to the Producer Agent, or declined. For more information, see Approval Stage For general information on the review of SIPs by staff users, see Assessors, Arrangers, and Approvers in the Rosetta Staff User's Guide. |
| Enrichment | The Rosetta system prepares the SIP for storage in the Permanent Repository. For more information, see Enrichment Stage. |
| Move to Permanent | The Rosetta system moves the SIP to the Permanent Repository. For more information, see Move to Permanent Stage. |
- SIP processing configuration, which specifies how the SIP is processed at each stage. A Deposit Manager can select a task chain for each stage from the predefined list.
A Deposit Manager can create multiple SIP processing configurations for different SIPs.
For more information about SIP processing configuration, see Defining SIP Processing Configuration. - SIP routing rules, which specify criteria for choosing the SIP processing configuration that must be applied to the specific SIP.
When creating SIP routing rules, a Deposit Manager defines input parameters (such as material type and Producer) and corresponding output parameters (such as SIP processing configuration that must be applied to the SIP and approval group that reviews the SIP).
For more information about SIP routing rule configuration, see Configuring SIP Routing Rules.
Pre-Approval Stage
Fixity Check
|
<mets:techMD ID="fid1-1-amd-tech"> <mets:mdWrap MDTYPE="OTHER" OTHERMDTYPE="dnx"> <mets:xmlData> <dnx xmlns="http://www.exlibrisgroup.com/dps/dnx" xmlns:out="http://www.loc.gov/METS/" xmlns:dc="http://purl.org/dc/elements/1.1/" xmlns:xlink="http://www.w3.org/1999/xlink" xmlns:xlin="http://www.w3.org/1999/xlink"> <section id="fileFixity"> <record> <key id="agent">REG_SA_JAVA5_FIXITY</key> <key id="fixityType">MD5</key> <key id="fixityValue">4179a95cc8635d84690a87e782c3ace4</key> </record> </section> </dnx> </mets:xmlData> </mets:mdWrap> </mets:techMD> |
Virus Check
Format Check
Technical Metadata Extraction
Risk Extraction
Approval Stage
- An Assessor and Arranger
- An Approver. The amount of content to be reviewed by an Approver is determined by the sampling rate parameter, which is defined at the material flow level. Staff users can mandate one of the following:
- 100% - All content must be reviewed by an Approver
- Less than 100% - The specified amount of content must be reviewed by an Approver. The rest of the content is moved to the next processing stage without an Approver's review.
Enrichment Stage
Move to Permanent Stage
SIP Routing Rules
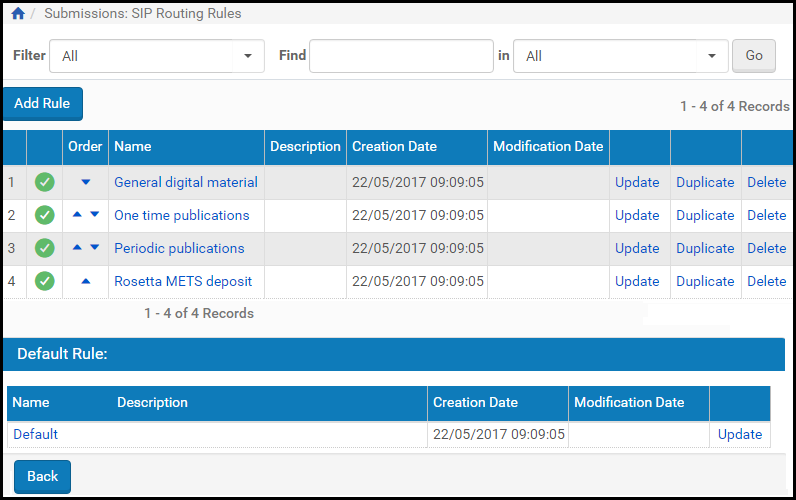
SIP Routing Rules
- To add a new rule, click the Add Rule button.
- To edit an existing rule, click the Update text of the rule's row.
- To create a rule based closely on an existing rule, click the Duplicate text of the rule's row.

SIP Routing Rules - Rule Details
Operators Used in Rule Parameters
String Values
- Equal - The string and the input value must match exactly.
- Contains - The string and the input value must match partially with the '*' character.
List of Strings
- List Contains – used when each error returned should exactly match each value in the rule (the order of the values is not significant).
If the rule matches only part of the error returned, the rule is ignored. For example, a rule defined as "A,B" will match to "A,B" and also to "B,A" (the order is not significant) but not "B,A,C" (since the additional error "C" does not exist in the rule). - List Equals ‐ Used when the order of the items in the list and the list itself should match exactly. For example, a rule defined as “Invalid page dictionary object, Invalid object number in cross‐reference stream” will match to the actual output from JHOVE – “Invalid page dictionary object, Invalid object number in cross‐reference stream.”
Numeric Fields
- Greater Than (>) - The input value should be greater than the parameter value.
- Less Than (<) - The input value should be less than the parameter value.
- Equal (=) - The input value should be equal to the parameter value.
- Not Equal (! =) - The input value should be not equal to the parameter value.
Date Fields
- After - The input date should be later than the parameter date value.
- Before - The input date should be earlier than the parameter date value.
- Equal (=) - The input date should be the same as the parameter date value.
- Not Equal (! =) - The input date should not be the same as the date parameter value.
Any
| Run-time Value | Operator | Possible Rule Values | Result |
|---|---|---|---|
| Demo Producer | Equal | Demo Producer | Match |
| Demo Producer | Contains | Demo* | Match |
| image/tiff or image/bmp | In List | Image/tiff, image/bmp | Match |
| image/tiff, image/bmp | List Equals | Image/tiff, image/bmp | Match |
| grey or gray | In List with Regular Expression | gr[ea]y | Match |
| 12345 | <, >, =, != | 10000 | < - No match > - Match = - No match != - Match |
| 23/11/2011 | Before, After, =, != | 23/11/2011 | Before - No match After - No match = - Match != - No match |
- OR
- AND (default)
Defining SIP Processing Configuration
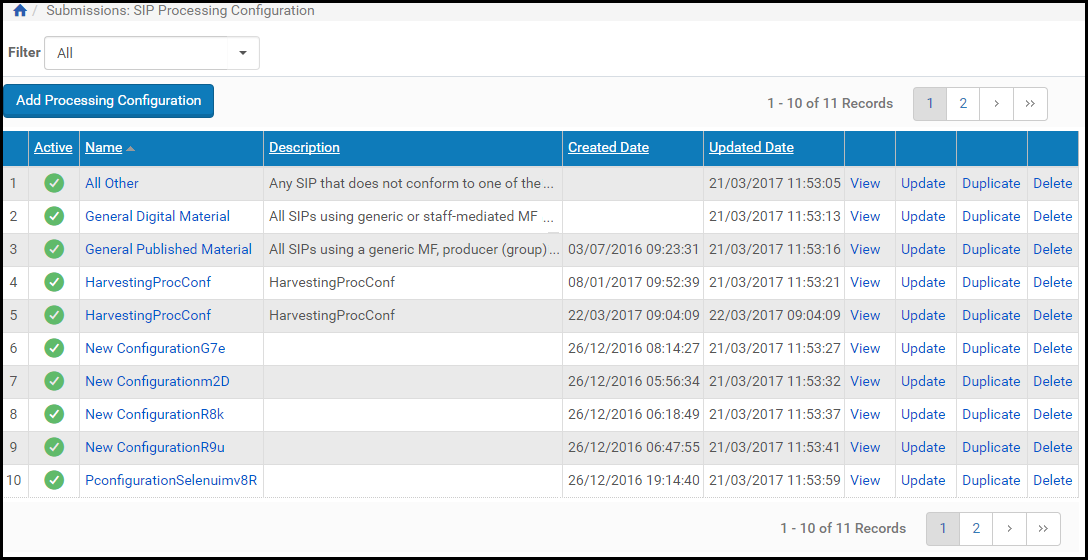
SIP Processing Configuration List Page
- Adding a SIP Processing Configuration
- Updating a SIP Processing Configuration
- Duplicating a SIP Processing Configuration
- Deleting a SIP Processing Configuration
- Activating and Deactivating a SIP Processing Configuration
Adding a SIP Processing Configuration
- On the List of SIP Processing Configuration page (see Defining SIP Processing Configuration), click Add Processing Configuration. The SIP Processing Configuration page opens.
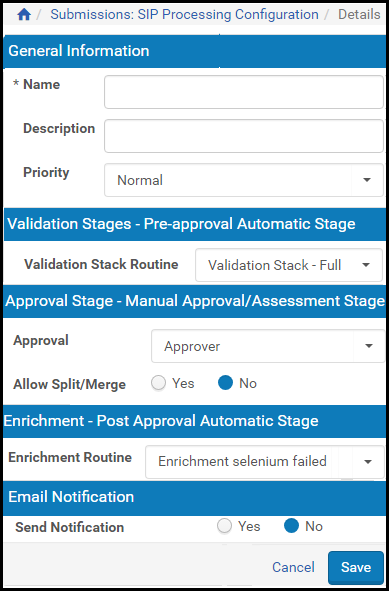
Add SIP Processing Configuration Page
- Complete the fields as described in the following table:
SIP Processing Configuration Page Fields Field Description Name The name of the SIP processing configuration. Description The description of the SIP processing configuration. Priority Select a priority: - High - Process ASAP
- Normal - SIPs are queued up to 1 hour
- Low - SIPs are queued up to 6 hours
Validation Stack Routine The list of available routines that can be executed when the SIP enters the validation stage. Approval The list of available options for the human stage of the SIP processing (for example, reviewing a SIP by an Approver). The following options are available: - Assessor + Arranger
- Approver
Allow Split / Merge Allow the ability to split and merge IEs. For more information, see Organizing IEs. Enrichment Routine The list of available routines that can be executed when the SIP enters the enrichment stage. Delete SIP when processing complete Deletes SIPs immediately after processing is completed Send Notification Whether you want notification of the results emailed to the staff user All fields with an asterisk (*) are mandatory. - Click Save.
Updating a SIP Processing Configuration
- On the List of SIP Processing Configuration page (see Defining SIP Processing Configuration), locate the SIP processing configuration with which you want to work and click Update. The SIP Processing Configuration page opens.
- Modify the fields as described in the table above.
- Click Save.
Duplicating a SIP Processing Configuration
Deleting a SIP Processing Configuration
- On the List of SIP Processing Configuration page (see Defining SIP Processing Configuration), locate the SIP processing configuration that you want to delete and click More. Additional options are displayed.
- Click Delete. The Delete Confirmation page opens.
- Click OK.
Activating and Deactivating a SIP Processing Configuration
- Yellow - The SIP processing configuration is active.
- Grey - The SIP processing configuration is inactive.
Any SIPs in progress that are associated with a deactivated SIP processing configuration do not get promoted to the next processing stage.
- On the List of SIP Processing Configuration page (see Defining SIP Processing Configuration), locate the SIP processing configuration that you want to activate or deactivate.
- In the Active column, click the check mark. The check mark in the Active column indicates the new status.
Configuring SIP Routing Rules

SIP Routing Rules List Page
- Adding a SIP Routing Rule
- Updating a SIP Routing Rule
- Duplicating a SIP Routing Rule
- Deleting a SIP Routing Rule
- Activating and Deactivating a SIP Routing Rule
Adding a SIP Routing Rule
- In the Input Parameters pane, matching criteria parameters are defined.
- In the Output Parameters pane, result parameters are defined.
- On the List of SIP Routing Rules page (see Configuring SIP Routing Rules), click Add Routing Rule. The Routing Rule Editor page opens.
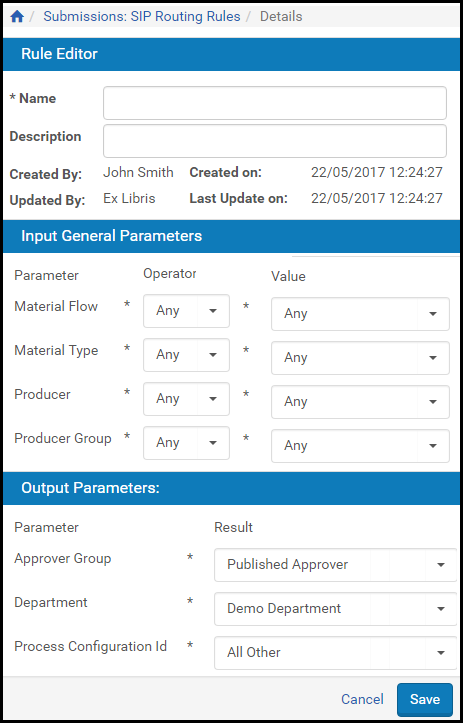
Routing Rule Editor Page
- In the Input General Parameters pane, complete the following fields:
Input General Parameters Pane Fields Column Description Operator The list of available operators. The operator describes the logical relationship between the parameter and the value. The values in the drop-down list vary according to the type of parameter. For more details, see Operators Used in Rule Parameters.Value The value for the parameter. For example, the department output parameter must contain "Academic." The value is either a text input box or a drop‐down list, depending on the type of parameter. - In the Output Parameters pane, complete the following fields:
Output Parameters Pane Fields Column Description Approver Group The approver group to which the SIP must be forwarded. Department The department to which the SIP is connected. Process Configuration ID The process configuration ID that is applied to the SIP. For more information about SIP processing configuration, see Defining SIP Processing Configuration. - Click Save.
Updating a SIP Routing Rule
- On the List of SIP Routing Rules page (see Configuring SIP Routing Rules), locate the SIP routing rule with which you want to work and click Update. The Routing Rule Editor page is displayed.
- In the Input General Parameters pane, modify the fields that you want to update.
- In the Output Parameters pane, modify the fields that you want to update.
- Click Save.
Duplicating a SIP Routing Rule
Deleting a SIP Routing Rule
- On the List of SIP Routing Rules page (see Configuring SIP Routing Rules), locate the SIP routing rule you want to delete and click Delete. The confirmation window is displayed.
- Click OK.
Activating and Deactivating a SIP Routing Rule
- Yellow - The SIP routing rule is active.
- Grey - The SIP routing rule is inactive.
- On the List of SIP Routing Rules page (see Configuring SIP Routing Rules), locate the SIP routing rule that you want to activate or deactivate.
- In the Active column, click the check mark. The check mark in the Active column indicates the new status.