
Managing Representations
Introducing Representation Functions
Representation functionality extends the life of intellectual entities (IEs) that require modifications for the following reasons:
- The library does not possess the technical resources or applications to render the IEs.
- The library possesses collections of objects in soon-to-be obsolete digital formats.
- Some objects in the library exist in a format that contains a problematic attribute that will not be supported in the future.
Rosetta offers preservation functionalities such as
- adding single or multi-file representations
- ordering files in multi-file representations
- adding representation metadata and provenance information
- updating the file content of a representation in permanent storage.
Rosetta breaks down representations into the following types:
- Preservation Master (PM): the system’s preservation copy of an object's files.
- Modified Master (MM): a copy of a PM that has been manually modified.
- Access Copy (AC): a derivative of a PM or MM that has been created (by Rosetta or by an external system) to support greater access (for example, a low-resolution Web browser copy).
- The Preservation Master is mandatory and there can only be one
- The Modified Master is optional and there can only be one
- Derivative copies are not preserved
- Custom preservation types, defined in the Preservation Type code table, are optional and repeatable
The following table describes representation-level activities and the situations in which they are used.
| Activity | When to Use |
|---|---|
| SIP Processing | During the Enrichment task chain, derivative copies are created and added as new representations. |
| Preservation Action | Running a preservation action involves creating a new representation (or representations) for each IE in the preservation set. |
| Derivative Copies | Functionality supports adding an access copy as a new representation through the Web Editor. (See Derivative Copy Representations].) |
| Ongoing Maintenance | The Editor can add a new representation to a specific IE when:
|
Preparing the material and processing the representation vary according to the user’s context in the system and the needs of the IE or preservation set. The add representation component receives the material for the new representation and launches the proper process according to the source of the call.
Adding a Representation: Process and Steps
Three stages comprise the process flow for adding a representation:
Locking the Intellectual Entity
The Editor must lock the IE before adding a new representation. This is done through the Web Editor Object Summary page for the selected IE (follow the path from SIPs List > Edit IE so the Web Editor opens, or conduct a search of IEs and then open one for editing).
Select Lock Object from the Actions drop-down list, then click Go.
The IE locks, the page is refreshed, and the Actions drop-down menu contains relevant options.
When a representation is added through the Web Editor, the system creates the descriptor file with information about the IE. In this case, a new representation is added to the IE with no relationship to existing representations. Thus there is no source representation.
Users can load files for the first time using the Choose From Server tab in the Web Editor (Add Representation - Load File stage). In this case, the user places files under the home directory. The system is responsible for copying the files to the general Import directory.
Adding the Representation
To add a representation from the Web Editor, access the page containing the object summary for your IE. Make sure the object is locked.
To add a representation:
- Select Add Representation from the Actions menu and click Go to launch the Add Representation Wizard.
Step 1 of the wizard opens.
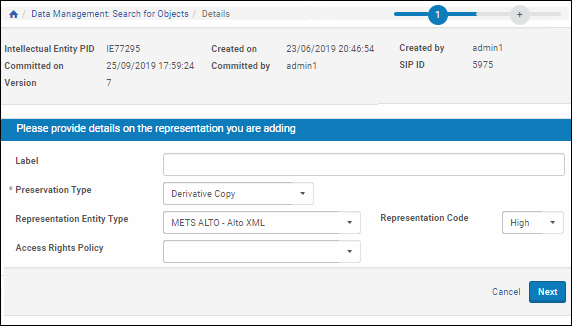
Add Representation - Details
- Enter values in the fields using the following table as a guide.
| Field | Description |
|---|---|
| Label | A name for the new representation |
| Preservation Type | Select the Preservation Type. This field is mapped to the field DNX.generalRepCharacteristics.preservationType
IEs must contain one preservation master and may contain up to one modified master. Other types are unlimited.
|
| Usage Type | Mapped to the fieldDNX.generalRepCharacteristics.usageType |
| Representation Code | Applies only when the Preservation Type is Derivative Copy. (System ignores entries for master copies.) Default value is None. |
| Access Rights Policy | Select an Access Rights Policy from the drop-down list of available policies. This policy applies exclusively to this representation. |
- Click the Next button.
If you selected Derivative Copy for your Preservation Type, the system moves you to the final step (2) in the wizard. (Skip the next step of this procedure and the accompanying figure.) If you selected Preservation Master or Modified Master, the Additional Information page opens as Step 2 of the wizard.
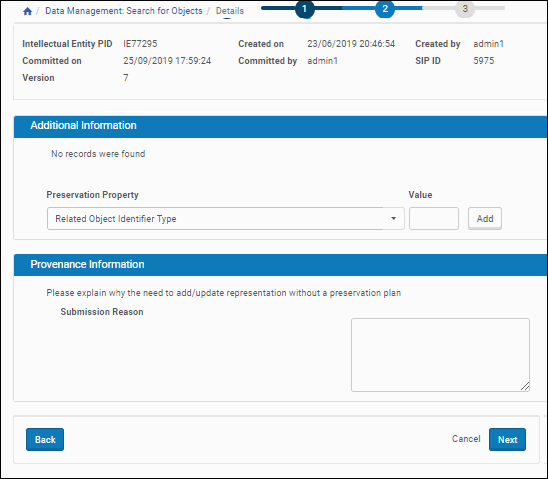
Add Representation - Additional Information for Master Copies
- Enter the following information in the available fields:
- For the Additional Information section, enter values for as many of the available Preservation Properties as you want. Select the property from the drop-down menu, enter a value in the field, then click the Add button. Repeat as needed.
- For the Provenance Information section, enter information that explains why a new representation is needed.
- Click the Next button to move to the next step in the wizard. (To return to a previous step or cancel the procedure, click the Back or Cancel button.)
The Load File page opens.
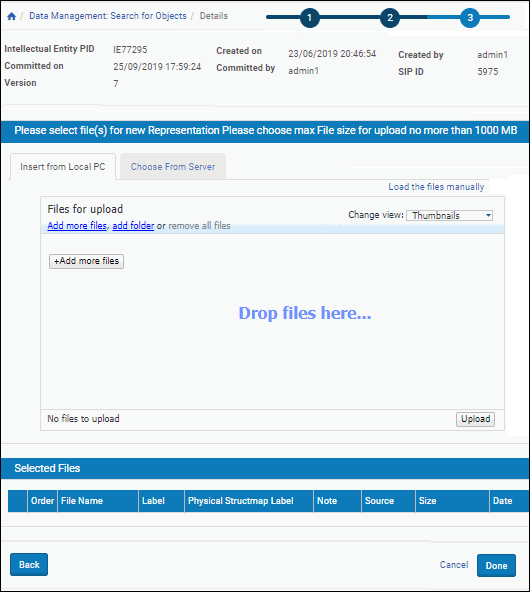
Add Representation - Load File
- In the Select File section, use the Insert from Local PC or the Choose from Server tab to browse to the local or server-based source of the file(s) you want to select for preservation.
- If you are unable to use the applet, you can load the files manually. To do this, click the link to Load the files manually at the top of the Select File section and load the files through your Windows-based file selection.
- When the Preservation Type value is Derivative Copy, this step will be Step 2 (out of two steps) rather than Step 3 (as pictured here).
- When you have selected the file(s) for your preservation copy, click the Done button to finish.
The system copies the files under the general Import Directory root.
Processing the Representation
When the Add Representation is called, the system loads the files into Rosetta, runs the Validation Stack, performs Enrichment tasks, and moves the IE to the permanent repository.
While the Add Representation process is running, the system displays status messages indicating the task is in-progress or complete. Any problems identified during the process are sent to the Technical Analyst (TA) Inbox (similar to problems found during SIP processing). This is noted in a message to the Editor, as are any notices of the IE being committed or rolled back. When the Commit or Rollback action is complete, the system unlocks the IE and removes the Import Directory and all of its contents.
- Add Representation is an asynchronous process. Once the Add Representation process is launched, the Editor does not interact with the process. When Add Representation has finished, the system displays a message on the Web Editor page so that the Editor knows to commit or roll back the action.
- If the Editor performed a number of actions on the IE without committing and then Add Representation fails, the following scenarios are possible:
If the Editor selects Commit, all of the actions on the IE except the failed Add Representation are committed.
If the Editor selects Rollback, all of the actions on the IE performed after the last commit are rolled back.
When the system completes the Add Representation process, it notifies the Editor by e-mail.
Updating a Representation
Rosetta allows you to update existing representations with minimal impact on the AIP and associated objects. Revised representations can replace existing representations without performing enrichment, without copying all related files, and without a preservation plan. Instead, the representation
- maintains its place in the structural map of the object
- updates the content and structure of the representation (not its metadata)
- references related files rather than uploading those same files that are already uploaded with the previous version of the representation
Revisions can be performed on a single representation through the UI (see Adding the Representation) or as a batch process through one or more APIs. (Information on APIs can be found on the Developer's Network (http://developers.exlibrisgroup.com/rosetta/apis/
Replacing Files Within a Representation
A single new representation can replace an existing one through a manual procedure in the Web editor. This revised version should be ready for upload when you begin this procedure.
To revise a single representation:
- Locate the representation or the IE to which the representation belongs. You can use any of the Rosetta search functions that access the permanent repository. (For example, from the Data Management menu, go to the Search and Manage Queries heading and select Search for Objects, then perform a search for the representation you are going to revise or replace.)
- Open the object in the Web editor and lock the IE.
- Select the representation you want to revise.
- The Actions menu changes to provide relevant actions. Select Update Representation and click Go.
The first step of the update wizard opens:
Update Representation Page
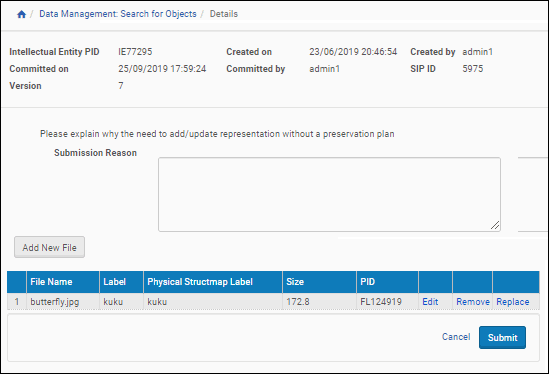
- Add a Submission Reason for the update.
- Click the Add New File button to add a new file. To replace an existing file, click the Replace Action beside the file you want to revise. A lightbox for the update representation opens.
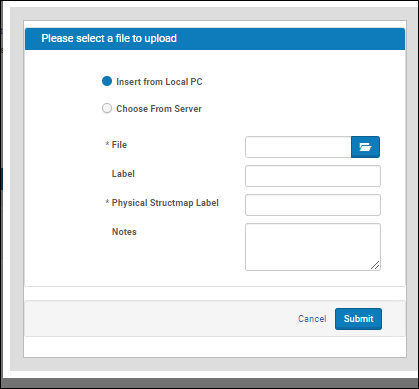
Light Box Form for Updating a Representation
- Click the Browse button and select the file you want to upload from a local or network drive.
- Enter a Label and a Structmap Label for the file and any additional information in the Note field of the form. The Structmap label and Notes fields will be displayed in the Delivery module of Rosetta.
- New files are appended to the end of the structmap.
- Only physical structmap labels can be edited. Logical structmap labels are added automatically for new files based on the file name and can be edited separately
- Click the Add Selected File button.
The lightbox closes and the new representation displays in the list of files on the Add Representation page.
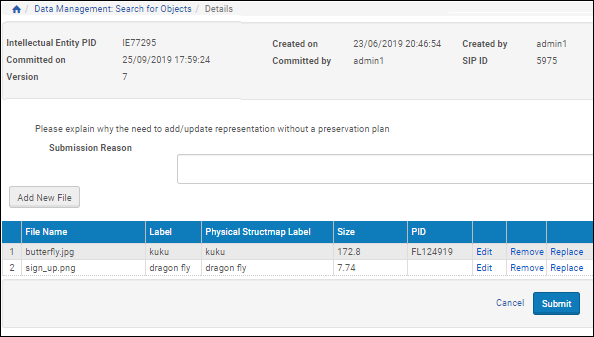
Update Representation Details Summary
- Enter a Submission Reason (optional) and click the Submit button.
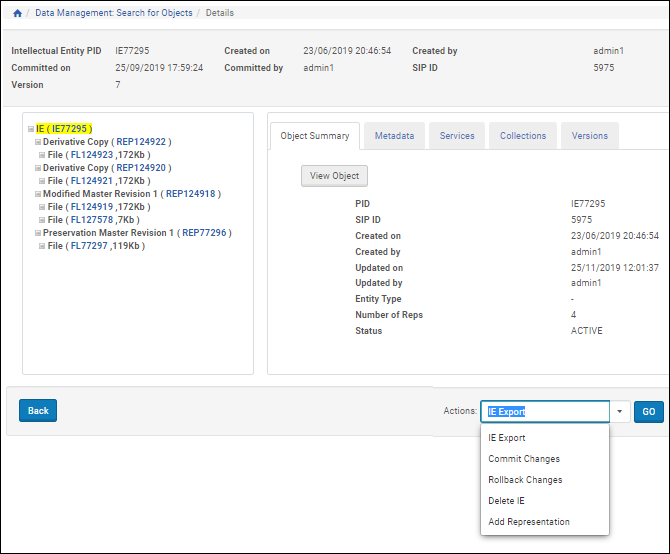
Rosetta reloads the IE in the Web editor. The new IE version appears in the object tree in the left column of the page:
 \
\Representation Updated in Web Editor
- Select Commit Changes from the Actions drop-down menu and click the Go button.
The page reloads with a status update and a link for refreshing the page. The object is locked again.
Deleting a Representation
You can delete a representation with any associated files.
The master representation cannot be deleted.
To delete a representation:
- Locate the representation or the IE to which the representation belongs.
- Open the object in the Web editor and lock the IE.
- Select the representation that you want to delete.
- Select Delete Representation from the Actions drop-down list.
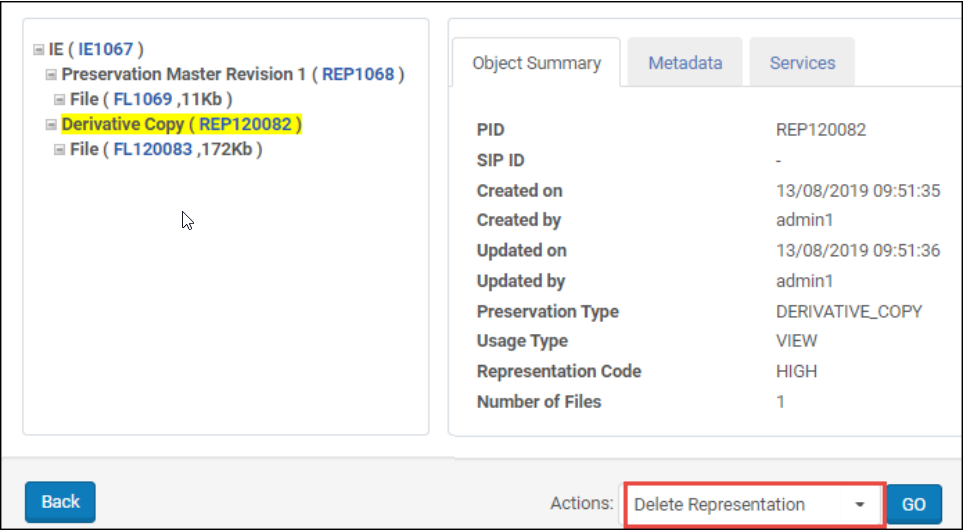
Delete Representation
- Click Go.
The representation is deleted.