
Adding Maps and Locations to Services
![]()
In apps built upon the React Native platform, when the end-user selects a position, the following tabs become available in the bottom drawer of the page:
- About – Displays either the name of the position, or, if the Note field of the position contains text, the text in that field
- Actions – Provides links to actions that are defined for the position (see Adding Actions to Map Positions, below); does not appear if no actions are defined
- Floor Plan – Displays map images, such as floor plans, if any are available for the position, and marks the location of the position on the map (see Creating a Map from an Image File, below); does not appear if no map images are configured for the selected map
- Around Here – Lists all the marked positions in the map, and shows their distance from the end-user's current location; selecting a position from the list selects that position in the map and opens its information in the bottom drawer of the page
Adding Maps
- Description - The name of the map, as it appears in various other places in the App Manager.
- Show Map Image / Image - Use these options to upload an image file containing a map. When an end-user selects a position in the map, the image in the file is made available in the bottom drawer, in the Floor Pan tab. For additional information, see Creating a Map from an Image File, below.
- Last Updated - Optionally configure a date and time for the map. If the date/time you configure is more recent than the date/time of the map on the end-user's device, the app downloads the newer map.
If you update the location categories and/or positions associated with the map, you must manually publish the map.
- Sort order - The order in which this map appears in a list of maps in the app.
- GPS top left / bottom right - latitude / longitude - You must identify the top-left and bottom-right coordinates in order to enable interaction between the map image and the native map app. You can find the coordinates in Google Maps, for example, by selecting on the corners of the area. If you require assistance with this, contact Ex Libris customer support.
- Description image - Optionally, select an image to represent the map in mobile apps. The image appears in the bottom drawer of the map page. The end-user can open the map by selecting the image there.
- Profile owner - Optionally, select a profile. When selected, only users associated with this profile can manage this map.
- Roles - Associate the map with the required app roles. For more information, see Customizing End-User Access to Services.
Adding Map Positions
Adding Map Location Categories
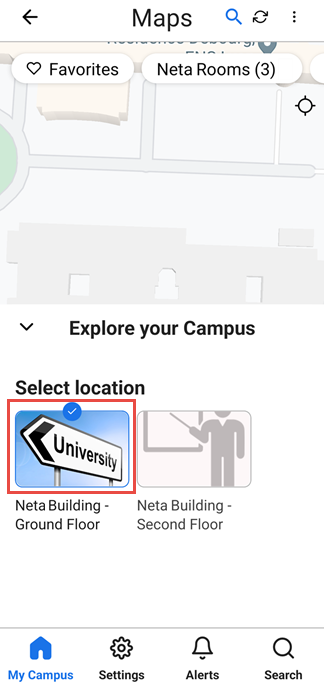
Map categories are used to group locations of particular types together, in order to make it easier for users to find the locations they are looking for. Examples of common map categories are Food and Drink and Bus Stops. The location categories of a map appear in a row across the top of the map (#1 in the illustration). When the user selects a location category, its name appears in the Search bar above the map (#2), and any of the positions in the category that are in the area included in the map are marked (#3). Users can drag the drawer at the bottom of the map (#4) up to see a list of the positions and access more information about them.

When the user first opens the map, no categories are selected. Only one category can be selected at a time.
- Description - The name of the category as it should appear in the Map page of the app and in the dropdown list when configuring map positions (see Adding Positions, below).
- Image icon - [Not currently in use.]
- Sort order - Enter a number to specify where this category should appear in the list of map categories that appears across the top of the map in the app. The higher the number, the closer to the beginning of the list the location category appears.
- Profile owner - Optionally select a profile. When selected, only users associated with this profile can manage map locations associated with this category.
- Roles - Associate the map with the required app roles. For more information, see Customizing End-User Access to Services.
Adding Positions
- Description - The name of the position. In React Native apps, this name is displayed in the About tab if the Note field is empty.
- Show on Positions Map - Whether the position appears on the map.
- Sticky Location - For the React Native platform: Select Yes to include this position in all location categories, as well as upon initial entry to the map when no category has been chosen. These positions serve as markers of important landmarks within the institution. This option has no effect in non-React Native app versions. See also Feature Focus – Maps.
- Customer Location Reference - This is a code used by your institution's backend server, if any. This code enables your backend server to map locations to campusM positions. Contact Ex Libris customer support for assistance.
- Sort order - The order in which the positions are presented in the App Manager and the app.
- Last updated - Optionally configure a date for the position. If the date you configure is more recent than the date for the position on the end-user's device, the app downloads the newer position when you publish the app or when the app downloads the map to which this position is associated.
- Image - An image for this position to display when the end-user selects the map to view details about the position. Select an image you previously uploaded to the Asset Manager; see Uploading Files.
Typically this is a picture of the building, event, or similar. The image should be approximately rectangular in shape, 200-400 pixels wide and 200-400 pixels high. It is recommended that the image be 50 KB or less, so as to not be too large for downloading to mobile devices over 3G.
- Latitude / Longitude - GPS coordinates for the map.
- Altitude - Include this information if it is useful.
- House no / Flat / House name / Street name / District / Town / County / Post code - Address information.
- Note - Text that is displayed to the end-user when they view details about the position. In React Native apps, this text is displayed in the About tab if it is filled in.
- Comments - Internal note that is not shown to the end-user.
- Categories - Select categories for the position one-by-one (see the on-screen text for instructions).
- Maps - Select maps for the position one-by-one (see the on-screen text for instructions). Each map you select must include the coordinates of the position within its map area.
Adding Actions to Map Positions
- Position - The associated position.
- Description - The name of this action as it should appear in the list of available actions that opens in the app when the end-user selects a position.
- Image - An image to display for this action in the list of available actions that opens in the app when the end-user selects a position. Select an image you previously uploaded to the Asset Manager; see Uploading Files.
- Location reference - Enter the code used by your institution's backend server to identify this position, if one is required. This code enables your backend server to map locations to campusM positions. Contact Ex Libris customer support for assistance.
- Url - The URL to open when the end-user selects this action. See Working with App URLs.
- Icon - For the React Native platform: Select an icon to display beside the action's description in order to identify the type of action (e.g., Phone Icon
 , Website Icon
  ; see illustration above). This option has no effect in non-React Native app versions. See also Feature Focus – Maps.
 - Roles - Select the app roles for which the action should be made available. For more information, see Customizing End-User Access to Services.
Bulk Upload of Maps, Categories, and Positions
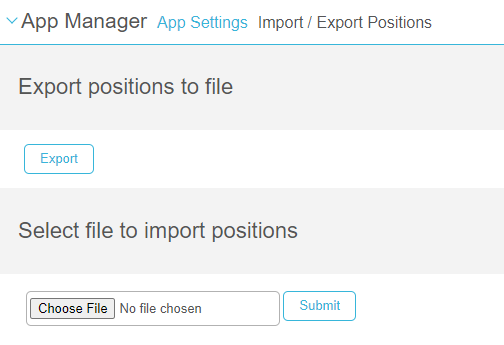
- Download an Excel file with your current Maps, Categorizes, and Positions by selecting Export from the Import/Export Positions page (App Settings > Maps/Locations > Import/Export Positions). (If you do not have any data yet, this file can be used as a blank template with the columns ready-made.)
 Bulk Upload of Maps, Categories, and Positions
 - For each tab of the Excel file (Maps, Categories, Positions) edit or add information according to the fields described above.
- campusM adds a Code column to your data for internal purposes that cannot be changed.
- Deleting data is not possible with the bulk upload feature.
- Select Choose File and select the Excel file with your data. Select Submit to load it into campusM.
Your maps, categories, and position data is available in campusM.
Creating a Map from an Image File
You can create a map from any image file by uploading the file and defining the GPS coordinates of the image's four corners as the map's GPS coordinates. If you then link the map to a position, end-users can see the map image in the app when they select the position. This can be useful, for example, for providing floor plans of the interiors of buildings, or a custom campus map.
In mobile apps under React Native, the image is displayed in the bottom drawer, in the Floor Plan tab, and the position to which it is linked is marked on the image. Users can zoom into a location in the map by double-tapping the location. (The zoom can be increased up to three times by additional double-taps. On the fourth double-tap, it returns to its default size.)

If a map image is linked to a position but the position's coordinates are outside the region included in the map (as defined by its coordinates), the Floor Plan tab does not appear for that position.
In the web app, the image is displayed in the Maps tab. All defined positions that are in the region covered by the map are initially marked in the map display. Selecting one of the positions, either by selecting the image marker in the map, or by selecting it from the Lists dropdown, hides the markers of other positions, and opens a small window in which information about the position is displayed. Users can zoom and pan in the map by selecting  to open the controls.

Preparing a Map Image File
In order for a map image to be used as a map, it should meet the following requirements:
- Map oriented north
- File smaller than 1 MB
In addition, it is recommended that the map have a fixed scale.
You can link multiple location categories and multiple positions to each map.
Configuring the Map
You create a map from an image file as you would create any other map (see Adding Maps, above). The GPS coordinates of the map image's corners should match the coordinates specified in the map settings. In addition, you must configure the following optional settings:
- Select the Show Map Image checkbox. This essentially turns on the Floor Plan feature for the map. It also adds the Image field to the page.
- Under Image, select the image file. (The image file must be uploaded before you can select it; for more information, see Uploading Files.)
Attaching the Map to a Position
You attach an image map to a position in the Positions page (App Settings > Maps/Locations > Positions), under Maps. (For additional information, see Adding Positions, above.)

Adding PC Availability Information to Positions
Some institutions provide PCs for students to use, for example, in libraries or laboratory environments. If your institution offers this type of service to students, and your system keeps track of which PCs are in use at any given time and which are available for students to use, you can provide this information in campusM maps. To do this, your system must have a server that can provide information about PC availability at specific positions whenever it is requested.
PC-availability information can be included in maps by creating a special location category for the information and then selecting this location category for those map positions at which such facilities are available. As with any map position, you can choose which maps the position should appear in. In the selected maps, a special location category button appears on the map for this category. When the end-user selects this button, a list of the PC-availability positions included in the map opens at the bottom of the map. The list includes information about the total number of PCs found at each site and the number of these PCs (seats) currently available for use. The list is sorted based on the number of available PCs at each site.

A map position can be configured to only provide PC-availability information, or to provide both PC-availability information as well as other information. This is configured by selecting one or more location categories in the position's settings. If only the PC-availability location category is selected, information is only displayed about the position when the end-user selects the PC-availability location category in the map. If additional location categories are selected for the position, the information displayed in the map for the position depends on which location category is selected.
The steps for setting up this feature are:
- Create a dedicated location category for PC-availability information; see Creating the Location Category, below.
- Assign the dedicated location category to the map positions for which the PC-availability information will be provided; see Configuring a Position to Provide PC-Availability Information, below.
- Configure the server to supply the information in the required format; see Format of the Output Returned by the Server, below.
Creating the Location Category
In order to receive PC availability information, campusM must have a location category configured for this purpose. This location category can then be assigned to positions for which this information is relevant.
- In the App Manager, on the Location categories page (App Settings > Maps/Locations > Location Categories), create the new location category. There are no special requirements for the settings of this location category, but its Description is used in the maps, so it should be a name that makes its purpose clear. For additional information about creating a location category, see Adding Map Location Categories, above.
 Adding a Location Category for PC Availability
 - On the Select web service endpoint to change page (App Settings > Customer Web Services > Web Service Endpoints), add an endpoint for the server from which the PC-availability information will be retrieved.

For additional information about configuring web-server endpoints, see Application Extension Kit (AEK) and Connect Layer Extension Kit (CLEK).
- Open a support case, asking them to create a link in the database between the location category and the web-service endpoint. In your request, be sure to identify the location category by specifying its Description and the web-service endpoint by specifying its Name/Type.
Configuring a Position to Provide PC-Availability Information
Once the location category is set up as described above, you can assign it to the map positions for which PC-availability information will be provided by the server. To do so, in the position's settings, under Categories, select the PC-availability location category. (For general information about configuring map positions, see Adding Map Positions, above.)

Format of the Output Returned by the Server
The server that returns the PC-availability data must return it in xml in the following format. Multiple room objects can be included, as required.
<ns1:pcAvailabilityResponse xmlns:ns1="http://campusm.gw.com/campusm"> [Note: This is the XML namespace, and should always be as it appears here.]
<ns1:rooms>
<ns1:last-updated>[date and time when this information was collected (ISO 8601 format, local time)]</ns1:last-updated>
<ns1:room>
<ns1:rid>[The Customer Location Reference of the position (from the position's configuration)]</ns1:rid>
<ns1:free>[The number of PCs currently available at this position]</ns1:free>
<ns1:seats>[The total number of PCs at this position]</ns1:seats>
<ns1:name>[A name for the position. It is recommended to make this identical to the Description of this position in the position's configuration.]</ns1:name>
<ns1:desc>[An additional description of the position]</ns1:desc>
<ns1:isParent>false</ns1:isParent> [Note: This should always be false.]
</ns1:room>
.
.
.
</ns1:rooms>
</ns1:pcAvailabilityResponse>
The following is an example:
<ns1:pcAvailabilityResponse xmlns:ns1="http://campusm.gw.com/campusm">
<ns1:rooms>
<ns1:last-updated>2024-12-24T15:52:14.</ns1:last-updated>
<ns1:room>
<ns1:rid>room1</ns1:rid>
<ns1:free>52</ns1:free>
<ns1:seats>60</ns1:seats>
<ns1:name>The Mac Lab</ns1:name>
<ns1:desc>room1</ns1:desc>
<ns1:isParent>false</ns1:isParent>
</ns1:room>
<ns1:room>
<ns1:rid>room2</ns1:rid>
<ns1:free>22</ns1:free>
<ns1:seats>60</ns1:seats>
<ns1:name>The PC Lab</ns1:name>
<ns1:desc>room2</ns1:desc>
<ns1:isParent>false</ns1:isParent>
</ns1:room>
<ns1:room>
<ns1:rid>room3</ns1:rid>
<ns1:free>9</ns1:free>
<ns1:seats>60</ns1:seats>
<ns1:name>The Chaos Lab</ns1:name>
<ns1:desc>room3</ns1:desc>
<ns1:isParent>false</ns1:isParent>
</ns1:room>
<ns1:room>
<ns1:rid>room4</ns1:rid>
<ns1:free>0</ns1:free>
<ns1:seats>60</ns1:seats>
<ns1:name>The Tablet Lab</ns1:name>
<ns1:desc>room4</ns1:desc>
<ns1:isParent>false</ns1:isParent>
</ns1:room>
</ns1:rooms>
</ns1:pcAvailabilityResponse>
Positions that are defined in App Manager as belonging to the PC-availability location category are only marked on the map if the XML output contains information about them.