
360 Core: Library-Specific Holdings: Uploading Multiple Titles to a New Library-Specific Holdings Database
- Product: 360 Core Client Center
How do I upload multiple titles to my new (empty) library-specific holdings database?
These steps are used to upload multiple titles to your new (empty) library-specific holdings database (also called library-managed holdings). If you have only a few titles to add, you can use the instructions for Adding Individual Titles to Your Library-Specific Holdings Database. If your library-specific holdings database already has titles in it, you must use the instructions for Updating Your Library-Specific Holdings Database.
- On the Data Management home page, click on the "0" in the Titles column for your library-specific holdings database:
NOTE: If there are already some titles included in this database, the number in the Titles column will be something other than 0. Instead of using the rest of these instructions, you should go to Updating Your Library-Specific Holdings Database.
- On the Database Details screen, click Titles in the tree menu on the left.
- Then click Upload Titles on the upper-right side of the page.
- The Upload Library Specific Holdings screen will appear. From here, click Download Template to save a database template:
- The template is a text document with columns provided (data is separated by tabs). You can enter your data into the file using any kind of text editor; if you do that, skip to Step 6 below.
- Alternatively, if you prefer to enter your data in a spreadsheet, you can open a spreadsheet application, such as Microsoft Excel, and open your text file from within the application. (You may need to change "Files of type " to All Files in order to see the text file.)
If you use Excel, it will start the Text Import Wizard. Accept all the default suggestions (in other words, it's a delimited file, importing from row 1, and the delimiter is a Tab), until you get to the step that allows you to select the data format for each column: Here you need to change the default for the first column -- Title -- to Text format. The remaining columns may stay as General:
- When you add new titles to the file, each title gets its own row (line), with the different columns available for all the information about that title. The only column that must be filled is the Title column, and (if your library subscribes to the 360 Core: eBooks service) the Type column. If you want your patrons to be able to click directly from a title to the resource itself, you'll also need to provide a Default URL.
The Type column will not show up in the spreadsheet template unless you subscribe to the 360 Core: eBooks service. If you do subscribe to the eBooks service, the Type column should contain either "Journal" or "Book." If your library does not subscribe to the eBooks service, and you choose to create your own spreadsheet rather than use the templates provided, please do not include a column for Type as this will cause an error in the upload process.
If you want to add titles with Japanese, Korean, or Chinese (Simplified or Traditional) characters, you may use the two right-most columns (Language ID and Alphabetization) to indicate how the titles should be sorted. See Chinese, Japanese, and Korean Alphabetization in E-Journal Portal for details.
For more information about what information is helpful to include, see this document.
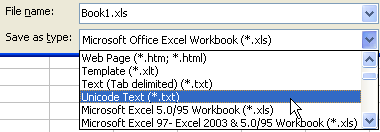
- After adding all the new titles, Save the file as a text document (.txt) again.
NOTE: If your file contains any titles that have non-Latin characters, you must save the file as a Unicode text document (.txt):
NOTE: Although our uploading system can handle large files, there is a limit to how large the file can be. You may need to split the file into multiple, smaller files.
- Back on the Upload Library-Specific Holdings page, click Browse to locate the file you have saved to your computer.
- Before uploading, notice that there is an Overwrite Existing checkbox below the File To Upload field. The box is selected by default, meaning your newly uploaded file will automatically overwrite any existing files. Leave this box checked, because you want the new file to overwrite the empty database.

- Once you have selected the file, click Upload on the right side of the header.
- You will see a pop-up window confirming that the file has been uploaded. Please note that this does not necessarily mean that the file has been successfully imported. Click OK.
- Shortly following the pop-up, you will receive an email message confirming that receipt of your files. The message will inform you if errors have occurred. Proceed to the next step: Viewing Your Upload Status.
- Date Created: 9-Feb-2014
- Last Edited Date: 15-Dec-2020
- Old Article Number: 7128