
Configuring Circulation Desks
This page describes how to configure circulation desks.
For links to all the main fulfillment documentation pages see Fulfillment.
Configuring Circulation Desks
- General System Administrator
- Fulfillment Administrator
- Adding a circulation desk (see Adding a Circulation Desk)
- Editing a circulation desk (select Edit from the row actions list)
- Deleting a circulation desk (Delete from the row actions list)
Adding a Circulation Desk
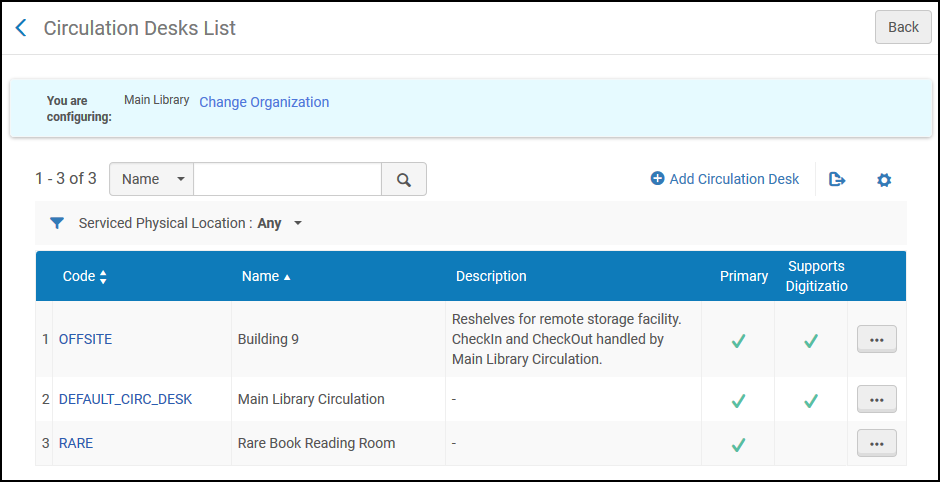
- Go to the Circulation Desk page (Configuration Menu > Fulfillment > Library Management > Circulation Desks).
- Select Add Circulation Desk. The Circulation Desk – General Information page appears. This is the first page of a five-page wizard.
 Circulation Desk – General Information PageYou can create a new circulation desk by creating a copy of an existing circulation desk. Select Duplicate from the row actions list and modify the new circulation desk as needed.
- Enter the circulation desk code and name (both required) for the new circulation desk.
- Enter information in the remaining optional fields, as described in the following table.
Circulation Desk – General Information Fields Field Description General Details: Primary Select this checkbox if the circulation desk can perform check-out and check-in services for another library. For details, see Configuring Fulfillment Relationships. For the request option to display in Primo, a library must have at least one primary desk configured.Reading room desk Select this checkbox if the circulation desk serves a reading room. - When a patron checks out a resource from a reading room, the patron is not permitted to remove the resource from the reading room.
- When a patron checks a resource in to a reading room, the patron must specify the check-in mode:
- Final – The patron no longer requires the resource, and the resource can therefore be returned to its permanent location.
- Not final – The patron still requires the resource. The resource should therefore be stored on the reading room’s hold shelf.
- If a circulation desk serves as a reading room, regular loans and returns (check-in/check-out) cannot be performed at this desk.
- If a circulation desk serves as a reading room and has a self check profile attached, items that are checked out via self check at this desk will not get desensitized.
- Reading-room functionality does not support fulfillment-network loans; network resources cannot be returned at reading rooms as "not final."
Location to move items to When configuring a reading room desk, select a location that will temporarily store the loaned items. The locations drop down box is populated by the list of locations that have a reshelving relationship with this desk. Selecting a location is optional; this field is blank by default. Only one temporary location may be selected at a time. Restore from reading room at checkin When configuring a reading room desk, if a location has been selected in the Location to move items to field, this field is added. This option defines the sequence of events that occur when a patron does a final check-in for a resource that is temporarily located in the reading room:
- When selected, Alma records the resource as being removed from the reading room and currently located at its permanent shelving location as soon as the final check-in is performed at the reading room.
- When cleared, Alma records the resource as being removed from the reading room and currently located at its permanent shelving location when it is checked in at the permanent shelving location.
If the terms of use (TOU) at the reading room differ from those at the permanent shelving location, the reading-room TOU remain in force until the location of the resource is updated. Among other things, this can impact the fines and fees associated with the resource.
Picks from shelf Select this checkbox to indicate that the circulation desk can pick up items from the shelf. When this checkbox is cleared, the circulation desk cannot pick up items from the shelf. For example, you can clear this checkbox for an unmanned circulation desk that provides return bins for reshelving but does not handle pick-up-from-shelf requests.If you select the Picks from Shelf checkbox, you also need to select the Has hold shelf checkbox in any circulation desk for this library.In order to place a request, the item's location must be attached to a circulation desk that is configured with both Picks from shelf and reshelve capabilities.Supports personal delivery Select this checkbox to indicate that the circulation desk can process personal delivery requests for users. If personal delivery is configured for a patron and the desk at which the Receive action is performed does not have this checkbox selected, Alma searches for another circulation desk in the library which supports personal delivery, and the item is sent there. If no such circulation desk exists, Alma searches for a library which supports personal delivery and has a Deliver To relationship with the receiving library. If no such library exists, the item is moved to the hold shelf.If the library that is the owner of the item has been configured with ‘Allow other libraries to handle personal delivery’ (see Editing a Library) then receiving the item at a desk that has the ‘Supports personal delivery’ attribute will process the personal delivery request even if the receiving library is not the item owner library. If the item owner library is not configured with the ‘Allow other libraries to handle personal delivery’ attribute then the item is sent back to the owning library for processing the personal delivery request.Supports registering new users Select this checkbox to indicate that the circulation desk can register new users that do not exist in Alma. If selected, the Register New User button appears in Manage Patron Services. Supports overriding return date Select this checkbox to have the Override return date and time option available on the Return Items page. Select this checkbox to enable sound alerts for the current circulation desk (disabled by default). This requires a sound alert to be configured in the Sounds Alert Configuration page as described in Configuring Sound Alerts.
Once enabled for a circulation desk, users of that circulation desk will see the sound icon in the scan bar, indicating that sounds are enabled. A user can shut off the sound alerts by selecting the sound icon. See Toggle Sound Alerts for more information.
Time to reshelve (hours)
The period of time that the item is considered as available, but shows as being reshelved in Alma and Primo so patrons and librarians know not to search for it on the shelf. This value overrides a library level configuration and may include decimals. Delay for hold notification (minutes)
Define how long Alma waits before sending a hold notification to a patron. When the delay is complete, Alma checks to see if the request is still active and if so, sends the hold notification to the patron. If the value is populated for both the circulation desk and the library, the value in the circulation desk is used. Additional Information: Description A textual description of the circulation desk. Map Not in use. Printing Information: Default Printer The default printer that is associated with the circulation desk can be selected from the Default Printer list. If only the default printer is selected, this is the printer used for all non-automated print jobs. If more printers are selected in the Additional Printers field, each user has the option of where to print. Select a printer from the drop-down list.Additional Printers After the Default Printer is selected, this field is made available to select one or more additional printers that users may set for their printing. Selecting one or more printers here will display an additional drop-down list on the Currently At drop-down window. Creates return receipts Select for return receipts to automatically be printed at the circulation desk. The Return Receipt Letter is generated. For details on customizing the letter, see Configuring Alma Letters.
The receipt is triggered at the circulation desk only when selecting "Done" (
 ) to terminate a session with a patron.
 Return receipt destination Displayed only when Creates return receipts is selected. From the drop-down list, choose the destination for the return receipt: - User preferred email
- Circulation desk printer
If User preferred email is selected but no email exists for the user, the receipt will be printed to the printer instead.
Creates loan receipts Select for loan receipts to automatically be printed at the circulation desk. The Loan Receipt Letter is generated. For details on customizing the letter, see Configuring Alma Letters. The receipt is triggered at the circulation desk only when selecting "Done" () to terminate a session with a patron. The Creates loan receipts also affects loans from self-check machines. Because there are no sessions at self-check machines, every loan action triggers the sending of receipt.Loan receipt destination Displayed only when Creates loan receipts is selected. From the drop-down list, choose the destination for the loan receipt: - User preferred email
- Circulation desk printer
If User preferred email is selected but no email exists for the user, the receipt will be printed to the printer instead.Hold Shelf Information: Has hold shelf Select this checkbox if the circulation desk has a hold shelf. The following fields are then displayed: - Hold shelf sorting – The criteria by which hold shelf items are sorted. Choose from the following options:
- Additional ID - This helps institutions to have a shared tracking number with the patrons. See also Configuring Fulfillment Jobs.
- Call Number
- Hold Shelf Expiry Time
- Hold Shelf Placement Time
- Requester ID - The Primary identifier of the user who requested the item
- Requester Name - The name (Last name, First name) of the user who requested the item
- Requester Preferred Name - The preferred name (Preferred last name, Preferred first name) of the user who requested the item
- Booking Request Start Time
- Title
- Maximum time on hold shelf (Days) – The maximum number of open days that an item can stay on the hold shelf.
The Fulfillment Hold Shelf Period policy (configured on the Request TOU) that is applicable for the on hold shelf item also plays a role in determining how long the item remains on the active hold shelf. Alma uses the lesser of the request’s Hold Shelf Period policy and the circulation desk’s Maximum time on hold shelf attribute. For example: if the circulation desk’s “Maximum time on hold shelf” attribute is 3 and the request’s “Hold Shelf Period” policy is 5, then the item will stay on the hold shelf for 3 days.
- Has hold shelf processing – Select to indicate that the circulation desk can store items that need to be processed before arriving at the hold shelf. Selecting this option displays the Place directly on hold shelf field in the following locations:
- Scan In Items page – Scan In Items tab (see Scanning Items)
- Scan In Items page – Change Item Information tab (see Scanning Items)
- Manage Item Returns page (see Returning Items)
If you select the Has hold shelf checkbox, you also need to check the Picks from Shelf checkbox in any circulation desk for this library.When using a self-check machine to return an item, if Has hold shelf processing is selected, the item goes directly to hold shelf processing. If Has hold shelf processing is not selected, the item is registered as returned and its status appears as Item In Place. It remains in the self-check machine’s bin and must be scanned in by an operator to activate the request.
Notify patron of canceling expired hold Select to notify the patron when their item on the hold shelf has expired. Digitization Department: Supports digitization Select this checkbox if the circulation desk supports digitization. The Work time (days) field is then displayed; the value of this field indicates the number of days for which the item is unavailable (field is for informative purposes – this value is not binding). Payment Information: Credit card Select to indicate that the circulation desk can accept payment by credit card. Cash Select to indicate that the circulation desk can accept payment by cash. Online Select to indicate that the circulation desk can accept payment performed online. Check Select to indicate that the circulation desk can accept payment by check. Print receipt? Select whether the circulation desk can print a receipt. Receipt copy email Enter the e-mail address to which you want receipts for payment to be sent. Self-Check Information: Has self check Select this checkbox if the circulation desk allows patrons to check in and check out resources using a self-check machine without the assistance of a circulation desk staff member. The following fields are displayed: - Integration profile
- Terminal password
RFID Information IP Address The RFID IP address of the relevant RFID reader. This is relevant if using Nedap RFID, or using the Other RFID type with a central RFID server that communicates with the RFID reader. If the department is managed by a circulation desk, enter the IP address here. If the department is not managed by a circulation desk, enter the IP address in Work Order Departments (See Adding a Department).
- Select Next. The Circulation Desk – Physical Locations page appears. This is the second page of the wizard. Use this page to specify which locations are served by the circulation desk.
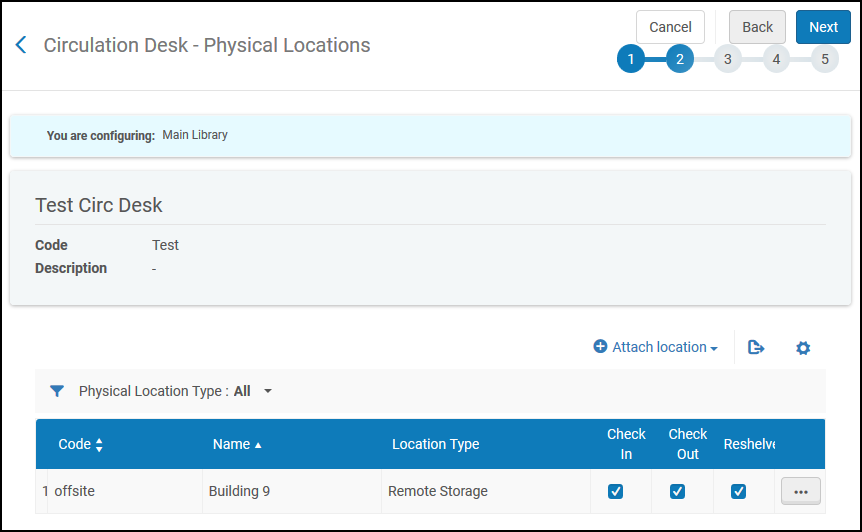 Circulation Desk – Physical Locations Page
- From the Physical location type filter, select to display all locations, or only closed, open, unavailable, or remote storage locations.
- Select Attach Location. From the Physical location name drop-down list, select the name of the location to be added. Note that a location may be served by more than one circulation desk.
- Specify the services — Check in, Check out, and/or Reshelve — that are performed by the circulation desk for the selected location.
If you do not select Check in and/or Check out, you cannot put an item belonging to this location on the hold shelf.
- Select Attach Location to add the selected location to the list of locations that are served by the circulation desk.
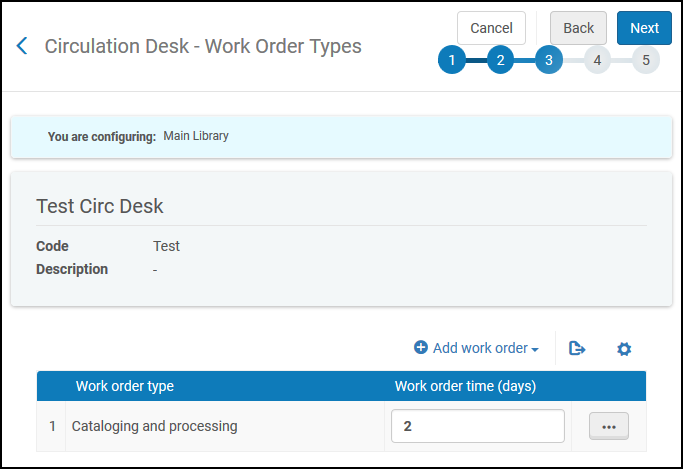
- Select Next. The Circulation Desk – Work Order Types page appears. This is the third page of the wizard. Use this page to define work order types to be associated with the specified circulation desk.
- Select Add Work Order. The Add work order dialog box appears.
- In the Work order type field, specify a work order type to be handled by the circulation desk.
- In the Work order time (days) field, enter the number of days for which you want the work order to be handled by the circulation desk.
- Select Add to add the work order and enable adding another work order, or select Add and Close to add the work order and return to the Circulation Desk — Work Order Types page.
 Add Work Order Dialog Box
 - Select Save. The circulation desk serves as a work order department for the indicated work order types.
- Select Next. The Circulation Desk - Operators page appears. This is the fourth page of the wizard. Use this page to define which operators have permission to perform circulation activities and handle patron requests at the circulation desk.
- Select Add Operator. The Add Operator dialog box appears.
- Select an operator (required) who performs functions at the circulation desk.
- Specify the roles — Circulation Desk Operator, Circulation Desk Manager, and/or Requests Operator — of the operator (see Adding Roles to Users for details on operator roles).
- Select Add and Close to close the dialog box. The selected operator is added to the list of operators of the circulation desk.
- Select Next. The Circulation Desk – Automatic Printing page appears. This is the fifth and last page of the wizard. Use this page to specify the rules for automated printing of request slips from the circulation desk for items that need to be fetched from the shelf. (Note that when an item is not on the shelf and its request processing starts when it is scanned in, the printing occurs at the desk at which it is scanned in.)
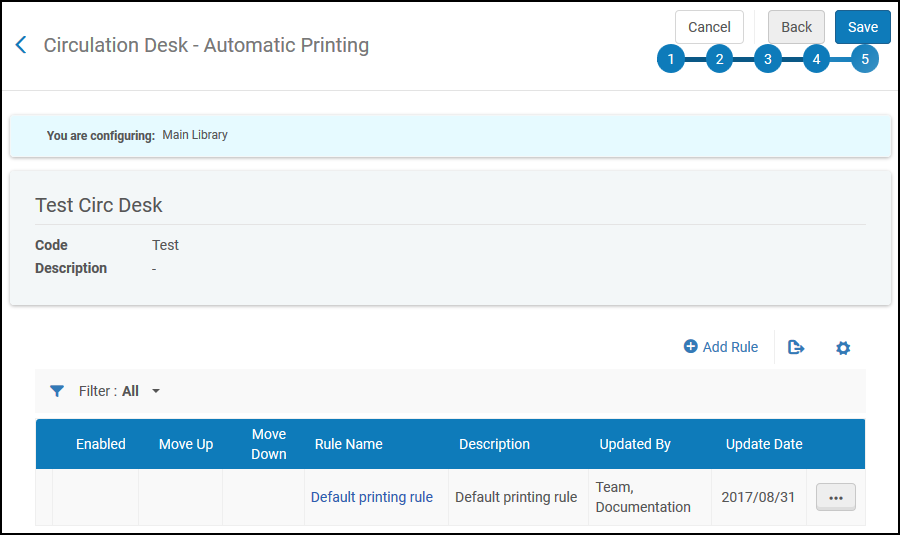 Circulation Desk – Automatic Printing Page
- Select Add Rule. The Automatic Printing Rules Editor page appears.
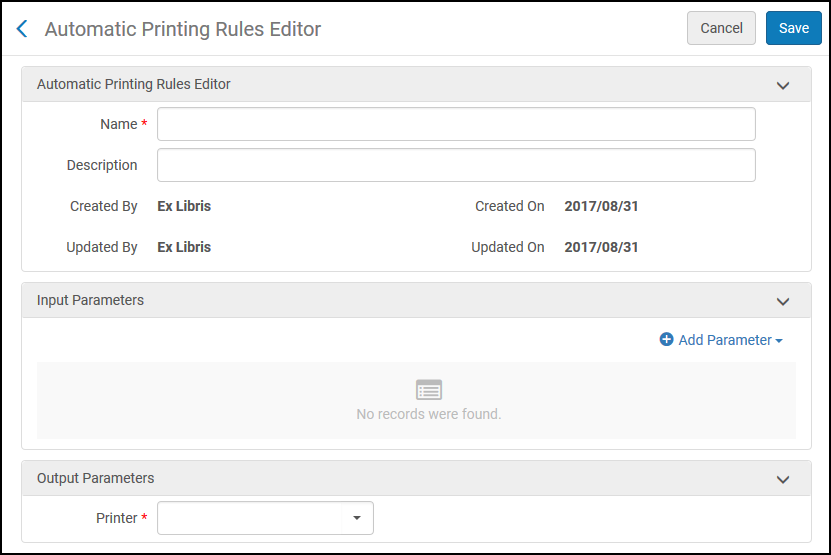 Automatic Printing Rules Editor Page
 - Enter the Name (required) and Description (optional) of the rule you are defining.
- Specify the input parameters for the rule, by Location and/or Material Type. For example, specifying Location = Archive and Material Type=Book indicates that when the item’s location is the archive and the requested material is a book, automatic printing is invoked according to the setting in the Output Parameters section.
- Select Add Parameter. The set of input parameters is added as a row in the list of input parameters for the circulation desk. Note that all the parameters in the list must be satisfied in order for the output parameter to be applied.
- In the Output Parameters section, select the printer to which you want to automatically print the items that satisfy the input parameters, or select No Printing to disable automatic printing for the items that satisfy the input parameters.
- Select Save on the Automatic Printing Rules Editor page to save the rule.
- Select Add Rule. The Automatic Printing Rules Editor page appears.
- On the Circulation Desk - Automatic Printing page, under Default Rule, select Edit. The Automatic Printing Rules Editor page displays the default printing rules.
- In the Automatic Printing Rules Editor section, modify the default rule name and description if required.
- In the Output Parameters section, select the printer on which you want to automatically print the items that do not satisfy the previously defined rules, or select No printing to disable automatic printing for the items that do not satisfy the previously defined rules.
- Select Save to save your changes to the default rule.
- Select Save on the Circulation Desk – Automatic Printing page to store all the circulation desk detail information that you entered and return to the Circulation Desks page. The new circulation desk appears in the list of circulation desks defined for the library.