Translatable
This page covers advanced resource sharing configurations including shipping cost rules, levels of service, item policy exceptions, resource languages, etc.
For links to all the main fulfillment documentation pages see
Fulfillment.
For a list of links to the main resource sharing online help pages, see
Resource Sharing.
For additional configuration tasks related to resource sharing, see:
Configuring Temporary Item Creation Rules
To configure temporary item creation rules, you must have one of the following roles:
- General System Administrator
- Fulfillment Administrator
A temporary item creation rule applies to a resource sharing library. A temporary item creation rule indicates that items coming from a specified partner must be moved to a specific location. You then configure a regular fulfillment rule which indicates that, for items in the temporary item creation rule, a specific Terms of Use must be invoked.
For example, you configure a temporary item creation rule which indicates that items coming from partner
A must be moved to location
X. You then configure a regular fulfillment rule which indicates that, for items in location
X (the location specified in the temporary item creation rule), Terms of Use
Y is to be invoked. For details on configuring regular fulfillment rules, see
Editing a Fulfillment Unit.
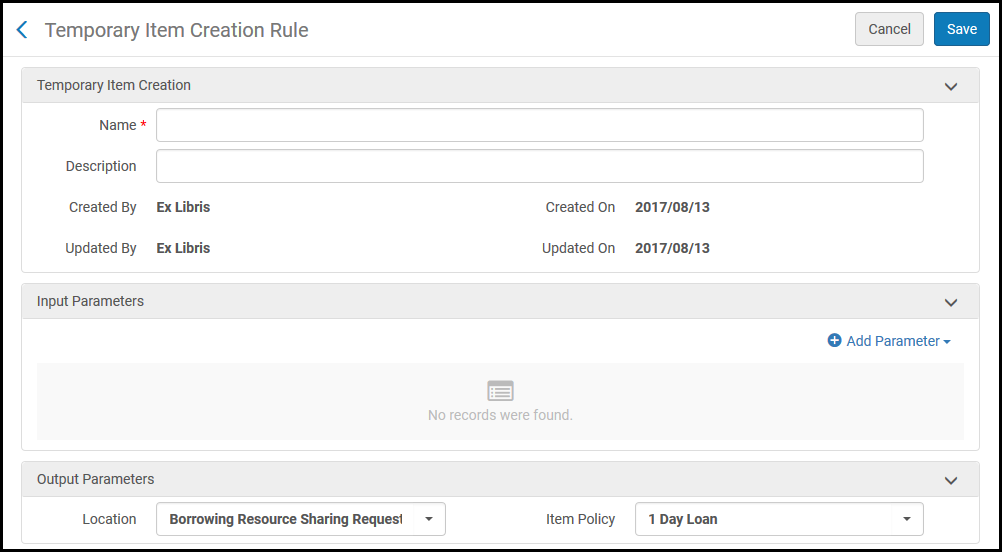
You configure temporary item creation rules on the Temporary Item Creation Rule page (
Configuration Menu > Fulfillment > Library Management > Temporary Item Creation Rules). For more information about rules tables, see
Rules Tables.
Temporary Item Creation Rule Page
The Temporary Item Creation Rules option appears only when you are in the context of a Resource Sharing Library; select Resource Sharing Library from the Configuring filter on the Fulfillment Configuration page.
The temporary item creation rules list displays rules only for the library that is currently being configured.
Temporary item creation rules are configured similarly to regular fulfillment rules (see
Editing a Fulfillment Unit), with the following differences:
- For Input Parameters, the following values are available:
- Circulation desk
- Days until due date – Enables you create a rule based on the number of days from receiving an item until the item’s due date.
For example:
- Name = Days until due date
- Operator = Greater than
- Value = 15
These parameters indicate that if there are more than 15 days from the time of receiving the item until the due date, the item belongs to the location indicated in the Location field, according to the policy indicated in the Item policy field. The Location and Item policy fields are located in the Output Parameters section.
- Resource sharing partner
- For Output Parameters, specify the Location to which to move the items, and the Item Policy to invoke. When working with an NCIP partner, the value in the Location field is used as the default location for the temporary item that is created when receiving a borrowing request.
Configuring Shipping Cost Lender Rules
To configure shipping cost lender rules, you must have one of the following roles:
- Fulfillment Administrator
- General System Administrator
Shipping cost lender rules enable you to configure the conditions under which shipping costs are applied to resource sharing lending requests.
To configure shipping cost lender rules:
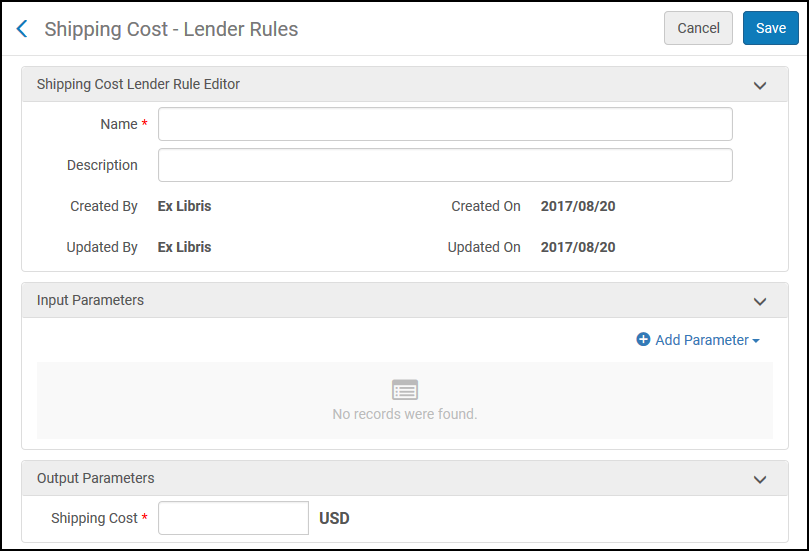
- On the Shipping Cost – Lender Rules List page (Configuration Menu > Fulfillment > Resource Sharing > Shipping Cost Lender Rules), select Add Rule. The Shipping Cost – Lender Rules page appears. For more information about rules tables, see Rules Tables.
Shipping Cost – Lender Rules Page
- Enter a name for the rule in the Name field.
- Configure input and output parameters in the relevant fields. Configuring a shipping cost lender rule is performed in the same manner as other rule configurations in Alma (see Configuring Automatic Loan Renewal Rules).
- Select Save. The shipping cost rule appears on the Shipping Cost – Lender Rules List page.
Configuring Shipping Cost Borrower Rules
To configure shipping cost borrower rules, you must have one of the following roles:
- Fulfillment Administrator
- General System Administrator
Shipping cost borrower rules enable you to configure the conditions under which shipping costs are applied to resource sharing borrower requests. The rules are run upon receiving the Borrowing Request.
To configure shipping cost borrower rules:
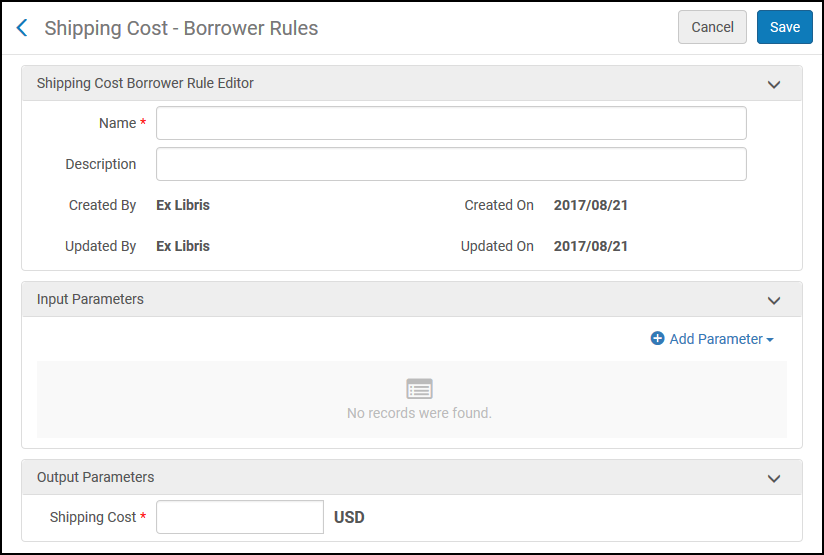
- On the Shipping Cost – Borrower Rules List page (Configuration Menu > Fulfillment > Resource Sharing > Shipping Cost Borrower Rules), select Add Rule. The Shipping Cost – Borrower Rules page appears. For more information about rules tables, see Rules Tables.
Shipping Cost – Borrower Rules Page
- Enter a name for the rule in the Name field.
- Configure input and output parameters in the relevant fields. Configuring a shipping cost borrower rule is performed in the same manner as other rule configurations in Alma (see Configuring Automatic Loan Renewal Rules).
- Select Save. The shipping cost rule appears on the Shipping Cost – Borrower Rules List page.
Configuring Sending Borrowing Request Rules
To configure sending borrowing request rules, you must have one of the following roles:
- Fulfillment Administrator
- General System Administrator
Sending borrowing request rules indicate when a borrowing request is sent automatically. Any borrowing request that matches a rule for automatic sending is automatically sent to the active partner, without requiring staff intervention.
Sending borrowing request rules appear on the Sending Borrowing Request Rules List page (
Configuration Menu > Fulfillment > Resource Sharing > Sending Borrowing Request Rules). For more information about rules tables, see
Rules Tables.
Sending Borrowing Request Rules List Page
Sending borrowing request rules that have been distributed from a network is indicated by a check mark in the
Network Rules List section of the page. The
network_sending_rules_precedence parameter determines whether the network, institution, or library level rules are executed first. For more information, see
Configuring Other Settings.
The following actions can be performed on this page:
- Add sending borrowing request rules (see Adding Sending Borrowing Request Rules)
- Edit sending borrowing request rules (select Edit from the row actions list)
- Duplicate sending borrowing request rules (select Duplicate from the row actions list and modify the relevant fields)
- Delete sending borrowing request rules (select Delete from the row actions list)
- Edit the Default Sending Borrowing Request Rule (select Edit from the row actions list of the default rule)
- Disable a sending borrowing request rule
Automatic send rules are activated only following a manual or automatic locate process.
Adding Sending Borrowing Request Rules
You can add a Sending Borrowing Request Rule.
To add sending borrowing request rules:
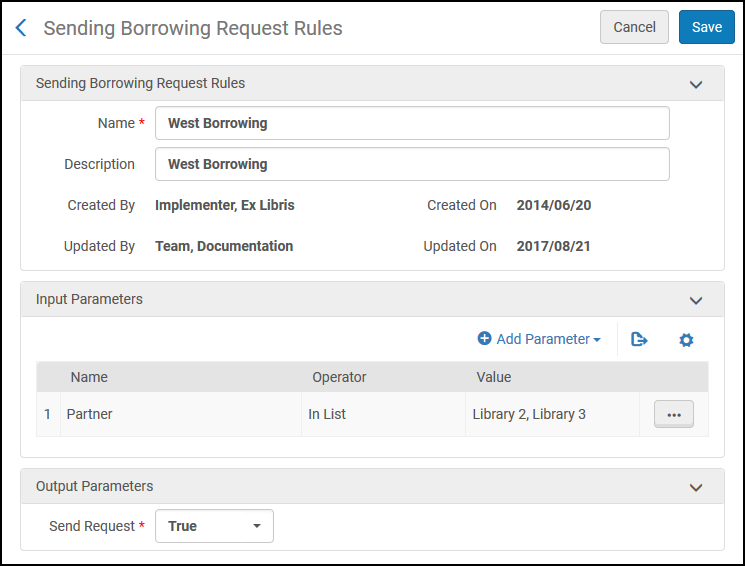
- On the Sending Borrowing Request Rules page (Configuration Menu > Fulfillment > Resource Sharing > Sending Borrowing Request Rules), select Add Rule. The Sending Borrowing Request Rules page appears.
Sending Borrowing Request Rules Page
- In the Sending Borrowing Request Rules section, enter a name in the Name field.
- Configure input parameters in the relevant fields. Configuring a sending borrowing request rule is done in the same manner as other rule configurations in Alma (see Configuring Automatic Loan Renewal Rules). Note that it is necessary to include a parameter (it can be a generic parameter, such as 'Partner is not empty'), or the rule will not be applied. The input parameters are:
- Converted from Hold Request - True or False
- Missing Article Metadata Fields - Choose one or more of the metadata fields
- Missing Book Metadata Fields - Choose one or more of the metadata fields
- Partner - Choose one or more of the configured resource sharing partners
- Price - Enter a decimal amount
- Requested Format - Valid options are Digital, Physical, and Physical non-returnable
- Self Ownership - Select True or False
- User Group - Choose one or more of the configured user groups
- Configure output parameter. The only output option is Send Request, which can be set to True or False. If the input value specified above is found on the request, the output parameter determines if the request is sent.
- Select Save. The configured rule appears on the Sending Borrowing Request Rules List page.
When the configured rule parameters are met for a resource sharing borrowing request, the request is automatically sent after an automatic rota assignment is invoked.
Adding the fields: ‘Chapter Title’ and ‘Chapter Author’ as mandatory will automatically reject any request coming from Primo that will miss this information.
Configuring Send Borrower Document Delivery Rules
Borrowers can set up rules which determine whether a digitally received resource should be automatically shared with the requesting patron, or wait for library staff handling before being forwarded to the requesting patron. For example, the document may require to be processed to increase its accessibility for a requester that requires increased accessibility.
These rules replace the now obsolete borrower_document_delivery_send_automatically parameter.
The default value of the rules is ‘true’, meaning that documents will be automatically forwarded unless a rule is configure to prevent that.
These rules can be configured at Configuration > Fulfillment > Resource Sharing > Send Borrower Document Delivery Rules.

Send Borrower Document Delivery Rule Editor
See also Peer to Peer Resource Sharing.
Configuring Additional Requested Media
To configure additional requested media, you must have one of the following roles:
- General System Administrator
- Fulfillment Administrator
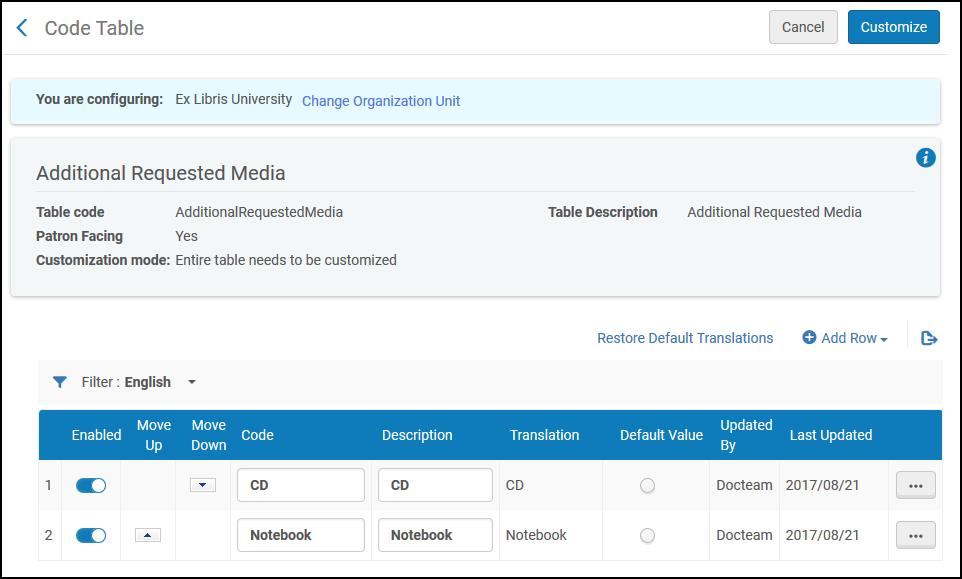
You can expand the granularity of requested resources, enabling a digital request to be requested as an audio or visual file, or a physical request to be requested as a book or a CD. When specifying the exact format in which the resource is required, the lending library processes the request in the requested format.
The options entered in this table appear when adding a borrowing or lending request, depending on the configuration in requested media definitions; see
Configuring Requested Media Definitions. Also see
Creating a Borrowing Request and
Creating a Lending Request.
Configuring requested media is done on the Additional Requested Media Code Table page (
Configuration Menu > Fulfillment > Resource Sharing > Additional Requested Media). For more information about code tables, see
Code Tables.
Additional Requested Media Code Table Page
To configure the requestable media types for resource sharing requests:
Configuring Requested Media Definitions
To configure requested media definitions, you must have one of the following roles:
- Fulfillment Services Operator
- Fulfillment Services Manager
You can configure attributes that pertain to the requested media types configured on the Additional Requested Media Code Table page (see
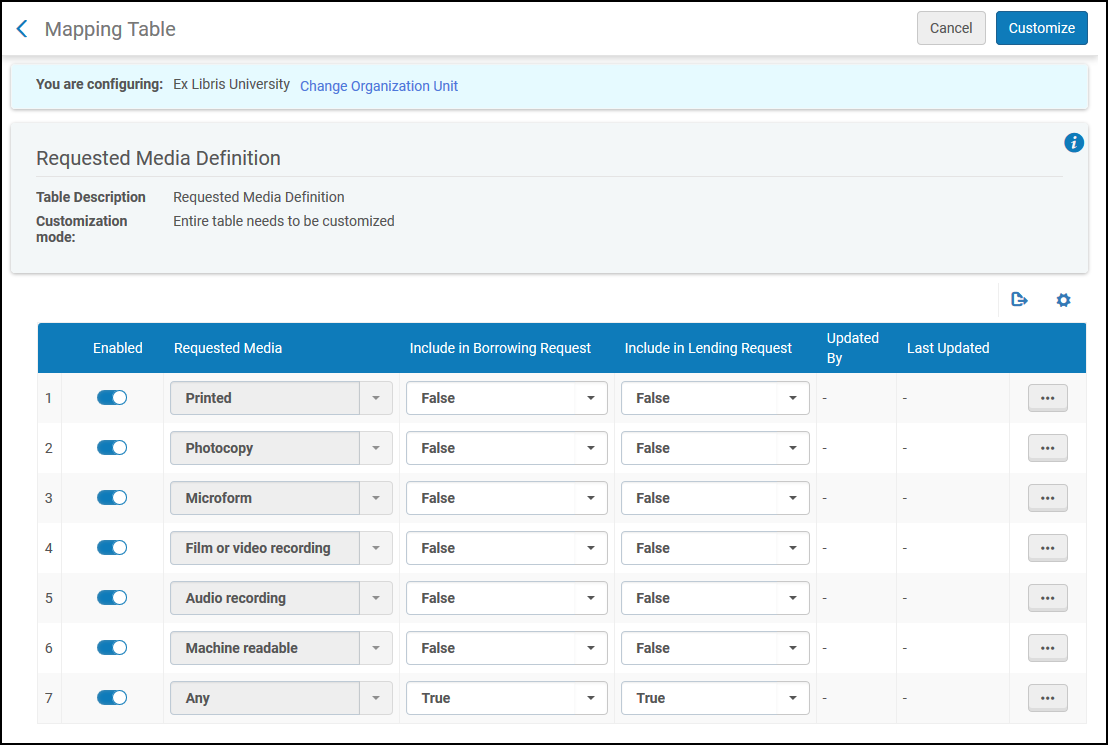
Configuring Additional Requested Media). The configurable attributes indicate whether the media types are to be available when submitting borrowing and/or lending requests. You can also configure a media type to not be available for either borrowing or lending requests.
The options entered in this table appear when adding a borrowing or lending request; see
Creating a Borrowing Request and
Creating a Lending Request.
Configuring media type attributes is done on the Requested Media Definition Mapping Table page (
Configuration Menu > Fulfillment > Resource Sharing > Requested Media Definition). For more information about mapping tables, see
Mapping Tables.
Requested Media Definition Page
To specify media types to be available when submitting a resource sharing request:
- Open the Requested Media Definition Mapping Table page (Configuration Menu > Fulfillment > Resource Sharing > Requested Media Definition). The default requested media types display, as follows:
- Printed
- Photocopy
- Microform
- Film or video recording
- Audio recording
- Machine Readable
- Any
- In the Create a New Mapping Row section, you can add the additional media types that were configured on the Additional Requested Media Code Table page (see Configuring Additional Requested Media), as follows:
- In the Requested Media field, select a media type. The displayed types are those configured on the Additional Requested Media Code Table page.
- In the Include in Borrowing Request field, select whether the media type is to be available when submitting resource sharing borrowing requests.
- In the Include in Lending Request field, select whether the media type is to be available when submitting resource sharing lending requests.
- Select Add Row. The specified media type displays in the Mapping Table Rows table.
- In the Mapping Table Rows table, select True or False in the Include in Borrowing Request and Include in Lending Request columns to indicate whether the specified media type is to be available when submitting borrowing requests or lending requests, respectively.
The Any media type must always be specified as True for both borrowing and lending requests.
Media types configured as True appear in the Requested Media field in the following places:
- When creating a borrowing or lending request either manually or from a search (see Resource Sharing).
- In a Ful Outgoing Email Letter, also known as a borrowing request letter, sent to a resource sharing partner when a borrowing request has an active partner of Type = Email (see Resource Sharing Requests).
- In a Ful Incoming Slip Letter, also known as a print slip letter, sent when selecting the Print Slip link for a lending request (see the relevant description in the Request Sharing Lending Requests Task List Links).
- In a Resource Sharing Shipping Slip Letter, sent when selecting the Ship Item link for a lending request, and ensuring that Automatically Print Slip = Yes on the resulting Shipping Items page (see the relevant description in the Lending Requests Task List Links table in Workflow Actions).
For information about the letters, see Configuring Alma Letters.
- Optionally, select Delete to delete a media type added from the Quick Add section. You cannot delete the default media types.
Configuring Levels of Service
To configure levels of service, you must have one of the following roles:
- Fulfillment Services Operator
- Fulfillment Services Manager
You can configure the levels of service that are available for resource sharing requests on the Levels of Service page (
Configuration Menu > Fulfillment > Resource Sharing > Levels of Service). For more information about code tables, see
Code Tables.
You can enable or disable the levels, and you can change the descriptions. Levels of Service
After configuring the levels of service, you can set the field value in the Primo request form and the borrowing and lending requests. The field also appears on the resource sharing task lists (
Creating a Borrowing Request) and when creating lending and borrowing rules (
Configuring Shipping Cost Lender Rules and
Configuring Shipping Cost Borrower Rules).
Mapping Alma Library Codes to External Library Codes for Libris ILL
To configure requested media definitions, you must have one of the following roles:
- General System Administrator
- Fulfillment Administrator
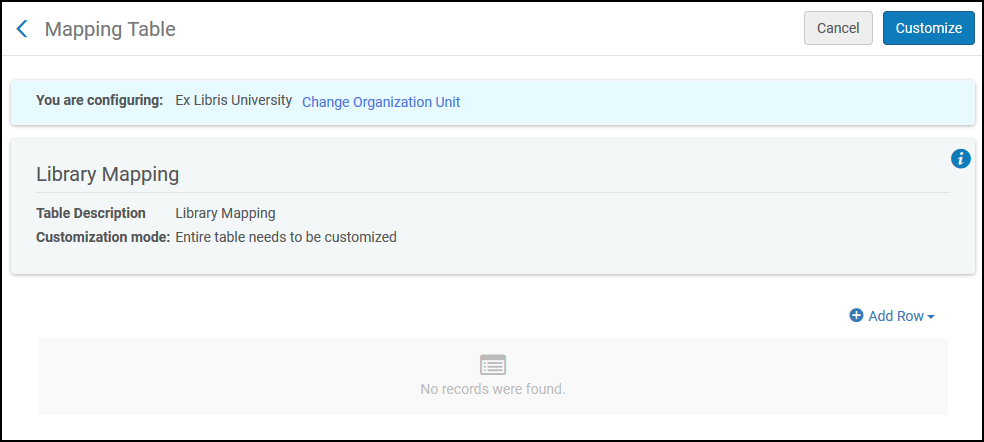
You can map Alma library codes to library codes in external resource sharing systems. This mapping table can be used in conjunction with the resource sharing integration profile. This enables customers using Libris ILL to map their pickup library codes to Alma codes so that resource sharing requests can be imported into Alma from Libris. Access the Library mapping table (
Configuration Menu > Fulfillment > Resource Sharing > Library Mapping). For more information about mapping tables, see
Mapping Tables.
Enter the external library code and its corresponding Alma library code.
Library Mapping
Configuring Brief Audit Fields
To configure brief audit fields, you must have one of the following roles:
- General System Administrator
- Fulfillment Administrator
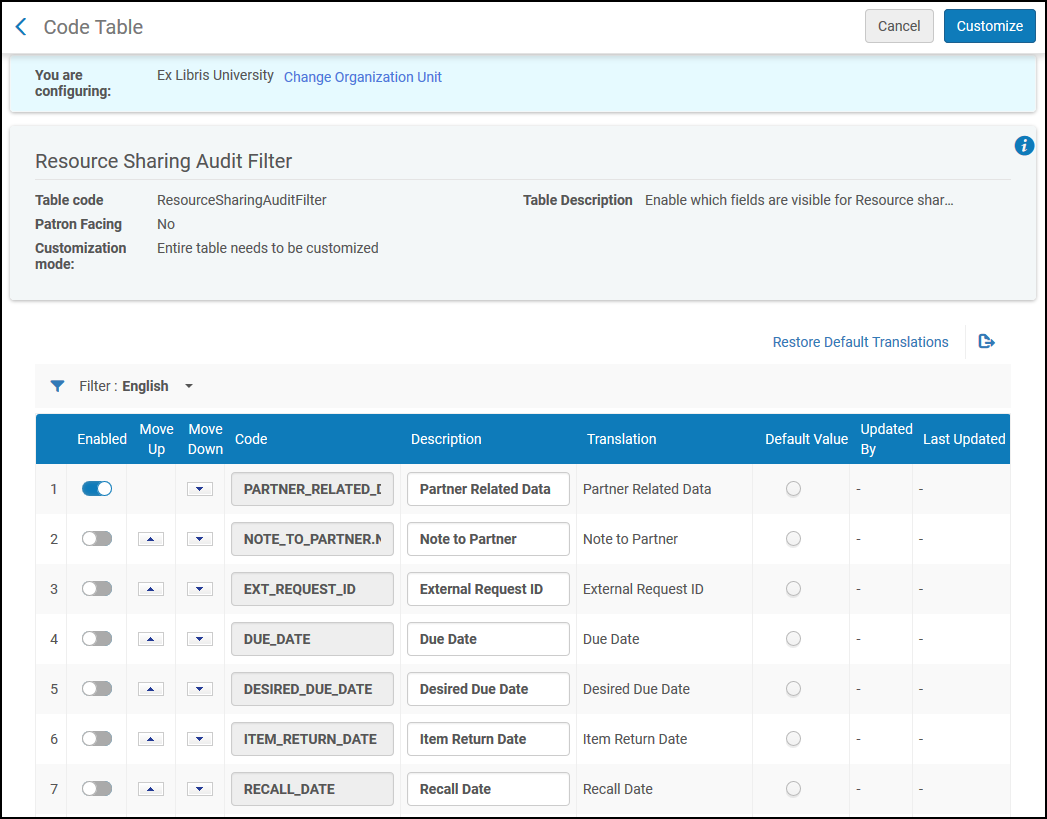
You can configure which audit lines will be visible in the resource sharing requests
History tab on the Brief Audit Fields code table (
Configuration Menu > Fulfillment > Resource Sharing > Brief Audit Fields). For more information about code tables, see
Code Tables. You can enable or disable each field. See
Managing Resource Sharing Borrowing Requests and
Managing Resource Sharing Lending Requests.
Brief Audit Fields
Configuring Resource Languages
To configure resource languages, you must have one of the following roles:
- General System Administrator
- Fulfillment Administrator
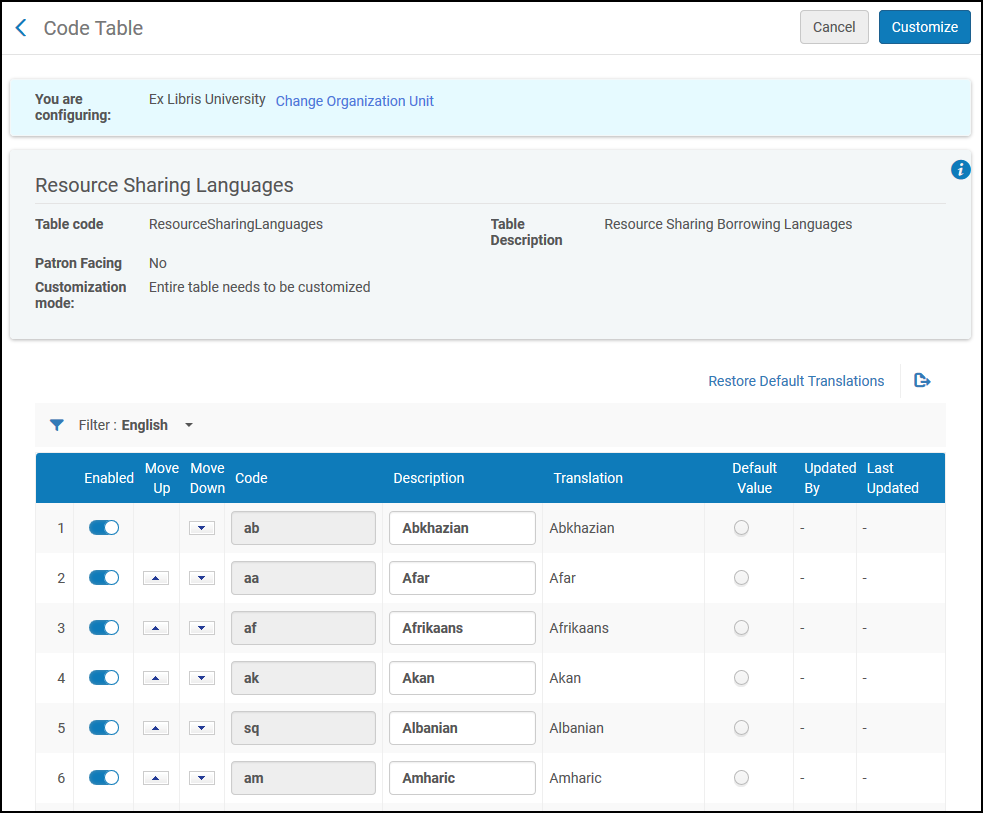
You can enable or disable languages that appear in the
Language drop down in the
Request Attributes section of a resource sharing request, indicating the desired language of the item being requested. See
Managing Resource Sharing Borrowing Requests and
Managing Resource Sharing Lending Requests.
Access the
Resource Languages page (
Configuration Menu > Fulfillment > Resource Sharing > Resource Languages). For more information about code tables, see
Code Tables. You can enable or disable a language, reorder the languages, or edit the name of the language.
Resource Sharing Languages Page
Configuring Item Policy Exceptions
To configure item policy exceptions, you must have one of the following roles:
- General System Administrator
- Fulfillment Administrator
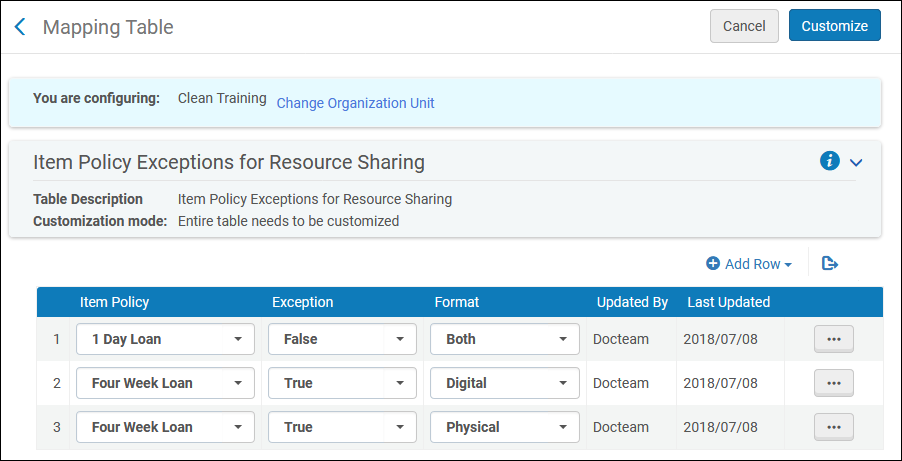
You can configure an item policy exception that indicates that the item should not be shipped for a resource sharing request. Access the Item Policy Exceptions mapping table (
Configuration Menu > Fulfillment > Resource Sharing > Item Policy Exceptions). For more information about mapping tables, see
Mapping Tables. For more information about item policies, see
Configuring Item Policies.
An item policy may be added with the exception set to either True or False. Setting the policy to True will create the item policy exception, which means it will be unavailable for resource sharing. Setting the item policy exception to False means that no exception will be created and the item will continue to be available for resource sharing as previously. The Format may be set to Both, Digital, or Physical. The format is validated when a resource sharing request is created and the item policy exception validation is selected.
Item Policy Exceptions
Configuring Primo Request Form Type by Genre
To configure the Primo request form type by genre, you must have one of the following roles:
- General System Administrator
- Fulfillment Administrator
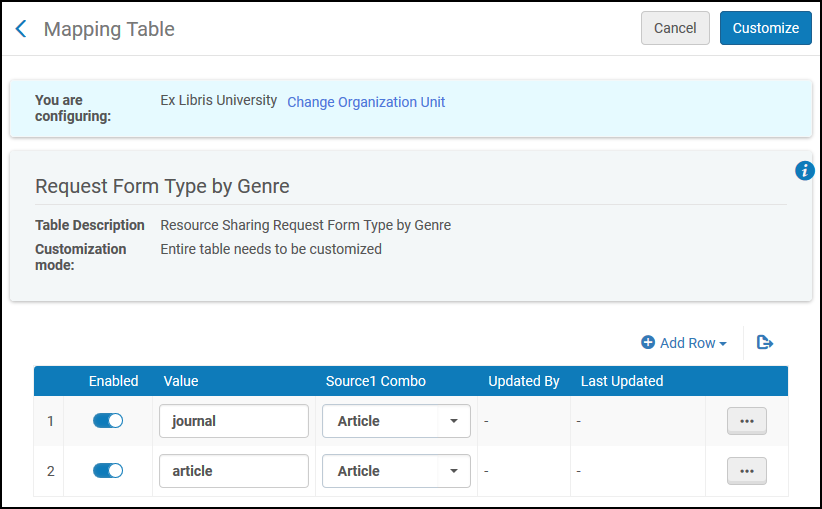
You can map the OpenURL genre field value to the Primo resource sharing request type selected. By default, Primo opens the request form with book selected by default; the other option is article. Access the Request Form Type by Genre mapping table (
Configuration Menu > Fulfillment > Resource Sharing > Request Form Type by Genre). For more information about mapping tables, see
Mapping Tables.
Resource Sharing Request Form Type by Genre
In the quick add section, add the value that appears in the OpenURL genre field. Then select either Article or Book and Add Row. Rows may be enabled or disabled by selecting on the Enabled checkmark.
Configuring Borrowing Request Statuses
To configure the borrowing request statuses, you must have one of the following roles:
- General System Administrator
- Fulfillment Administrator
In order to customize the description and translation text of borrowing request statuses, access the Borrowing Request Statuses code table (
Configuration Menu > Fulfillment > Resource Sharing > Borrowing Request Statuses). For more information about code tables, see
Code Tables.
This page enables you to define the borrowing request's status text that will be displayed in Primo and in the requests list in the Alma patron services page.
Borrowing Request Statuses
Configuring Request Reject Reasons
To configure the request reject reasons, you must have one of the following roles:
- General System Administrator
- Fulfillment Administrator
In order to customize the description and translation text of request reject reasons, access the Automatic Locate Reject Reasons code table (
Configuration Menu > Fulfillment > Resource Sharing > Automatic Locate Reject Reasons). For configuring automatic location of resources and configuration of rejection requests, see
Setting Up Lending Requests.
For more information about code tables, see
Code Tables.
This page enables you to define the request's reject text that will be displayed in Primo and in the requests list in the Alma patron services page.
Request Reject Reasons
Configuring Internal Request Reject Reasons
You can configure the list of internal reject reasons for lending requests at Configuration > Resource Sharing > Configuration > Internal Reject Reasons.
This enables libraries to record their own workflow-related reasons and not be confined by the external list of reject reasons, which are limited by protocols.
The Internal reject reason is optional and only viewable by the lender.
Internal reject reason
For more information, see Managing Lending Requests.
Configuring Renew Reject Reasons
To configure the renew reject reasons, you must have one of the following roles:
- General System Administrator
- Fulfillment Administrator
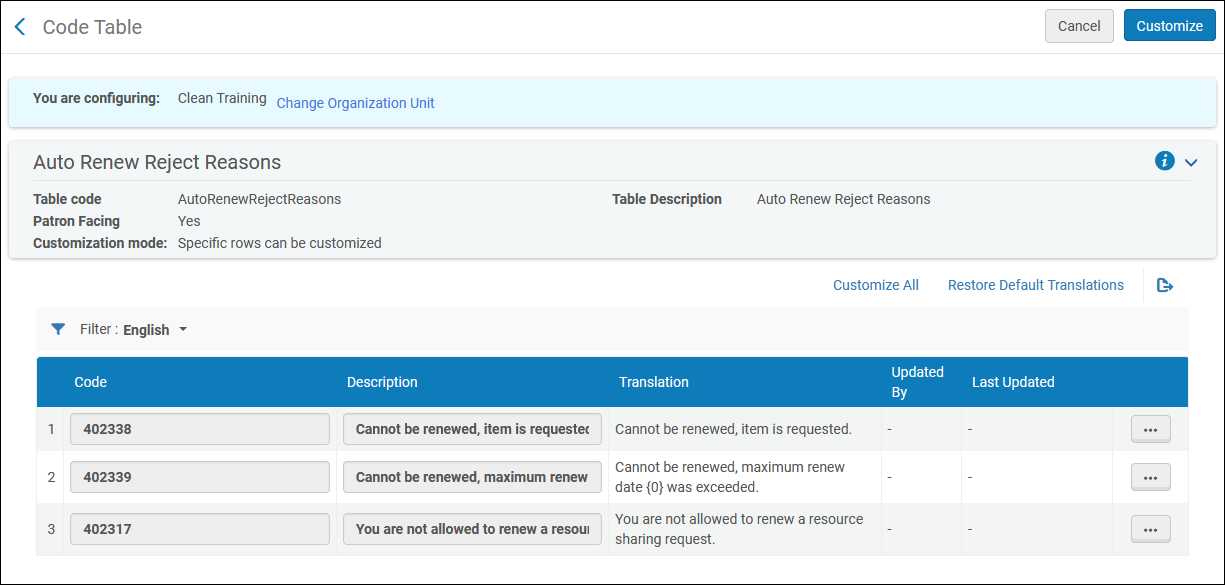
In order to customize the description and translation text of renew reject reasons, access the Automatic Renew Reject Reasons code table (
Configuration Menu > Fulfillment > Resource Sharing > Automatic Renew Reject Reasons). For information on automatic renewal for Borrowing workflow profiles, see the
Automatic renew step in
Workflow Profile Steps. For more information about code tables, see
Code Tables.
This page enables you to define the request's renewal rejection text that will be displayed in the Full Borrowing Info letter (code: FulBorrowingInfoLetter) when it is sent to the patron.
Renew Reject Reasons
Configuring Patron Queries
The Query to Patron letter is sent to a patron when a user selects
Send query to patron on the Borrowing Requests page (
Fulfillment > Resource Sharing > Borrowing Requests); see
Managing Resource Sharing Borrowing Requests. The letter can be configured to have multiple versions suitable for different situations, such as a question about the requested item, or a query about fee payment. This sort of letter is sent with the expectation that the patron will reply to it.
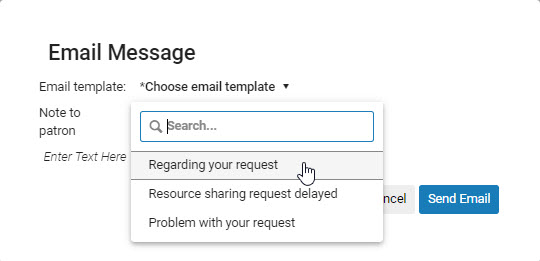
Selecting a version of the Query to Patron letter in the Borrowing Requests page
Alma provides two systems for configuring these letters in Alma: patron query templates and patron query types.
You can configure Alma to use either patron query templates or types, but not both, using the
send_query_to_patron_use_xsl parameter in the Customer Parameters Mapping Table. When
send_query_to_patron_use_xsl is set to
true, patron query types are used; this is the default setting. For more information, see
Configuring Other Settings.
Patron query types are deployed by default. Patron query templates are deprecated and will be removed in a future version of Alma.
Configuring Patron Query Templates
To configure patron query templates, you must have one of the following roles:
- General System Administrator
- Fulfillment Administrator
Patron query templates are configured on the Patron Query Templates mapping table (
Configuration Menu > Fulfillment > Resource Sharing > Patron Query Templates). For more information about mapping tables, see
Mapping Tables. Each template contains a short list of fields that are assembled to create the letter sent to the patron. The initial format of the letter is not configurable, but – if configured – the letter can be edited before it is sent.
This option appears in the menu only when the
send_query_to_patron_use_xsl in the Customer Parameters Mapping Table is set to
false (see
Configuring Other Settings). When
send_query_to_patron_use_xsl is set to
true, the Patron Query Types option appears instead (see
Configuring Patron Query Types).
PatronQueryTemplates Mapping Table Page
The following actions can be performed on this page:
- Add a patron query template (see Adding Patron Query Templates).
- Edit a patron query template (Modify the column values in the Mapping Table Rows section).
- Delete a patron query template (select Delete).
Adding Patron Query Templates
You can add a patron query template.
To add a patron query template:
- Open the PatronQueryTemplates Mapping Table Page (Configuration Menu > Fulfillment > Resource Sharing > Patron Query Templates).
- Select Add Row. Enter a name for the template in the Name field.
- In the Subject field, enter a subject. You can use the variables %reqId% and %reqName%; these will be replaced with the borrowing or lending request’s external ID or the patron’s name, respectively.
- In the Header field, enter a header, such as “Dear Sir/Madam:”.
- Enter additional lines in Query Line 1, 2, and 3. These fields are substituted into the Query to Patron Letter. For more information, see Example Letter Customization: Query to Patron Letter.
- In the Edit if Single field, enter True if the message will be open for editing, or False if the message will be sent directly to the patron without any opportunity for editing.
- Select Add Row. The template appears in the list of templates.
- Select Customize.
The fields are assembled into a letter that is sent when a user selects
Send Query to Patron on the Borrowing Requests page. See
Peer-to-Peer Resource Sharing.
Configuring Patron Query Types
To configure patron query types, you must have one of the following roles:
- General System Administrator
- Fulfillment Administrator
You can configure alternative versions - patron query types - of the Query to Patron letter using the enhanced XSL Query to Patron letter. You can define up to thirty types of this letter in this way.
Patron query types are configured on the Patron Query Types code table (
Configuration Menu > Fulfillment > Resource Sharing > Patron Query Types). For more information about code tables, see
Code Tables.
This option appears in the menu only when the
send_query_to_patron_use_xsl in the Customer Parameters Mapping Table is set to
true (see
Configuring Other Settings). When
send_query_to_patron_use_xsl is set to
false, the Patron Query Templates option appears instead (see
Configuring Patron Query Templates). The Patron Query Templates option will become obsolete in the future.
Patron Query Types Code Table Page
Adding a Patron Query Type
You can add a patron query type by enabling one of the types in the code table and configuring it.
To add patron query types:
- In the Patron Query Types code table (Configuration Menu > Fulfillment > Resource Sharing > Patron Query Types), enable one of the disabled patron query types.
- Modify the Description of the type you enabled. It is this Description that appears in the drop-down list of query types when Send query to patron is selected from the row actions of a Borrowing Request. The code is used in the XSL of the letter to map the query type to the text that will appear in the Query to Patron letter when the user selects that type of query.
- Repeat the steps above to add additional patron query types, as required.
- Select Save when you are done.
For information about configuring the Query to Patron letter for the enabled patron query types, see
Configuring Alma Letters.
The default XSL template only includes rules for patron query types 1 and 2. If your system has more than two types defined, you must add rules for the additional types to the template before you can configure them. You can do this by copying one of the existing rules and modifying the copy as required for each additional rule.
Configuring Borrowing Request Inactive Filters
To configure the borrowing request inactive filters, you must have one of the following roles:
- General System Administrator
- Fulfillment Administrator
In order to filter statuses out of the Active display in the Borrowing Requests Task List, access the Borrowing Requests Inactive Filters code table (
Configuration Menu > Fulfillment > Resource Sharing > Borrowing Requests Inactive Filters). For more information about code tables, see
Code Tables. For information on filtering borrowing request see
Filtering Borrowing Requests Using Facets.
Borrowing Request Inactive Filters
Enabling a row makes means that this status will now be considered as "Completed" instead of "Active" in the Activity status facet on the Borrowing Requests Task List.
After you enable or disable statuses, contact Exlibris support and ask them to run re-indexing for the changes you made; the changes do not take effect on existing requests in the task list until re-indexing is performed.
When setting rejected requests not to display as part of the active requests, it is recommended not to set "rs_keep_rejected_request_active" to "BORROWING" or "BOTH" as this would cause active requests to not appear in the active list.
Document Delivery Link for Multiple SAML Authentication Profiles
For cases where a user has more than one SAML IDP profile in their system should configure the Document Delivery Notification Letter so the SAML link includes the idpCode for the correct SAML profile.
<!-- Do not remove Ex Libris workaround created variable to alter current SAML delivery page -->
<xsl:variable name="SAML_URL">
<xsl:value-of select="notification_data/download_url_saml" />
</xsl:variable>
<xsl:variable name="DOCID">
<xsl:value-of select='substring-after($SAML_URL,"digitalDoc")'/>
</xsl:variable>
<xsl:variable name="GOOD_SAML_URL">
<xsl:value-of select='concat("https:/<Alma Host Name>/services/login?auth=SAML&idpCode=<SAML IDP Profile Code>&digitalDoc=",$DOCID)'/>
</xsl:variable>
</tr>
<tr>
<td><a>
<xsl:attribute name="href">
<xsl:value-of select="$GOOD_SAML_URL"/>
</xsl:attribute>@@for_saml_users@@@@click_here@@</a>
</td>
</tr>
<!-- GOOD_SAML_URL select ends -->
Libraries can include a link in the Document Delivery Notification Letter email that does not require authentication. To ease the patron experience and align with practices at your library, digital requests can be accessed without first authenticating.
 Shipping Cost – Lender Rules Page
 Shipping Cost – Borrower Rules Page
 Sending Borrowing Request Rules Page
